Search the Community
Showing results for tags 'lacquer'.
Found 24 results
-
The same friend that gave me the nesting table to repair gave me a chair to take to the furniture bank. It needed some help. It had been "sitting in the attic for a while." Seat was a mess and bird poop over many spots. As an aside, I think this is the first piece I've ever worked on that had a wipe-on stain and not just a spray on toner, given the marks on the bottom of the seat base. Procedure: Take off set cushion Clean with naptha, then soap & water The finish had deteriorated around where the hands would be on the arm. This happens with exposure to body oils over time. I tried to clean up, but no luck, so It got sanded off. The upper back was salvageable with a cleaning and light sanding. Apply a coat of shellac to seal over most of the areas. Apply aerosol toner (lacquer with color in it) in dark and extra dark cherry Apply clear lacquer as a top coat Flip the top of the padding over and add several layers of polyfill padding Reupholster the top with new fabric Reattach the seat Before: Atter seat removal and sanding arms New upholstery on seat Finish repairs All done

- 13 replies
-
- 10
-

-

-
Our Patriot Turners- From OFF The Lathe, @User74 posted a lovely two species, pedestal bowl. Check out his post for mor images and the great comments by our members- What’s Coming Up- If you missed last Friday's Tool Talk from Cindy Drozda, It is available on YouTube- Todd Raines, from All Things Woodturning, will be hosting a free online demonstration where he will turn small pieces of oak burl. Click on the image for the link to registration- For The Newbies- Learning to sharpen your traditional HSS tools can be daunting. Mike Waldt demonstrates how to get the profile correct and throws in some other great tips. Tomislav Tomasic turns a small bowl in this video. His method of reverse chucking is similar to that used by Richard Raffan. Expand Your Horizons- If we have a theme this week, it's all about sharpening. Mike Waldt's emphasis was on creating a symmetrical grind. This video, from Richard Raffan, demonstrates creating an asymmetrical grind and why it could be beneficial. Richard demonstrated how this specialty grind is used- Mike Peace reviews the Camvac dust collector from Record Power- Turning Time With Easy Wood Tools- This week the spotlight is on Easy Wood Tools' Rougher. The Rougher is excellent for creating tenons, turning blanks from square to round and removing material quickly. It is available in a wide range of sizes. The Pro version, the largest, is 28.5" long, Full Size at 24.5", Mid-size at 21", Mini at 16", Easy Start at 12.5" and the Micro at 9.25". The Roughers can use both regular and negative rake cutters as well as the square and radiused cutters. The Mid, Mini and Easy Start tools accommodate the new Beading Cutters. It didn't take long for bowl turners to realize that the radiused cutter produces an almost flawless surface on the outside of a bowl. Practically eliminating the need for sanding! The original EWT Rougher in action- For those of you in Canada. Click on the image for the link And finally- New Turning Items- I never have much success with rattle can lacquer. This new stuff from Craft Supplies USA may be the answer- Turning accessories and project items for sale. Click on the image for the link- Bandsaw blade for woodturners- Highland Woodworking Everything Else- Safe turning
-
First of all I would like to thank Jim Blume for his great pattern. This cutting is from 1/2" White Oak (very dense) using Pegus #3 blades Finished using Watco gloss lacquer Comments and questions are always welcome
-
Maple wood with 2X clear I used the same bottle of color for all the colors, just kept adding more lacquer thinner using the air brush. Cutting the slot for the mirror between the backer board and the carved pieces was a little strain on my little brain but got er done. I might have said before, no woodworking sales sites sells these air angle air grinders and this is what I start hogging out the wood then turn to the Dremel with the flex shaft for the tight narrow gruves. Four different shades counting the middle is a very light pink. These grinders were what they sold for years, both are 20 years old and now this is what they look like now. The older model only took 1/4" bits but now the new model has an 1/8" collet included for all the bits I order from Wood Carvers Supply, Inc in Florida.. They do have a catalog online for ordering bits. The last time I was in Harbor Freight they still had the older models screwed in to their displays and I ask the manager if I could buy those and he said no???? The air tools are much better for lasting than the electric models of anything thats sold anywhere. I would like to put this mirror in the Gallery but not savy enough. The URL has me stumped. I are a wood worker, not a computer goo- ru
- 17 replies
-
- 9
-
-
-

-
- dremel
- flex shaft
- (and 5 more)
-
Missed last weeks post so this one will be have a little extra. Our Patriot Turners- @nevinc posted a couple of projects he has been working on. First, a neat little table item that would be useful in any kitchen- Nevin combined woodworking and turning to complete the project- He also posted a question and his method of storing sawdust from various species of wood he uses as fillers. He was wondering what storage method the rest of us use for storage. Check out his post and let him know your method- And, Nevin showed us some beautiful walnut bowls he had finished- He received lots of positive comments in his post- @Steve Krumanaker has been busy fulfilling orders to some of the artisans in his area. He has been working with one who sells "Bee Products" for whom he make honey dipper lids. Steve posted a couple of short videos on how he has upgraded his manufacturing process. Steve is also making drop spindles for another craftsperson. These are used in the process of turning wool into yarn. He developed a neat jig to create shop made dowels for part of the pieces. In this post, he explains why he made the parts instead of buying them- @Gerald added a project to our "Off The Lathe And Finished" thread. These beautiful ornaments got lots of great comments and a couple of questions as well. Head on over to the thread and check out more on these- Gerald was also kind enough to provide links to videos on sharpening. I must apologize for not recording who asked the question on sharpening. Gerald had entered the AAW August Turning Challenge and provided us with the link to the voting and winners- https://www.aawforum.org/community/threads/august-2023-turning-challenge-final-results.21511/ @KevTN Asked for help identifying a specific pattern for the rim of a platter. Our turners had several suggestions. If you can identify this patter, please help out Kevin- @RustyFN has a gorgeous spalted bowl on his lathe! What’s Coming Up- Cindy Drozda is live tomorrow- Thursday, October 12 at 2pm EDT. She will be discussing how do you protect your eyes, ears, and lungs in the workshop. For registration, follow this link- https://streamyard.com/watch/PsF54zh7XSVb For The Newbies- Kent Weakly's video on what tools are not suitable for bowl turning- Carl Jacobson makes an oak lidded box. Notice that Carl uses both traditional and carbide tools to complete the project- A simple bowl turning to use as a succulent planter from Craft Supplies USA From Tim Yoder on choosing your sandpaper Richard Raffan demonstrates how to make your turned bowls look really top notch by refining the bottom. Expand Your Horizons- Several articles from Kent Weakley on bowl finishes. https://turnawoodbowl.com/my-favorite-food-safe-wood-finish-waterproof-almost/?ck_subscriber_id=1577117793 https://turnawoodbowl.com/make-shellac-wood-bowl-finish/?ck_subscriber_id=1577117793 https://turnawoodbowl.com/spray-lacquer-illustrated-guide-equipment-system-set-up-technique/?ck_subscriber_id=1577117793 Jim Rodgers continues his series on hollowing- Alan Stratton posted this video on YouTube. It reminded me of a similar project that @Gerald had shown us sometime back- The Four Ways videos from the first of the month- Mike Peace- Richard Raffan- Sam Angelo- Tomislav Tomasic- New Turning Items- From Niles Bottle Stoppers- https://nilesbottlestoppers.com/product/cocktail-muddler-set/ From Woodturners Wonders- Diamond wheels for both bench grinders and Tormek grinders- https://woodturnerswonders.com/collections/diamond-wheels?_kx=gV5SF2As_3IwtBi5TrpHVQM0F3UvGVbQKzhWGippDlk%3D.VJvU8R Everything Else- From Ron Brown's Newsletter- When you share the joys of your craft with someone who has never seen shavings fly off a fresh bowl blank or get to watch a spinning top appear in just a few minutes, you might change their world. A small pebble can create a world of ripples. Members of our woodworking club have attended county fairs, woodworking shows, and symposiums which always included live demonstrations. Why? Most people can’t visualize what we do. I’ve seen people become fascinated with turning after they made a simple maple or oak pen at one of these events. I’ve seen their entire family get interested and turning became their family hobby. They’ve planned family trips around turning shows and symposiums along with week-long hands-on learning at folk schools. I’ve witnessed folks buying their first mini lathe and accessories then go on to develop a lifelong passion for the smell of freshly milled lumber and the shavings from another bowl blank. The benefit to you of doing something like that is they bring their non-turning skill sets from their regular jobs, i.e. management, leadership, and organizational skills. Many have become club officers including President. One such fellow served three terms and on a personal note, became my dentist until he retired. We’ve seen lawyers, engineers, business executives, moms, teenagers, pastors, and doctors get the turning bug all because they saw a turning demonstration at a craft fair or other public event. I’ve told the story many times of how I attended a two-hour club demonstration in a cold dark basement one Saturday between Christmas and the New Year. Nick Cook made a top, a garden dibble, a honey dipper, a toothpick holder, and a mahogany plate plus some other things I don’t remember. One couple thought that was terrific and booked a day's instruction with Nick. Then they started a turning club, then I attended, then I got hooked. Now I make a great living inventing and offering turning accessories to the turning community worldwide. During the thirteen years I was on the Woodworking Show Circuit, I was able to demonstrate turning in front of over a million people. That’s a pretty good ripple! Thank you, Nick Cook. In order to cause the ripple, you have to toss the stone in the first place. I would encourage you to invite someone to a club meeting or over to your shop for an hour or two for coffee and to make some shavings. You never know how big that ripple might become Safe turning
- 4 replies
-
- 6
-
-
-
- tomislav tomasic
- sam angelo
- (and 42 more)
-
Came on this commission by chance. Went with my son to a card shop. He told the owner about my turning and the owner bought a bowl. On a later visit we discussed dice cups and trays. They do Dungeons and Dragons game days and he wanted cups for anniversary give aways . This evolved into discussion on selling dice boards which may go for 200 plus , yes look it up. Anyway he ordered 25 engraved cups and 8 boards with leather bottoms. So after maybe 3 months is done. Used several dyes and lacquer finish.
-
Got one of a set of nesting tables from a friend that had a leg broken off. Process of repair: Take off one end of legs with the damage Work apart the joint on the other end since the dowel pins were at right angles Find broken off pieces and glue and clamped them back on Removed broken off dowel pin. Cleaned out holes Filled remaining missing piece with stick epoxy, let cure a few minutes then chisel and sand down to flush Glued in new dowel pin and reglued the rest Lighty sand top Apply a bit of touch up marker where needed Apply a couple coats of shellac, then a coat of lacquer Before Putty with overfill Putty after sanding Glue up Back together
-
For those new to woodturning there is a dance you have to learn to be a good woodturner. Feet positioning and movement are some of the keys to this dance. Well needless to say my dance has been impaired as of late but is getting nearer to normal.My last day of PT is Friday and for the last 10 days have been working on boxes for my two therapists. The walnut came from the Methodist church about18 years ago. Finish on the walnut is Watco as I do not know of a easier and better finish for it. Tops have clear gloss Watco Lacquer. these are about 5 inches wide.
-
Got the lacquer on these handles last night and put them together today. Still messed up the insert on one and cracked the handle. Pizza / is server is new for me This ice cream scoop is the hardest kit of them all but the wife likes it best. This is the large pizza cutter. The small ones just not selling but sold the only large I had. Another new item . These seam rippers are just glued into the handle. These are my Fire Stix and one of my most consistent sellers , outside of snap tops. Now ready for the season mostly.
-
A good intro to buffing finishes and how various finishes differ. This is by Jeff Jewitt, wood finishing author, operator of Homestead Finishing, maker of Transtint and TransFast dyes, and now guitar maker/finisher. This would be useful if you are doing a high gloss finish and would be helpful for turners.
- 2 replies
-
- 3
-

-
- jeff jewitt
- buffing
- (and 3 more)
-
Excellent article https://www.popularwoodworking.com/flexner-on-finishing-woodworking-blogs/water-based-finish-isnt-lacquer/?utm_content=152619564&utm_medium=social&utm_source=facebook&hss_channel=fbp-69179861432#
- 5 replies
-
- 6
-
-
-
- water based
- water borne
- (and 2 more)
-
I built one prototype bar stool and two kitchen side chairs in times past, using poplar wood, and I had to do something with them. So, I decided to practice spraying colored lacquer (a new technique for me). Wow! They sure are blue. When I selected the colored lacquer, I thought it would be darker. Oh well. Blue is the new gray. The side chairs were sprayed and assembled in multiple steps so that there would be no blue lacquer over-spray on the clear lacquer details. Thanks for looking. Danl
-
Often people beginning struggle with finishing. They find one that usually works, then use that one on everything, whether it's the best fit or not. Sort of like using the same tool for every operation. In fact some non-woodworkers tend to think of every finish as "polyurethane" (I've had customers say this to many times about their factory furniture.) https://www.woodmagazine.com/woodworking-tips/techniques/finishing/3finishes
-
Finally got around to making some photos of my new turnings. This one is Bradford Pear dyed with Chestnut Stains. Finish is lacquer. I tried something different on the dye because I got the idea when applying the stain . I applied a full width application all the way down the piece and then started only going part way down the side to get the effect you see in the picture looking like a run down the sides. That gave me the idea to do the whole thing that way so I had to sand off the first full pass. The wood was almost burned because that void at the top was rotten into the center.
- 5 replies
-
- 5
-
-
- dye
- hollowform
- (and 2 more)
-
I think I will let the moms and dads worry about teaching them where the other two lessor states are!!. Gloss and glitter used on the states and satin used over the acrylic paint around the states. The glitter shows up more than the picture shows......
-
Can't say I'm half way through but at least I'm started on her stained glass Nativity Scenes. A little brighter color with clear lacquer. Each stand has a different width groove plus gluing in a plug on each end so the pine, yuck, don't close up as the seasons and humidity changes. Time it takes to do 130 or so boards is about 15 minutes total time for all pieces....so Howdy Duty will have to wait..
- 8 replies
-
- 6
-
-
- stained glass
- nativity
- (and 2 more)
-
Three things about lacquer: Pros (which is why they are often used in production furniture) + Fast drying, even the slow drying "brushable" lacquers dry in 30 minutes or less + Wide variety of sheens available from flatter than dead flat to high gloss (0 - 85+) and hard enough you can adjust sheens easily with abrasives or polishing compounds + Easy to repair because adding more melts into existing Cons - High odor during application - Not quite as resistant as varnish to chemical damage - solvents and white water rings - Can blush in high humidity application
-
I had an ornament with a plain look and decided to try dye. The piece had been finished with lacquer . I applied Chestnut stains dye over the lacquer. This dye has shellac about 5% in it. After the dye was dried with heat gun I applied lacquer. Now for the question will this treatment lead to finish failure?
-
Finally got back on my lathe. When my daughter saw this fruit bowl I had made for my wife, which I posted on back in October, she wanted something similar. This is what I came up with for her. It started out as four pieces of 8/4 poplar. I edge glued two pieces together, then edge glued the other two pieces together, then face glued those two chunks together to make a big blank. I wanted to try my hand at making a bowl that was pretty much at the maximum diameter allowed for my lathe. With that heavy of a blank, I was a little wary of it flying off the chuck. I screwed on a face plate and turned the bottom and the chuck mortise, then mounted it on the chuck, and turned the inside very gently until I had removed some of the weight. Finishing was a coat of Bullseye Sealcoat sanding sealer, followed by a coat of amber shellac, and then three coats of spray lacquer. I haven't given it to her yet; I hope she likes it. I turned it with a combination of Easy Wood Tools, and a traditional 3/8" bowl gouge I purchased from a gentleman on this site. This is my fourth bowl. Thanks for looking.
-
This came across my feed today. And it's appropriate, I got approached Sunday by a neighbor's son who wanted a gift made for his mom (for Christmas). 1) they are always late for stuff and 2) Mom is a vet and lost her 33 year old horse that she had since teenhood (which was also very stressful for her) and 3) I already had a pretty full week planned. At first he wanted the 5x7 in the center of the horse cutout. Yikes, to scale it up would have made a 22x34" frame with a 5x7 opening. Redesigned. Finished it up right after lunch and second coat of shellac now drying. For last minute finishing, use one of these finishes: Lacquer, Shellac, and Waterborne. https://www.woodmagazine.com/materials-guide/finishes/christmas?did=203714-20171221&utm_campaign=wood_weeklyupdate_122117&utm_medium=email&utm_source=wdm-newsletter
- 3 replies
-
- 4
-
-
- quick drying
- waterborne
- (and 3 more)
-
Today we look at another type of common finish – Lacquer The Product Lacquer became popular right after WWI and was a derivative of the gunpowder manufacturing process (with declining demand). It was deemed to be the perfect finish, at least relative to what was currently available. Typically called “nitrocellulose lacquer” (NC lacquer) it also usually has some other resins added. It's definitely worth adding to your finishing arsenal, especially if you can spray and have good ventilation. The resins are dissolved in a product called lacquer thinner. While it’s called a “thinner” it contains three components · Active solvents (do the brunt of the work dissolving the resins) · Latent solvents (help but are not totally effective by themselves) · Dilutents (thin and add little to no function other than to dilute) There is not a standard formula for lacquer thinner, so it depends on the manufacturer, desired characteristics (faster or slower evaporating, cheaper, etc.) There are over 20 different chemicals that can be mixed to make a lacquer thinner. There are lots of varieties of lacquers from simple lacquers, CAB lacquers, pre-catalyzed, post-catalyzed, auto lacquers, etc. Catalysts help make a stronger finish. Pre-cat is done in the can when you buy it. Post-cat comes in two cans which you add the catalyst just prior to use. Lacquer cures by evaporation of the thinner and will re-dissolve in it. Compare this with varnish that once cured, will not re-dissolve in mineral spirits. As a benefit, when you apply multiple applications of a lacquer, it melts into the lower layers and becomes in essence, one layer. Compare this with a varnish where the layers remain separate. What this also means is that you can apply a coat of lacquer over a clean and sound factory finish and it will bond just fine. It also means if you spill solvent (big culprit is fingernail polish remover, because fingernail polish is often lacquer-based). Lacquers are the most common finish used in production furniture and cabinetry. In over 10,000 pieces I’ve worked on, I can count on one hand those that were not some type of lacquer. Characteristics Lacquers are a fast drying and hard finish. It's easy to complete the finishing in less than a day. Pros: · Very fast drying (good for production work, spray and 30 minutes later package up, also means dust is less of a problem) · Very fast application when spraying, you can finish a piece of furniture in less than a couple of minutes · Drying rate can be controlled by selection of thinners used · Color from perfectly clear (known as “water white”) to amber, depending on resins · Hardness facilitates rubbing out to a high gloss sheen (or any other sheen) · Available in sheens from no sheen to high sheen · Easy to repair (good for manufacturers and delivery companies to correct transit damage) · Easy to strip · Compatible with glazes, fillers, and toners (lacquer with dye or pigment added) Cons · Noxious fumes, especially when spraying Not as much resistance to water and chemicals (acids, alkali, solvents) as varnishes Application Like most finishes, there are three ways to apply lacquers: Spray Since it dries so fast, most lacquers are sprayed. Because of the fumes, ventilation is important. Spray on coats overlapping half as you go. It is not necessary for each coat to fully dry before adding another coat. Air movement will help the evaporation of the solvents. When I’m doing touch up, I frequently use a hair dryer on the cooler setting to accelerate the curing. Lacquers are also commonly available in aerosol cans for small jobs. Brush Most lacquer dry to0 fast to brush. But when slower-drying solvents are used, they are slow enough to brush. Deft Wood Finish and Watco Lacquer are two commonly available brands. Fairly simple to brush, just get it on and don’t keep back going over it. “Slower drying” means 30 minutes, not 5 hours. Clean the brush with lacquer thinner. Cloth There is a “Padding Lacquer” that is designed to be wiped on. I believe it’s largely used for touch up and repair as it does not have much build. And often it’s shellac with a lacquer thinner type solvent. Adjusting sheen Because a lacquer finish is hard, it is easy to adjust a sheen by rubbing with steel wool, Scotch-Brite pads, various abrasive compounds. You can get a see-your-nosehairs high gloss sheen by using successive grits of polishing compounds. Auto compounds that you can find at auto parts stores work well. You can also buff with a lamb's wool buffer and "swirl remover compound" Fixing Goofs Drips and runs are easy to repair. Let them harden, sand or scrape level and apply another application which will dissolve and blend into one coat. Another common problem is blushing. This occurs in hot & humid conditions where the water vapor gets trapped in the finish while the solvents evaporate. You can either wait for a drier day to apply another coat, spray on a slower drying lacquer thinner that is sometimes sold in aerosol cans as “no blush” or “blush eliminator.” Packing marks occur when some packaging (foam, plastic sheet, cardboard) is in contact with the finish before it fully dries. Happens when the factory is a bit too anxious to box it up and send it out. Usually light abrasion and perhaps another light coat will remove the marks and return a good finish. When rubberized pads (such as those on the bottom of clock radios, lamps, etc.)are in contact with lacquer, the chemicals that keep the pad soft and flexible migrate into the finish and do the same there. This is called "plasticizer migration." The cure is to abrade out the damage and re-coat. In severe cases the finish may be damaged down the bare wood. In this case, touch up including restoring the color and layers of lacquer will usually work. Strip and refinish might be needed in extreme cases.
-
Clewes did not make it so we had our own turning two weeks ago. Finically got thru with the finish work. Dyed with yellow and royal blue in Chestnut stains alcohol base. Back is shellac sealed and then Watco. Rubbed out with Mcguiar's rubbing cod and polishing cod. Then Renaissance wax.
-
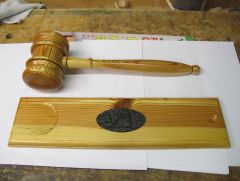
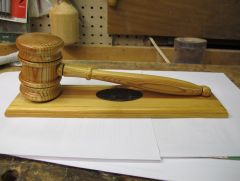
From the album: Old Jail Gavel
gavel made from old jail beam with carpenter's mark inlay -
From the album: Old Jail Gavel
Gavel made from the old jail beam


.png.35577a6cbe423769f573b2a36215080e.png)


.png.fc57a59cc91181fe6f7a30a1ff668e5a.png)


.png.412cfc6ee24db21f58cce132992ccf08.png)


-.png.f849b758464fd3a37baa1e9bface1e04.png)