Search the Community
Showing results for tags 'burl'.
-
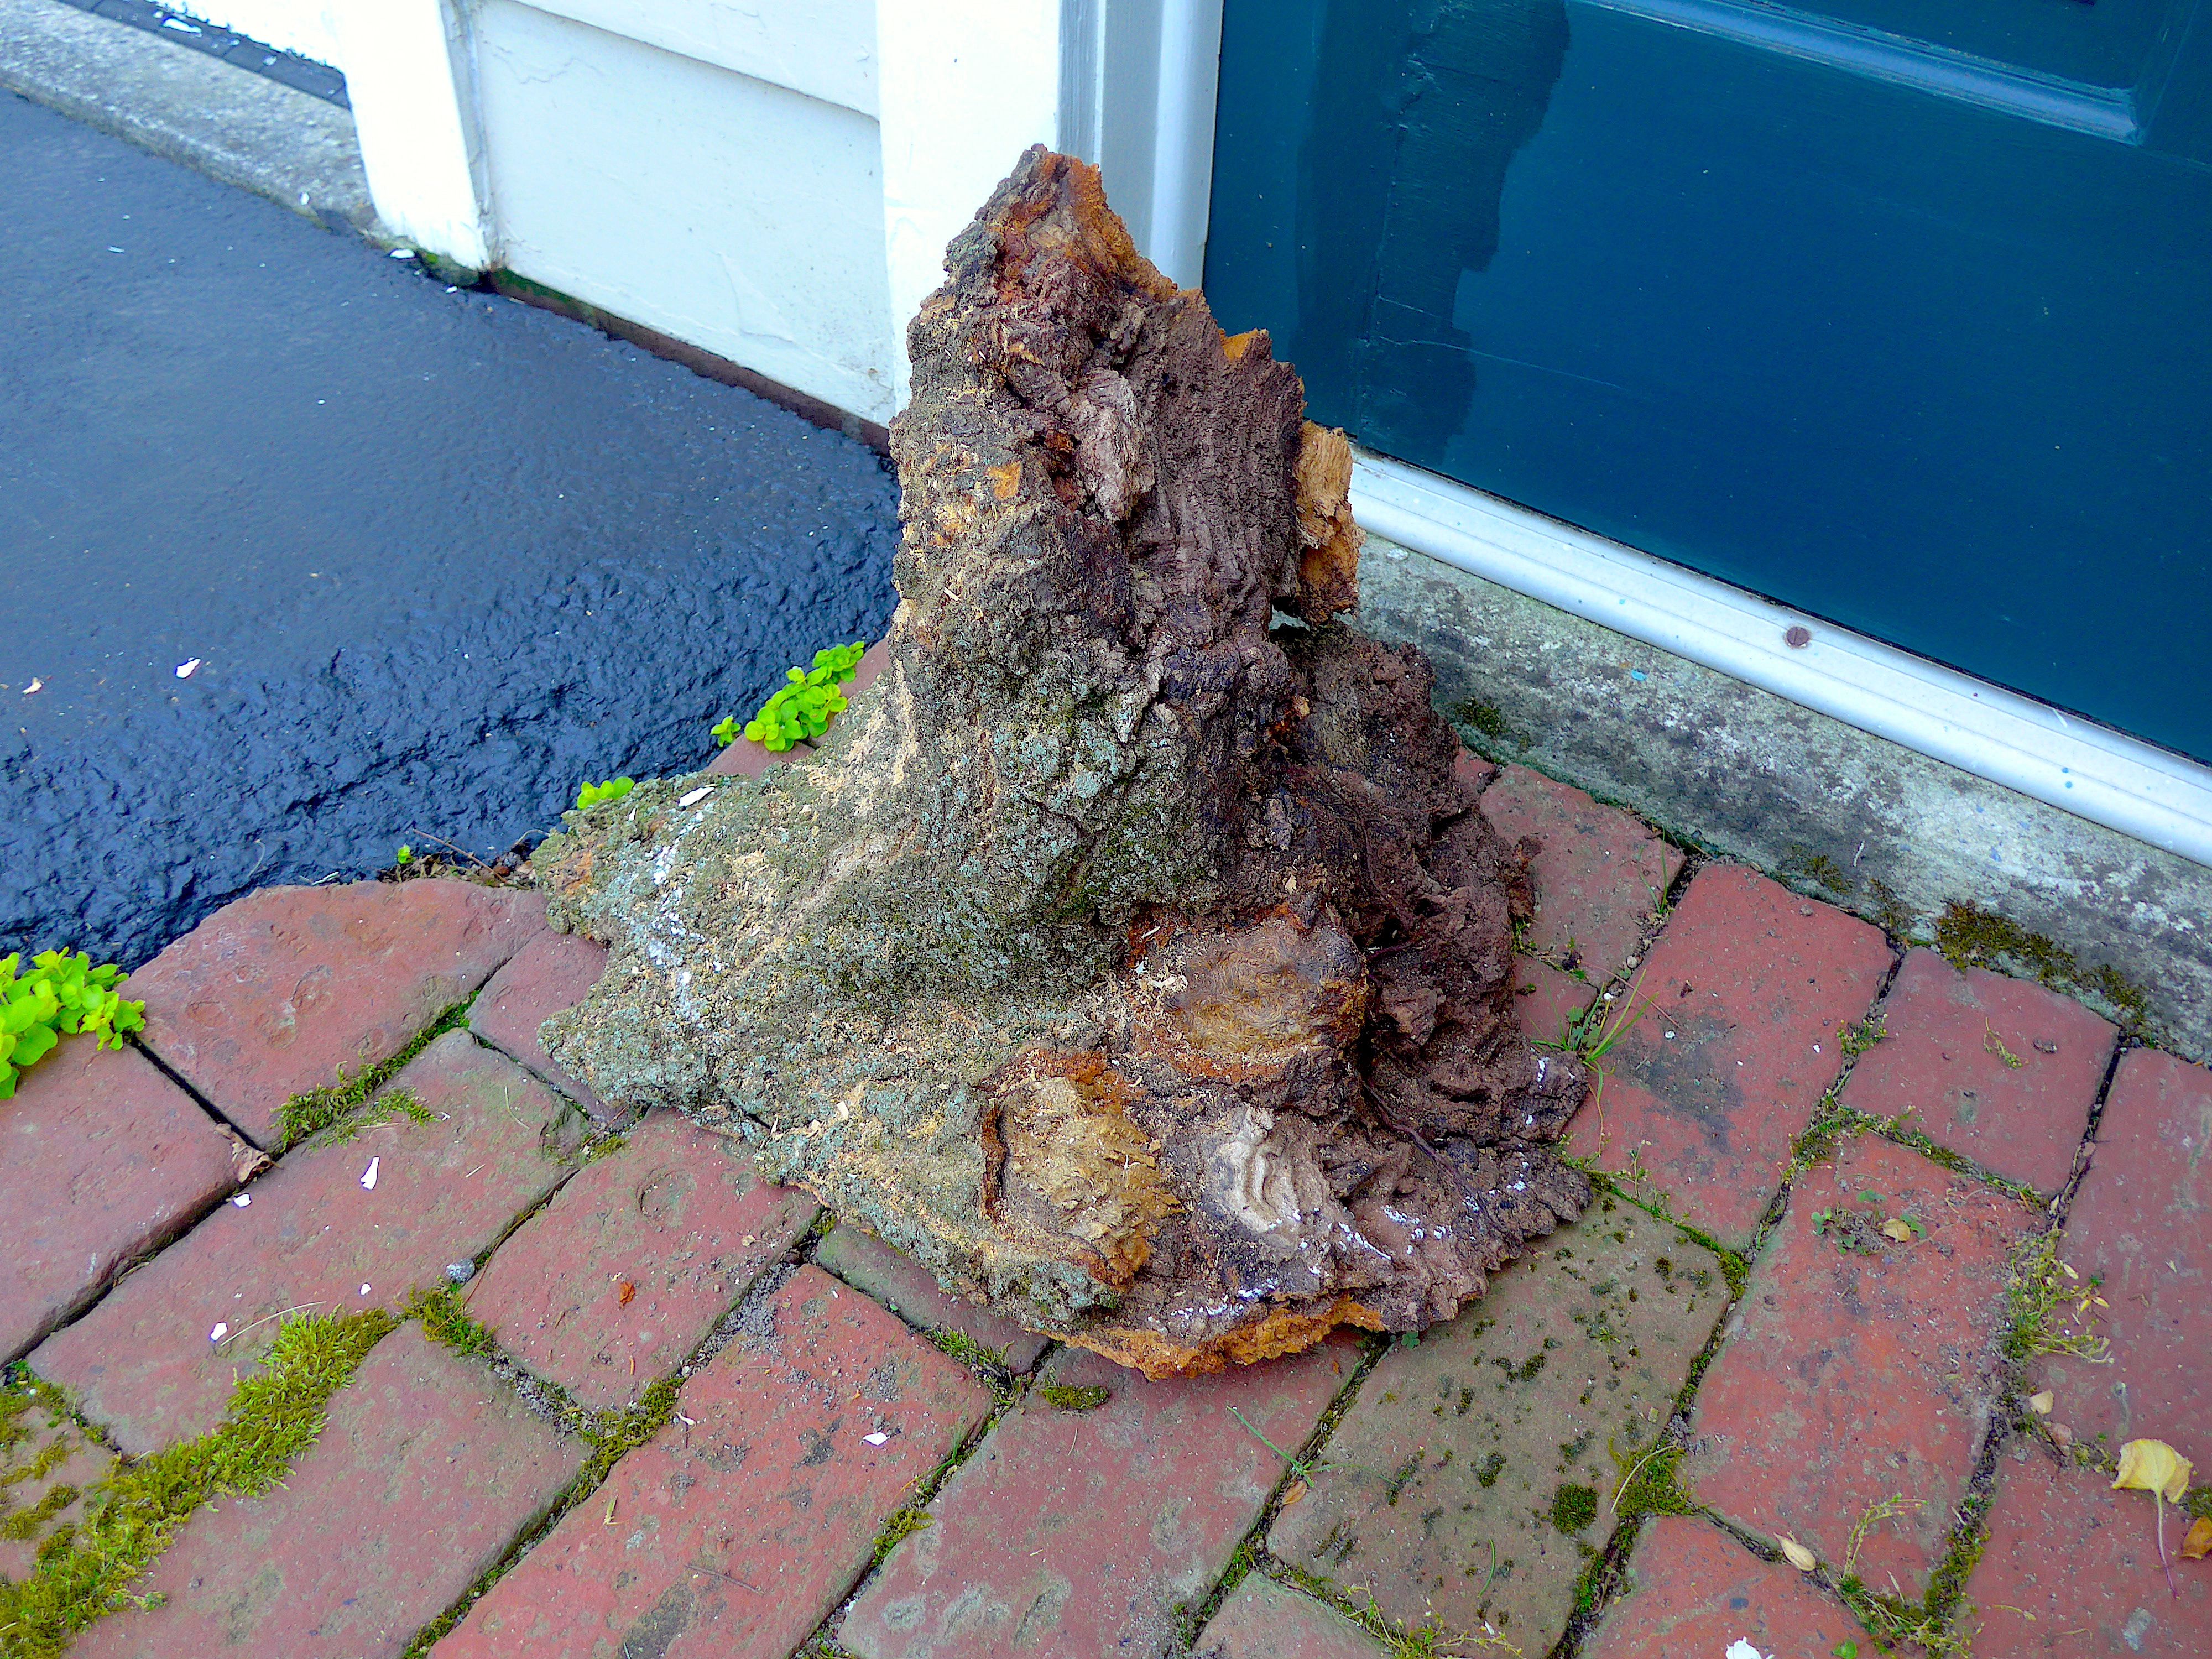
hello all I am cutting down a California Peppertree that has very large Burls on it and I need advice on how I should cut tree to preserve what turners are looking for i just don’t want to incorrectly cut the tree up and ruin some killer pieces of wood please advise tree is 36” thank you kindly for any advice link is to pictures of tree pictures https://share.icloud.com/photos/0abqA-jeCgmZTkoxPWulR-nsQ
- 5 replies
-
- 3
-

-
- burl
- harvesting
- (and 1 more)
-
.thumb.jpg.573d1497d0675219908c85aabefd797a.jpg)
Good Monday Morning Patriot Woodworkers! August 25, 2025
John Morris posted a topic in General Woodworking
Good Monday morning! Good Monday morning Patriot Woodworkers! What did you get done over the weekend, and what have you planned for the week ahead! Inquiring minds want to know. Please tell us what's happening in your shops, your life, and any events going on with you. Thank you for being here folks! Welcome new members To view our newest members and welcome them to our digs, please see our Members Page, you can "Sort" by join date and click on their names and be taken to their profile page where you can leave a message of welcome. Thank you for making our newest folks feel welcome. Featured Topic @FrederickH has a big ol burl! Featured Download A Christmas present for the small child in your family. Featured Video Woodcraft project for making an epoxy and wood handled knife, pretty awesome. -
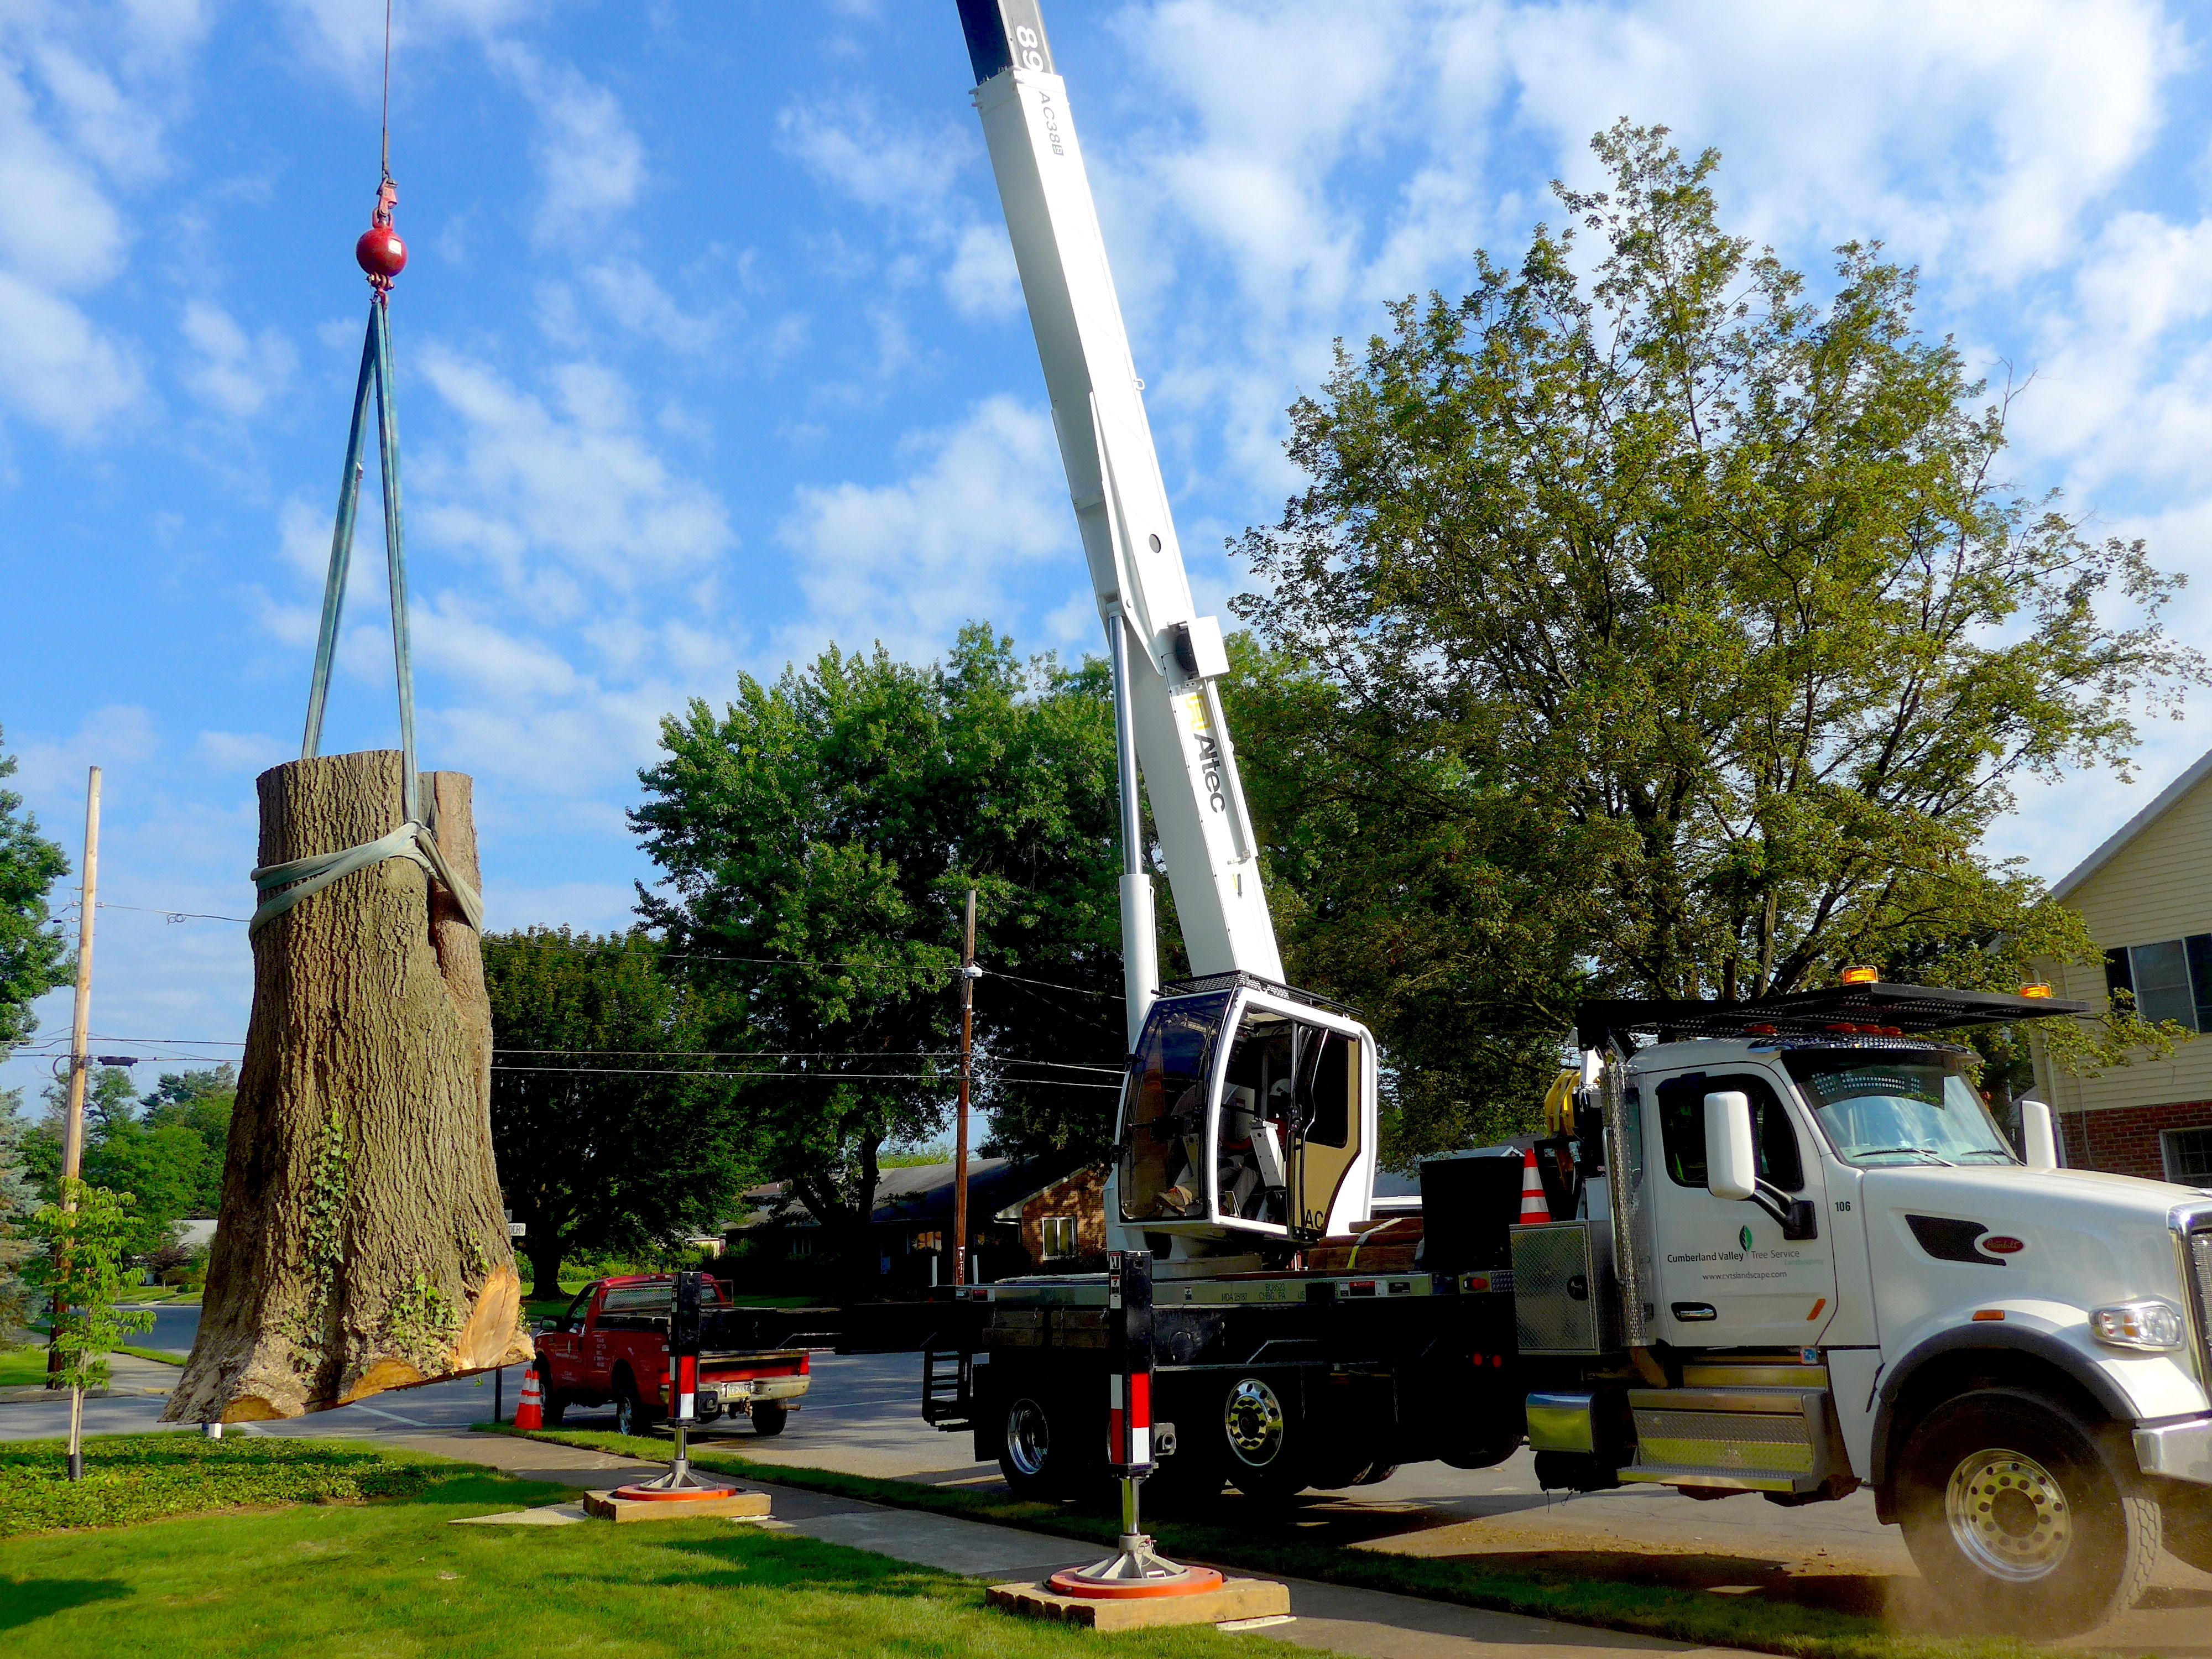
Here's the burl that came from the trunk section of our red oak. Any suggestions on what to turn??? The last photo shows 1 of 3 trunk sections that came down today, along with my burl.

-
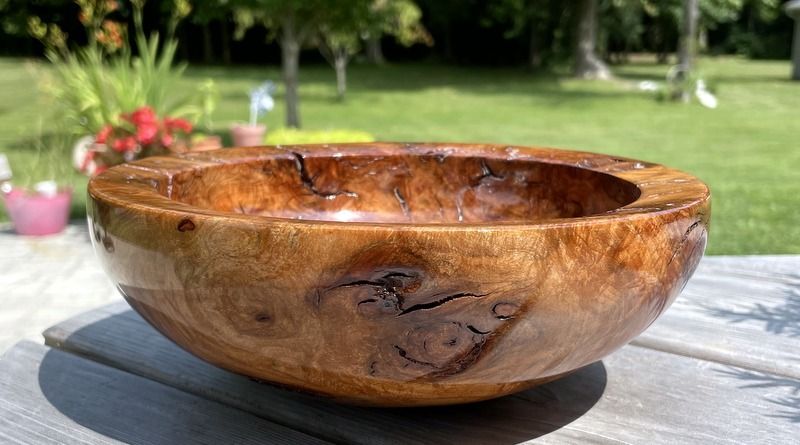
Another thunderstorm about to roll on through! Our Patriot Turners- @FrederickH showed us his red oak burl bowl he has just about finished. Gorgeous color and spectacular character. Checkout Rick's post for more images and his description- What’s Coming Up- Click on the images for links to more information and registration Cindy Drozda will be have her live tool talk on Friday, July 18th, 2pm Eastern (18:00 UTC). The Mid Atlantic Woodturning Symposium announced the addition of Helen Bailey to the demonstrators' lineup. For The Newbies- A short video, from Tim Yoder, on Tool Rest Care A very informative video from Richard Raffan on using the skew chisel. Expand Your Horizons- Wanna turn a bowl but haven't purchased that scroll chuck yet? Ernie Conover has got you covered. This tutorial was published in the Woodworker's Journal. https://www.woodworkersjournal.com/turning-bowl-just-lathe-faceplate/ Turning Time With Easy Wood Tools- We have pretty much covered the individual Easy Wood Tools. Seeing the tools in creative action is a great way to learn how to use them and their capabilities. This video shows the use of EWT tools while finishing an already roughed out bowl- If you are in the Baltimore MD area this coming weekend, stop in at the Woodcraft store and catch this great demo by David Welch! https://www.woodcraft.com/pages/store/baltimore?srsltid=AfmBOor9jiSeqV1Fz_JMQGbEEq8FQjjSktp4fKfeqMwWqFnNf1brKFrl @Jordan Martindale New Turning Items- Ron Brown is working on a new bandsaw circle jig that should be useful if you do "Bowls From A Board" This product should ship on or around August 1, 2025. Check out Ron's website https://www.ronbrownsbest.com/ Everything Else- I've committed (or maybe should be) to doing a demo at the local turning club in early August. I always try to do something a little different than just turn an item. The demos are scheduled for about 1 hour so it is challenging to come up with something unique and doable in the limited time frame. My plan is to show how to do the John Beaver "wave bowls". These bowls take me several days from start to finish. Using several bowls, in various stages of completion, I think I can do an interesting demo; especially since both types of bowls start out with the same operations. I have created 4 Sycamore bowls- 3 as part of the demo and 1 is a finished recessed wave bowl (I have a protruding wave bowl, too). The center bowl is at the point where the decision is made to create the recess or protruding wave. The "wave" isn't glued so folks can see how the pieces are held during turning This bowl will be used to explain how the protruding wave is created This bowl will be used to show how the inside of the bowl is finished. This one is glued together but not finish The finished bowl is on the lathe now and getting a Poly bath. Once it dries, I'll finish off the bottom to reshape the foot to get rid of the dovetail recess. Safe turning
-
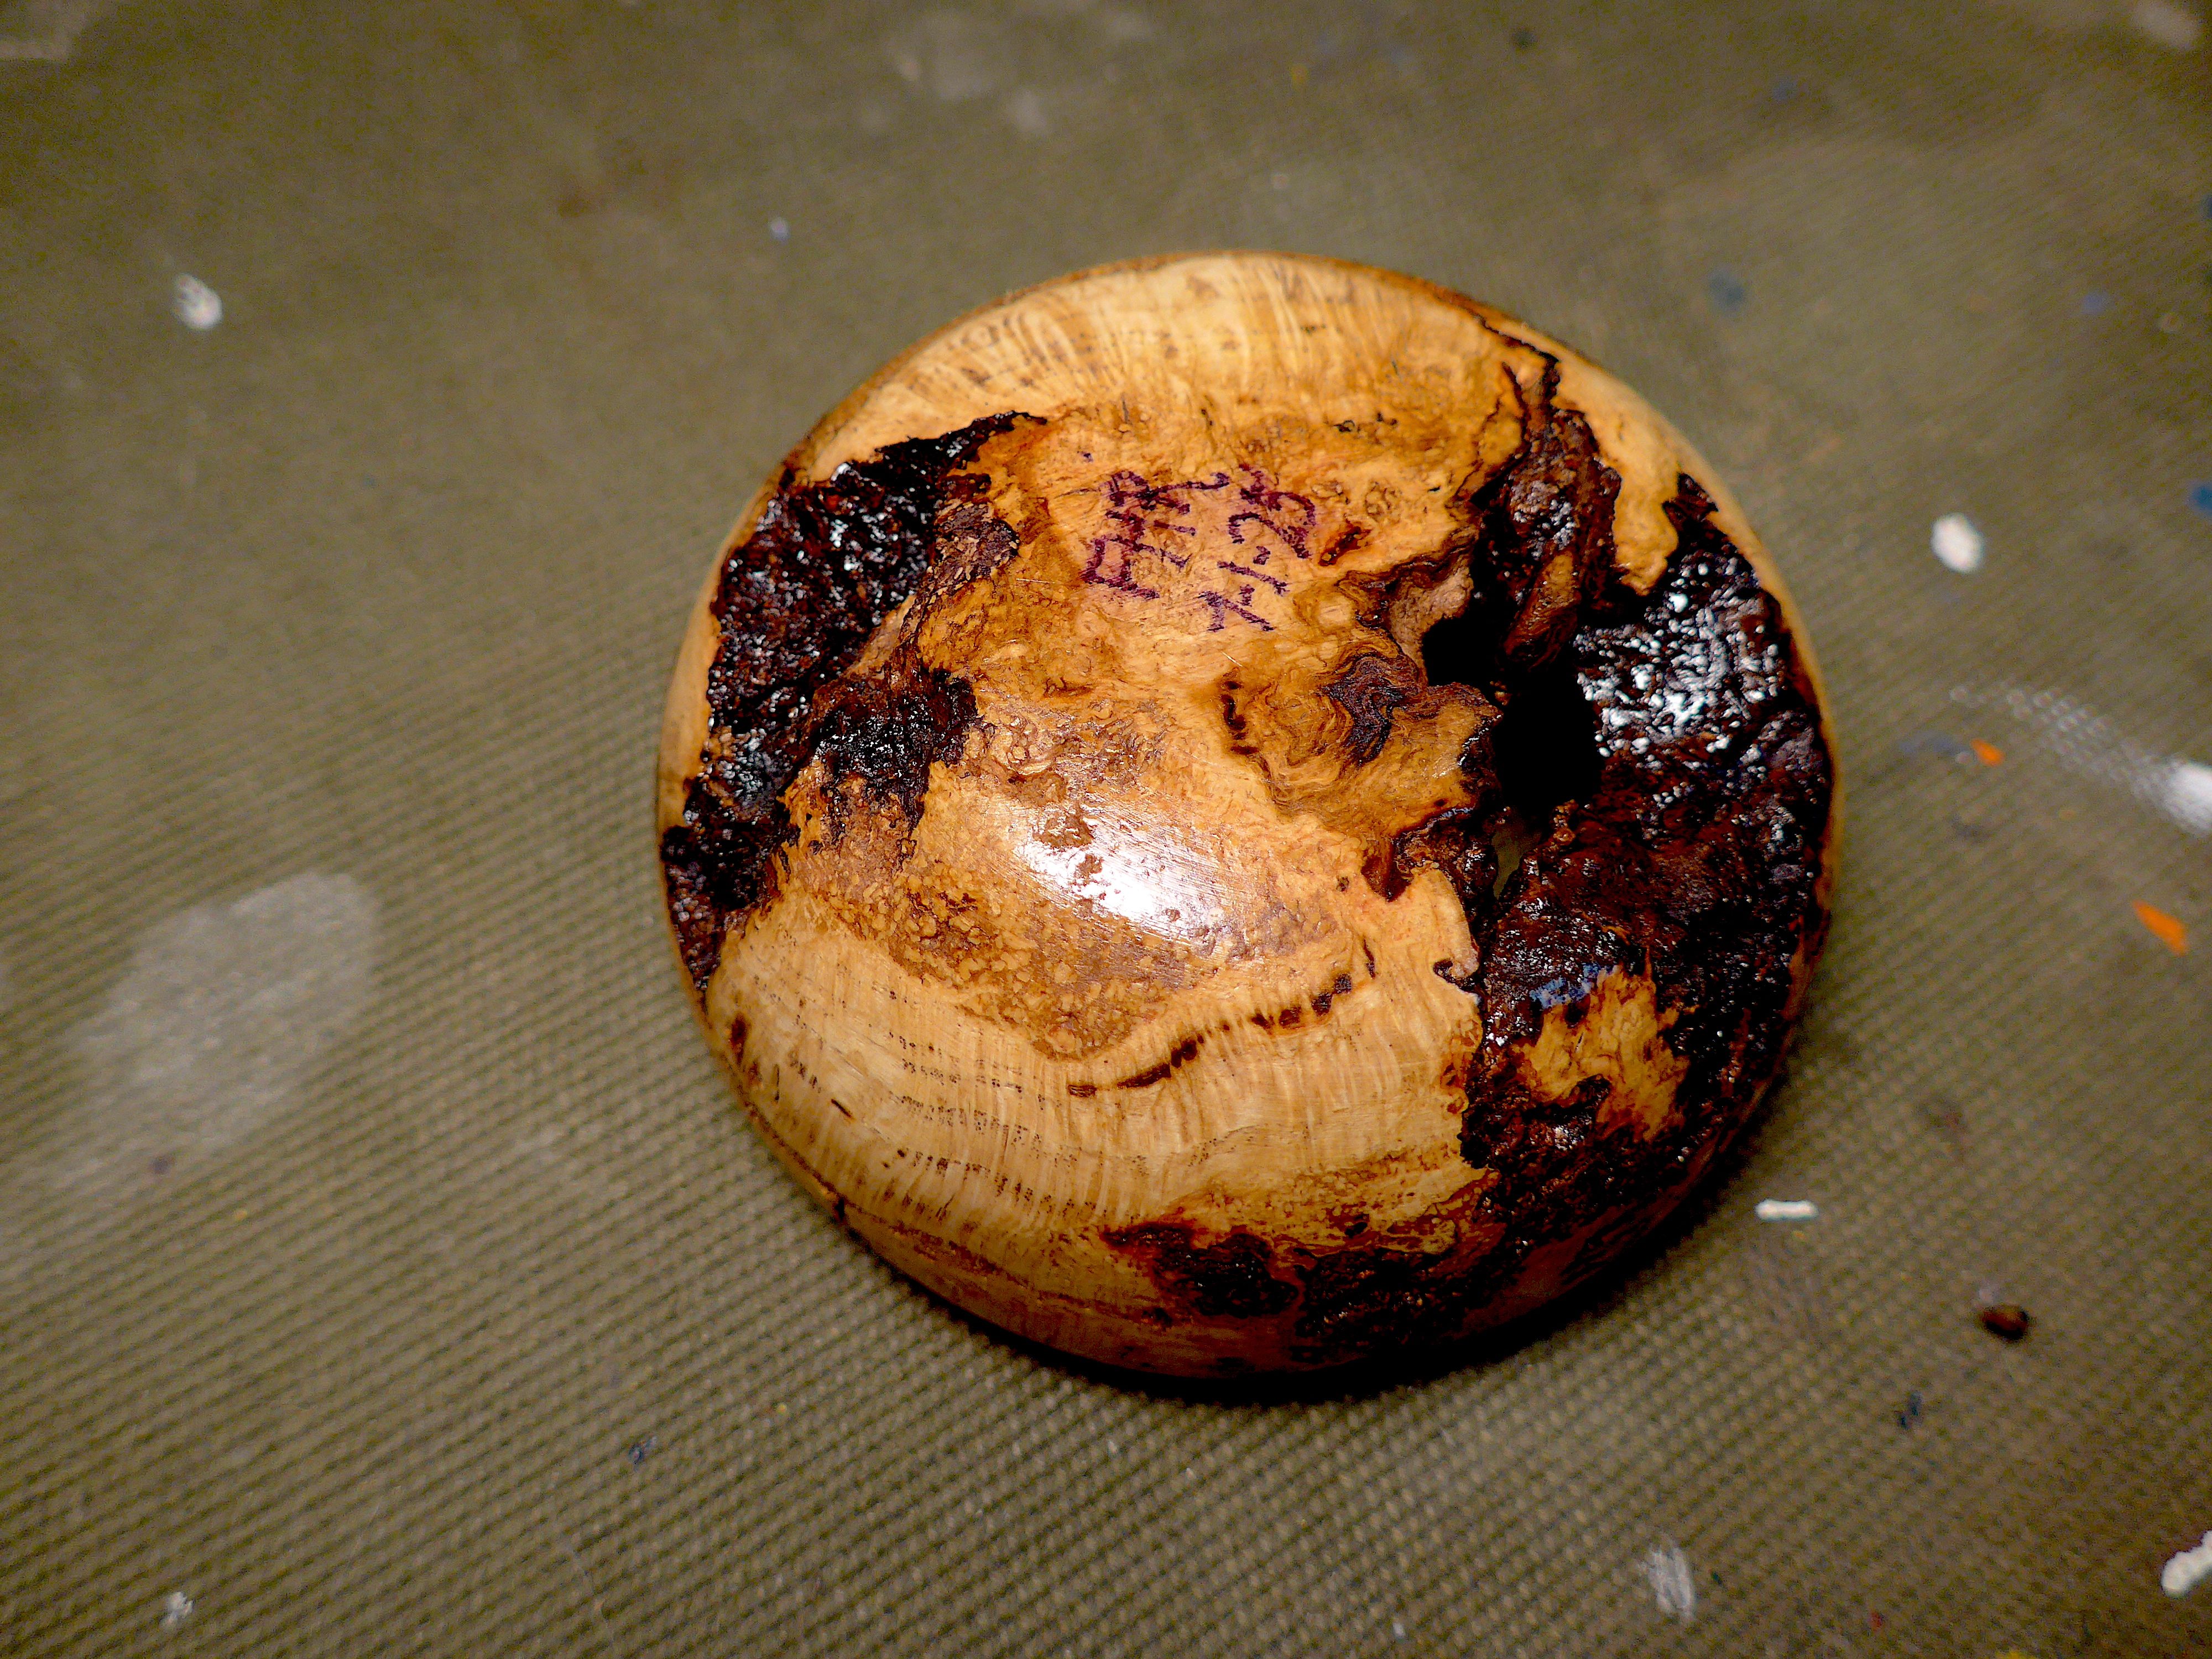
I can't seem to be able to locate my original posting about this burl. Here's the finished project, as promised. It awaits some light sanding to knock down the shiny spots.
-
Just a little over a week left to reach our goal of $1800. If you haven't gotten your raffle tickets- DON'T DELAY! Our Patriot Turners- @FrederickH salvaged an oak burl and wondered whether we thought it was worth turning. You can probably guess we were 100% in favorite of doing it!! Check out more images and our members comments here What’s Coming Up- Last Friday (June 20) Cindy Drozda's Tool Talk was about cutting threads. She used a dedicated jig for her demonstration. If you missed it, she made it available on YouTube- Click the image for more information and registration For The Newbies- If you are getting ready to turn that first bowl but need some advice on mounting the blank, Mike Peace has some ideas- Sam Angelo follows up with more ways to mount turnings on the lathe- Woodcraft has a great page on their site for turning lessons. If you need ideas on awesome projects, check it out! Click the below image!! Expand Your Horizons- On your tool rack , there's the spindle gouge, the bowl gouge and the parting tool. But, what about that skew chisel gathering dust. Richard Raffan and Tomislav Tomasic have some tips, techniques and ideas for improving our skew skills! Speaking of Richard Raffan, he was recently given the 2025 Honorary Lifetime Award by the AAW- Turning Time With Easy Wood Tools- If you are in the Leesburg, VA are on Saturday, June 28, stop by the Woodcraft store and check out the Easy Wood Tools demo- https://www.woodcraft.com/pages/store/northern-virginia?srsltid=AfmBOooX-T5uZvqRSaE53QE8POZK3Az_uUkkKI4F6AiBz28zxtHegHai Another EWT shared video showing how easily a bottle stopper can be made- AQMKdmjEumcWBsnzATzgqKdhM_B42S3eIyZZnqgeYCBchGv6K1yRedL_mLQVDjURiFkIQvYOXHI2FkUFbc40B6C7.mp4 @Jordan Martindale New Turning Items- Tim Yoder recently reviewed a new CBN wheel for his grinder. Woodcraft has a sale on turning kits and supplies! Click on the image for the link to all the goodies! Highland Woodworking has the Woodslicer Bandsaw Blades on sale-. Click on the image for the link Everything Else- @Gerald asked for some images of the John Beaver wave bowls I am preparing for a demo I am doing in August. This will be a club demo for the local Cumberland Valley Woodturners. These are just some images of the bowls in various stages of development that I will use to show how they are made. The actual production of a bowl, from start to finish takes several days to allow for glue drying, coloring, sanding and finishing. The bowls are roughed out but left a bit thick so that there will be enough "meat" for gluing later in the process Special supports are made to custom fit inside the bowl to provide a way of holding it together while turning operations are done later. The supports are hot melt glued in place. John Beaver uses MDF but I didn't have any. The supports are drilled to accept dowels to maintain alignment. One of the supports is labeled to keep things aligned. The blank is moved to the bandsaw and a wave is cut in two steps. Dowels are inserted and a pressure block added to the tail stock to make sure everything stays in place and aligned. At his point, the bowl could be made with a wave that stands proud of the surface or recessed below the surface. Recessed wave waiting for the squeeze out to gel. The inside of the bowl will have the supports removed and then turned to the final thickness. The extra "meat" in the wall thickness makes sure there is enough surface for a good glue bond when turning the inside to a respectable wall thickness. Safe turning
-
Well another election is in the books. I, for one, will be glad to return to commercials for Ozempic and Liberty Mutual car insurance. Our Patriot Turners- @RustyFN picked up some great looking Sycamore logs- He received lots of comments on the popularity of Sycamore for turning. Check out the comments at- Rust also made a super score at his local Woodcraft store. Our resident Ring Master turner, @Headhunter, posted some awesome bowls he has completed! Head on over to Tony's post and see more images and the comments from our gang- @Fred W. Hargis Jr was perusing some of our older topics and posted an observation about a commonly turned wood- @DAB turned a nice little bowl from a wood I had never heard of- Ohia. I found this from an Internet search- https://dlnr.hawaii.gov/forestry/plants/ohia-lehua/ He has some interesting stuff he is thinking about storing in this one! @forty_caliber has several serious hobbies along with turning. It's fantastic when you can meld them together. In this post from "What's Off Yor Lathe...", Monty turned an adapter to help build his short wave radio antenna farm. Also, in the "OFF" topic is a really nice bowl posted by @user74- The new items start here- What’s Coming Up- Click on the images for links to more information and registration For The Newbies- Safety video from Craft Supplies USA. PSA- not just for Newbies!! With Christmas coming, a gift idea from Alan Stratton @Steve Krumanaker Practice your spindle turning and a little hollowing with this item from Mike Waldt Expand Your Horizons- The "4 Ways" collaboration is back! A winged box!! A neat project for the seamstress in your life from Carl Jacobson- New Turning Items- I think we posted this before from another source. Here is Tim Yoder's assessment of the Tru-Arc tool Everything Else- Safe turning
-
The old Dogwood tree, outside my window, should be in full bloom tomorrow. Hard to believe when I transplanted it, from my parents mountain property, it was a single, spindly stick. That was 56 years ago! Our Patriot Turners- @RustyFN showed us a beautiful new turned lidded box he made. He said this one is made from Maple. He certainly has perfected the flocking technique, too! Our turners gave him lots of compliments in his post- @Gerald has been creating amazing designs with his JaHo jig. His most recent refrigerator magnet is a beauty! Check out this addition to his post- More activity on our two continuing posts of "What's On/Off the Lathe" From ON: @Gerald provide a closeup look at his JaHo jig in action- You can see how this jig can create some fantastic designs. Check out Gerald's post for additional images. From OFF: @kreisdorph turned a gnarly piece of mulberry into a beautiful bowl- Kent also finished these beauties. This spalted piece caught my eye because of the shape. Years ago, an artist friend sent me a picture from a magazine. He fell in love with the shape. I think it was a hint for me to turn one. Alas, I have not done it. New projects start here- @lew was looking for some input on design and proportions for turnings. He used miniature hollow turnings to get an idea of what had pleasing shapes and asked our turners their opinions. As always, our members provided some excellent advice and suggestions. What’s Coming Up- Click on the images for links to more information and registration- This is a replay of the most resent Tool Talk from Cindy Drozda For The Newbies- Thinking of design and proportions, Lyly Jamieson's turning tip discusses the design for bowls, Pen turning is a great way to get into turning. Kits can be inexpensive and provide amazing results. Tim Yoder shows us how it's done!! Now for a little more of a challenge, Jim Rodgers turns a segmented pen- Expand Your Horizons- Last week we posted a shop tour hosted by Mike Peace. The craftspeople were making Beads Of Courage boxes. Mike takes a segmented glue up and turns his own version of a Beads of Courage box- Sometimes the most beautiful turning is not the most perfect piece. Alan Stratton explains- https://youtu.be/hx1qGGVvU-g?si=mSuL1RJNLd0YDMOu EDIT: Cannot get this video to show in published post. Link seems to work. A short video from Richard Raffan demonstrating how he utilizes as much of a turning blank as possible. Check out the unique parting tool! New Turning Items- Been really difficult to find anything new on the market. Maybe by the time the income tax return is ready there will be some new toys to spend it on. Everything Else- An excerpt from Ron Brown's newsletter on advice for the new turner My advice for a new turner or a student would include the following: Find a turning club in your area and attend some meetings. These people are a tremendous resource and are always eager to help. Start with pens. Start by watching some YouTube videos for instructions. Get setup for basic pen turning, a 7mm mandrel, some slimline pen kits, proper sanding grits, CA glue, friction finish, etc. Pens are quick to make, easy to turn, and provide an immediate sense of accomplishment. If someone wanted to sell a few pens to pay for more turning stuff, many folks earn turning money this way. Then make some spinning tops for fun and give them away. Turn a few bottle stoppers and give them as gifts to friends and relatives. As soon as you can afford it, buy an inexpensive 4 jaw scroll chuck. Add more jaws down the road or buy a chuck with a few jaws included. Quality chucks with multiple jaw sets can be very expensive. Save that for later. For now, just get a serviceable chuck for around $100. Turn small plates from a 3/4" thick piece of wood using a recessed tenon in expansion mode for practice. A family member might even wish to add decorations or paint your masterpiece. Now that you have a scroll chuck, practice making turned lidded boxes, goblets, and soup ladles for the kitchen. Try turning a few small bowls from green wood. Turn the walls to 1/4" and watch them go oval. Turn a few 1/2" thick to let them dry in a paper bag for a few months, then re-turn them to 1/4" wall thickness once they’ve dried if they didn’t crack or explode. Once you've done all that, evaluate your interest in turning and if you love it, like most of us do, prepare to spend some money (easily $500) on High-Speed Steel lathe tools, a specialty grinder, and a sharpening jig. Next, set about learning to cut with traditional turning tools and learn to keep them sharp. Note: You only need a few HSS tools. In the beginning, don't buy more than 10 total, and never buy turning tools in a set. Always purchase the tool you need for the job at hand. After that, plan to take some full-day turning classes and plan to attend some turning symposiums in your area. From there, the sky is the limit. Turning can be as much or as little as you want. You can learn to make shavings in a couple of hours. It takes a lifetime to become a “Turner”. Did play a little at the lathe this week. The largest usable piece of that wind shake cherry was dry so I put it on the lathe. The more I turned, the more defects were uncovered. Filled the cracks with CA and sanding dust. The colors are nice but I don't like the tiny splits throughout the piece. Sanded to 600 and beeswax/mineral oil finish. Safe turning
- 6 replies
-
- 6
-
-

-
- ron brown newsletter
- alan stratton
- (and 24 more)
-

-

-
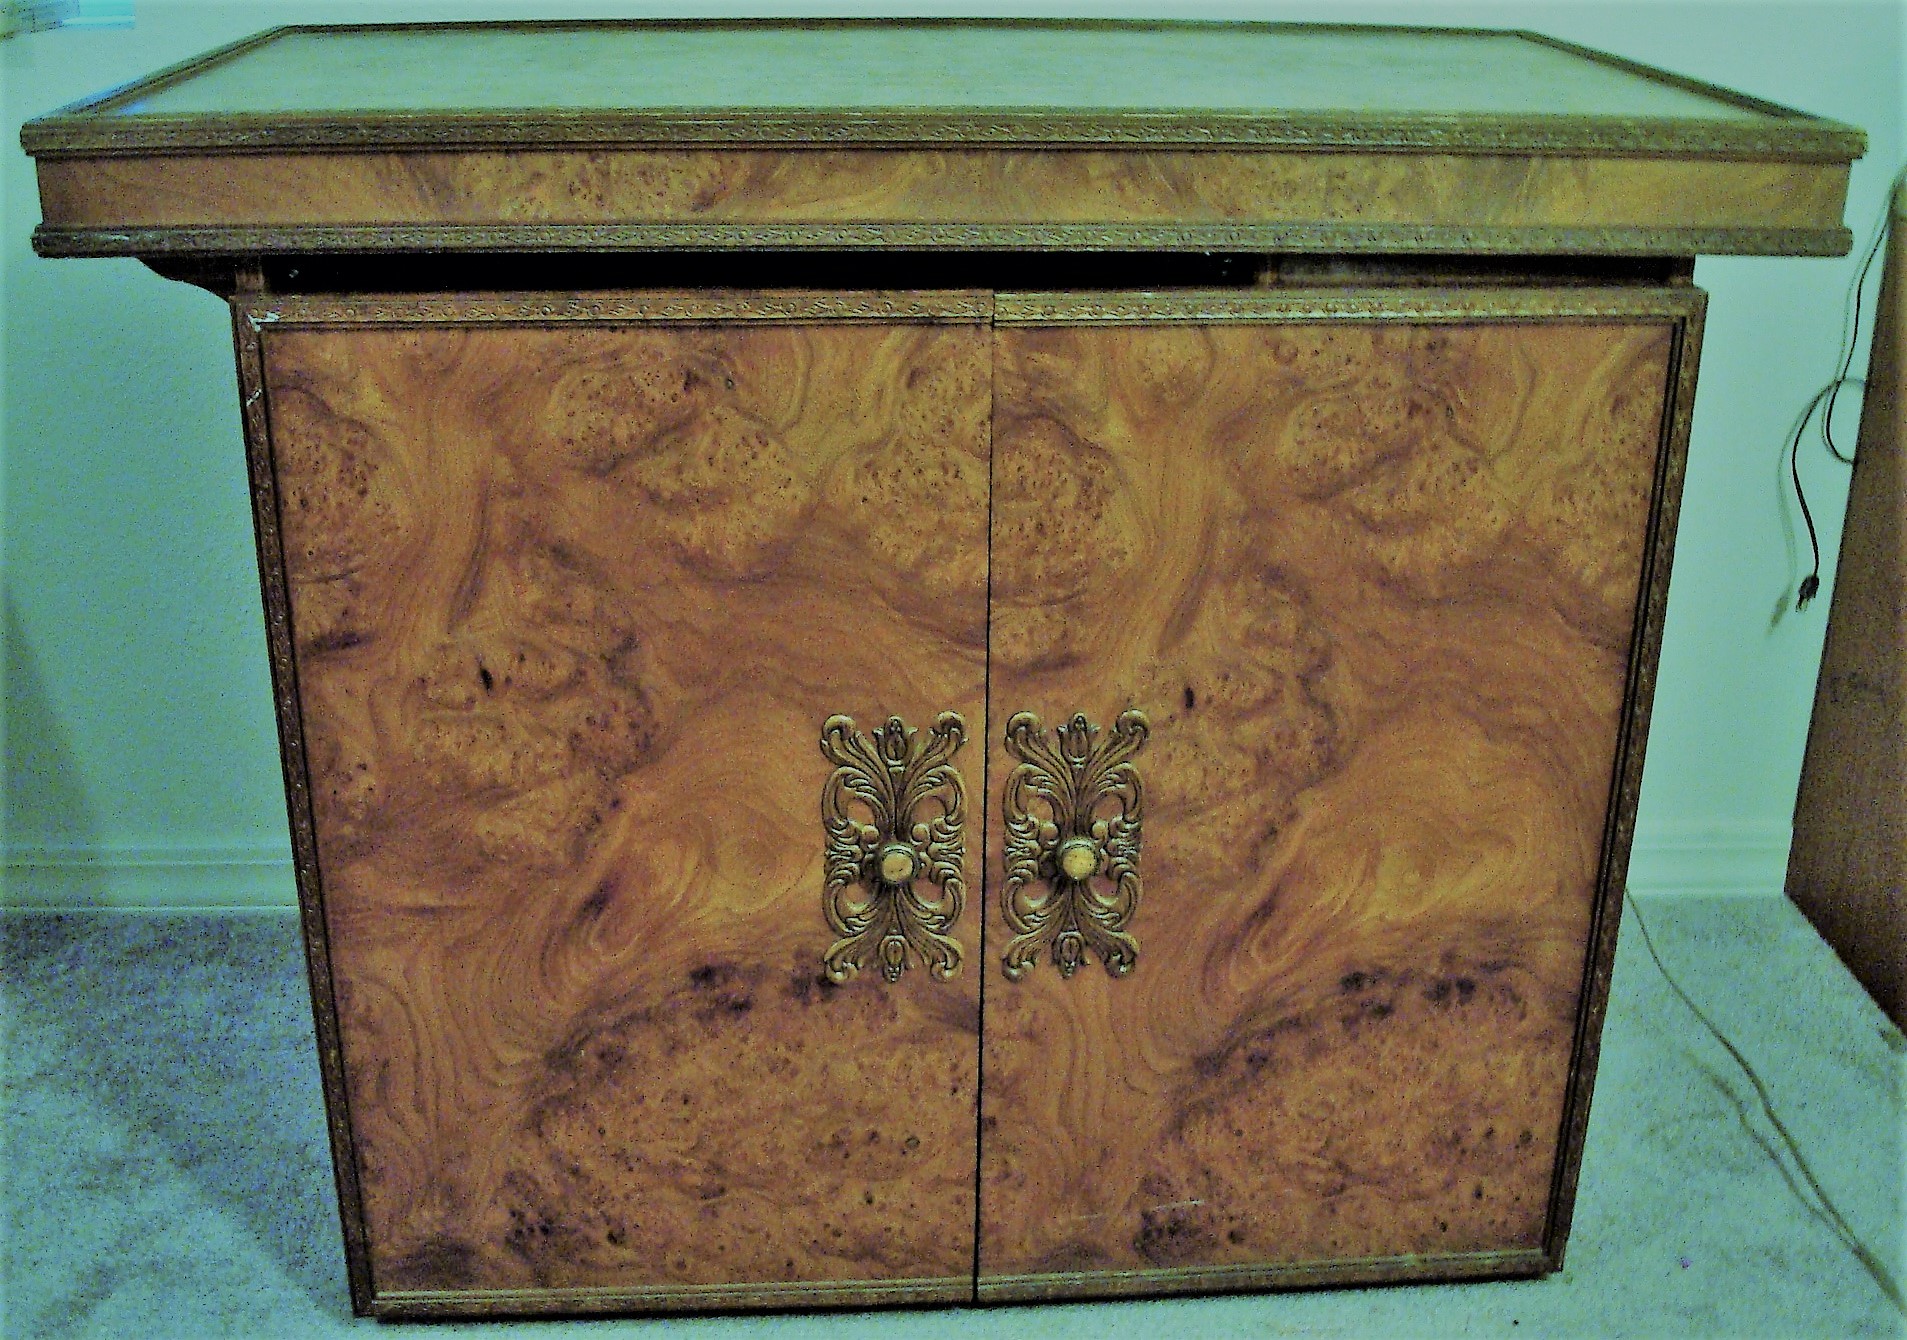
I was at my local Woodcrafters store and ran across all these ‘burl blocks.’ I asked about them. Somehow they got them from Italy. They were going to be turned by a car manufacturer into shift knobs and other high end wood accent pieces. A friend of mine makes knives and thought he might like them for knife handles. One of the guys that works there made a hidden box out of one of them. (didn’t get a picture of it) but here is a pic of the blank. I am thinking of getting me a couple of them.
- 16 replies
-
- 10
-
-
- burl blocks
- burl
- (and 2 more)
-

From the album: The Hulsey Family 2021 Wounded Warrior Christmas
Shaving kits made by Mr. and Mrs. Hulsey -
Shaving and Woodworking
John Morris posted a gallery image in Adopt a Wounded Warrior Family for Christmas

From the album: The Hulsey Family 2021 Wounded Warrior Christmas
Mr. Hulsey and his wife make shaving kits from burl wood, yes, they are woodworkers too! -
Writing this between relatives in and out- Our Patriot Turners- @forty_caliber is the latest of our turners to join the Laser Engraver membership. He shows us his setup in this post- Looking forward to seeing more of this setup and learning more about the software for running one of these. Forty also gave us a look at the latest Pecan bowl he is turning- Here's more about the turning- In response to last week's "Wednesday's...", @HandyDan turned an ornament from Tim Yoder's video Dan tells us a little about it here- Something from our sponsor, Laguna Tools. This is a very important program and is being assisted by Easy Wood Tools as well. Read more about how our sponsors are helping our service people deal with stress- https://info.lagunatools.com/treating-combat-stress-with-woodturning?utm_campaign=Blog Efforts&utm_content=184735260&utm_medium=social&utm_source=facebook&hss_channel=fbp-334443799903158 Toolmetrix is the driving force behind this effort and their YouTube channel is here- https://www.youtube.com/c/ToolMetrix What’s Coming Up- Not strictly for the turners but maybe something you'll find interesting- More information here- https://woodshows.com/?fbclid=IwAR2henZqJhbZxTHaxLC0iDrrM8t1A66rBHE4O2F1Psj_kqv6y0MrmCYQGdQ Click on the above image for the link to registration. For The Newbies- If you are new to resin casting, Alumilite has a series of informative instructional videos on YouTube. This link is to their play list- Expand Your Horizons- Mike Waldt turns a English Oak Burl Bowl New Turning Items- Something picked up from Cindy Drozda- More information here- http://www.cindydrozda.com/ Craft Supplies USA has a sale on domestic turning blanks- https://www.woodturnerscatalog.com/t/27/Domestic-Hardwoods Not a new turning item but a new video on using pen mandrels from Ruth Niles- Carl Jacobson has teamed up with Cindy to produce several videos demonstrating her products. The videos can be seen at-https://www.youtube.com/channel/UCNy-wl-mEMeViINGA0wTaiw Everything Else- Rick Turns list of woodturning videos on YouTube from last week- Safe turning and stay well
-
"It was the best of times, it was the worst of times, it was the age of wisdom, it was the age of foolishness, it was the epoch of belief, it was the epoch of incredulity, it was the season of Light, it was the season of Darkness..." Charles Dickens. A couple of pecan bowls from either half of the same log. One half of the log had a bit of a burl formation. I found it interesting to see how different the grain patterns were. So much for a book-matched set... Both of these were soaked in soapy water and allowed to air dry to about 13%. Sanded to 800. Finished with General Wood Bowl finish followed by beeswax friction polish. .40
-
I roughed this bowl last fall or early in the spring, really don't remember which. It's about 8" diameter so I left it about an inch thick figuring to turn it to about 1/2" or so after it dried. I thought it was ready to finish and started to mount it on the lathe but the more I handled it, the more I liked the feel and heft of it. To be honest, after roughing it I didn't much to this bowl but sand it a bit and remove the bottom. I guess it just spoke to me. It's so much thicker than what I would usually do but for me, with this bowl, with this piece of wood, it just works. About 8" diameter, a couple or three inches deep and about 1" thick. Finished with gloss wipe on poly applied while spinning.
- 6 replies
-
- 6
-
-
- burl
- norway maple
- (and 3 more)
-
Yes, I realize it is Thursday. But in my defense- I had this entire post written last evening and just before it was to be submitted- it disappeared. Not sure what combinations of keys I pressed but I was staring at a blank post entering screen. Please check the "Everything Else" topic about Ruth Niles! Our Patriot Turners- @Gerald showed us the progress he was making on a beautiful piece of cherry burl- a gift from his son. Geral certainly did this piece of wood proud! @AndrewBis not one to sit around and waste time. He posted several projects he is working. First is a birch bowl. Andrew is really applying the suggestions you all have been providing and it shows in this piece. He is also working on a cup and a goblet- Finally, Andrew started on a fantastic looking piece of exotic wood (Bhilwara). Can't wait to see this when the finish hits it! A while back we were discussing finishes. There were several posts this week on that topic. First, @Ron Altier asked us about a home brew finish he read about. Our members had lots of input on this one. Another post dealt with oil and wax finishes. @AndrewB was curious about using sesame seed oil and beeswax. The type of oil used with this mixture must be carefully chosen to avoid it becoming rancid. @Gerald suggested using Walnut oil as a finish. Walnut oil, specifically formulated for this purpose, is food safe and will not create a problem for users with food allergies. The following link is useful for understanding the safety aspect. https://www.woodstockmagazine.com/2016/06/06/113196/walnut-oil-or-mineral-oil-learn-why-andrew-prefers-walnut-oil-to-protect-his-bowls This is one example of what is available- https://bowlmakerinc.com/product/oil-wax-finish-8-oz/ What’s Coming Up- Craig Timmerman is offering Interactive Remote Demonstrations. More information can be found at his website- https://www.armadillowoodworks.com/index.html For The Newbies- The other week we were having a discussion on how to handle grain tearout. @Gerald mentioned a reverse turning technique. "Rick Turns" posted a video on turning a vase. In that video, he uses the reverse turning technique. Expand Your Horizons- We have been looking for ways to make a wooden vessel waterproof. Here's a fairly low tech method- New Turning Items- I'd like to extend a big Thumbs Up to @FlGatorwood for this weeks new turning item! Retail price is $3799.99. I found it at Woodturners Wonders for $3500. Just in case you haven't saved up enough of your lunch money for the lathe, here's another offering. This is very similar to Jerry Marcental's chuck plate- https://woodturningtoolstore.com/product/special-elio-dr-safe-drive-set-of-two-2-5-3-5/ Everything Else- Rick Turns Youtube video list from last week- On a personal note, Ruth Niles lives a very short trip from here and I have visited her shop on several occasions. You won't meet a nicer person than Ruth. This past week some A**H*le hacked her Instagram account and set up a scam in her name. The scammer is impersonating her and advertising a seminar for turners. This is not Ruth! I played along with the scam to find out more. You register ( used fake info) by email. They tell you to buy a Nike gift card for $100. Then send them a photo of the card numbers so they can register you. As Ruth said, it is doubtful anyone would fall for that but she is really worried about her business reputation. Please spread the word that this is a scam and Ruth has no part in it. Thanks! Safe turning and stay well
-
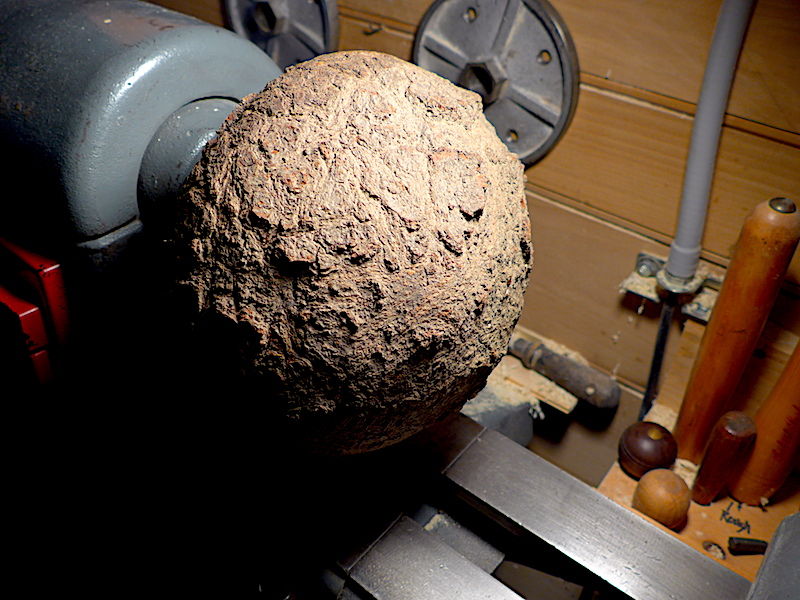
I have a mature pine tree around 38 to 40 inches diameter between my garden my sewer pond and one of my pond dams. I am not sure what is attacking it, but it has hundreds and hundreds of these little 3-4 inch up 6-8 inch burls growing on the branches. In the past I just considered them a pain as I was throwing 40 or 50 burled branches out of my garden each year. With my recent interest in lathe work I noticed that people specifically looking for burls for lathing due to the unique grain and pattern of the wood. I went and collected maybe 50 or 60 of these burls up from beside the garden and under the tree and hauled them to the shop thinking I might try to turn them at some point. I have been thinking about it for the last 3 days or so and I honestly find myself stymied as to how to go about doing anything with them. They aren't going to make bowls cups or vases they simply aren't big enough for such things. Not only that but I really am not sure how to go about putting them on the lathe to begin with. I am assuming that almost certainly this will be a faceplate item but still trying to work out how to go about doing that yet. I went ahead and cut one in half with the chopsaw earlier and realized by looking at the grain pattern that if want to show the unusual grain pattern I need to lathe the object perpendicular to the branch. To mount to a faceplate I thought I may be able to cut a small flat spot on the rounded burl backside to mount the burl. So far this is where I am.... Anyone have any ideas or advice?.... Let me rephrase that.. any "good" ideas or advice... lol...
-
That's what I was asking myself as I was turning this very dry oak burl that I had purchased at the local auction. Most of the shaping was done with scrapers and it seemed to take forever. Most of my turning experience has been with spindle turning for various candle stands.
-
Finally got all unpacked, laundry done, dog washed and settling back into the routine. Our Patriot Turners- @FrederickH wanted to know about turning a burl. Specifically, if it should be turned green or be allowed to dry first. Our turners provided some input but see if you can give him additional information- A while back, @Gerald showed us some crosses he was designing for a group at his church. Gerald has redesigned them some and posted his newer version- @John Morris has added some new woodturning links to the Links Directory. Check them out at- https://thepatriotwoodworker.com/links/category/21-foundations-and-non-profits/ What’s Coming Up- If you are in or around West Harrison, IN this weekend, Check out the this woodturning event! Click on the above image for the link to registration and more information. For The Newbies- Lots of new turners get a "starter set" of traditional tools when they purchase their lathe. Sometimes these sets are part of the lathe package. These starter tools will require sharpening before you start to turn and as you turn. Both Tim Yoder and Carl Jacobson have created sharpening videos. They demonstrate how to sharpen and some of the available equipment to make the task of sharpening easier. Tim Yoder's is in 2 parts. Part 2 is linked from Tim's channel- Carl's is a single part video- Expand Your Horizons- Another way to add interest to your turnings. This particular instance is on a bowl but the method lends itself to most any turning New Turning Items- A few weeks back, @Gerald posted some information about making a lift/moving device for a lathe. If making one isn't your thing, this just might help you out- This is available at- https://boratool.com/catalogsearch/result/?q=bora+pm+900+workbench+caster+kit&amnoroute Everything Else- The Woodturning OnLine newsletter for October is available at- https://www.woodturningonline.com/ I am still latheless but I did order the Jet 1640 EVS. In the meantime, I'm trying to get the workshop ready for the new arrival. The old Delta occupied the same location since it arrived and took the place of the Bridgewood lathe- my first one. Both of these lathes were bench mounted. The Jet will be "free standing" so I needed to make room. The bench the old lathes set on doubled as storage. I need to keep it. I was able to swap positions of some of my equipment. The old lathe's home- The area under the drill press- I was able to swap the lathe bench and the drill press area- Those drawers are filled with tools and hardware. The air compressor and a "new" small cabinet now occupy the empty space left from the where the lathe bench used to set. From the first picture, you can see how I stored my lathe tools. That was OK but when I started learning the benefits of carbide tools and my collection grew; I needed to make a different holder. The carousel worked better but, as you can see, it was mounted to the bench. Need something new for the free standing lathe. Made this wall mounted holder Safe turning
-
Sometimes it really pays off to having so many good friends "in the business". I've been involved in the woodworking industry and have made many life-long friends over the past 35 years. Woodworkers for the most part are friendly and generous types in my experience. So I've been sitting on a piece of spalted maple for a very, very long time, waiting for the right project. We just introduced negative rake carbide cutters to our line here at EWT. I've honestly not been a big fan of turning resins / acrylics / man-made materials, always much preferred turning wood. When we tested these NR cutters I was very surprised what a difference they make in turning this man-made "stuff". So I finally found a great use for this piece of maple! I sent it off to my friend Heath Knuckles, and he transformed this piece of wood into some very cool hybrid blanks. If you are not familiar with Heath and his work, here is a link to one of his projects: So Heath took my piece of maple... and sent these back to me.... Now I just have to wait for my lathe to come back from a trade show to spin a few of these!
-
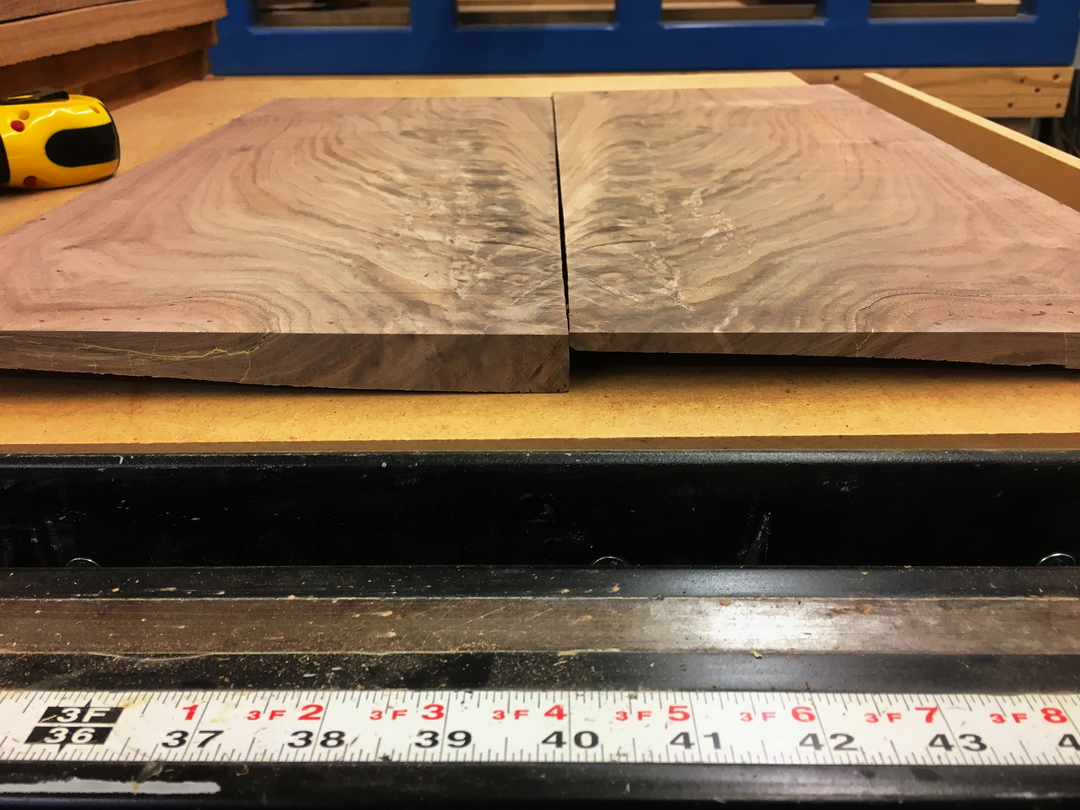
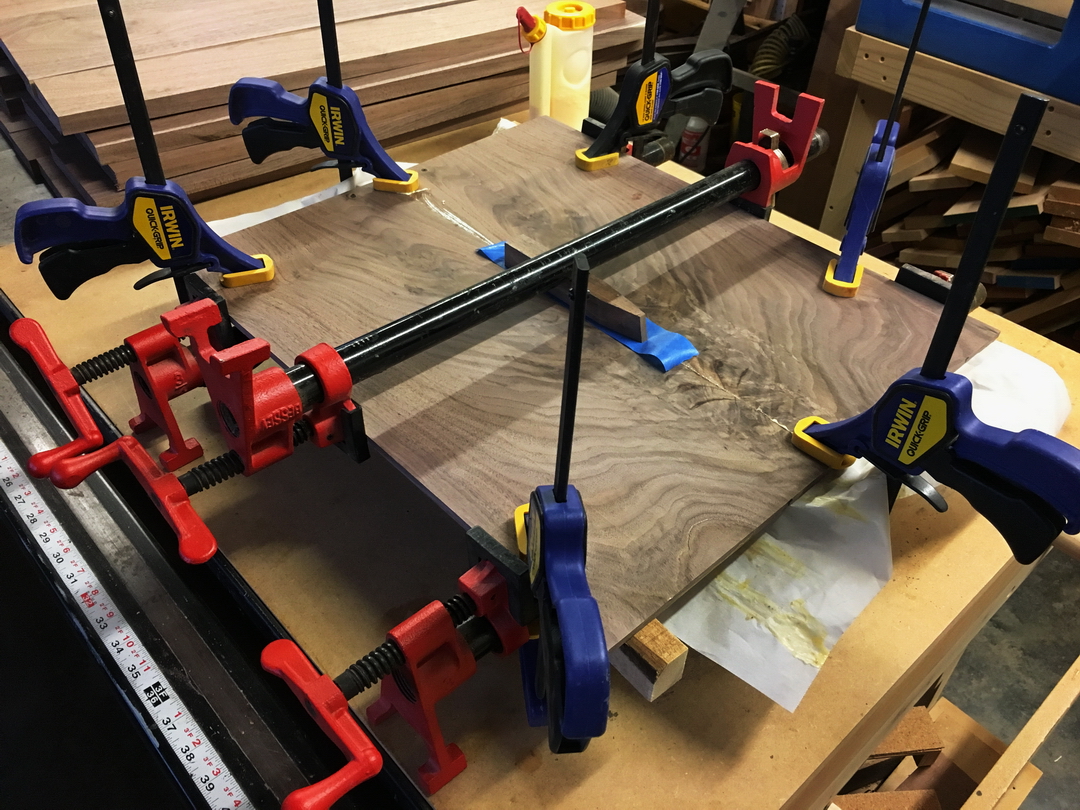
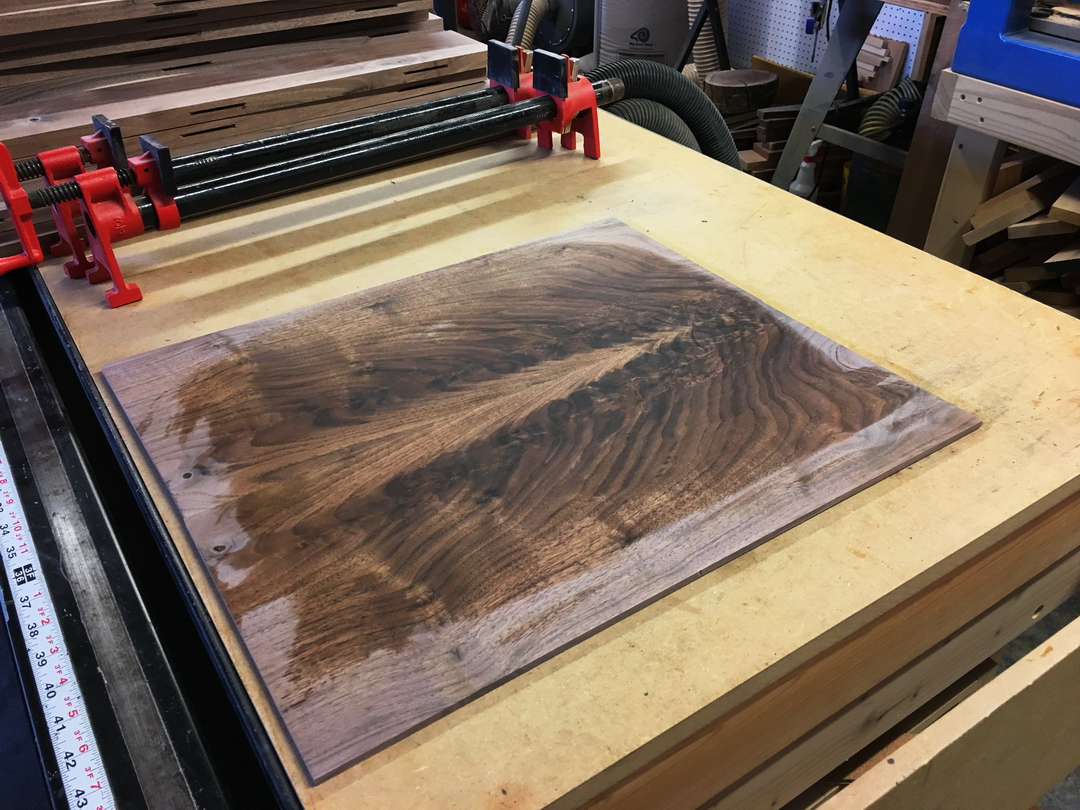
When I picked up the lumber for the 5 Walnut plaques (just posted about those) I noticed a 'nugget' on the end of one board. So I cut that off and resawed it today and it's gorgeous! It ended up about 17" x 20" x 1/4" thick in its bookmatched and sanded to 220 form. Now I have to decide what to do with it... I have a few ideas but nothing concrete yet. The boards were very straight except for right at the end on this particular one so I had to be careful resawing it. Opened up to reveal the nugget - Lots of surfacing needed to get them equal and level - Glued - Bookmatched, sanded to 220 grit - More later when I figure out what I want to do with this - David
-
I made this about 35 years ago. Make a guess on (what kind of wood) and what is it. Preston
-

From the album: Pens
Showing off the other. side -

From the album: Pens
Sierra/Gatsby twist pen that I finished last night


.png.8f022a747eb0cee946513d7ae06bbdd6.png)


.png.6850d9eb76d901d6a6c569be0419dfd4.png)


.jpeg.ae569389b99ee89559a2a40646f0d462.jpeg.606116d2e17f2ac2b27f43367248c933.jpeg)