Search the Community
Showing results for tags 'dovetail'.
-
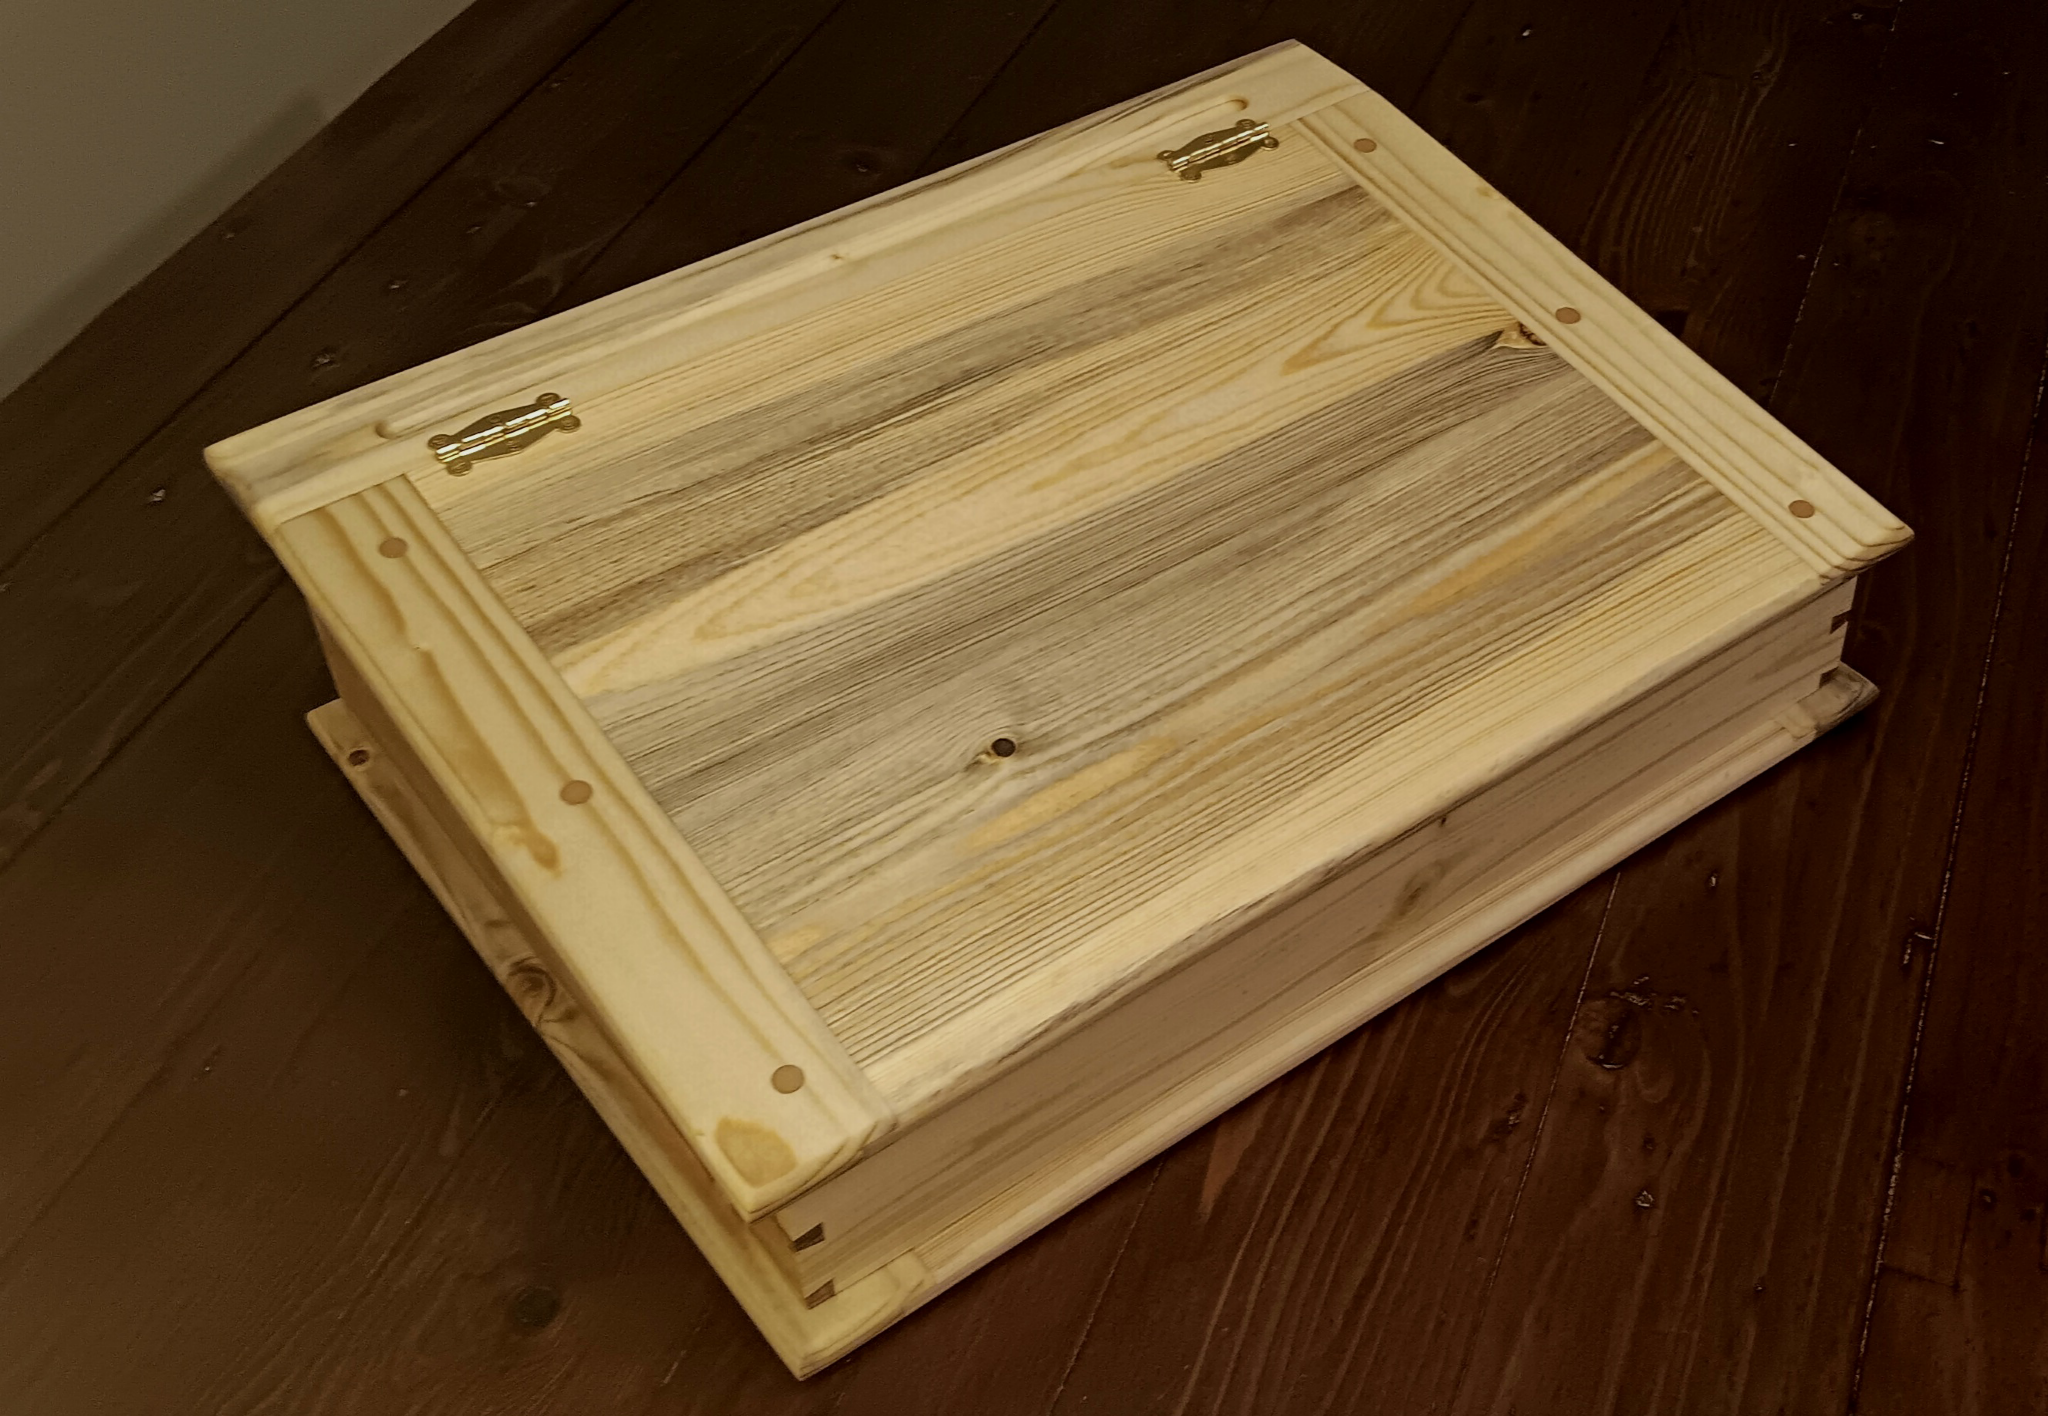
This is a Shaker style Lap Desk that I made for my eldest grandson. It has a pencil trough slot at the top (zoom in). The Lid has a brass flap stay on the left and brass hinges. The grain is awesome! Zoom in and look! It has bread board ends. .... and hand cut dovetailed corners. Thanks for looking! Cheers!! MrRick

-
 Instructions Welcome to our Glossary of Woodworking Joints. Feel free to edit and add terminology to this research page. Please follow the general guidelines as outlined below. Add only woodworking terminology that is widely used in the crafts, arts, trades and industry of woodworking. Avoid entering terminology that is used locally, or regionally. Please research your own entries, before entering them here, and verify that they are indeed accurate and reliable. A B Biscuit Joint - Crescent-shaped slots are carved into 2 pieces of wood, then an oval-shaped "biscuit" is glued into place to join them both. Keeps glued boards aligned while glue dries and strengthens the bond. Cut perfect biscuit slots with our Biscuit Jointers. Box - A corner joint with interlocking square fingers. Receives pressure from two directions. Bridle - The bridle joint is often defined as the reverse of a mortise and tenon, and is chiefly used in the carpentry and joinery trades. The name probably originated from the fact that it bears some resemblance to the manner in which a bit slips into the horse's mouth and is fastened to the bridle. Like Mortise and Tenon, but easier to make as it is open on three ends. Butt - The end of a piece of wood is butted against another piece of wood. This is the simplest and weakest joint. Of those, there is the a) T-butt, b) end-to-end butt, c) Miter butt and d) edge-to-edge butt. C D Dovetail - See various types of Dovetail joinery below: Through - A Through joint is where the end grain is visible from both boards. Through dovetail joints are most commonly used on box construction and carcass (framework of the piece). This joint is also called a plain dovetail by many in the woodworking community. In the past the ends showing through would have been masked by a veneer. Today they are a sign of exceptional quality and are left showing with pride. Half-blind - A half-blind dovetail joint also known as the single-lap dovetail joint is exactly opposite of a through joint because the end grain is not visible on the boards. Sockets house the tails at the end of the boards so the dovetail ends are invisible. Half-blind dovetail joints are commonly used for attaching drawer fronts. Secret mitered - A secret mitered joint is also know as a full-blind mitered dovetail and full-blind dovetail joint. Secret mitered joints are used in box work and cabinet construction and offers the best strength out of all of the dovetail joints. These joints are used for box work or fine cabinet construction where strength is needed without a joint you can see. Secret double-lapped - The secret double-lapped dovetail joint is kind of the like the mitered joint but has a visible section of end grain on a single edge of the joint. similar to the secret mitered dovetail, but presents a very thin section of end grain on one edge of the joint. Secret double-lapped joints are used for box construction and carcass construction to hid the dovetails. Sliding - The sliding dovetail joint is created by joining two wood boards at 90 degree angles, where the they intersect different than other types of dovetail joints. They intersect by sliding the tail of one board into the middle socket of the other. Sliding dovetail joints are commonly referred to French Dovetail joints. Sliding joints are commonly used to joint cabinet sides to shelves, sides to cabinet bottoms, shelves to horizontal partitions, table frames to adjacent sections, sides to drawer fronts, cabinet sides to front rails, body and neck in guitars and violins. Doweling - Doweling is the term generally given to the method of jointing timber and other materials by wooden or metal pegs, which are called dowels. For cabinet-making and similar work straight-grained beechwood dowels are mostly used; these may be bought by the gross, in lengths of about 36 ins., and of any desired diameter. Draw bore - The draw bore joint method of joinery is typically used in a mortise and tenon joint. Some times in order to add additional strength to a mortise and tenon joint the crafts-person will bore through the joint and add a pegs or dowels to secure the tenon to the mortise, going a step further, one would also bore a hole(s) in the mortised part, then bore a hole(s) in the tenoned part that are offset slightly, then insert and ram home a trenail or trunnel pin, the tenoned part will draw tightly into the mortise. Doweling Joint E Edge Joint - Used to connect 2 boards along their length. Edge joints are usually glued, and are made stronger with complementary interlocking protrusions. The profile expands the edge-to-edge glue surface, but more importantly, produces the precise surface alignment that’s essential for fast glueups. F Finger Joint - (also known as a comb joint) A woodworking joint made by cutting a set of complementary rectangular cuts in two pieces of wood, which are then glued. To visualize a finger joint simply interlock the fingers of your hands at a ninety degree angle; hence the name "finger joint." It is stronger than a butt or lap joint, and often forms part of the overall look of the piece. G Glued - The glued joint is made by planing two pieces of timber so that when placed together they are in contact with each other at every point; they are then usually united with glue. Alternative names under which it is known are the butt joint, the rubbed joint, the slipped joint, whilst in certain localities it is known as the slaped (pronounced slayped) joint. Glued Joint H Halved - The halved joint is frequently known as half-lapping, and sometimes as checking and half-checking. In the majority of cases it is made by halving the two pieces, i.e., by cutting half the depth of the wood away. There are, however, exceptions to this rule, as in the case of "three-piece halving" (or, as it is sometimes called, "third lapping") and in the halving of timber with rebated or moulded edges. Halving is one of the simplest methods of connecting two pieces of timber, especially where it is desired to make frames and bracket supports for either inside or outside use. Halved Joint L Lap - or Halfing Joint - The end of a piece of wood is laid over and connected to another piece of wood. Due to a large surface area of long-grain to long-grain wood and glue surface coverage, this is a very strong joint. There are many versions of the lap joint but they all involve removing half of the wood from each piece using a saw, chisel, or router. 1/2 of the wood material on both pieces is removed, weakening the joint somewhat, but the two boards are aligned flush and stable. M Mitering - The term mitering is generally used to denote the type of joint used at the corner of a picture frame; or where two pieces of wood are beveled away so as to fit each other, as the skirting or plinth mould. In these cases the timber is cut so that the joint is at 45 degrees to the face, and the two pieces, when placed together, form an angle of 90 degrees (a right angle). Mortise and Tenon - A mortise (or mortice) and tenon joint is a type of joint that connects two pieces of wood or other material. Woodworkers around the world have used it for thousands of years to join pieces of wood, mainly when the adjoining pieces connect at an angle of 90°. In its basic form, it is both simple and strong. Mortise Corner Stub - Foxtail - Haunch - Tenon Bare Faced - Feather - Pinned - Stubbed or Stump - P Pocket-hole - Simple to make and often seen on manufactured items as it is easy to reproduce using a jig. Drill holes at an angle to both pieces for a stronger joint. For very best results, use a Forstner bit, which are well known for their ability to drill clean and chip-free holes in wood. S Saddle - The "saddle joint" is used for connecting upright posts to heads or sills of framing, and undoubtedly takes its name from its similarity to the way in which the saddle fits the horse. It does not weaken the framing as does a mortise and tenon joint, and shrinkage has little effect upon the joint. Saddle Joint Scarf - The method known as "scarfing" is used for the joining of timber in the direction of its length, enabling the workman to produce a joint with a smooth or flush appearance on all its faces. One of the simplest forms of scarfed joint is known as the half lap, in which a portion is cut out at the end of each beam or joist, equal in depth to half the full depth of the beam, and of equal length to the required scarf. Plated Sarf Joint T Tongued and Grooved - The tongued and grooved joint is used in one form or another throughout the whole of the woodworking trades, covering, as it does, a great variety of work from the laying of flooring boards to the construction of dressers, bookcases and other cabinet work. As the name of the joint implies, one one board a groove is created, on the joining board a tongue is created, and the two are married or matched together. Tongue and Grooved Joint Tambour Joint - A tambour joint is made with a ball and socket for joinery that allows movement between wood pieces, such as a roll-top desk or breadbox door. This joinery does not require glue or fasteners. The interlocking joint allows the joined pieces to move, flex, and move along a track.
 -
Added a few to my collection almost new.
-
Great little class here by our sponsors at Woodcraft. Joinery Class: Half-Blind Dovetails WWW.WOODCRAFT.COM Master a classic joint using a combination of power and hand tool techniques Considering...
-
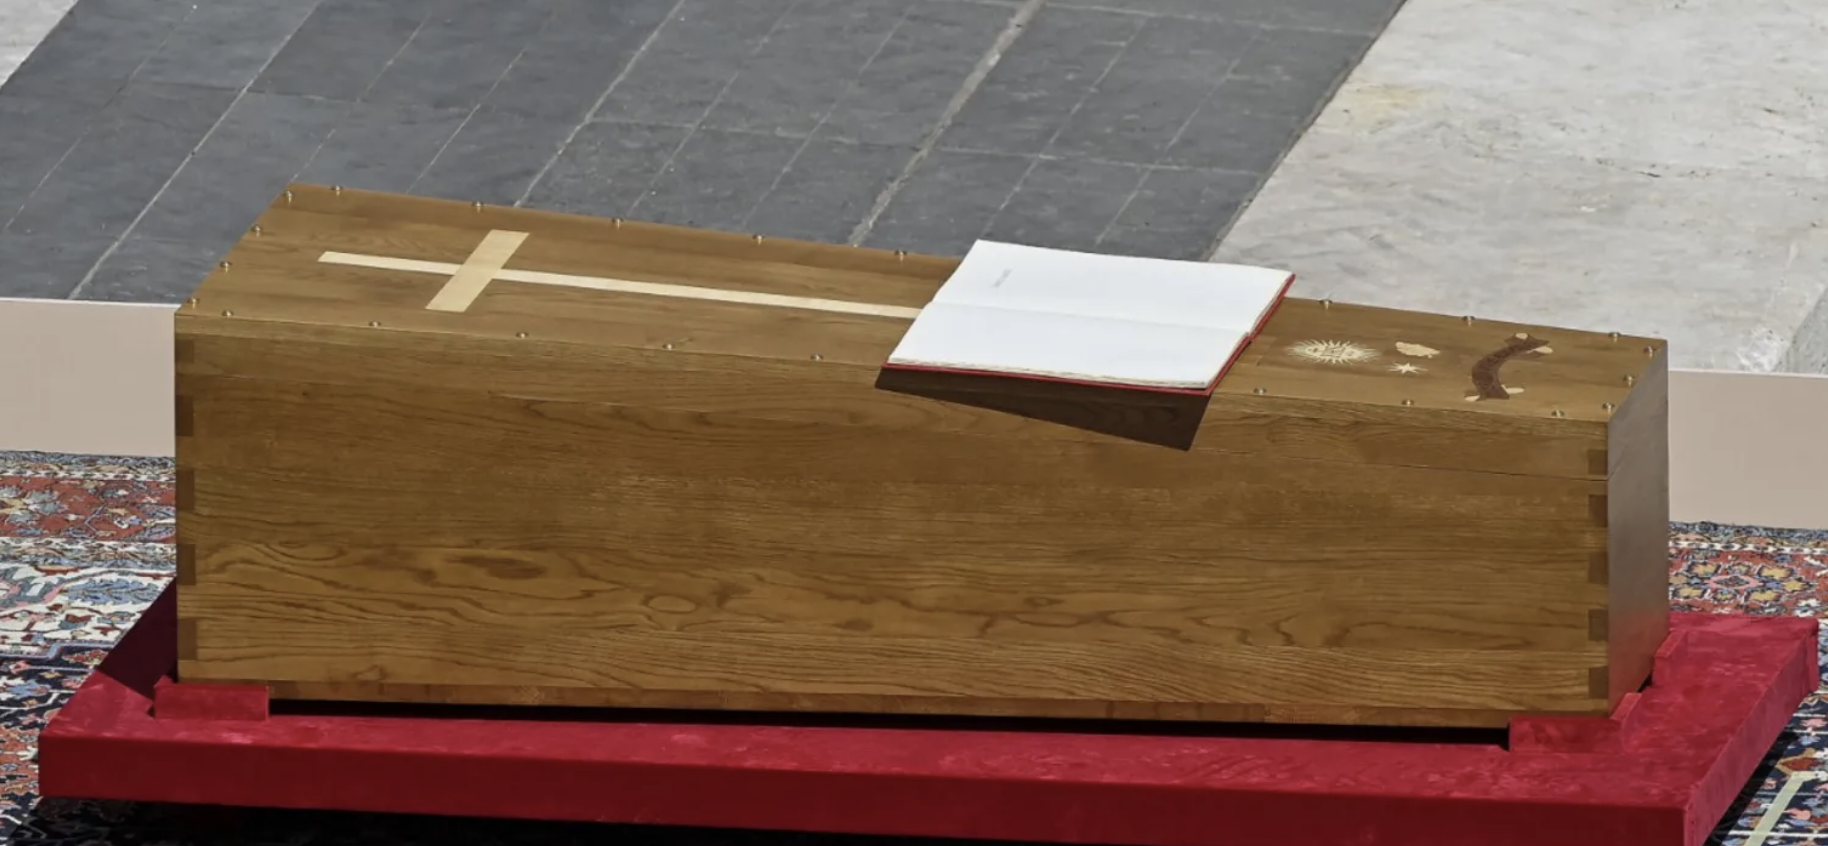
While I'm not Catholic I do mourn the death of the Pope, I had great admiration and deepest respect for the man. That said, I didn't watch the funeral proceeding, other thatn to see glimpses mentioned in the news. I couldn't help but be struck by the extraordinarily simple and yet very beautiful coffin he was buried in. There was some marvelous craftsmanship in the making of that coffin. I couldn't help but wonder if that was sitting in the wings, or some number of craftsman went to work the moment of his death. However it came about, those dovetails and that inlay in the top, as well as the overall design is certainly a striking piece of work.
-
I'm reading a Fine Woodworking book on "Boxes, Carcases, and Drawers." It's just a collection of articles from the early days of FWW. One of them is by Tage Frid, one of the major authors of the day. He writes, "Furniture construction is broken into two main categories: frame and carcase. In frame construction, relatively narrow boards are joined -- usually with a mortise and tenon joint -- as in a chair or table base, or a frame and panel door. In carcase construction boards are joined end to end using dovetails, tongue and groove joints and the like, as in a drawer or hutch." Seems simple enough, huh?
- 5 replies
-
- 5
-

-
- tongue and groove
- dovetail
- (and 11 more)
-
There's nothing quite as pleasing as cutting through-dovetails for a box. Straight forward in execution and satisfying when done.
-
As a child growing up I remember in a few homes I would visit there were these wonderful furnishings with these really beautiful dovetail designs typically on the surface of the furnishings. I had not thought much about it because in the early 70's it wasn't hard to find or view quality furnishings, it was taken for granted. Homes were still filled with the "good stuff" from the 19th century on up through the mid 20th century. As a child I did not know what I was seeing, because it was so normal. But now looking back at the homes I would visit with my parents, to visit friends, relatives, cocktail parties etc, within those homes were some really beautiful furniture! One of the furnishings that seemed popular and I remember specifically two homes we would frequent that had the Lane furnishings within. Lately I have been perusing Facebook Marketplace and Scandinavian and Mid Century is all the rave, again, and I am happy to see it coming back. I love that time period and style. It's known as MCM furnishings, or Mid Century Modern. I have always been pulled to that design and style, one of the reasons I embarked on my sculpted rocking chair builds awhile back. I do believe, correct me if I am wrong, but I think Lane started out as a box and blanket chest maker in the early 1900's. Their cedar lined chests are in abundance in the classifieds, beautiful today as they were then. Here are a few of the Lane Acclaim Series of furnishings I remember as a child, very cool, I still love it! From the little research I have done, I am not sure if this style was produced mainly in the 70's or earlier. I know many of you remember this style. High Fi Stereo Media Console Links of interest Lane Cedar Chest Home Furnishings Hall of Fame interview with Bernard Lane Lane Furniture Blog
-
So I reached a point today where it was necessary to acquire new skills to move forward with the entry table project (See the entry table thread for more on that ongoing saga). So off to the shop I go, turn on some tunes, grab some scrap and start knocking together some dovetails…how hard can it be right?…… Famous last words, it turns out it is a lot harder than it looks. The first attempt was ok but gappy, second attempt was just a debacle. After that one, I took a break and reassessed many many life choices. Played ball with the shop dogs and came back to it knocked out the third attempt which is actually acceptable. Learned a few lessons today which is always a good thing: 1. Free-hand dovetails done by guys like Christian Becksvoort or Paul Sellers is a LOT harder than they make it look. 2. You can reference both chisels and saws on a knife marked layout line. 3. Everything in the joint has to be square. 4. Clearing out the corners of a blind dovetail is a pain, and I now realize what the purpose of a skew chisel or fishtail chisel is. For what its worth, cleaning out a blind dovetail without one is a tedious process. With lessons learned I think I have acquired the necessary knowledge to move on to the next step of the entry table which will give me ample opportunity to practice and build skills.
-
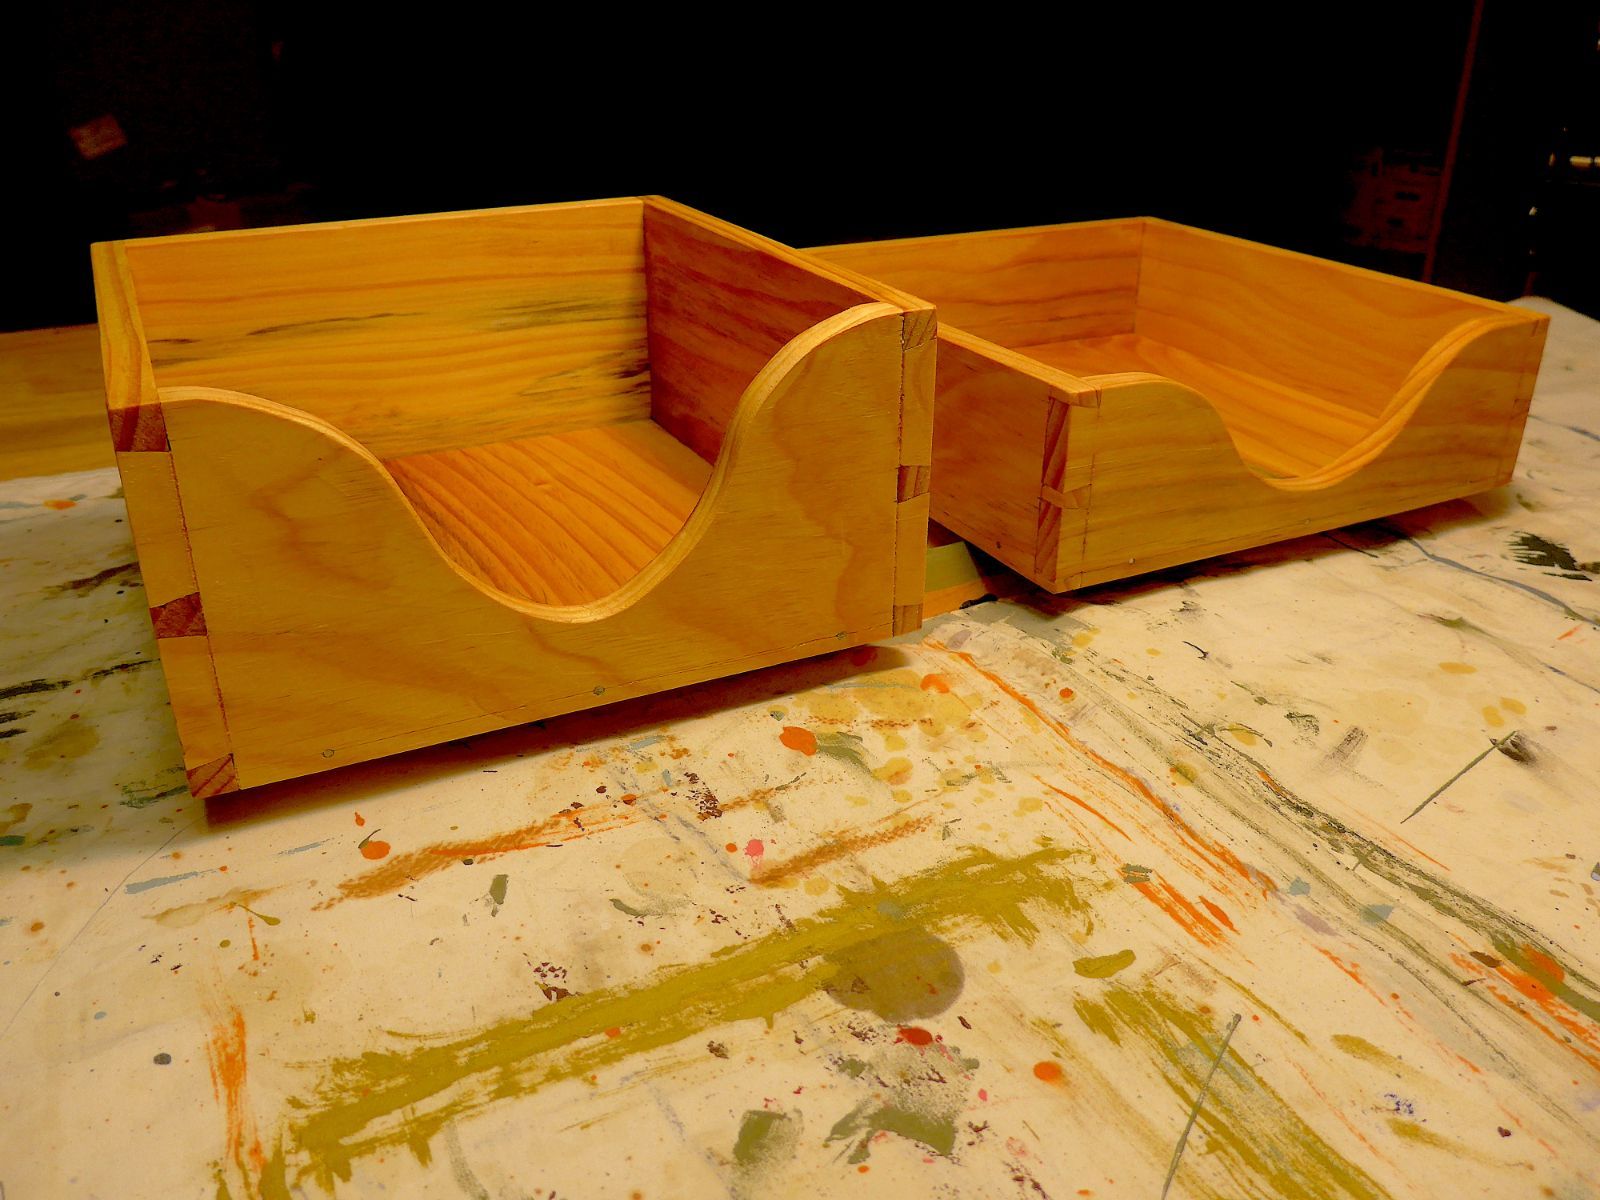
Time to clear off the bench, and start on Box #2 out of the 3 boxes from Leftovers... Start up. need to get things sized...including the thin panel for the bottom.. Even had a choice of two lids... There was a problem, though... Neither were wide enough....Cut the ends to match the width of the lid..will trim the lid to match the box's length when the box is done... Bottom panel was too thin to run on the tablesaw...so We have ways.... Ok... lay out time! Tried out the NEW Cutting gauge, too... Meh..work in progress on sharpening the cutter... Yes, I do Pins first..."X" marks the waste areas...time for a "different saw" Geo. H. Bishop Co. No. 10 to be exact...Bar is the depth stop, btw... Chopping block is set up..chopping half way down ( about a 1/4") on the outside face, first.. Then flip over, and complete the chopping out ( couple chips flew straight back and nailed me on the nose....) Use these Pins to trace out the tails.. Bandsaw to cut on the waste side of those lines...trying to leave the lines..then chop out as before..then a dry fit... Little chunks in the corners needed pared out... Back was starting to hurt, Clothes Dryer was done...so.. I think I'll call it a day...almost got something done? Stay tuned..
- 20 replies
-
- 9
-
-
- through dovetails
- cutting gauge
- (and 1 more)
-
I really like Joel's blogs. Another good one. The Stanley 444 Dovetail Plane TOOLSFORWORKINGWOOD.COM I have had a Stanley 444 since 1990. It is definitely one of the strangest planes...
-
I thought I would try making TS cut dovetails. I used a special grind (10-deg) TS blade, an Incra HD 1000 miter gauge, and a flush trim router bit. I made a sled which attached to my miter gauge. Using a marking gauge, I laid out the tail height on a sacrificial board a smidge higher than the material thickness, tilt my TS blade 10-deg, and raised the blade to the desired height. I ganged my L/R drawer side boards and cut the tails simultaneous. Because the tails were symmetrical on the front bd and the rear top bd, the tail cutting went fast. I clamped a block to the sled to allow me to make repeat cuts by flipping and rotating the boards between cuts. After the tails were cut, I laid out the pins, the same way you would if the dovetails were cut by hand except, I used a 0.5 mm mechanical pencil instead of a marking knife. I did not need a knife kerf and the pencil line is easier to see. Sorry no pic. Now, I changed out my blade to a flat bottom blade and set the height the same height as the special grind blade. Using the Inca miter gauge rotated to 10-degree, I started to cut the pins. After the pins are cut to the initial setting, rotate the miter gauge to minus 10-degree and cut the other side. Do not change your set-up. When cutting the pins always error on not cutting enough material. I used a coping saw to rough cut the pins and then cleaned-up the bottoms using a ¾” dia. flush trim router bit. My initial fit-up revealed that I had 3 pins which needed more material removed. Because I was using a miter gauge, I could re-cut either side of the pin. I use a pencil scribble to mark where the pin material had to be removed. You may see a #1 and #2 marked on either side of the pins. These markings helped me use the correct miter gauge setting. Because I used symmetrical set-up/cutting to make the tails, I used symmetrical set-up/cutting to cut the pins wherever possible. Because of this technique it appears in the pics that I was off my line when cutting the pins, but the fit-up reveals something different. In some locations the pins did not need to be marked. As I gain experience using this technique, I will learn where to mark and not mark. The pics of the tails and pins are from my 2nd effort and before glue-up. Sorry, I did not get many set-up pictures. The holes that are in some of the pieces are for Blum Tandem undermount draw slide attachment. For me, I’m sure this technique is faster than cutting them by hand. I am pleased with the results. Danl
-
.thumb.jpg.573d1497d0675219908c85aabefd797a.jpg)
(Furnishings)Woodcraft Magazine Issue 81 (Classic Shaker Counter)
John Morris posted a topic in Plans and Software
View File Woodcraft Magazine Issue 81 (Classic Shaker Counter) A wonderful plan by our sponsors "Woodcraft Magazine". Woodcraft has given us permission to share any items from their online catalog, thank you Woodcraft! Submitter John Morris Submitted 08/14/2022 Category Furnishings- 1 reply
-
- 3
-
-

-
- mortise
- tiger maple
- (and 9 more)
-

Version 1.0.0
20 downloads
A wonderful plan by our sponsors "Woodcraft Magazine". Woodcraft has given us permission to share any items from their online catalog, thank you Woodcraft!-
- 2
-
-
- tiger maple
- curly maple
- (and 9 more)
-
From the album: Rachel's Standing Desk Project
There is even a pinned joint....legs were pinned in place- 2 comments
-
- 1
-
-
- dovetail
- standing desk
- (and 2 more)
-
I've got my brother's Buck and this little Zeno. That's it. The Buck is tolerable but balky. The next time I'm in Tempe I plan to drop the blade off at Woodcraft in Chandler for out-sourced sharpening. It seems like a reasonably priced service. Or buy a blade? Isn't Buck USA no longer Buck? And the Zeno .. Well .. Time for recycling, I fear. Thinking ahead, what do I want? My biggest cut may be a 3" plank of thin to 1" thickness. Or as small as 1/4" square stock. 1/8" thick slats which may be dry and brittle. Then there is angled and slat-style dovetailing which I have not yet attempted. One saw for all, for a beginning intermediate. Prefer domestic manufacture and, like my shoes, recraftable. Thank you.
-
From the album: Gun Case
-
From the album: Old English Plate Shelf
Finished and ready for delivery. My go to finishing schedule for most of my flat work is water based dyes for color, followed by a coat of boiled linseed oil, then oil based varnish. I still love the warmth and glow of oil based varnishes, it has a warmth that I love.© Courtland Woodworks
- 7 comments
-
- 1
-
-
- curly maple
- dye
- (and 6 more)
-

WoodRiver dovetail jig review
kmealy posted a topic in Machinery, Tools, Research, Reviews and Safety
This is the one I got from Wood Magazine and it includes the half-blind and accessory thru dovetail templates. Executive Summary: I think there are better units out there. Woodcraft has several other options. It is nice because there is an accessory template to do through dovetails. It is also sturdy and heavy built. I have two router jigs -- an old Porter-Cable one that works fine but only does half-blind dovetails and is not flexible on width of pieces. Another one that is not made any more and is way more adaptable, does through and half-blind dovetails but is extremely complex. I read the manual, went to an all day class with handouts, then spent two days studying, making notes and diagrams, and trying things. When I pull it out, it takes me an hour or two to get started with it. And to do most anything you have mid-stream adjustments and or template changes to make (permitting the opportunity to mess up). I was hoping this one would be simpler to use. I understand that with any jig, you need to fine tune the depth of the dovetailing bit to fit the pins you cut. The manual is kind of sketchy. The parts listed for the bits and templates are not exactly what was sent. It appears they changed/upgraded without changing the manual whose revision date is the same month as manufacture (I have discovered this is not uncommon from Chinese manufacturers). And the one size bushing that had a label for 7/16 on it was the wrong size 1/2". But the slots appear to be 1/2", so not sure until I do a test run. Woodcraft sent a replacement to me same day and arrived a day later. But it appears the supplied bits will work. But not listed anywhere the thru dovetails are limited to 1/2" thick wood, maybe at least on the tail pieces? I have a bigger bit but it won't work because it's a 1/2" shank and does not fit a 1/2" bushing. The settings for the template are not fixed and I was told that I'd need to fiddle with things a bit to accommodate different thicknesses of wood. The half-blind should be good once set up. But the through dovetail template needs flipped between tails and pin cutting, so you'll need to run a trial and adjustment every time. I think if I was going to buy one, I'd just go for the Leigh Through Dovetail Jig https://www.woodcraft.com/products/td330-through-dovetail-jig-leigh -
My wife and I watched our Grandson, Teddy, for a week, while his parents moved into their first house on Long Island. While here, he did the usual things for a 5 year old, play dates, swimming in the local creek/pool, helped with yard work, and helped me start a dovetailed, sliding lidded box, that is to be used to store loose parts for my Delta shaper. We didn't quite get around to painting it but I'll show him the results when finished. All-in-all, he had a great time!!!!
- 17 replies
-
- 12
-
-
- box
- lidded box
- (and 4 more)
-
I'm sure glad I can learn a lot about woodworking on the internet. Here's a couple of the first few hits on "types of wood joints" I am going to practice making dovetials [sic] like this and get a good, strong joint. Seems kind of wasteful of wood, though. I will have to wait until I have some turkey legs before I can get a tendon for a mortise and tendon [sic] joint, too. They obviously stole the above from Bob Vila (or vice-versa) I think I will also make some of these very strong dovetail joints. (found at another site 8 joints you need to know) And I am going to look for some of those marvelous square profile biscuits, but I may need to change the cutter on my biscuit joiner machine. Trying to figure out the difference between a miter joint and a mitered butt joint, too. And your standard dowel joint, described as, "You’ll find dowel joints on woodworking items where visible screws or nails are not desirable, such as high-end cabinetry, bookcases, and custom stairways." This is a very attractive and strong joint that I'd expect to see on high-end cabinetry. All can say is, "Geez, glad I have 40 years experience."
-
Well, I was going to post this last night after we got to our son and daughter in law's new house that they just moved into, but I had to help my son put together the new sofa/bed that Tami and I were going to sleep on. We got done after midnight so I figured that it would have to wait until this morning. In Part 2 of this project of making a Cedar Lined Walnut Blanket Chest for Nori, my first grand daughter that will be born this coming November, John Moody, Ron Dudelston and I were all at John Moody's house to hang out for a few days and we were building this chest together in John Moody's shop. In the first post on this project we got all the lumber milled down and got the panels glued up. So in this post we got all the panels sanded down and cut to final dimensions, cut and dry fit the dovetail joints, cut and fit the plywood bottom, glued up the chest, rough sanded the chest, routed the top, attached the top, and milled the cedar boards that will line the inside of the chest. It took a lot more sanding than we planned on the panels as we got some bowing in the glue ups which cost us extra time over our short weekend together. But we finally got everything down to the right thicknesses and got the dovetails cut. Here are John and Ron as we were working on the dry fit. Those dovetails turned out great! John has the Dovetail Jig from Peachtree Woodworking and it was really easy to do. After getting the birch plywood bottom notched and fitted into the dadoes and making sure that it wall perfectly square, it was time to get it glued up. Taping the inside corners with the Blue Painter's Tape sure was a time/work saver to deal with the squeeze out during the clamping. I can't tell you how many times John told Ron and I during this build "Don't ask me how I know this, but we need to do/not do ___________ or it will mess up the chest." Since he has made quite a few blanket chests his experience and wisdom was great to have. After letting the glue dry overnight, we got up early on Monday morning to get as much done as possible before Ron and I had to head back up north to Indiana. Ron got all the dovetail joints sanded down flush and they all look great! After getting the rough sanding done, we did the measurements and cut and routed the decorative edge on the top and then mounted the top using 3 of the Rockler chest hinges. We had hoped to get more of the chest done, but ran out of time to get the bottom trim and lining the inside with the cedar and do the final sanding. So Ron will do the final sanding and I will head up there later this week and we finish the trim and cedar lining at in his shop. After that I will be taking it to my kid's house and putting a few coats of a wipe on oil/varnish finish before Tami and I head back home to California. I had a great time working with John and Ron on this project. We were all worn out as it was a lot of work to get done over a weekend, but it turned out great. Before we blew off all the dust and carried it out to Ron's van, the last thing was to get John and Ron's signatures on the bottom in permanent ink so Nori will know how much love was put into this chest. Once I get the final finish on I will post some more photos. Here is photo of all of us at the Moody's before Ron, Dorothy, Tami and I headed back to Indiana.
-
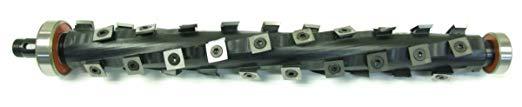
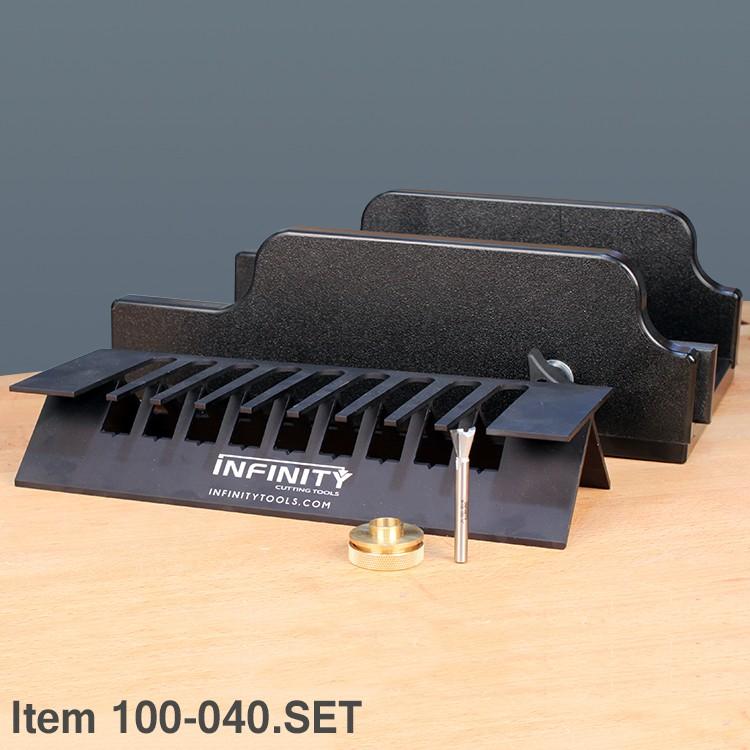
Just ordered these. Will be waiting my loving caresses upon my arrival. Byrd Shelix for the DeWalt. And, a tapered dovetail jig from Infinity. I see hours/days of fun in my future.
-

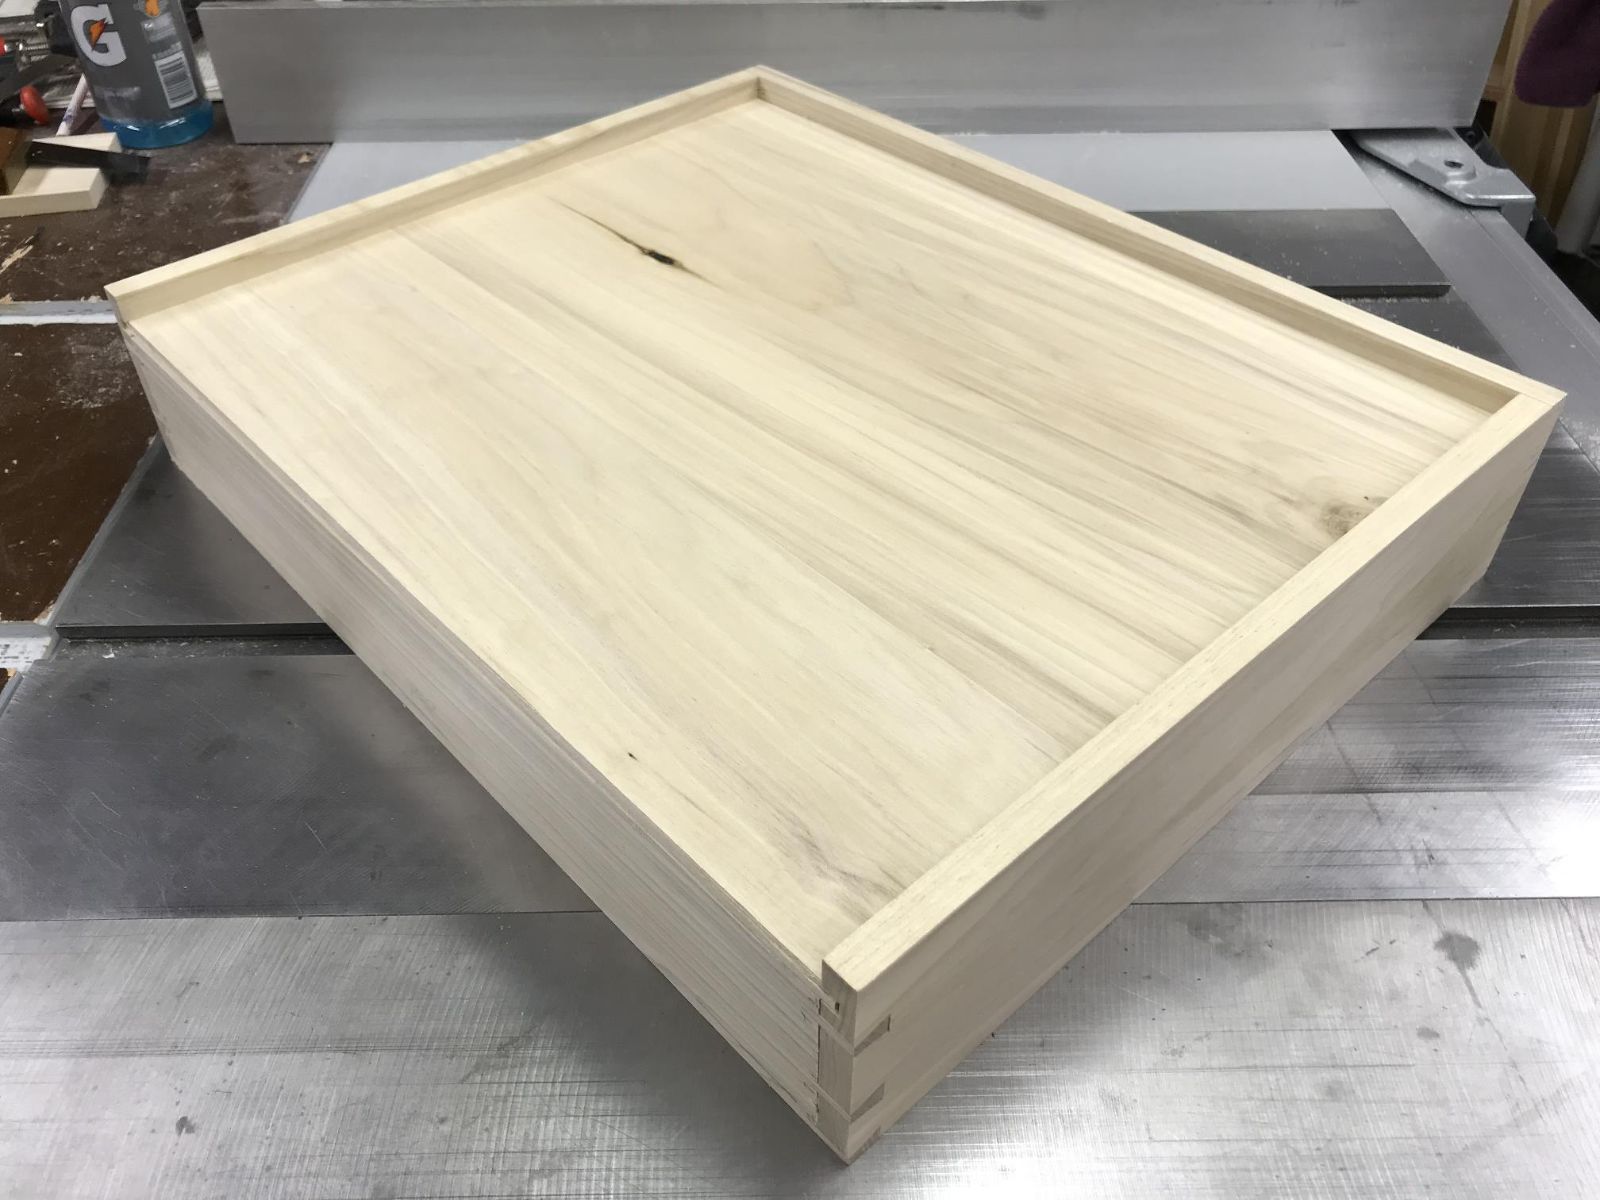
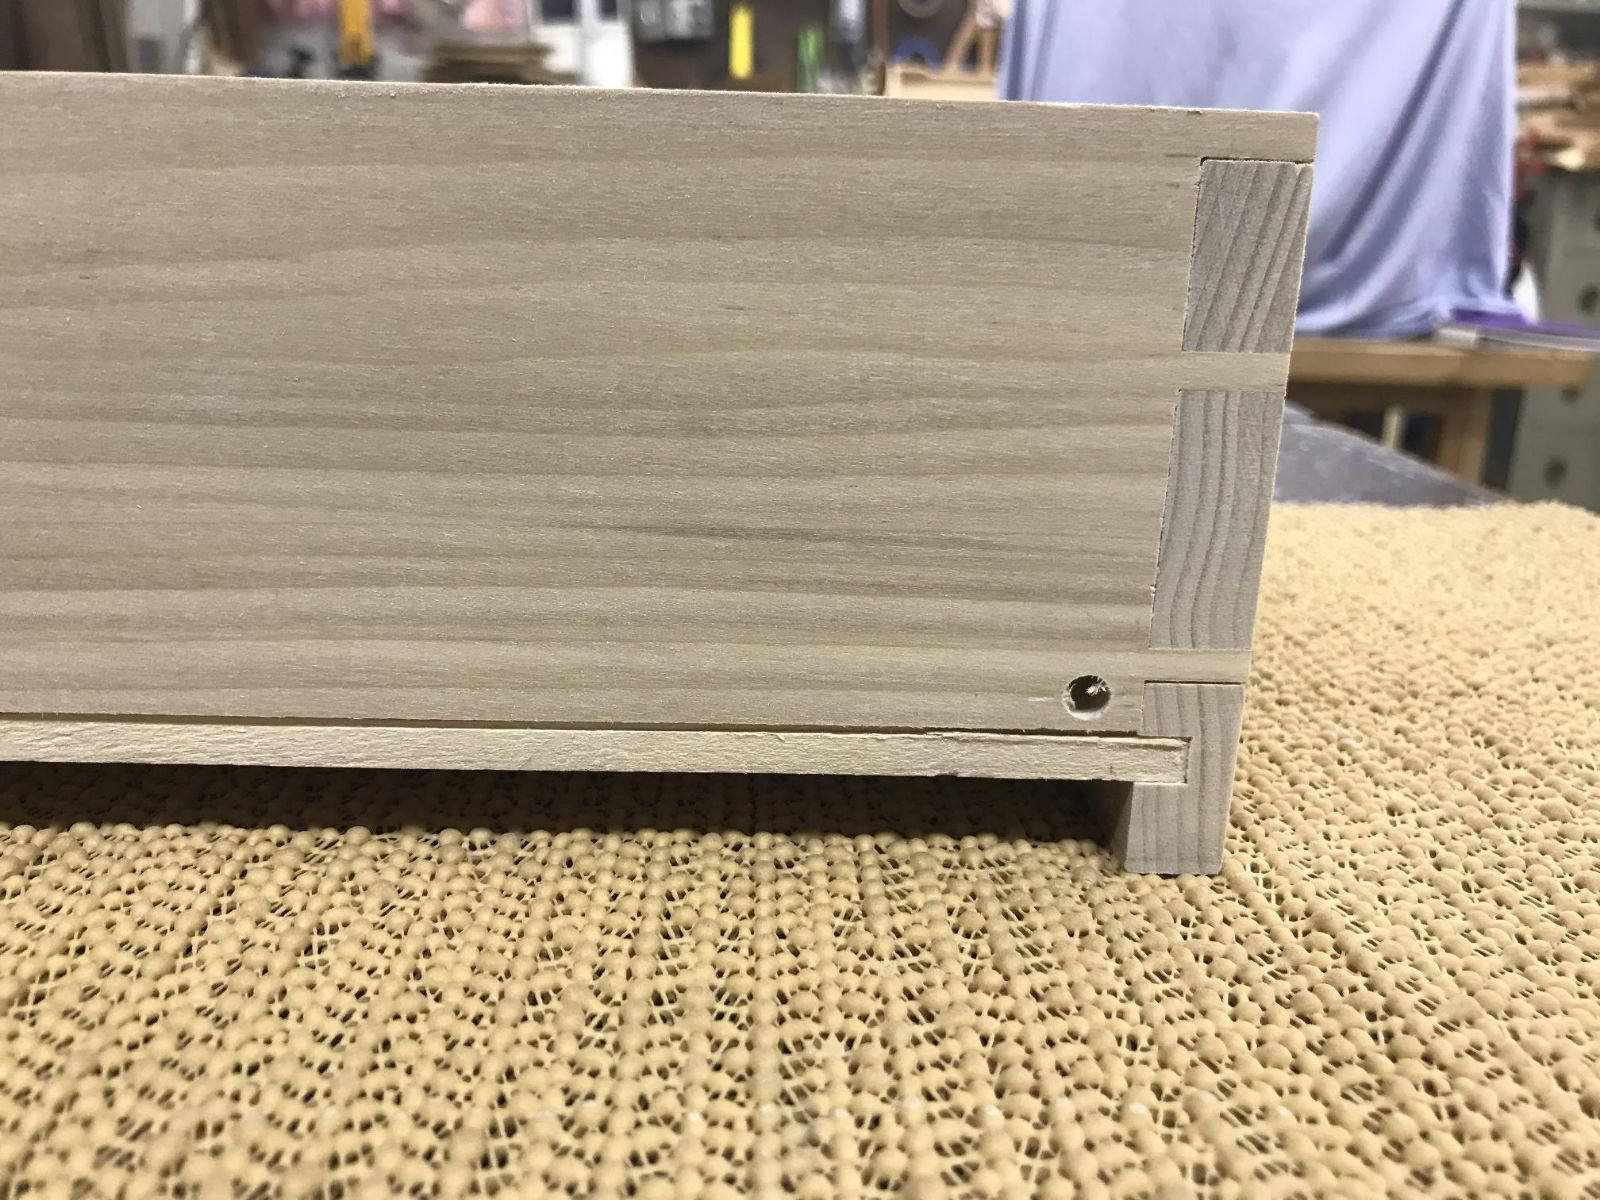
From the album: A Stepback Cupboard
I might need a bit more practice, doing these handcut, half blind dovetails....I donot apply any finish to the sides, or the insides, of drawers....tkes to long for the smell to go away...Ash for the front, pine for the sides, poplar for the back. 1/4" plywood for the bottom.