Search the Community
Showing results for tags 'Maple'.
-
I’ve been waiting to get to my own closet since we moved in here. The existing closet is like all the other storage in this house. A study in tacky particle board. I started laminating up the first of the panels today. It will be maple panels with sapelle trim to match the rest of the house. Paul

-
Hi, I suck at telling a story, but I promise I'll try to get better. Instead I thought I'd just post a few gratuitous pictures of some recent work/progress on an instrument build. Specifically, carving the back braces. Instrument is Cedar top over spalted maple.
- 184 replies
-
- 14
-

-

-
- guitar
- instrument
- (and 4 more)
-
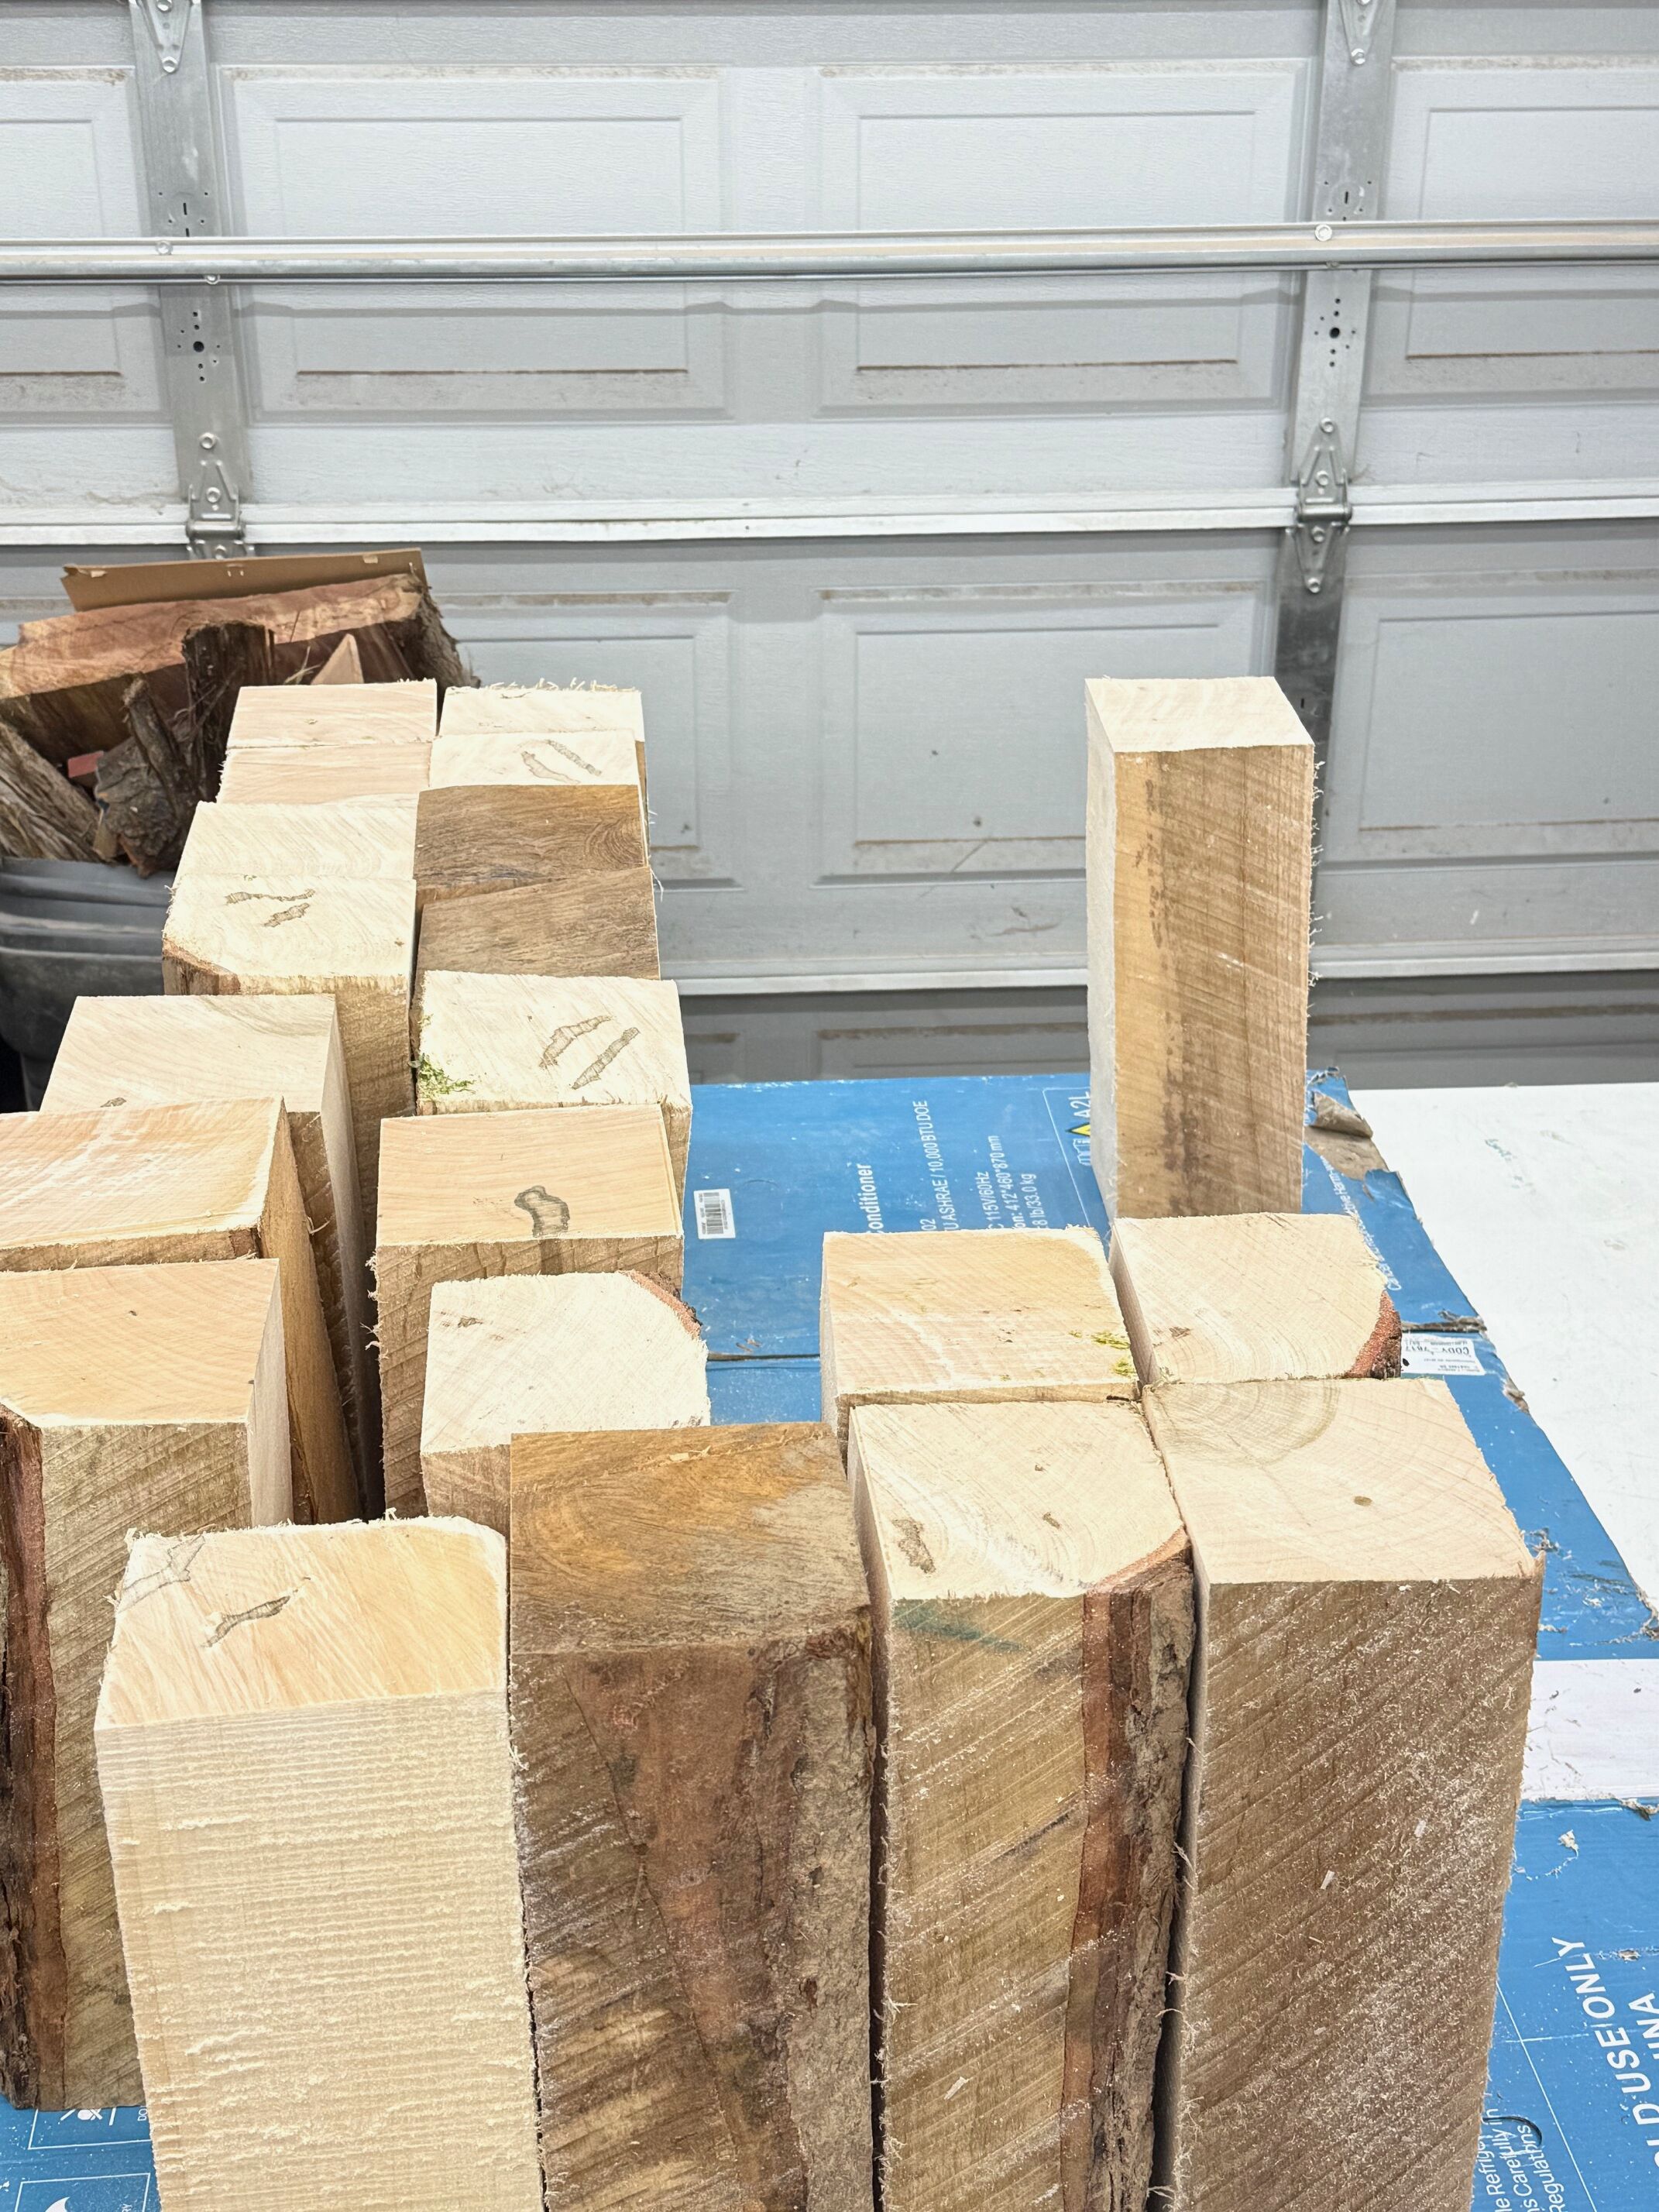
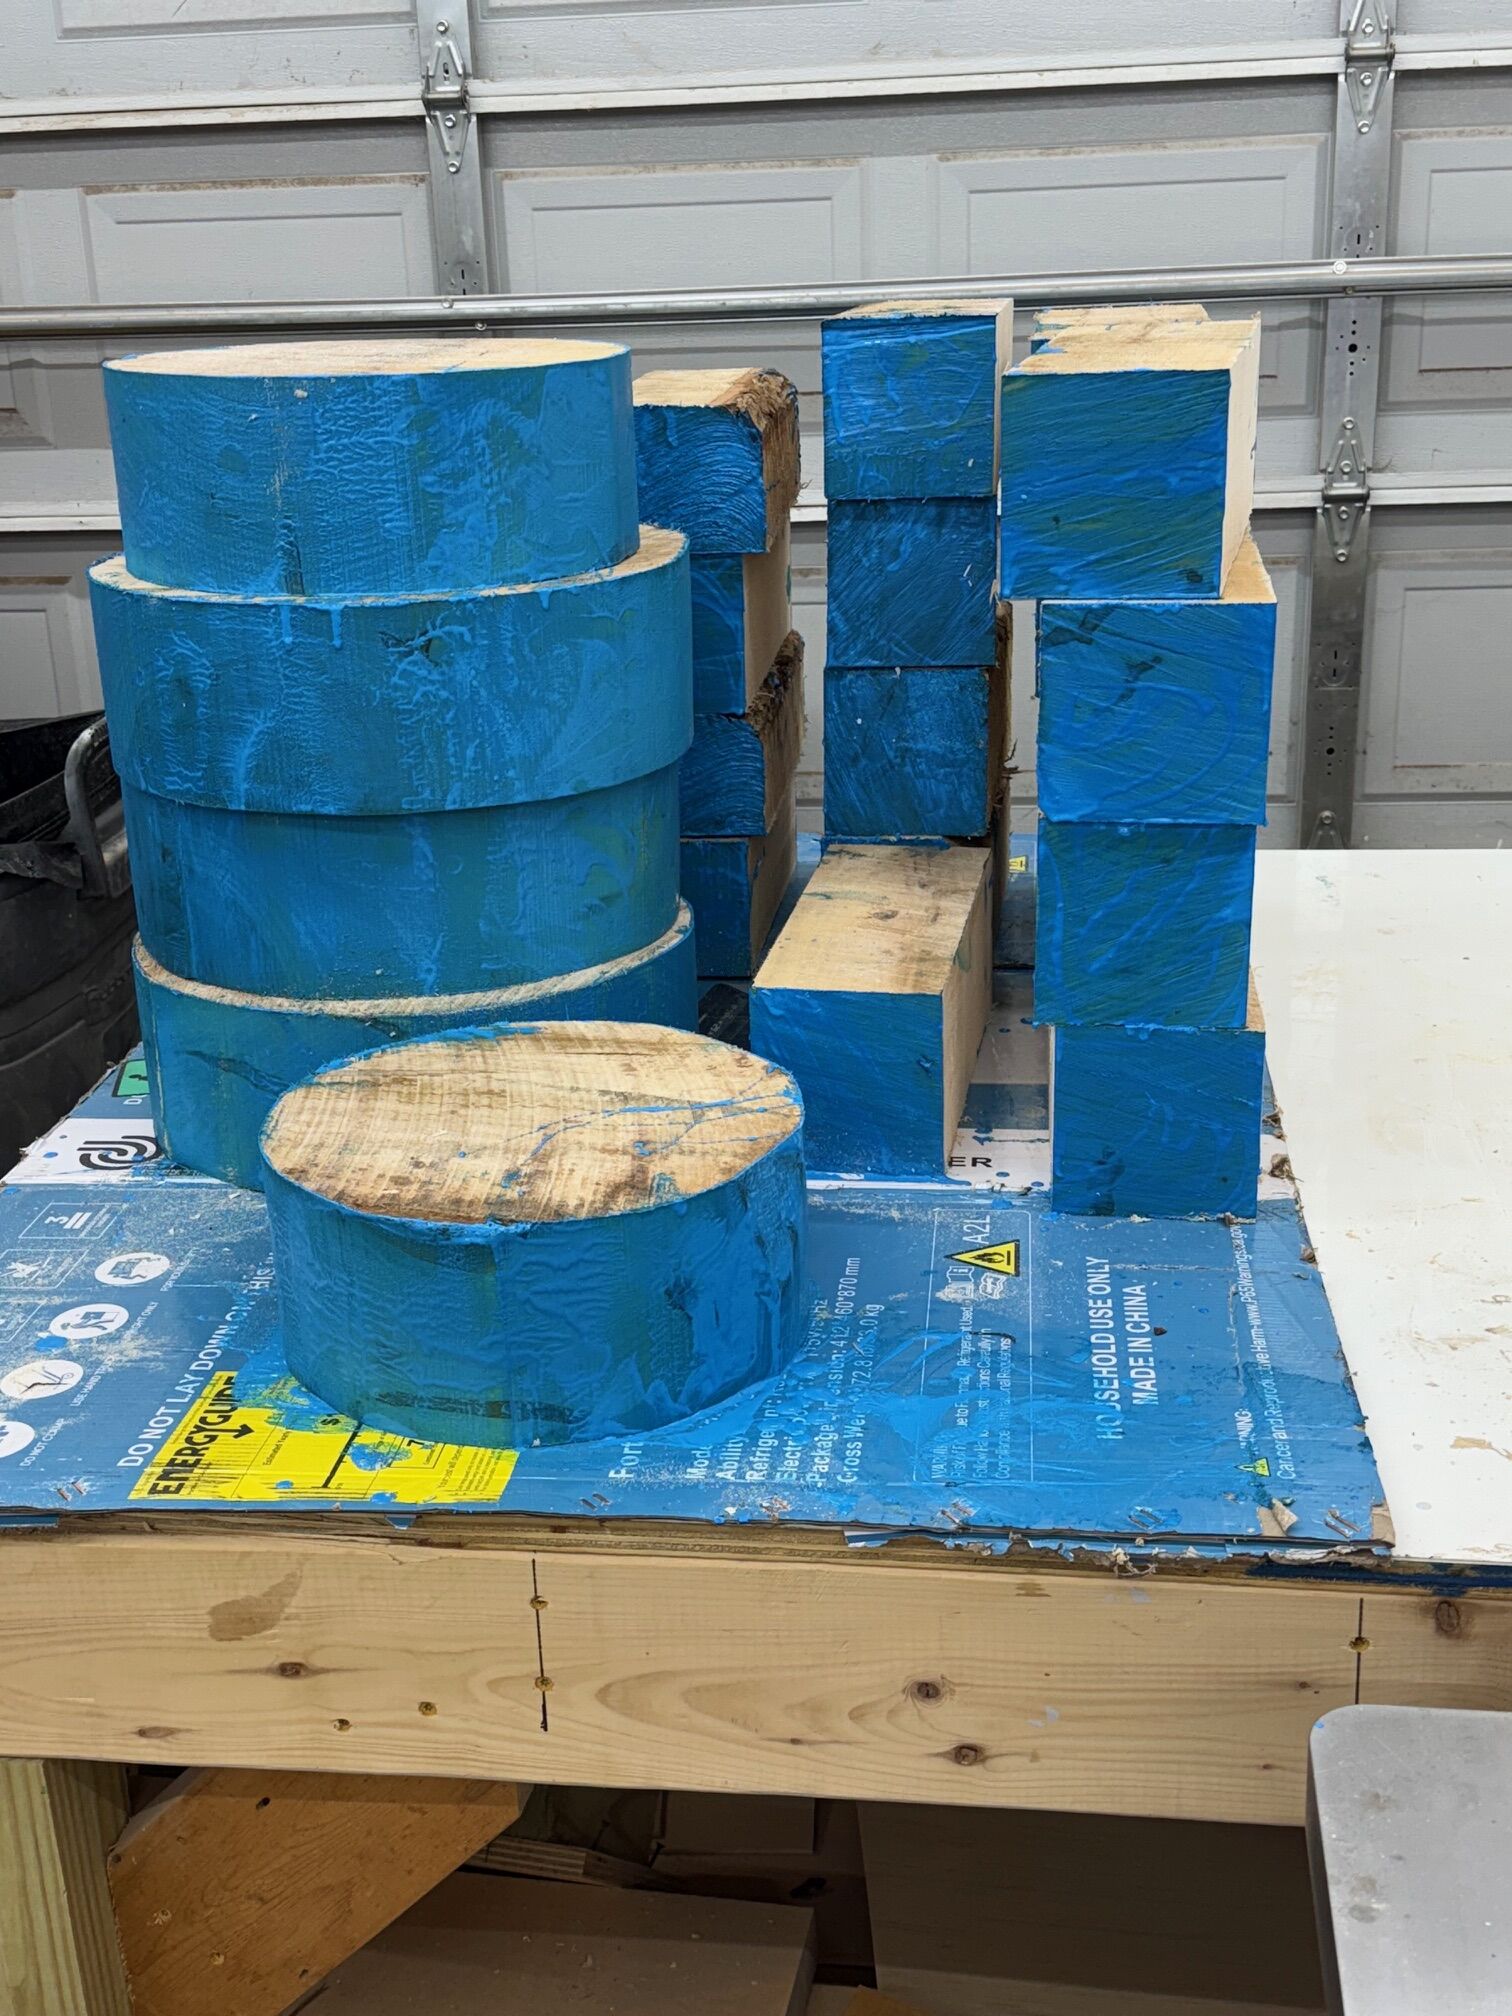
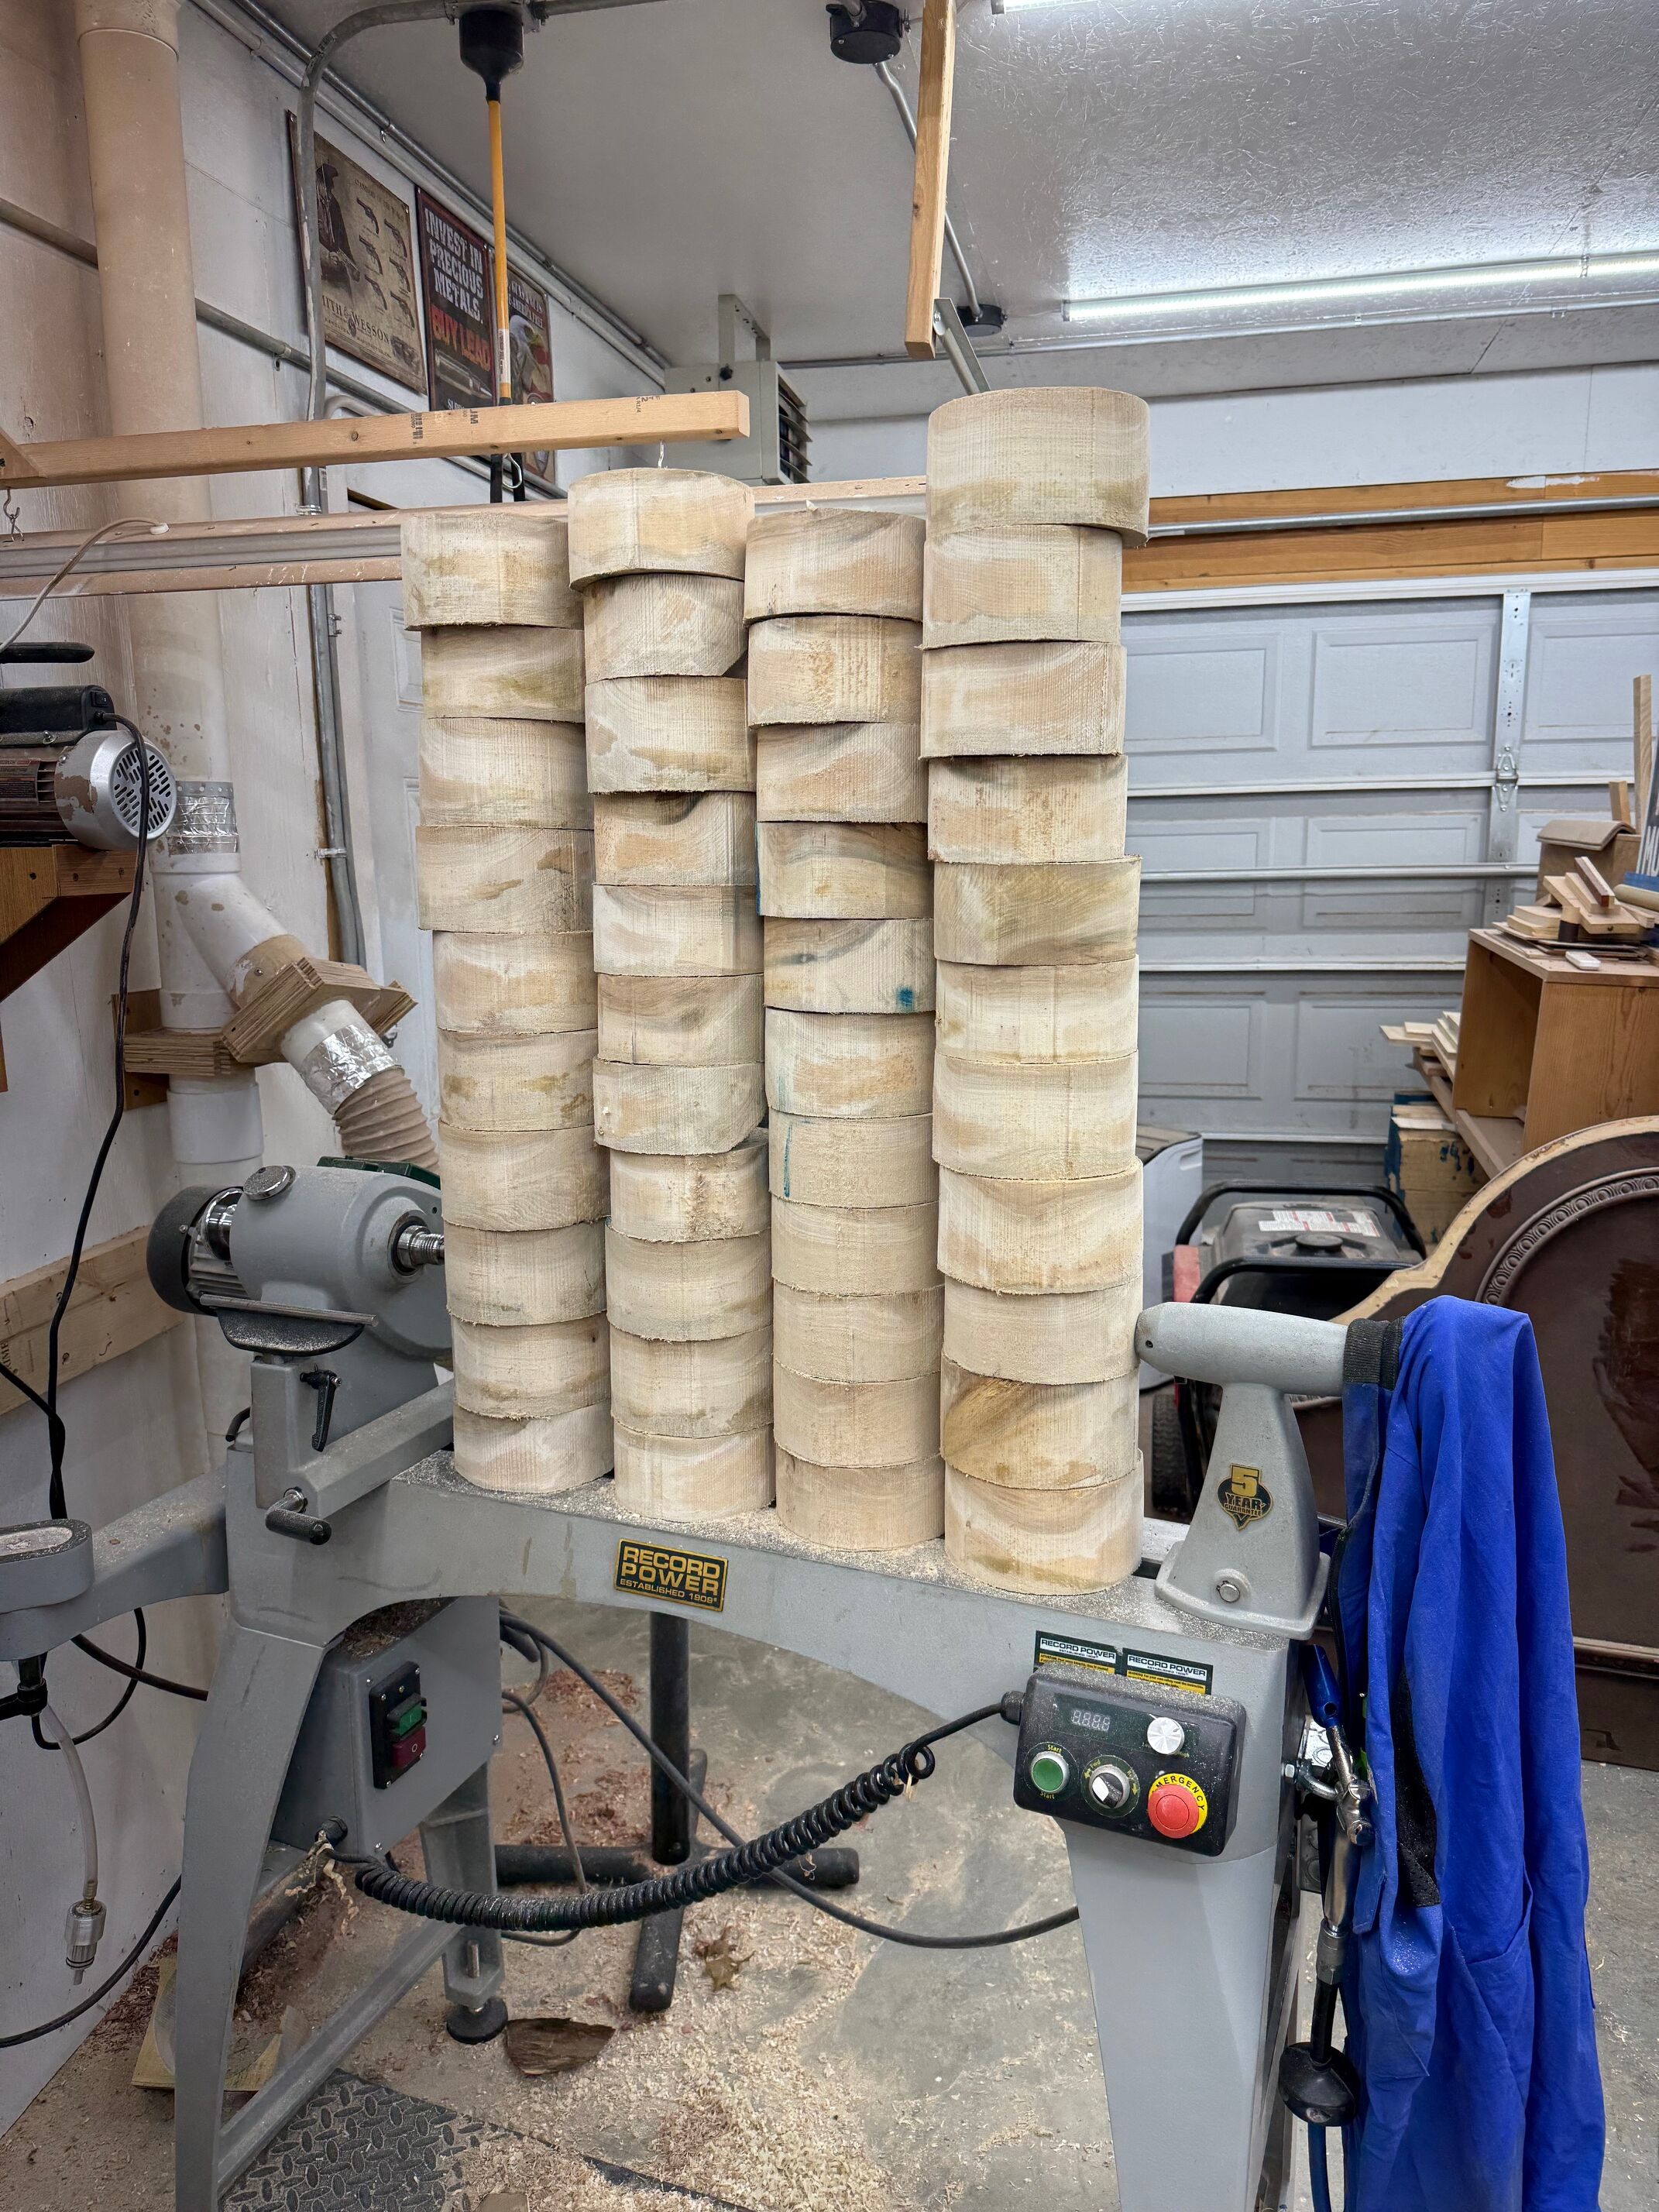
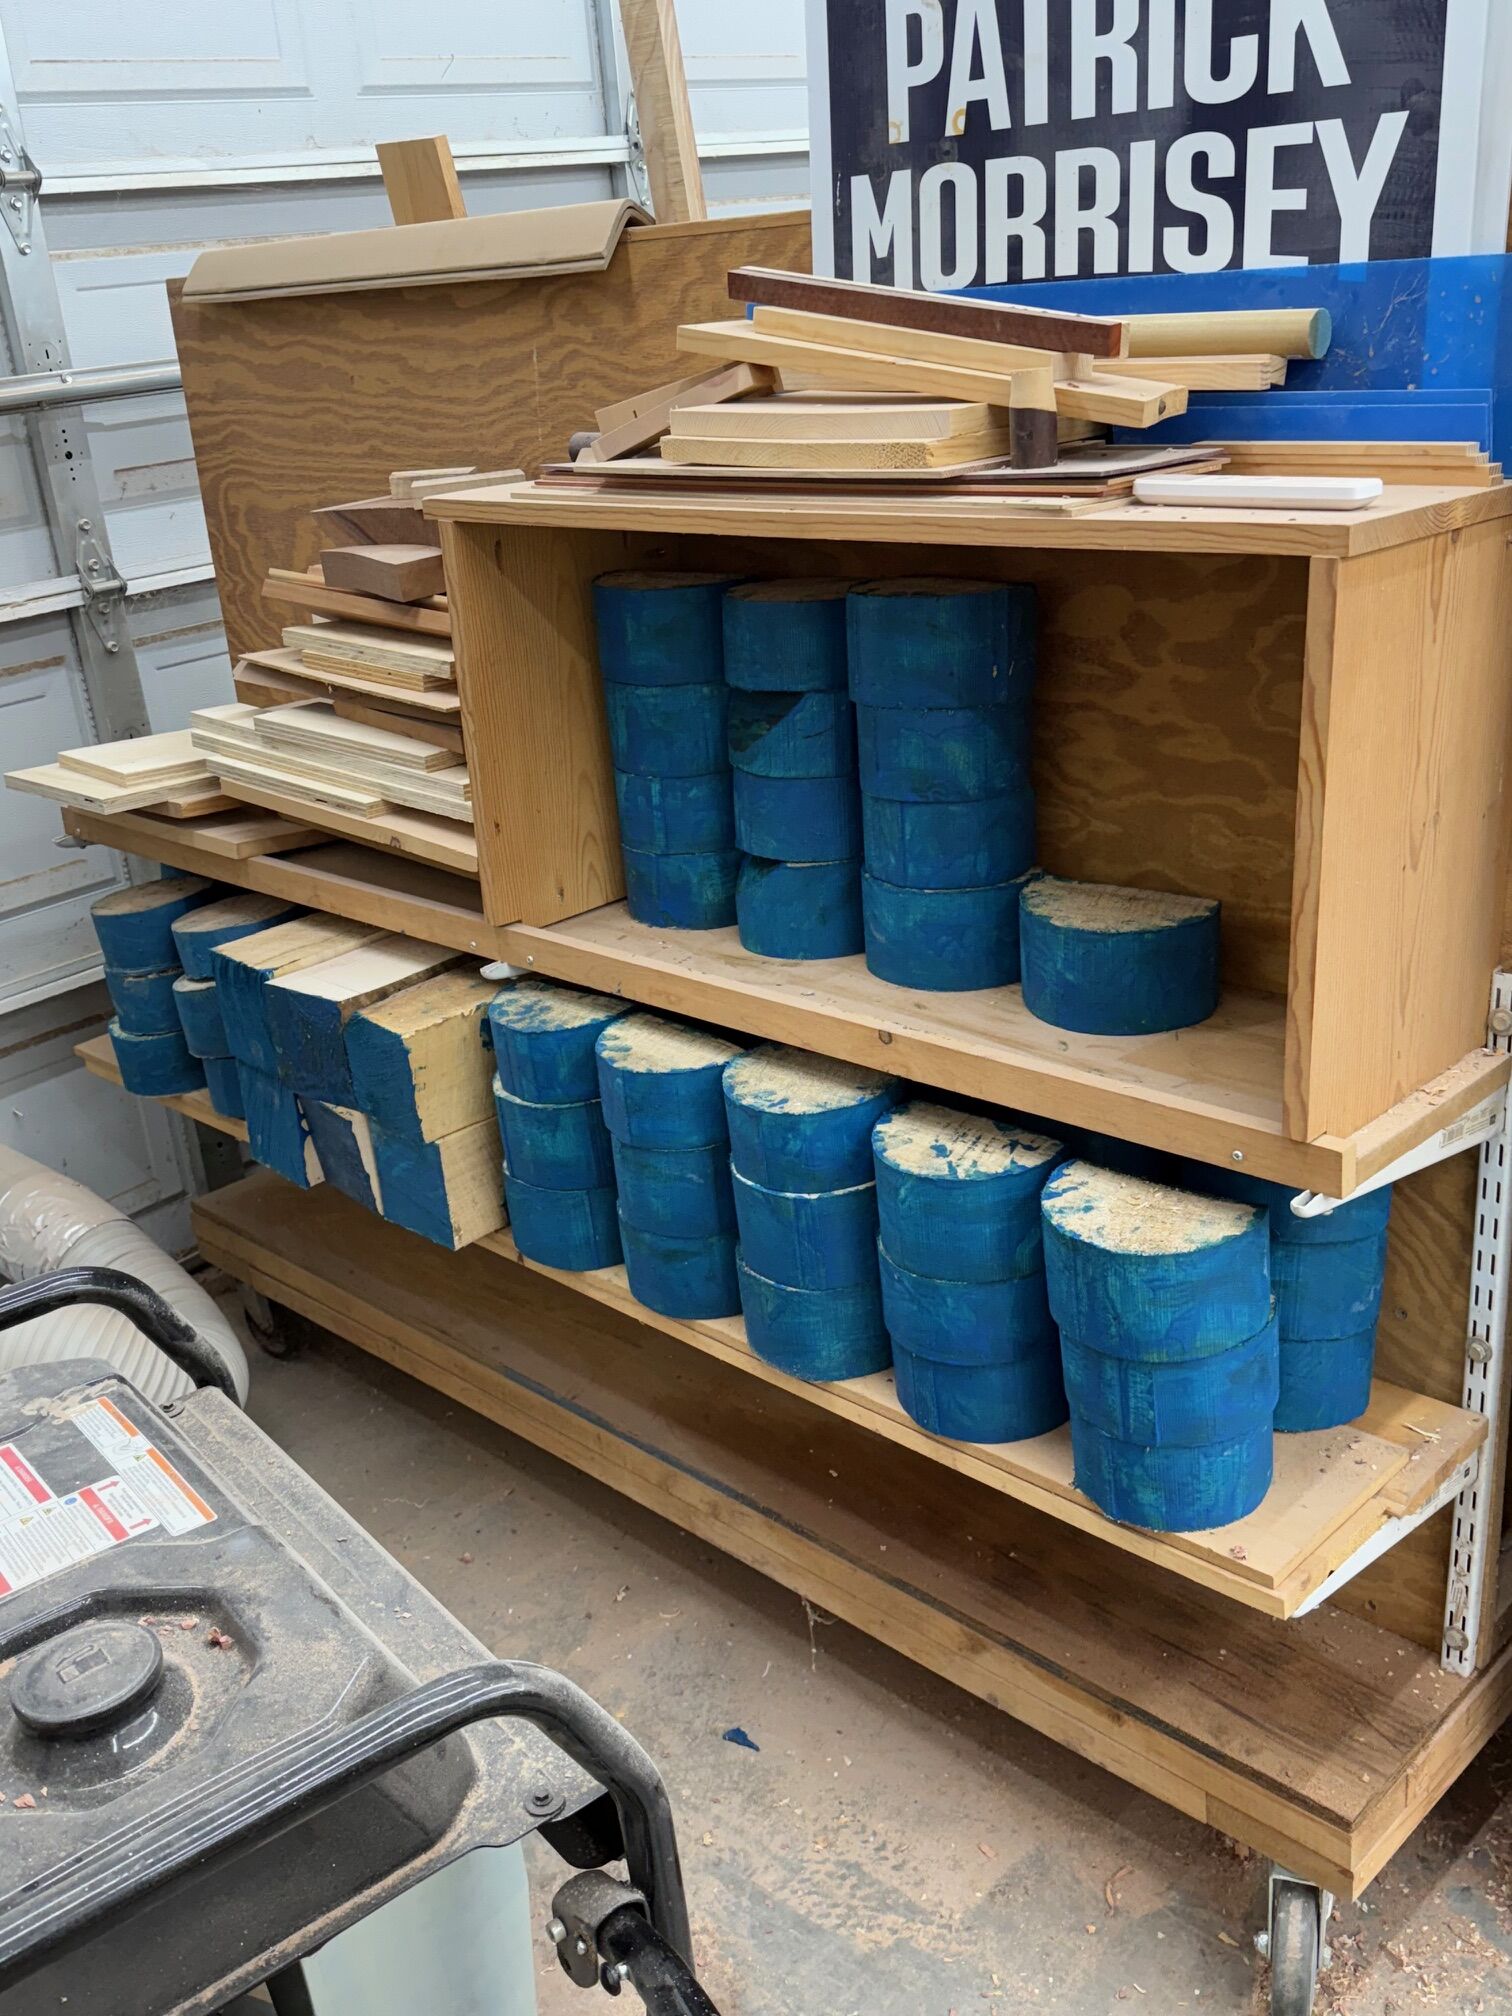
I got a load of 3” thick maple and 5” thick maple. I cut the 5” into a few large bowl blanks and large spindle blanks. The 3” thick I cut a bunch of 6-1/2” bowls for my Woodcraft classes and some 14” blanks for myself. The hardest part was trying to find storage for all of it.
- 6 replies
-
- 7
-

-
-
- maple
- bowl blanks
- (and 1 more)
-
Got a new toy, the vision pro from WeCreate, it's a 45watt diode laser. According to the manufacturer it will cut up to 1" thick soft wood. Haven't tried that but I can tell you it cuts 1/4 maple and walnut like butter. I've wanted to do something like this since I saw a similar ornament from Gwinnet wood workers on youtube several years ago. Anyway, this is the first one I've done taking advantage of my new capabilities. It's a walnut shaft with maple medallions that have a walnut inlay. Possibilities are promising with this I think.
- 11 replies
-
- 8
-
-
-
-
- lathe
- woodturning
- (and 5 more)
-
And a small cut-off of 1/4" Plywood... 1/2" thick Maple scraps...2 ends, 2 sides...Needed to set out a few tools.. Lay out some dovetail pins, and saw the lines... Chop out the waste, use these Pins to lay out the Tails, and saw the waste away from the tails...then a dry fit was attempted... 1 corner done, 3 to go.... Maple scraps started out like this... After resawing off the nasty side of 2 boards (still have one to do,,) Ripped down til they match for width... Planed off the saw marks... To come up with 4 sides of a box... Plywood was a left over from the last 2 Projects...might have a second one, lurking around in the shop...1 for a box bottom, one for a lid's panel? Stay tuned..
-
Our Patriot Turners @Headhunter is traveling farther down the rabbit hole of Ringmaster bowls! Here's another "Leaky Bowl"! Check out more images in Tony's post- @RustyFN shared a really nice resaw jig for the bandsaw. He says it works great for preparing his segment turnings- Rusty received lots of comments. Please check his post and see what you think! Rusty also scored some fantastic maple for turning blanks! I think he's trying to take over Steven Newman (aka The Bandit) for what he paid for the slabs! We had some more friendly teasing on Rusty's topic of carbide tools- A couple of new additions to our "What's On" Post @Fred W. Hargis Jr saw a neat little box with a drawer from Tim Yoder and decided to give it a try- Fred gives us more details in this entry- And Rusty showed us a gorgeous cedar shallow bowl he is turning. Great comments on this one, too- @Gerald posted this in the "Good Monday Morning" forum. He and his Mrs are getting ready to move into their new home and they needed some curtain rods. It wasn't until I got married that I learned the difference between curtains and window treatments- about $200 per window What's Coming Up- Cindy Drozda has a tool talk this Friday, October 24 Click on the "Watch on YouTube" button above/left to get a notification of the start. EDIT: https://streamyard.com/watch/fJ7bC6unW7tZ Also from Lyle Jamieson- Here's the link for registration- https://www.cindydrozda.com/html/IRD.html For The Newbies- A couple of things from Mike Peace. Do yo really need a moisture meter? Mike Shares his thoughts- Mike also shares some tips for the beginning woodturner- Tomislav Tomasic did posted a couple of easy turning projects to help hone your spindle turning skills Expand Your Horizons- More skew practice while making a turned box, from Craft Supplies USA Tim Yoder posted this about the wheels on his steady rest- Turning Time With Easy Wood Tools- Since I started using faceplate rings, I rarely remove my chuck from the lathe. This video, from McCullim Woodworking, demonstrates just how "easy" it is to mount a blank using Easy Wood Tools products- The Yorkshire grit can really bring out the luster of wood and epoxy/acrylics- It's going to be a super busy weekend for the Easy Wood Tools demonstrators. Check out these Woodcraft locations for one near you and stop in to see the tools in action. https://www.woodcraft.com/pages/store/cincinnati https://www.woodcraft.com/pages/store/orlando https://www.woodcraft.com/pages/store/sacramento https://www.woodcraft.com/pages/store/raleigh https://www.woodcraft.com/pages/store/tulsa https://www.woodcraft.com/pages/store/harrisburg-york https://www.woodcraft.com/pages/store/orlando Woodcraft stores are promoting Easy Wood tools throughout the month of October. @Jordan Martindale New Turning Items- Everything Else- This popped up as the first video when I was checking YouTube for new turning ideas. Very little to do with turning but for all of us who still have fond memories of growing up using one of these Safe turning
-
Spalted maple.
- 818 replies
-
- 10
-
-
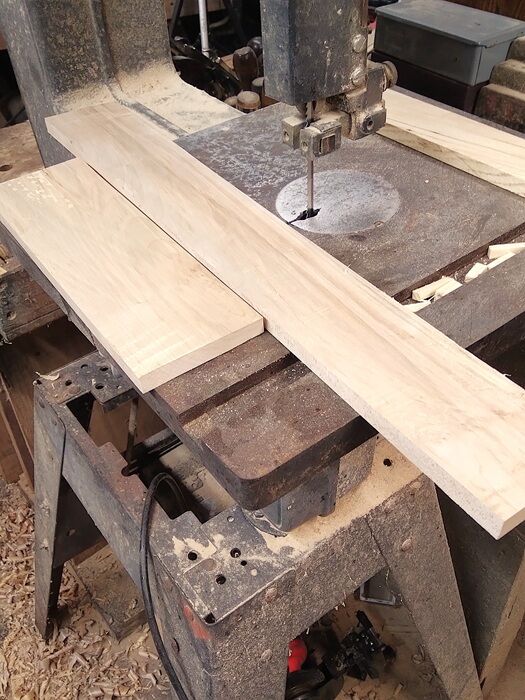
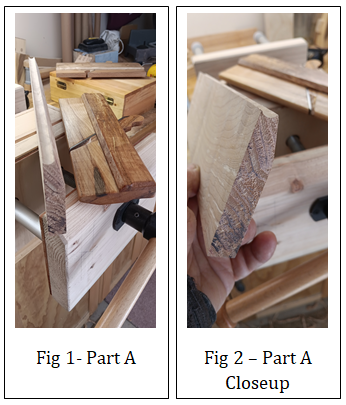
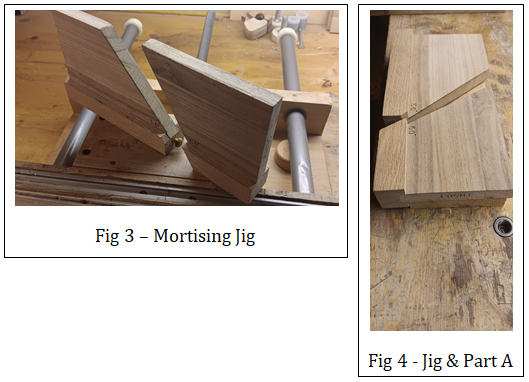
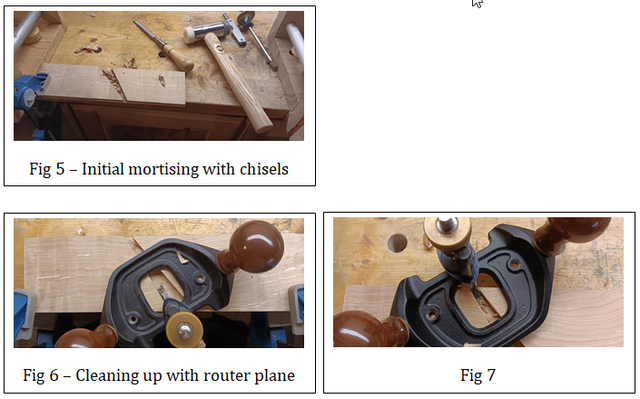
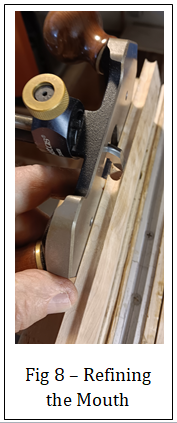
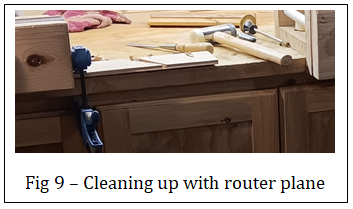
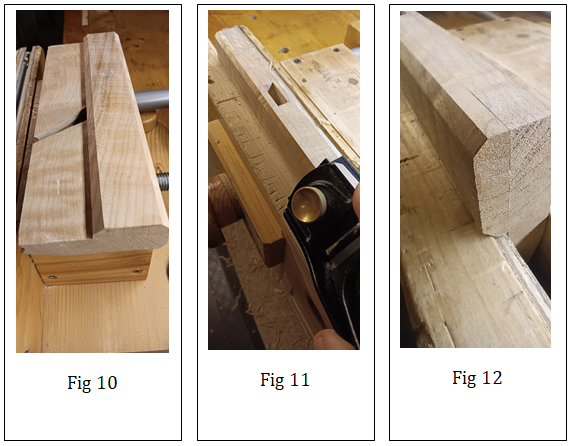
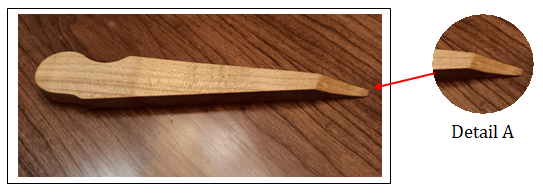
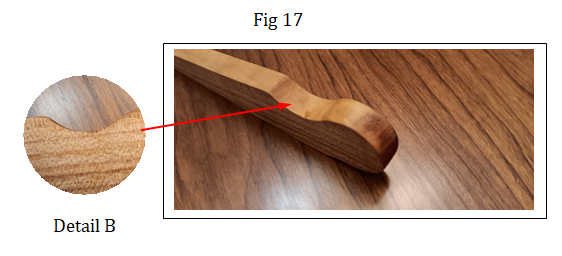
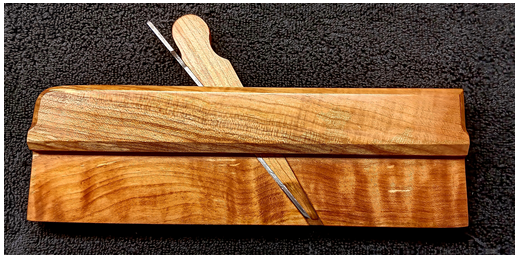
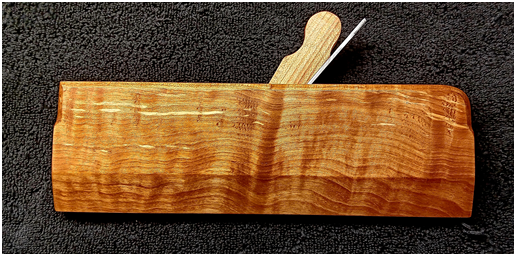
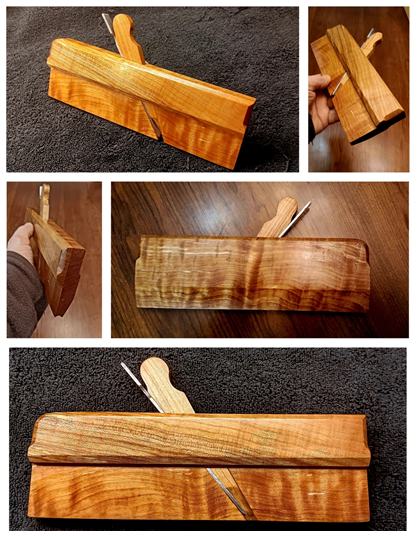
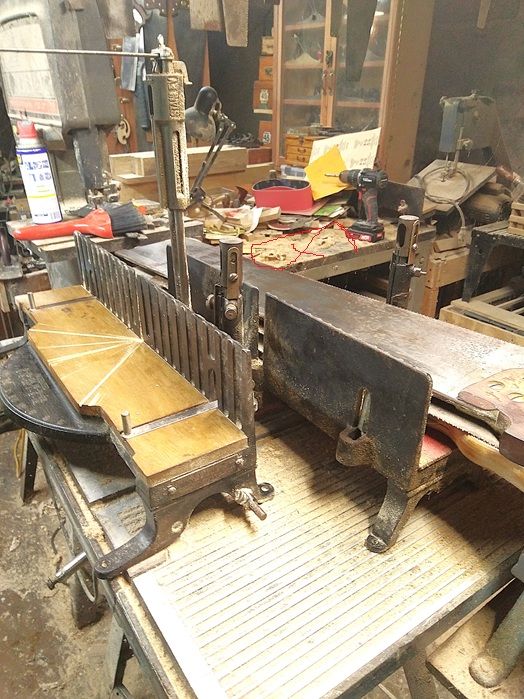
Introduction I enjoy doing most of my wood working projects with hand tools. I feel that I've become adept roughing stock with handsaws and squaring all four sides by hand planing. I've also become much better at joinery over the years with my favorite being handcut dovetails. One area that has intrigued me is creating mouldings with hollow and round moulding planes. Pursuing this has taken me down the road of making moulding planes. It has been a delightful pursuit. In addition, I make the blades or cutters and go through the whole heat treatment process. The Beginning I started by cutting two finished blanks out of Spalted Maple. These two blanks make the complete body of the plane. The first one (Part A) was milled to 5/8" thick x 3-1/8" high x 10" long and is the main body and left side in one piece. The second (Part B) was milled to 3/8" thick x 1-9/16" high x 10" long and is the right side that is laminated to the first piece. This plane will be a No. 2 ( 1/4") Round Moulding Plane. In Fig.1, it's mating plane, a 1/4" Hollow Moulding Plane sits on the right. It was used to make the 1/4" round groove as shown for the new plane on the left. When done this will make a matching set of 1/4” Round and Hollow Moulding Planes. See the closeup of the new plane's bottom in Fig 2. Mortising the Escapement Area Now it's time to mortise the escapement area for the blade's bed, cheek, throat, mouth, etc. I made this jig, see Fig 3 below, that I use for locating the bed angle at 50° and the wedge face at 60° on Part A. The jig has an adjustment screw that allows me to fine tune the mouth opening for Blade and Wedge. I can explain further how I use this jig if anyone is interested. Once I have the jigs placed where I want them (see Fig 4), I clamp them down on Part A to the bench and scribe the mortise cavity to be cut. Initially I cut the mortise cavity boundaries using my chisels (see Fig 5) Then I use my Lee Valley Veritas Large Router plane to excavate the cavity as shown in Fig 6 and 7. Here in Fig 8, I’m refining the mouth with the router plane. Fig 9 shows how I’ve clamped it to the bench while mortising. Laminating and Shaping Next in Fig 10, I laminated the Right Side (Part B) to Main Body (Part A). I then started chamfer detailing . In Fig 11 - 13, I am chamfering along the top edges and bottom edge of the Right Side (Part B). In Fig 14 & 15, I have done Stopped Chamfers for the front and back corners. The Wedge Next I shape the wedge Per Fig 16. As mentioned earlier the bed angle is at 50° and the wedge face at 60° on Part A. The wedge will be a 10° angle and is approx 6” long. Making the angle slightly larger initially then fine tuning to fit the mortised area is advisable. Detail A shows the curvature required for the shaving to climb up and out as you are planing. Fig 16 Per Fig 17, this is the notch, Detail B, for assisting in wedge removal. Blade This is the complete 1/4” round blade per Fig 18. I didn’t go into detail here with the whole process of shaping, heat treating, honing, etc. Again if anyone is interested and has questions please let me know. Fig 18 Finishing To start I coated all the plane body (except the bed) and the wedge with two coats of 50/50 cut Tung oil. Per fig 19. I let this cure for one week. Fig 19 Then I brush coated with two coats of Shellac and allowed to dry overnight. The actual sole is left only with the tung oil coating. After this, I French polished with shellac to make the grain “pop” per Fig 20. Fig 20 Finally per fig 21, I coated and buffed eveything with wood butter except the bed and bottom of the wedge. Here’s the completed 1/4” Round Moulding Plane per Fig 21 and Fig 22. Fig 21 Fig 22 Thanks for Looking! Cheers! MrRick
- 7 replies
-
- 4
-
-
-
- plane
- moulding plane
- (and 3 more)
-
My closet restoration has a slight delay of a few days before I can demo the old closet. I spent some time creating the MFT table but today I built two plant trellis for the front porch. I made them out of scrap leftovers of maple and sapelle. I went to Lowe’s and HD to just buy them but the stuff they were selling was pretty much garbage. It’s all screwed and glued with Type 3 so hopefully it will hold up for at least a few years. Paul
-
Decided to clear off a spot...donated an un-used MitreBox and saw...that was just sitting around and getting rusty.... Had 2 to send over to the Lutheran's Thrift Store...the area back there in the red circle...needed cleaned off.... Thing with a motor? A Wen Power Planer..about the size of a Stanley #5 Jack plane, and 3 times the weight... Had a stash of Ash planks I was going through, cutting out the bad areas....I sorted through the stacks...found enough to lay out... Imagine the ones laying flat as Drawer Fronts, and the ones standing up on edge as the dividers between the drawers...this gave me a measurement as to how TALL a case I needed to build...20"...then from there, I got a depth of 16" and a width of 24"...roughly... Next, find enough parts that were long enough to make a panel for the top, and 2 panels for the sides.. Cross cut a few for length...and laid out for the top panel.. left stick needed ripped down a bit(Didn't feel like lowering the saw blade just yet) Ripped that extra off, along with the defects along the outside edge...rearrange a few boards...some needed to be jointed.. We have ways... worked my way through, until.. Last edge...then set up for a glue up..(lowered the saw blade, this time) Spread a bead of glue along one edge, rub that edge against the next edge..repeat as needed...1 clamp on top, 2 clamps underneath..let this heavy mess sit a spell... Sorted out enough boards for one of the 20" long/tall sides... These will need cross cut, and the one on top need ripped down a bunch...then repeat for the other side panel... Same here, these need cross cut for length, jointed and maybe one ripped for width.. Plan at the moment...top corners will get through dovetails...and maybe a slight round over...Bottom divider, will be the "bottom" of the case...and sit in a rebate...may add feet of some sort. Maple runners for the drawers to slide on, front "dividers" out of Ash...both the runners and the dividers ( other than the bottom) will be in sliding dovetails...back of case is to be 1/4" plywood, glued and screwed into a rebate along the sides and the underside of the top... Then, build 5 drawers.. Should be fun, stay tuned...
- 60 replies
-
- 11
-
-
Most here know these have a been a staple for me for several years. Here is the latest batch of mason jar honey dipper lids. These will go to a local bee keeper who sells her honey in pint mason jars. Assorted Indiana hard woods. Graphics are done with a small hobby laser.
-
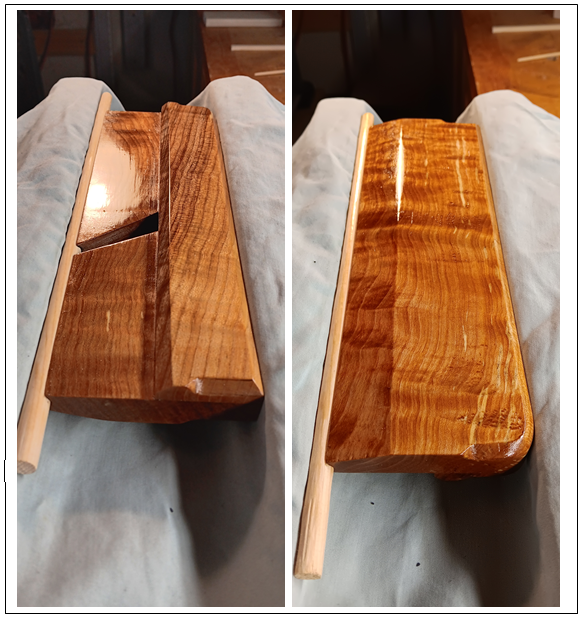
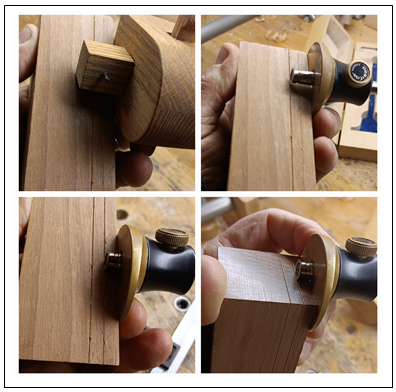
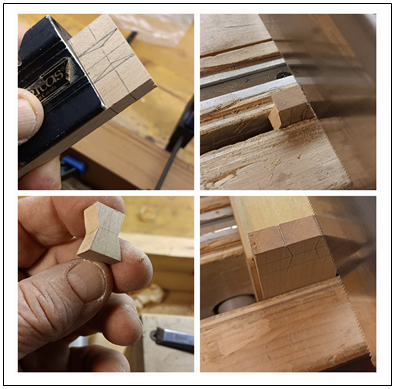
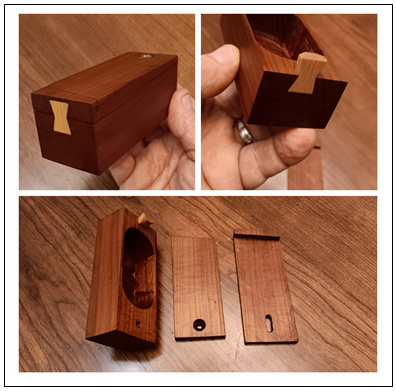
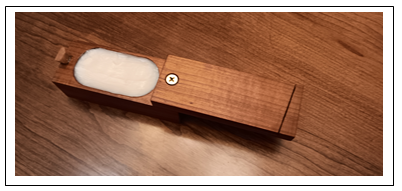
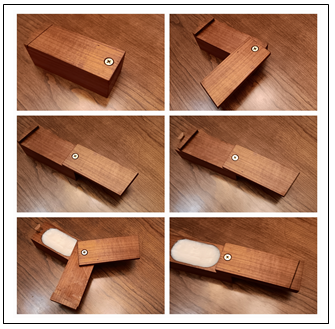
INTRODUCTION It seems like everyone has made a grease box except me. I never heard of one until seeing Roy Underhill's Grease Box Video of "The Woodwright's Shop". After making this, I'm hoping I'll now belong to a GBOC ( grease box owners club). LOL! I didn't have any Walnut but did have lots of Spalted Maple, Eastern Hard Rock Maple, and Torrefied Maple. So I decided to make mine out of the latter two. PREPARING STOCK and SCRIBING I found a chunk of Torrefied Maple, which I used for the box. I roughed out the size to 4-1/8" L x 1-5/8" W x 1-5/8"H. In Fig 1, you'll see the steps of marking up the parts with a couple of my gauges. I lightly scribed two lines 5/16" in and apart with one of my homemade gauges. When finished they'll be 1/4" thick. Then, I used my LV micro adjust wheel marking gauge to go over the scribed lines. I didn't want any ragged lines from the pin type cutter left by my home made gauge. Fig 1 SEPARATING PARTS In Fig 2, I began by separating the parts into a Cover lid, Locking lid, and the main body. I used my LV Dovetail Saw 20 TPI, and a Japanese Ryobi pull saw. Fig 2 MAKING the BUTTERFLY DOVETAIL I'm not sure what to call this. It's butterfly shaped like a spline yet operates when closing the lid like a dovetail. Ergo, I call it a "Butterfly Dovetail". I made it using the Eastern Hard Rock Maple and with my LV extra fine dozuki saw. The part, Fig 3, was a bit small for me to handle and finicky, but I managed okay. It's not perfect but will do. This part, as everyone probably knows, acts as a locking feature for the Cover Lid, which slides into it. Then the Locking Lid swings around and locks the Cover Lid and everything into place. To see how this operates look at the Grease Box Video from Roy Underhill's of the "The Woodwright's Shop". Fig 3 SANDING and REFINING Sanding the parts was slow. Torrefied Maple is hard as a rock. It's also difficult to chisel end grain because it's a bit brittle. Having said this, when done and being successful, it yields beautiful smooth results. I used 80, 150, and 220 grit. FINISHING Finally per Fig 4, I finished all the parts with two coats of a 50/50 cut of pure Tung Oil. I let this dry for a couple of nights. Then I applied wood butter and polished. Fig 4 Here’s my Grease Box full of my home made “Wood Butter” Fig 5 Here’s the Grease Box opening process from left to right, top to bottom. Fig 6 Conclusion All in all it was a nice little project. There were a few hiccups but it was fun. It seems a little small but I wanted to try one to see how it went and maybe it will lead to making another larger one. Thanks for Looking! Cheers! MrRick
- 6 replies
-
- 9
-
-
-
-
- grease
- grease box
- (and 2 more)
-
I have been getting tired of changing hoses on the shop vac every time I need to change tools so I built a distribution box with blast gates to solve the issue. Paul
-
The only picture I got of the wedding shower gift before it was wrapped. Walnut, maple and purple heart. Approximately 16" x 10". Woodcraft Magazine article for the idea. Made a bunch of these years ago for Christmas presents.
-
Was asked to make a couple of charcuterie, or as I call them charcutie or coochiecoo, boards. Did these out of 5/4 16 x 11 maple. Still have to put oil or conditioner on them yet. Don't know if they'd sell or how much to charge. Made about a dozen of them.
- 4 replies
-
- 8
-
-
-
- charcuterie
- maple
- (and 1 more)
-
I have been meaning to build a storage unit for under the lathe for some time. I got the delivery of the maple for the closets so I decided to use some of it to build the storage unit. It’s a simple 6 drawer chest. I assembled the carcass today and milled up the drawer stock. Paul
-
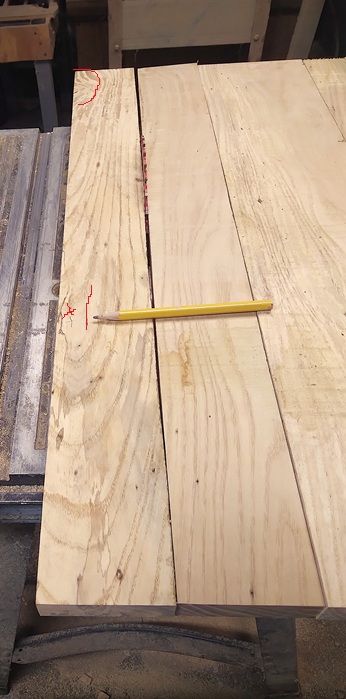
Been ripping and a-cutting on a few planks...and a Project has been started... Some of the parts.. Then a few more parts.. Some other parts needed a little help.. So...we help it out a bit..with a bit of Cardio thrown in.. The goal was to get rid of all the wane, and BIG knots...and fuzzy edges... One plank used to be a 1 x 8 x 6'...took a while...but.. One board was rejected..wonder which one? Had a replacement handy... And..just to make the panel a tad wider... That "small knot"? might get shifted to the outside, and then sawn off.. Other parts.. 5/8" thick Soft Maple for the sides and back of a drawer...Ash for the 3 aprons and a drawer front...which leaves.. Needed for of these...to make tapered legs with...let them sit overnight, then... De-clamped them...set up the rip fence to just skim two faces...one to remove the glue lines, the second one was to skim of a face, to get rid of the "Fuzzies", 90 degrees to the first pass Passes #3 and #4..fence was reset to 1-1/2" width...and the other 2 faces were run through... Will have to trim the ends square..then decide which two faces to cut the tapers on... Until then.. I'll leave then clamped together. Need to joint a few edges... And get these 5 glued up into a top for a table.... Stay tuned..
-
Another pattern by Steve Good. This one is cut from 1/4 Baltic Birch with a stained maple background. I think it turned out pretty good. The small letters made for quite a challenge. obtw - if you cut it, be aware that the "Great Seal" is backwards in the original pattern. The arrows are always on the right side with the olive branches on the left.
-
For our next presidents challenge at our club our president picked an 11” tall vase with two embellishments. I decided to do a basket illusion vase so I have beading, burning and coloring. Here it is from start to finish. It was turned from hard maple.
- 7 replies
-
- 9
-
-
-
-
- vase
- basket weave
- (and 1 more)
-
Have laid in a supply of Lumber.. All 1 x 6s...first 4 are Maple ( not sure which type) some are fairly decent.. And one that will take a bit of work to use.. Plus a BIG knot down on the end...3 out of 4 are good enough...Can cut around this a bit, for the smaller parts.. This corner needs cleaned out/up.. DVD Cabinet needs an extension add to the door, as it is too shallow to close up nicely. Old Pine Table is too small, and too short...and the Cats have been using a leg as a Scratching post.. And that corner needs a good cleaning out, and block any Access to Cats Entry.... Top needs to be 26 x 22, and the height needs to be just under 32" Maple Table Project for March? And an Ash repair/upgrade to the DVD Cabinet? Provided of course, that I finally figure out how the editing program works in this New Computer Tower....those 5 photos took almost an hour to edit!
-
Our city just cut down a large silver maple tree. I picked up a few pieces for bowls. I’m trying to decide how I want to cut this as I normally cut out the pith area. This one intrigued me as it is a Y. As you can see one pith on one side the other has two. I think it might make I nice produce an interesting interior but I can’t decide how to slice it. Any thoughts?
- 7 replies
-
- 4
-
-
- pith
- silver maple
- (and 2 more)
-
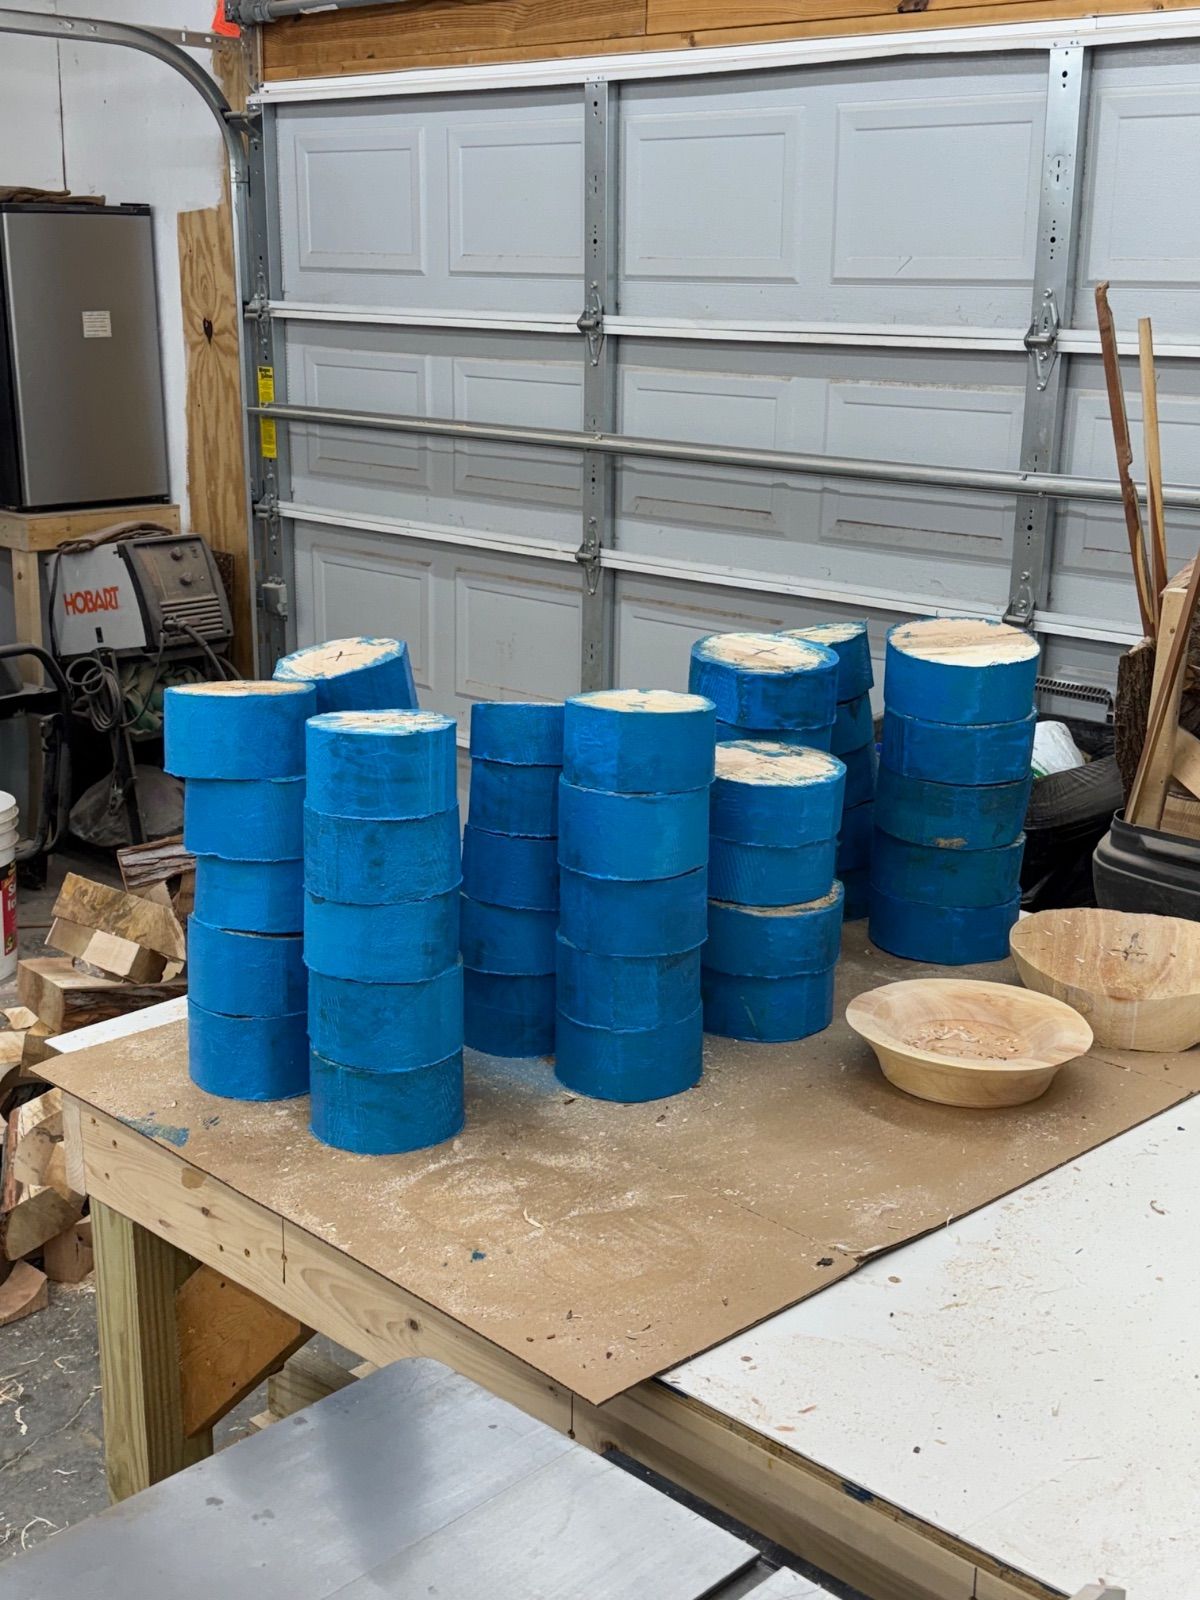
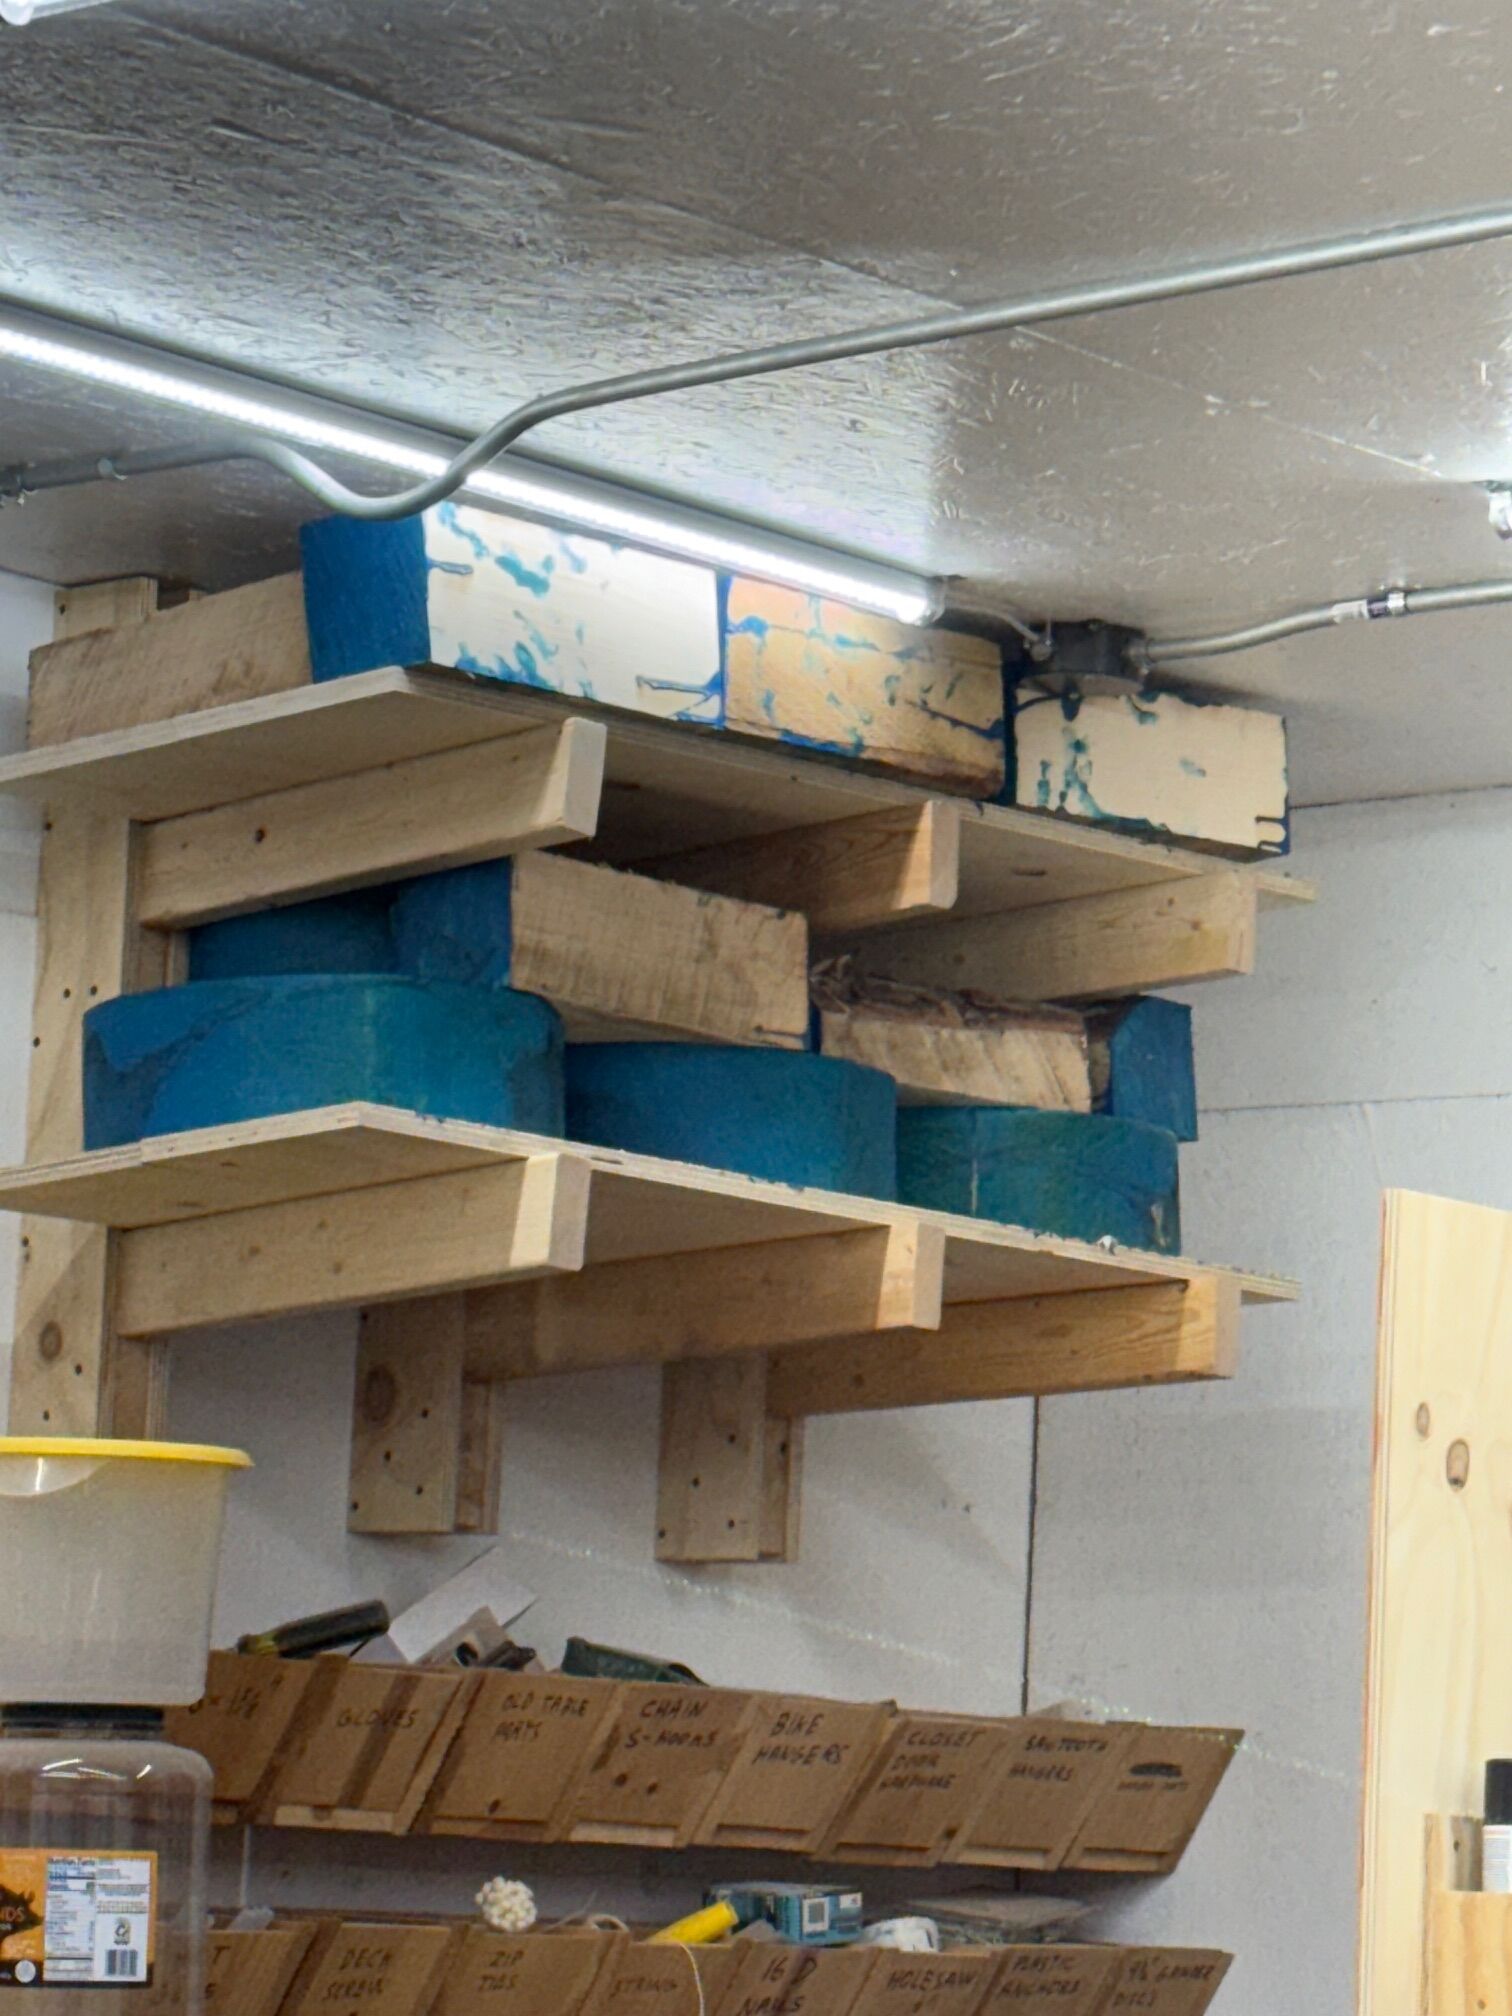
A friend of mine called me and said a co-worker had a maple tree cut down and gave me the address. I went to check it out and everything was cut 8” to 10” thick. Too small for what I like to turn. My mentor gave me the idea to cut a bunch of small blanks for my Woodcraft classes. I thought that was a great idea. I brought home 4 pieces around 2’ in diameter. I got 25 6” blanks and 17 7” blanks all around 3” thick.
- 12 replies
-
- 8
-
-
-
- maple
- bowl blanks
- (and 1 more)
-
When the city has to cut down trees the dump them on a lot, free for the taking. I drove by on Thursday and noticed they brought in a a big silver maple tree. I wasn’t able to get there until today and the firewood folks had already cleaned out the easy pickings but I did find this large hunk, made me wish I had a bigger chain saw then my little 18” but I managed to cut from both sides and pick up some pieces. Didn’t take many pictures. It’s very wet but the plan is to rough them out, coat the end grain with anchor seal till they dry out. all in all a good score for me.
-

From the album: Genn Spain
-
Our next project is a linen closet. Took the old doors off and emptied it out today. Tomorrow demo. It will involve a drawer bank with aromatic cedar drawers, two banks of lazy Susan’s and shelving. We will use maple and sapelle. There will also be three sliding doors to match the doors we just finished. Paul
- 34 replies
-
- 10
-
-


.png.36ea96fbc3b7c02018de36f9eed2cbee.png)


.png.0e638802bbd679beed42913de306ea3d.png)

.png.89a72a08e25b525ff6a6b7f544d9f1e3.png)
.png.692a1153bb1223fb1e3ab5ed46bcaa8d.png)