Search the Community
Showing results for tags 'Box'.
-
Our Patriot Turners @Headhunter is traveling farther down the rabbit hole of Ringmaster bowls! Here's another "Leaky Bowl"! Check out more images in Tony's post- @RustyFN shared a really nice resaw jig for the bandsaw. He says it works great for preparing his segment turnings- Rusty received lots of comments. Please check his post and see what you think! Rusty also scored some fantastic maple for turning blanks! I think he's trying to take over Steven Newman (aka The Bandit) for what he paid for the slabs! We had some more friendly teasing on Rusty's topic of carbide tools- A couple of new additions to our "What's On" Post @Fred W. Hargis Jr saw a neat little box with a drawer from Tim Yoder and decided to give it a try- Fred gives us more details in this entry- And Rusty showed us a gorgeous cedar shallow bowl he is turning. Great comments on this one, too- @Gerald posted this in the "Good Monday Morning" forum. He and his Mrs are getting ready to move into their new home and they needed some curtain rods. It wasn't until I got married that I learned the difference between curtains and window treatments- about $200 per window What's Coming Up- Cindy Drozda has a tool talk this Friday, October 24 Click on the "Watch on YouTube" button above/left to get a notification of the start. EDIT: https://streamyard.com/watch/fJ7bC6unW7tZ Also from Lyle Jamieson- Here's the link for registration- https://www.cindydrozda.com/html/IRD.html For The Newbies- A couple of things from Mike Peace. Do yo really need a moisture meter? Mike Shares his thoughts- Mike also shares some tips for the beginning woodturner- Tomislav Tomasic did posted a couple of easy turning projects to help hone your spindle turning skills Expand Your Horizons- More skew practice while making a turned box, from Craft Supplies USA Tim Yoder posted this about the wheels on his steady rest- Turning Time With Easy Wood Tools- Since I started using faceplate rings, I rarely remove my chuck from the lathe. This video, from McCullim Woodworking, demonstrates just how "easy" it is to mount a blank using Easy Wood Tools products- The Yorkshire grit can really bring out the luster of wood and epoxy/acrylics- It's going to be a super busy weekend for the Easy Wood Tools demonstrators. Check out these Woodcraft locations for one near you and stop in to see the tools in action. https://www.woodcraft.com/pages/store/cincinnati https://www.woodcraft.com/pages/store/orlando https://www.woodcraft.com/pages/store/sacramento https://www.woodcraft.com/pages/store/raleigh https://www.woodcraft.com/pages/store/tulsa https://www.woodcraft.com/pages/store/harrisburg-york https://www.woodcraft.com/pages/store/orlando Woodcraft stores are promoting Easy Wood tools throughout the month of October. @Jordan Martindale New Turning Items- Everything Else- This popped up as the first video when I was checking YouTube for new turning ideas. Very little to do with turning but for all of us who still have fond memories of growing up using one of these Safe turning

-
I've been dabbling with Greene and Greene techniques and features for boxes about a month now. I really enjoy it. I have also made a number of boxes using the Shou Sugi Ban techniques. So I decided to experiment making a box incorporating both these techniques. I started my making a box out of Pine and Cedar with box finger joints first as shown. This is a dry fit. No glue yet. I then started "pillowing" the finger ends Next I loosely tacked on a plug to see how it would look. I decide to take the risk and move forward. So I bought square hole punches from Lee Valley. Once I got the punches, I started making square holes as shown on all four corners of the box. It was alot of work. I Shou Sugi Ban burned the Top (lid) Here's a view showing the brass hinges installed. Note how the box is contoured to lift the box off the surface. This is called a "cloud lift" There are several variations of this G&G technique. Here's a corner shot Here's the box open with my gent saw placed in it. Hope you liked it. Thanks for looking! Cheers!! MrRick
- 4 replies
-
- 3
-

-

-
- greene and greene
- shou sugi ban
- (and 4 more)
-
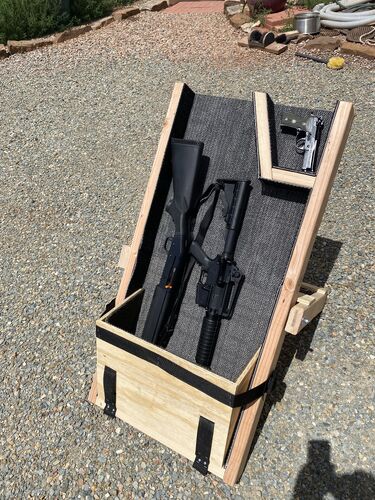
View File 3 Gun Dump Box Construction shows how to build a 3 gun dump box for competition use. Submitter DAB Submitted 10/20/2025 Category Yard and Outdoors
-
Version 1.0.0
13 downloads
This plan shows how to build a 3 gun dump box for competition use. -
 Instructions Welcome to our Glossary of Woodworking Joints. Feel free to edit and add terminology to this research page. Please follow the general guidelines as outlined below. Add only woodworking terminology that is widely used in the crafts, arts, trades and industry of woodworking. Avoid entering terminology that is used locally, or regionally. Please research your own entries, before entering them here, and verify that they are indeed accurate and reliable. A B Biscuit Joint - Crescent-shaped slots are carved into 2 pieces of wood, then an oval-shaped "biscuit" is glued into place to join them both. Keeps glued boards aligned while glue dries and strengthens the bond. Cut perfect biscuit slots with our Biscuit Jointers. Box - A corner joint with interlocking square fingers. Receives pressure from two directions. Bridle - The bridle joint is often defined as the reverse of a mortise and tenon, and is chiefly used in the carpentry and joinery trades. The name probably originated from the fact that it bears some resemblance to the manner in which a bit slips into the horse's mouth and is fastened to the bridle. Like Mortise and Tenon, but easier to make as it is open on three ends. Butt - The end of a piece of wood is butted against another piece of wood. This is the simplest and weakest joint. Of those, there is the a) T-butt, b) end-to-end butt, c) Miter butt and d) edge-to-edge butt. C D Dovetail - See various types of Dovetail joinery below: Through - A Through joint is where the end grain is visible from both boards. Through dovetail joints are most commonly used on box construction and carcass (framework of the piece). This joint is also called a plain dovetail by many in the woodworking community. In the past the ends showing through would have been masked by a veneer. Today they are a sign of exceptional quality and are left showing with pride. Half-blind - A half-blind dovetail joint also known as the single-lap dovetail joint is exactly opposite of a through joint because the end grain is not visible on the boards. Sockets house the tails at the end of the boards so the dovetail ends are invisible. Half-blind dovetail joints are commonly used for attaching drawer fronts. Secret mitered - A secret mitered joint is also know as a full-blind mitered dovetail and full-blind dovetail joint. Secret mitered joints are used in box work and cabinet construction and offers the best strength out of all of the dovetail joints. These joints are used for box work or fine cabinet construction where strength is needed without a joint you can see. Secret double-lapped - The secret double-lapped dovetail joint is kind of the like the mitered joint but has a visible section of end grain on a single edge of the joint. similar to the secret mitered dovetail, but presents a very thin section of end grain on one edge of the joint. Secret double-lapped joints are used for box construction and carcass construction to hid the dovetails. Sliding - The sliding dovetail joint is created by joining two wood boards at 90 degree angles, where the they intersect different than other types of dovetail joints. They intersect by sliding the tail of one board into the middle socket of the other. Sliding dovetail joints are commonly referred to French Dovetail joints. Sliding joints are commonly used to joint cabinet sides to shelves, sides to cabinet bottoms, shelves to horizontal partitions, table frames to adjacent sections, sides to drawer fronts, cabinet sides to front rails, body and neck in guitars and violins. Doweling - Doweling is the term generally given to the method of jointing timber and other materials by wooden or metal pegs, which are called dowels. For cabinet-making and similar work straight-grained beechwood dowels are mostly used; these may be bought by the gross, in lengths of about 36 ins., and of any desired diameter. Draw bore - The draw bore joint method of joinery is typically used in a mortise and tenon joint. Some times in order to add additional strength to a mortise and tenon joint the crafts-person will bore through the joint and add a pegs or dowels to secure the tenon to the mortise, going a step further, one would also bore a hole(s) in the mortised part, then bore a hole(s) in the tenoned part that are offset slightly, then insert and ram home a trenail or trunnel pin, the tenoned part will draw tightly into the mortise. Doweling Joint E Edge Joint - Used to connect 2 boards along their length. Edge joints are usually glued, and are made stronger with complementary interlocking protrusions. The profile expands the edge-to-edge glue surface, but more importantly, produces the precise surface alignment that’s essential for fast glueups. F Finger Joint - (also known as a comb joint) A woodworking joint made by cutting a set of complementary rectangular cuts in two pieces of wood, which are then glued. To visualize a finger joint simply interlock the fingers of your hands at a ninety degree angle; hence the name "finger joint." It is stronger than a butt or lap joint, and often forms part of the overall look of the piece. G Glued - The glued joint is made by planing two pieces of timber so that when placed together they are in contact with each other at every point; they are then usually united with glue. Alternative names under which it is known are the butt joint, the rubbed joint, the slipped joint, whilst in certain localities it is known as the slaped (pronounced slayped) joint. Glued Joint H Halved - The halved joint is frequently known as half-lapping, and sometimes as checking and half-checking. In the majority of cases it is made by halving the two pieces, i.e., by cutting half the depth of the wood away. There are, however, exceptions to this rule, as in the case of "three-piece halving" (or, as it is sometimes called, "third lapping") and in the halving of timber with rebated or moulded edges. Halving is one of the simplest methods of connecting two pieces of timber, especially where it is desired to make frames and bracket supports for either inside or outside use. Halved Joint L Lap - or Halfing Joint - The end of a piece of wood is laid over and connected to another piece of wood. Due to a large surface area of long-grain to long-grain wood and glue surface coverage, this is a very strong joint. There are many versions of the lap joint but they all involve removing half of the wood from each piece using a saw, chisel, or router. 1/2 of the wood material on both pieces is removed, weakening the joint somewhat, but the two boards are aligned flush and stable. M Mitering - The term mitering is generally used to denote the type of joint used at the corner of a picture frame; or where two pieces of wood are beveled away so as to fit each other, as the skirting or plinth mould. In these cases the timber is cut so that the joint is at 45 degrees to the face, and the two pieces, when placed together, form an angle of 90 degrees (a right angle). Mortise and Tenon - A mortise (or mortice) and tenon joint is a type of joint that connects two pieces of wood or other material. Woodworkers around the world have used it for thousands of years to join pieces of wood, mainly when the adjoining pieces connect at an angle of 90°. In its basic form, it is both simple and strong. Mortise Corner Stub - Foxtail - Haunch - Tenon Bare Faced - Feather - Pinned - Stubbed or Stump - P Pocket-hole - Simple to make and often seen on manufactured items as it is easy to reproduce using a jig. Drill holes at an angle to both pieces for a stronger joint. For very best results, use a Forstner bit, which are well known for their ability to drill clean and chip-free holes in wood. S Saddle - The "saddle joint" is used for connecting upright posts to heads or sills of framing, and undoubtedly takes its name from its similarity to the way in which the saddle fits the horse. It does not weaken the framing as does a mortise and tenon joint, and shrinkage has little effect upon the joint. Saddle Joint Scarf - The method known as "scarfing" is used for the joining of timber in the direction of its length, enabling the workman to produce a joint with a smooth or flush appearance on all its faces. One of the simplest forms of scarfed joint is known as the half lap, in which a portion is cut out at the end of each beam or joist, equal in depth to half the full depth of the beam, and of equal length to the required scarf. Plated Sarf Joint T Tongued and Grooved - The tongued and grooved joint is used in one form or another throughout the whole of the woodworking trades, covering, as it does, a great variety of work from the laying of flooring boards to the construction of dressers, bookcases and other cabinet work. As the name of the joint implies, one one board a groove is created, on the joining board a tongue is created, and the two are married or matched together. Tongue and Grooved Joint Tambour Joint - A tambour joint is made with a ball and socket for joinery that allows movement between wood pieces, such as a roll-top desk or breadbox door. This joinery does not require glue or fasteners. The interlocking joint allows the joined pieces to move, flex, and move along a track.
 -
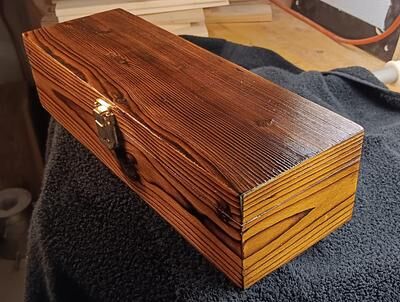
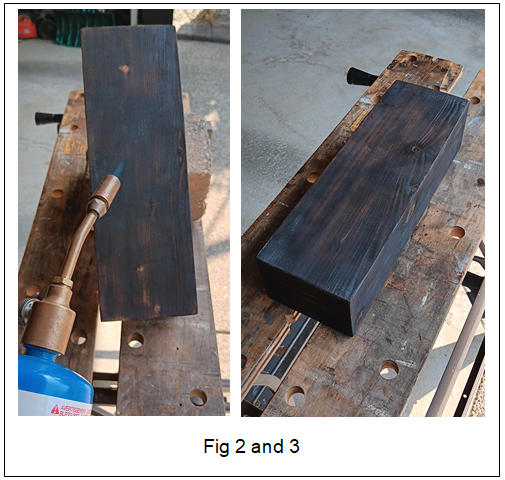
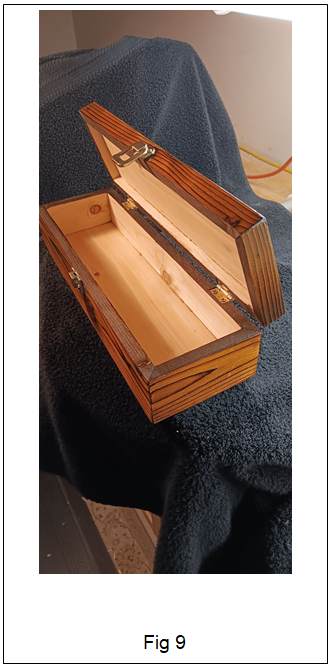
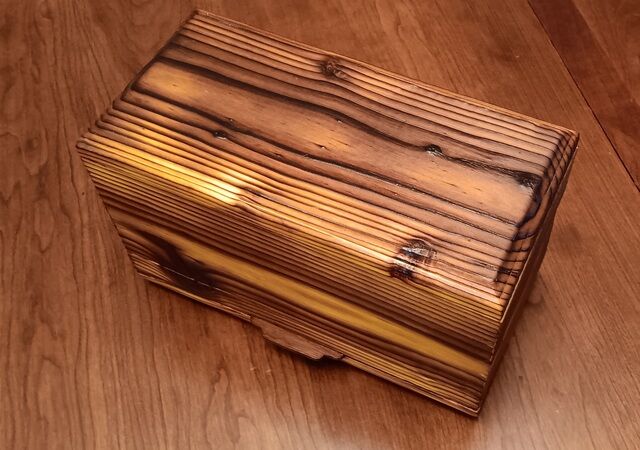
INTRODUCTION It's been a long time since I made a fully, all sides, mitered box. As miters go, It is the ugliest box I've ever made. I mean "butt ugly"! Okay...okay...maybe not that bad but challenging! I think many of us may take mitering for granted and sort of dismiss making a whole box this way. To tell you the truth, I don't know why I did and then to add insult to injury I decided to finish the surface with the Yakisugi technique or "Shou Sugi Ban" as we call it in North America). MAKING THE MITERED BOX I started by cutting all sides on my tablesaw. Yes!... my table saw! As hand tool crazy as I am, I couldn't imagine doing all these miters and bevels by hand (hereafter just called "miters"). My blood pressure is high enough. And then I still could not get the miters as perfect as I wanted all around. Even using my tablesaw! LOL. Then it dawned on me... I'm going to torch the thing so perfect miters may not matter! It is highly likely there will be some separation from burning and minor gaps on the corners. But it will add to the rustic look I was after with this technique. We'll see. Next... I glued it all up. I'm usually very strategic and meticulous gluing up. However by the time I completed mitering, I didn’t mind being messy and just slathered it on. Here it is ..... "Plain Jane" in Fig 1. BURNING THE BOX So why am I doing this? I dunno. I like challenges or maybe I'm just "bonkers"! Next, I started the "Shou Sugi Ban" process and torched all six sides, edges, and corners. I wasn't after a deep "alligator skin" burn but rather an even medium surface burn. Some alligator skin char was acceptable. The look I was after was the "Kimo - Tora" as some call it. This is a good site to see the different ones. See Fig. 2 and 3. WASHING THE BOX With the grain, I then brushed away as much of the dry blackened ash surface as I could on all six sides. Next I washed all sides with the hose and brush cleaning away the dirty surface. See Fig 4 and 5. APPLYING THE STAIN After it completely dried out, I decided I wanted to give it a yellow dye stain followed by shellac. I went everywhere looking for a small size can like 236ml. Do you think I could find it? And on top of this the ones I did find were like $15 -18. But no yellow or orange. Man 'o man!... things have really gotten expensive and limited. The heck with it!! Anyways I made my own using Tumeric. One coat on all sides was all I needed. However Tumeric is a fugitive stain. Though you wouldn't agree if you got some on your clothes or the rug not to mention your hands. LOL. See Fig 6 and 7 FINISHING WITH SHELLAC To prevent future fading it was sealed with four coats of blonde shellac. First coat was a one pound cut. Second, third, and fourth coats were a two pound cut. Then brass hinges and clasp was added. Here's the results: See Fig 7, 8, and 9 Hope you all enjoyed this!! Feel free to comment, ask questions and thumbs up if you like it! CHEERS! MrRick
- 4 replies
-
- 3
-
-
- miter
- shou sugi ban
- (and 2 more)
-
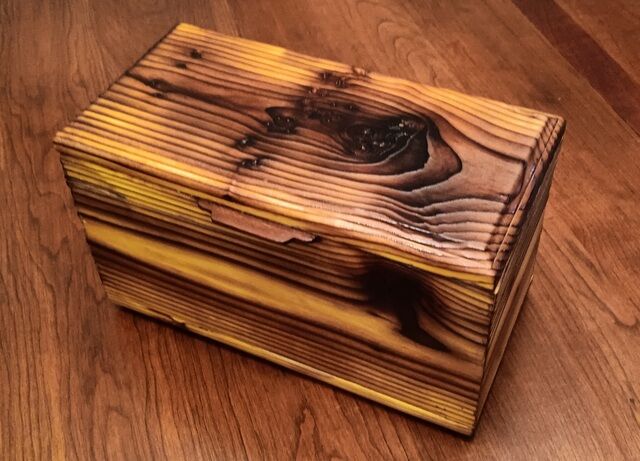
The Japanese have a wood burning process called " Shou Sugi Ban" With this Shou Sugi Ban process, I did a "Deep Burn" on a fully mitered Pine box. Then wire brushed it Zoom in and check out the grain. I then dyed it. Afterwards, I gave it three coats of 2 pound blonde shellac. I made a lift handle.... look closely. Installed brass hinges.... Here's a view of the bottom. Feel free to comment, ask questions and thumbs up if you like it! Thanks for looking! Cheers! MrRick
- 9 replies
-
- 7
-

-
-
- box
- shou sugi ban
- (and 3 more)
-
Came home from work Thursday and found a wonderful box full of goodies for making Shaker Oval Boxes. I ordered this starter set to learn how to make the boxes, from John Wilson box maker. It includes everything to get started from the water pan to bend the bands, to the forms to make box sizes from #0 through #4 and the copper tacks, the finger templates and a few more items to get started. I have Mr. Wilson's books that I purchased previously and enjoyed them so much, and I completely enjoy the man as well, I decided to go one further and acquire the set to get started. Home | Shaker Oval Box WWW.SHAKEROVALBOX.COM My goal is to learn these sizes, then as I progress I'll make my own forms and finger patterns for the larger size boxes. Any competent woodworker can create this kit on their own, but the reality is, I do like supporting a craftsman when I can, when funds permit it, and since I have came to know John Wilson through his books and videos, I like the idea of giving him my business anyway I can. Thanks Mr. Wilson! I'll build oval boxes along with my chairs and stools and other Shaker crafts and other items as well, and someday I'll get good enough to hopefully supplement our retirement when the time comes. I'll keep ya'll abreast of my box making progress.
- 29 replies
-
- 10
-
-
- john wilson
- box
- (and 3 more)
-
.thumb.jpg.573d1497d0675219908c85aabefd797a.jpg)
Good Monday Morning Patriot Woodworkers! November 18, 2024
John Morris posted a topic in General Woodworking
Good Monday morning! Good Monday morning Patriot Woodworkers! What did you get done over the weekend, and what have you planned for the week ahead! Inquiring minds want to know. Please tell us what's happening in your shops, your life, and any events going on with you. Thank you for being here folks! Welcome new members To view our newest members and welcome them to our digs, please see our Members Page, you can "Sort" by join date and click on their names and be taken to their profile page where you can leave a message of welcome. Thank you for making our newest folks feel welcome. Featured topic Mr and Mrs @Smallpatch collaborated on this beautiful fireplace screen, what a wonderful family heirloom this will be, to be treasured for many years by all. Featured image @RustyFN created a beautiful winged box (vessel) with lid, see more at the topic Winged Box. Featured video This video features Harley Refsal, a woodcarver, teaching at the John C. Campbell Folk School. The school, founded in 1925, teaches traditional crafts and celebrates the heritage of the Appalachian region. Harley shares their expertise in Scandinavian flat-plane carving, demonstrating the techniques and discussing the history and symbolism behind the art form. -
I won the chapter challenge last year at our club with the lamp I made. That means I had to pick what everyone has to make for this years chapter challenge. I want to pick something that the newer turners could turn and the experienced turners could take to the next level. I chose a winged box. This is mine so far. Still have a ways to go.
- 16 replies
-
- 13
-
-
-
Our Summer fund raiser is still happening! Remember, this is to provide funds for the site operation and unexpected expenses. Our Patriot Turners- @AndrewB posted a couple of new items he is working on, check out his posts! And- We had a post on our "What's Off Your Lathe And Finished" by @kreisdorph. That Black walnut sure is lovely! What’s Coming Up- Cindy Drozda posted the video of her live tool talk event from last week. Always some great tips! Cindy and Todd Raines will be hosting a Woodturning Sharing event on August 2, 2024 https://community.woodturner.org/events/event-description?CalendarEventKey=22337b94-ff08-4811-a511-019074232f14&Home=%2fevents%2fird-demonstrations&_zs=ceDib&_zl=EQRA4 https://community.woodturner.org/events/event-description?CalendarEventKey=48fd6950-9604-44ed-b3d9-0190c7ad94e2&Home=%2fevents%2fird-demonstrations&_zs=ceDib&_zl=AQRA4 https://mawts.com/ For The Newbies- @AndrewB posted about learning to turn bowls. Member @Gerald was kind enough to locate a video from Stuart Batty on the subject. Reposting Gerald's link here- Also, here's a video from Kent Weakley on the correct use of the bowl gouge- Some great tips from Tim Yoder! Check out the one on turning speed. Expand Your Horizons- Do you do craft shows or just looking for some new ideas for turnings? Mike Peace has two neat turned "animals" that might interest you. New Turning Items- A couple of weeks ago, we posted a video from Todd Raines demonstrating the Robust "Tru-Arc" tool. Sam Angelo gives us his impression of the tool in this video- Everything Else- I did an Easy Wood Tools demonstration for The Catoctin Area Turners' club last Thursday in Leesburg, VA. I thought @Gerald would be interested in their Beads of Courage boxes shown during the show and tell portion of their meeting Well the rolling pin blanks are finally finished- yesterday! The demo/workshop is this Saturday. 24 blanks here and 2 more at the workshop location. I make my blanks 22" long and 2 x 2" square. The lathes available for the workshop max out at 15" and 17" so angles had to be adjusted for a pleasing look when turned. Also some of the supplied blanks were smaller that 2 x 2 all that required different cutting angles. Some blanks were larger (almost 3 x 3) and my jig for cutting the angles wouldn't let the saw blade reach a high enough point to cut the proper insert slots. Had to design another jig for those blanks. Now on to Mimi's honey-do list that has been expanding exponentially! Safe turning
- 2 replies
-
- 4
-
-
-
- bowl turning
- kkent weakley
- (and 28 more)
-
First time, for me, seeing this. Pretty cool.
- 7 replies
-
- 8
-

-
-
- stanley.number 70
- plane.
- (and 2 more)
-
I learned how to make simple storage boxes from a Youtube video. I liked the simple design but i felt it was lacking so I added a handle or two, knob for opening the lid and a way to support the lid in the open position. I feared the weight of the lid in the open position (180° from closed position) might pull the hinge screws out over time so I wanted some kind of stop just past the 90° angle. On the first box I used a chain as a stop but it was difficult to locate the right positions for the chain attachments, determine the right length of the chain and keep the chain out of the way when I closed the box. My final solution was to open the lid to the desired position, place a small block of wood under the edge of the lid and screw it in place. Not necessarily pretty but for utilitarian use I'll take function over form every time.
-
Jewelry Box Model with Compound Curves - I like to make "concept" models with Sketchup. This is my latest, Jewelry Box, a rather complex project that required some "workarounds" to get the most out of the program. What do you think? Is it okay to post these models that are not real world objects? Please forgive me if this is a duplicate posting. I thought I had posted here, but can't find it on the site. Dan
- 19 replies
-
- 8
-
-
-
- compound curve
- jewelry box
- (and 3 more)
-
We have a group of friends that has been meeting for quite a few years on Tuesday. We call the group Turning Tuesday. One of the older friends is more of a chip carver than a turner. He likes the boxes I have been making lately and asked me if I could make one out of basswood so he can chip carve it. The lid is Purple Heart because that is what he wanted. Here is the box, 8” tall and 5” in diameter. I can’t wait to see what he carves on it.
-
I had posted this earlier in what's on your lathe, it's the first lidded box I've tried. As I mentioned this piece of wood is what Tim Yoder might call "durnifIknow" and it was a tough piece to work with, very dry and hard...had quite a few cracks as well. You can see some of the splits around the cracks in the lid and the foot.Overall, the learning from doing this was priceless. I worked some more on the bottom and never got it the way I wanted but I'm pretty happy about the way the rest of it went. I realize this isn't one of those top caliper turnings you guys do, but someday (maybe) I'll get there.
-
There's a guy on a FB forum who has made the ubiquitous planter boxes from cedar pickets. He says, "Customer wants them painted/stained black, and sealed with a polyurethane." (Some of us) are trying to convince him that poly for an exterior finish and worse over paint, is a really bad idea.
-
Think I posted the beginning of this in a Monday or Friday post. Wife wanted something special for grandson’s graduation. She found a box and wanted to put a 1k bill in it . Don’t make those anymore. So how about 1k in gold , too much hassle. Do she buys a 1k watch and I make a box and get engraved. Box is Bubinga.
-
This one I 5.5” in diameter and 4” tall. This is from some of the kiln dried maple I got. I bought some new flock and used blue on this one.
-
Anyone tried the quarter/quarter/quarter method for boxes, drawers etc.?
-
My wife got this idea for grandsons graduation to give him 1K in a box. The cash part has changed but the box is a go with engraved $1000 bill on top of lid and Bible verse on inner side. Well the box is done and lid goes to engraving Friday . Holding on finishing till that gets done.
-
Vacillated on this or the Turning forum and this one won. I had a box with lid on the headstock of my lathe and every time I needed something inside it have to lift the top and probably drop something. So decided a drawer would work better. Used mostly scraps I had in the shop. Box was the easy part with an apron in front and the side toward the tailstock to act as slide guards. Used sliding dovetails for mounting drawer sides to face. Just happened that this piece of ply was a perfect fit for the bottom . Just had to cut it to length. Cut slots in sides for the back to fit and then glue it up. Had some Watco danish oil cherry from an estate to give the ply some color (not in pic) . Watco danish oil natural for the walnut front. Applied two blocks to underside on left and back to make a tighter fit to head stock. Waxed drawer sides and bottom. That little rim around the top makes a good retainer of round objects.
-
I’m still waiting for the laminated door verticals to cure so I thought I would make a box for my daughter. It’s an easy build using one pattern and the shaper origin. I used 1/2” SOSS barrel hinges for the lid. Paul
-
Our turning club has two TVs and sound system . We added two new microphones, a mixer and a PA speaker this month. The old DeWalt drill box is not large enough to handle all this so I set out to make a box which I fear is a bit oversize . However there will be padding added. measures about 18 l x 7.5 h x 12.5 deep. Did not want it to be too heave so planed the oak sides down to 3/8. As usual forgot pictures till done so staged on on the jig. This is what will go into the box plus the sound mixer. Router setup for finger joints. Had to change the clamps for 3/8 wood and didn't quite get it tight for first one and had to make a new end board That take care of and tight clamps left no problem. Laid out to check dado for continuity . The hard part here for me is to remember the order So I mark the corners to match. Test fit for sides. Now to make the top and bottom and hope I remember to take pics.
-
I'm reading a Fine Woodworking book on "Boxes, Carcases, and Drawers." It's just a collection of articles from the early days of FWW. One of them is by Tage Frid, one of the major authors of the day. He writes, "Furniture construction is broken into two main categories: frame and carcase. In frame construction, relatively narrow boards are joined -- usually with a mortise and tenon joint -- as in a chair or table base, or a frame and panel door. In carcase construction boards are joined end to end using dovetails, tongue and groove joints and the like, as in a drawer or hutch." Seems simple enough, huh?
- 5 replies
-
- 5
-
-
- tongue and groove
- dovetail
- (and 11 more)


.png.36ea96fbc3b7c02018de36f9eed2cbee.png)