
Search the Community
Showing results for tags 'paint'.
-
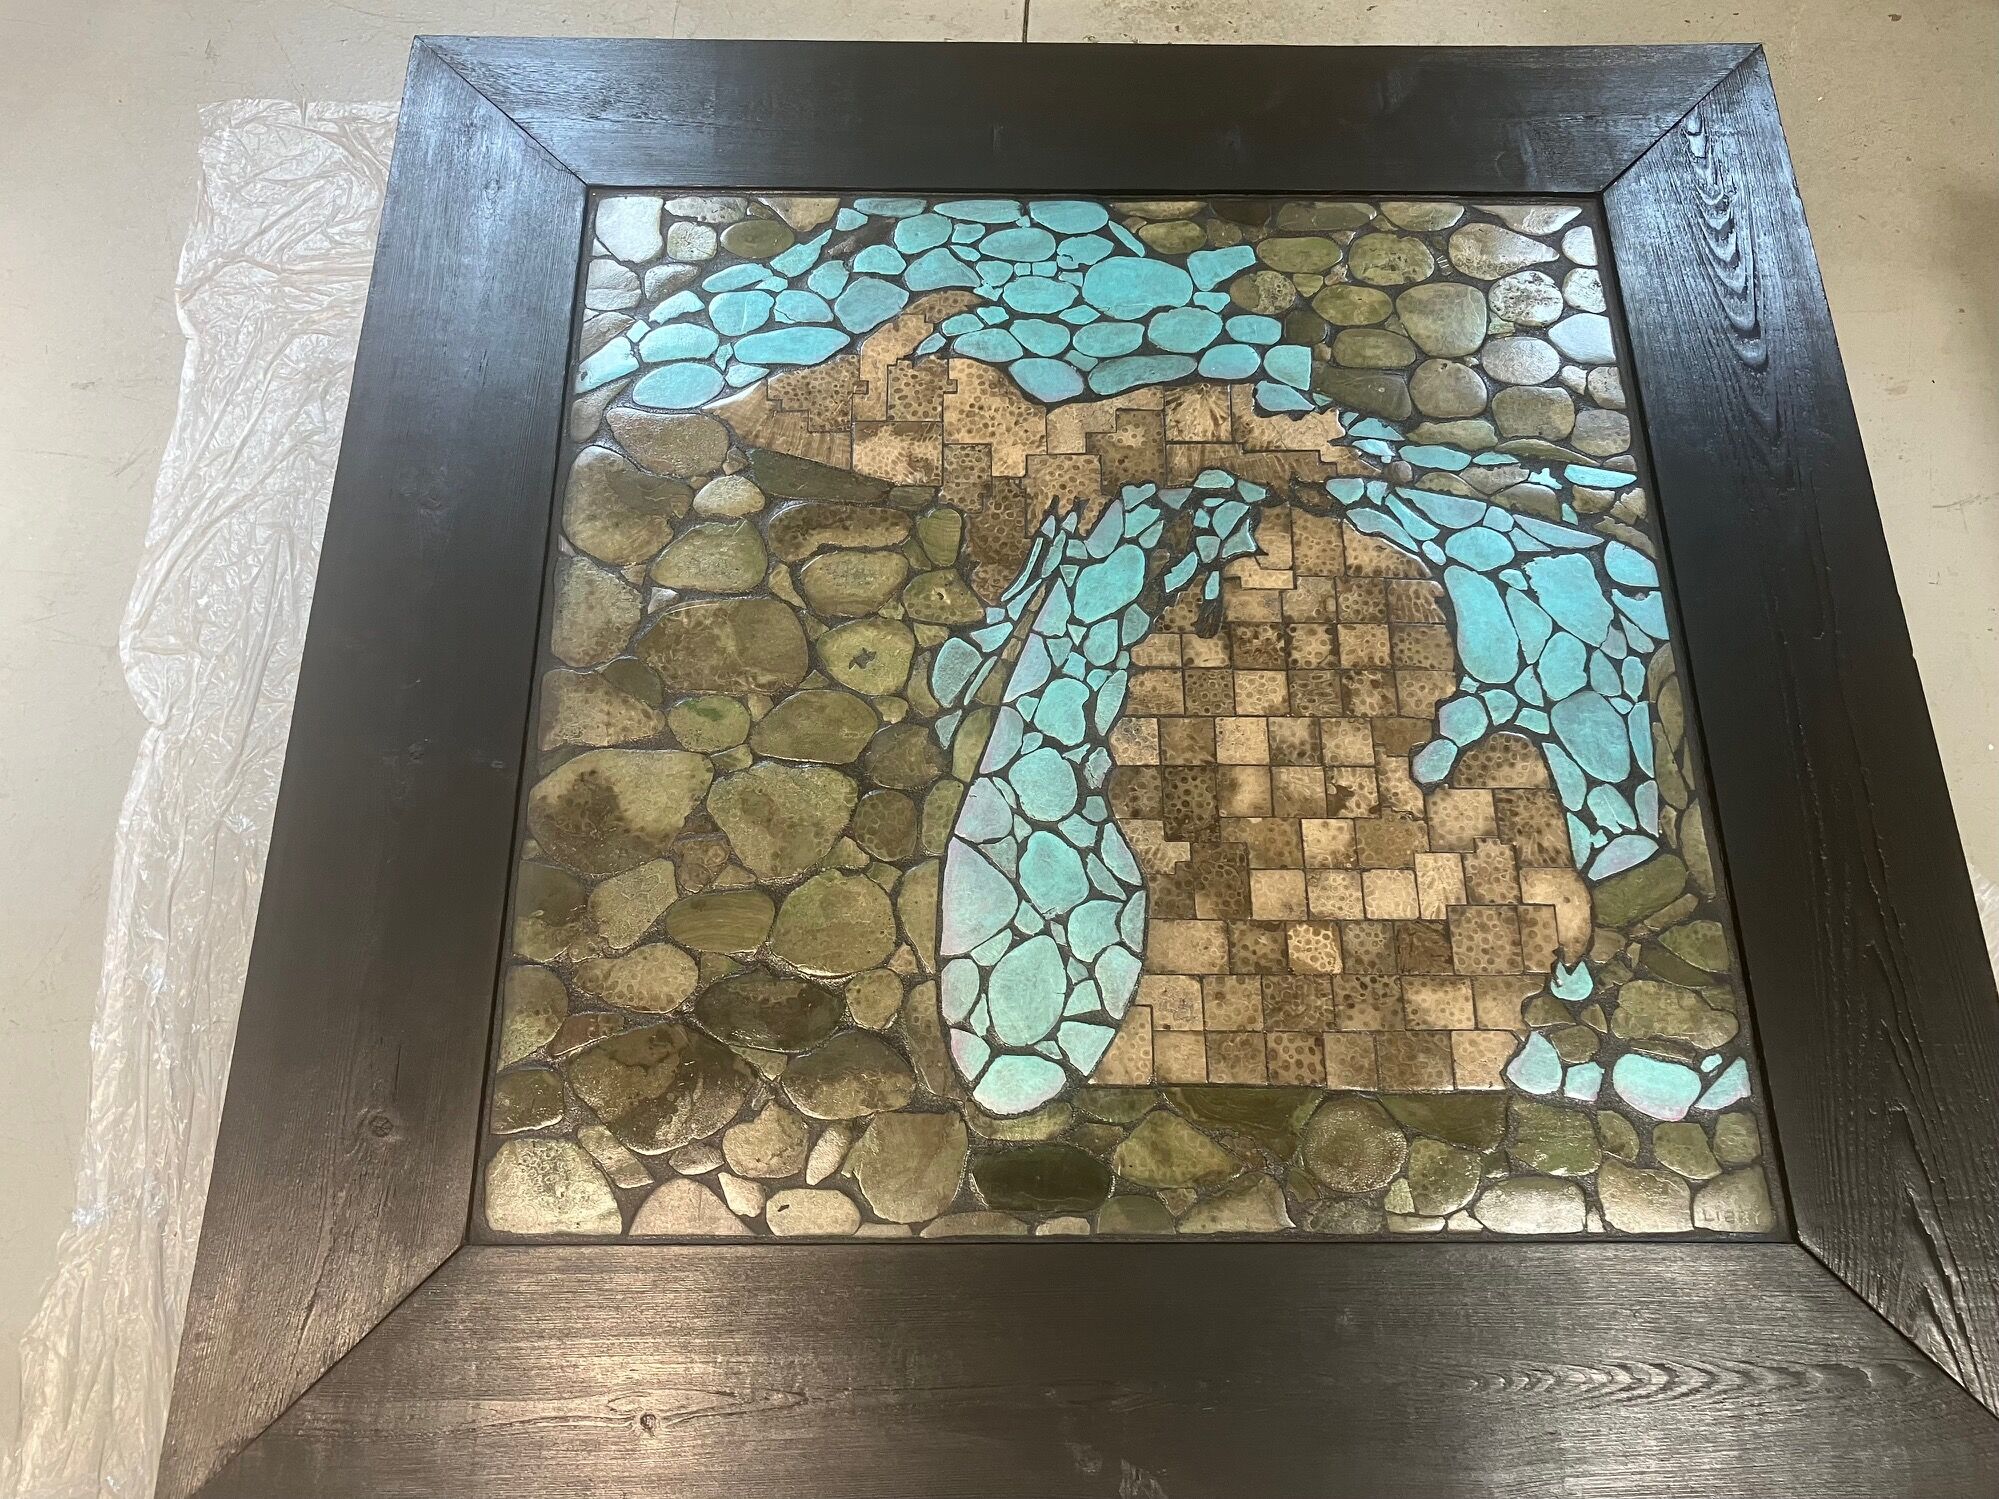
This came from a retiring judge's chamber. It's a map of Michigan surrounded by the Great Lakes made completely out of Petoskey stones (It's a Michigan thing). The state is made up of cut stones in the shape of each county. I have no idea how old it is, but it's not a teenager. It measures about 42" across, including the 1 x 6 frame, which is connected to the 1/2" plywood the stones are fastened to. Very very solid! It's going up for auction at the wife's charity fundraiser. I was asked to "clean" it up and make it presentable. Ended up refinishing the frame with acrylic latex house paint from Sherwin Williams and buffed the stones with quartz countertop polish. Have no idea what (if anything) it'll bring, but somebody sure put a lot of time into it originally.

- 9 replies
-
- 12
-

-

-

-
- michigan
- great lakes
- (and 6 more)
-
Just a quick comment here, I painted my window trim today and used (again) my crappy Wooster paint brush, for latex general purpose, Wooster Pro brush. I have two that I have used over the last year plus or minus, and each time I use them, they loose bristles in my work. These brushes are thee crappiest brushes I have ever used. I had a collection of Purdy's that I used for a quite some time and I don't remember losing a bristle or hair. I wore my Purdy's out, and last year I went to Home Depot to pick up a couple Purdy's and they don't sell um anymore, they sell these crappy Woosters that look good, but when I use them they suck. The finish is fine, keep a wet edge and paint flows pretty good, but having to keep picking bristles out of the paint or having to pull loose ones from the brush while painting gets old really quick. I just went to the Purdy website and looked for dealers, our ACE is supposed to carry them so I guess I'll look em up, only a couple bucks more but worth it. My rant of the month.
-
I have come up with a couple of ways to apply stain/paint/glue when making small wooden projects (most of my projects are small). On Amazon I found these foam cleaning swabs that are great for applying stain/paint/glue to my small projects. There is no lint or hair to get stuck on the wood, they are pretty absorbent and they do a good job spreading glue/stain evenly. After I am finished with the applicator I snip the foam tip off and keep the plastic handle that comes in handy stirring small cans of stain or paint and come in pretty handy when mixing and applying epoxy glue. I was making a large coffee cup display cabinet for my daughter where I cut 1/8" dados for i/8" plywood shelves and came up with the idea of using pipe cleaners for getting glue down into the dados without making a big mess. I thought someone might be able to use these ideas in their own work.
-
This was an oft-referenced article on Wood, then Steve's store,Hardwood Lumber & More, then Steve's personal site, all of which have gone away. I hope this is fair use: PAINT ON A CLEAR EXTERIOR FINISH By steve@AskHLM.com on 3/22/2014 Paint On A Clear Exterior Finish We woodworkers (especially when it comes to finishing) are creatures of habit; we use the finishes we use because they are the finishes that we have always used. But, from time to time it's good to step back and examine old "truths" just to see if they really are true. The use of marine varnish to finish exterior elements in non-marine applications is one of those "truths" that has long needed to be revisited. That is the purpose of this article. Several years ago when I began participating in the WOOD Magazine Finishing & Refinishing Forum we regularly saw questions from homeowners and others asking for advice on the best way to finish exterior doors, especially those exposed to the weather and subject to high UV. The options then were Helmsman Spar Urethane (and its polyurethane look-alike competitors), expensive marine varnish, and exterior paint. Over the years little has changed except that, thankfully, more and more woodworkers today understand just how poorly any finish that contains urethane resin will perform when exposed to UV. Even with only partial exposure to direct sunlight polyurethane will fail quickly, often peeling like a bad sunburn before the end of even a single season. Marine varnish, then as now, was the recommendation of choice offered by a number of contributors. There is no arguing that quality marine varnishes will outperform polyurethane "spar varnishes" if UV resistance is the only objective. But, good marine varnish is very expensive; and, in reality it offers no reprieve from regular, on-going maintenance. You must still tend to the finish every year in full-sun environments; you must inspect, sand damaged areas, and recoat. Further, even those who regularly recommend marine varnish products will tell you that a minimum of 5 or 6 coats is required to obtain the full benefit of these finishes. So, not only are you applying two to three times more varnish; you are applying a product that costs two to three times more, and your maintenance schedule is unchanged. Further, it is important to understand that marine varnish is "long-oil" varnish; varnish that is softer and much less resistant to moisture in the form of water-vapor than regular or "short-oil" varnish. Moisture movement into and out of the wood with seasonal changes in relative humidity is every bit of destructive to joinery as UV is to wood. These quality marine varnishes are excellent finishes in their intended environment. If I owned a wooden boat I would use nothing else. But, we are not talking about maintaining a boat; our objective is to apply a durable finish to a front door and to use a finish that will offer maximum protection along with minimum maintenance. Quality oil-based exterior paint, sans the pigment, is ideally suited to this application. Exterior oil-based paint, after all, is little more than exterior oil-based varnish with a lot of pigment added. Remove the pigment and you have a very durable exterior varnish with additives that benefit the finish on your front door. These additives, intended to discourage insects such as wasps and wood boring bees, and prevent the growth of mold and mildew, would be useless in a marine environment; but, we aren't talking about a marine environment. We are talking about your front door. With this as a background permit me to introduce you to my friend Jim Kull. Jim was the owner of a successful refinishing shop in Southern California prior to his retirement and move to Texas. His retirement gave him a bit more time to experiment so he conducted and posted the results of the following test on the WOOD Magazine Finishing & Refinishing Forum where he served as the host. When Jim decided to step down from his host duties he was instrumental in my becoming host of that forum.Here then is Jim Kull's original post edited slightly for clarity: "In a recent post my friend, Steve (Mickley), made reference to my tests of doggie sprinkling on exterior finishes. I figure after almost a year of testing it is time to post some interesting discoveries. As a preface, allow me to set the stage. Almost daily there is a posting about clear, exterior finishes for doors, chairs, signs and such. Responses run the gamut from diehard marine finishes to apply a coat of primer and then paint. Each of these has a bit of a problem. Marine finishes are not always the easiest to find, and it grieves me to think of a lovely oak, teak, mahogany, fir, redwood or similar nice wood door painted in mauve goop. Bob (from Florida) inspired me with his continuing and accurate statements about the failings of a clear coat and the advantages of a good quality exterior paint. I decided after lots of reflection that he really was right but there was always the picture of mauve in my mind. So, how could one take advantage of his advice and yet capitalize on the beauty of a nice wood? I began to reflect on the characteristics of paint. Now comes the boredom... There were several things I knew about paint: Exterior paints contain a mildewcide and a fungicide that a (marine) varnish does not. The best quality paints will contain a UV (inhibitor) and trans-oxide pigments in very high percentages. Almost all paint is custom mixed by the store. The retailer maintains a large supply of base products that are used to achieve the desired color. There are generally four base products and the specific one for your paint is determined by your color choice. These base products are either named or numbered. They are named pastel, deep, tint and neutral. If numbered it is cleverly 1, 2, 3 and 4 with the exception of Olympic who numbers 1, 2, 3 and 5. Olympic is unaware that "4" comes before "5". Pastel and/or 1 is virtually a pure white and used for the lightest of colors. The others are slightly color altered from white and more translucent than pastel. These are used for succeeding deeper colors. All of this comes to neutral, 4 and/or 5. These are clear and used for (mixing) the darkest colors. In the can they are somewhat opaque but dry more or less clear. Now comes the testing. I bought 4 oak exterior doors. Each door was given one coat of the same MinWax Stain. On 3 of the doors, I applied 2 coats of "base" to the 6 sides of each door (3 coats on the top and bottom edges). Each of these three doors had a different type of exterior neutral, 4 or 5 base. The fourth door was finished with a consumer "spar" varnish from my local friendly paint/hardware store. The bases for the 3 painted doors were an exterior semi-gloss acrylic, an exterior semi-gloss oil-based polyurethane floor paint, and a semi-gloss oil-based trim and siding paint. The doors were set up, slightly inclined, in mostly direct sunlight under a pecan tree in the backyard. (My wife just loved that one.) Daily, the sprinklers managed to hit the doors. The birds in the pecan tree used the doors for target practice. And, yes, the dogs did anoint the doors on a regular basis. My blonde Cocker, Zazu, was particularly enamored with the doors. Over the course of the test the doors experienced lots of Texas sunlight, rain and snow. The temperature went from below freezing to over 100. The advantage to the inclined position of the doors was the snow, ice, water from the sprinklers and the rain tended to collect in the raised panel areas. I feel these doors were subjected to far more severe environmental conditions than would be expected from normal use. The results were interesting. The "spar" varnish (initially) looked fabulous; but, after about 2 weeks it began to develop small cracks. In rapid order the door began to turn black, started to mold and the smell was enough to knock a buzzard off of a manure wagon. The water-based acrylic is milky in the can like a water-based poly. It dried to a more or less water clear surface but was a bit cloudy. It tended to wash out the stain a bit. Over time it became cloudier and ultimately become almost white. But, it remained solid and protected the wood. The oil-based bases are also a bit opaque in the can but dried to a clear finish that is almost identical to a spar varnish - they added an amber tone to the doors. Both the oil-based poly floor paint and the oil-based trim and siding paint remained "clear" over the entire test period. The testing came to an end with a bit of encouragement. My wife said something clever like,"Get those damned doors out of the backyard!" She does not understand science. The floor poly had some minor checking and a thinned coat of the same base over the surface made that disappear. The door with the oil-based trim and siding paint was perfect, other than it had lost a bit of the gloss. So, I am with Bob - paint the door. My preference is the oil-based products. If you are predisposed to a water-based use an acrylic rather than latex. One thing you will find when you go out shopping for your product is a lack of knowledge on the part of the salesperson. Not many of these folk are aware that their neutral or 4 base will dry clear. If you want to have some fun, spring it on them. They will suggest you are full of Donkey Dust. Ask them to shake a can and put some on a stir stick. Dry it and voila, it is clear." Jim Kull One final admonition; if you decide to try the paint solution you must understand that you are applying it like varnish, not like paint. Use a good natural fiber brush, keep your coats thin, (emphasis added; keep the coats thin! We recommend thinning with paint thinner to improve flow-out and leveling.) and brush the paint-base out into a thin, uniform film. If you apply the paint-base too heavily you will get a cloudy finish. Addendum to Earlier Article Several important things have changed since this article was originally written. Perhaps the most important development has been the advent of low VOC products. Many of the oil-based exterior paints still on the market have been reformulated to meet the more stringent VOC requirements. While these products will still work it is important to understand that thinning these products introduces new requirements. The low VOC paint bases can not be thinned with mineral spirits/paint thinner. You must thin with naphtha. If you do not; if you attempt to thin with traditional mineral spirits/paint thinner the finish will remain tacky literally for days and will never cure properly. The second and somewhat more frustration development is that oil-based products are becoming more and more difficult to find. They are available, primarily in paint stores that cater to the trade; but, they will require more searching, possible even beyond city, county or even state borders. The oil-based paint bases remain superior. Even though some water-borne finishes will work they simply will not last as long. Copyright 2003-2010 Steve Mickley, Copyright 2007-2010 Hardwood Lumber & More…Ltd. All rights reserved. No unauthorized reproduction of any images or content without permission. All logos are Copyrights of their respective companies. Author steve@AskHLM.com Copyright 2014 by Ask HLM
- 5 replies
-
- 5
-

-
- spar varnish
- helmsman
- (and 3 more)
-
Spent the day rototilling our little garden and planted onions. Garlic has sprung up and looks like most of what I planted survived the winter. Harvest won't be until mid summer. Our Patriot Turners- @Gerald is turning some really neat refrigerator magnets! He has been practicing with his new JaHo jig to adding very interesting embellishments to some of these items. Please hop on over to his post and see what our turners thought of his work- Gerald also posted about these magnets in the "Monday Morning" forum We've had some additions to several of our continuing posts. From "What Lathe Are You Using"- @RustyFN, @HARO50 and @Steve Krumanaker From "Off The Lathe"- @kreisdorph- From "What's On Your Lathe"- @calabrese55- And, from "What's Your Favorite Wood..." @RustyFN, @keithlong and @Cal @keithlong is looking for a specific crafting item. He is making keychains and needs to find a part. Please check out his post and see if you can suggest a source for the part he needs- Keith also added to @Fred W. Hargis Jr's post about Easy Wood Tools rougher cutters. Looks like he found a pretty good price on cutters- What’s Coming Up- Click on the images for links to more information and registration- For The Newbies- Turners are always seeking new ways to amp up the visual effects of their turnings. In this video, Sam Angelo uses various tools to create interest on the turning's surface. He also adds some color to highlight the embellishments. Expand Your Horizons- Several of our members make "Beads of Courage" boxes for kids with cancer. Mike Peace recently did a short video spotlighting the Gwinnett Woodworkers as they prepare segmented blanks for their Beads of Courage Box initiative. A really worthwhile cause. Alan Stratton shared a video where he turned a bird's beak natural edge bowl. What I found interesting was his method of holding the turning when reversed chucking. New Turning Items- Not new but on sale from Woodturners Wonders- https://woodturnerswonders.com/collections/lathes?_kx=gV5SF2As_3IwtBi5TrpHVQGZ2p91Dzyb6Hq8u86HRP26F2J3AVp8xSSqd_hTF8cT.VJvU8R Everything Else- From Ron Brown's Newsletter, struck home with me as this was the way I was raised: I Can’t Because I Don’t . . . When someone says I can’t because I don’t have something I will need to do it, the money, the accessory, or just about anything else, I wonder how anything ever gets done. I grew up in a working-class poor family. We always had food, although a lot of the time it was because we had our own chickens, rabbits, and pigs. We were taught not to waste. I learned very early that you can almost always find a way if you want to make something happen. When we wanted to go fishing, we first dug the worms, caught the grasshoppers, or made our own doughballs. Bamboo fishing poles with a cork float and one old hook worked fine. We had hours of fun and usually came home with a basket of fish. Catch and release, what is that? You already have a lathe and a few tools, add wood from the firewood pile and you are in business! You can make anything if you want to. Use what you have on hand, until you get something better. Figure out how to use what you already have in new and creative ways. Lots of things will do double duty nicely. No matter how much stuff you have, you will always want something better. (I usually have the solution just so you know). My point is when you think you can’t because you need something else, the adventure has usually just begun, if you get creative and figure out how to accomplish the task by using something else in an unconventional way. Don’t spend your precious shop time being frustrated because of what you don’t have. Do something while you save up for the miracle tool, jig, or fixture that will make all the difference. I’ll be here when you are ready. How do I know this works? I learned how to write because I have never been able to pay someone else to write for me. I know how to publish mass emails because a publicist charges way more than I can afford. I know how to edit photos, drawings, and videos for the same reason; I can’t afford to pay someone else to do it for me. I know how to program all of my CNCs, my lasers, and my 3D printers myself because I’ve had to learn to do it if it is going to get done. I know how to upload my edited videos to YouTube, Facebook, and Instagram along with shorts and reels because I made myself learn to do it. My point is don’t be so eager to accept defeat. Use your God given talents to figure it out. You will surprise yourself when you make a second and third effort. One of the greatest forces in the world is persistence. I've been playing with shapes and proportions. None are finished, a couple need hollowed. This is some of that wind shake cherry. Safe turning
- 6 replies
-
- 3
-
-
-
- beads of courage
- paint
- (and 30 more)
-

From the album: Tru Welborn
-
Started work last month on a platter test which I have not completed and this pic is not all I have done to this test in pine. The methods used so far in this one were round Saburr tooth burr plunged end on, dremel style saw blade ( this has since been burned to enhance), carbide round burr and metallic gourd ink. So now I have started a pecan platter from one of the blanks left from the offering plates two years ago. Had to fill a bit for inclusions which are common with pecan. Used epoxy slow set with black mica powder for that. as I was hollowing it came off chuck and lost a chunk requiring more epoxy. more tomorrow I hope.
-
My wife went to the local retail Sherwin-Williams paint store to purchase wall paint. $70.00/per gal which included 4% Supply Chain surcharge, effective through 12/31/2021. We have been a SW customer for many years (preferred customer) and they did not have the decency to inform her of the surcharge before the purchase. She had to read it on the receipt. Danl
-
Containers and shavings slows the drying process but can take up extra space in the shop, especially if you have a bunch of blanks in different stages of drying. Another method of slowing the drying is to put a sealer directly on the surface of the blanks. This can work for the rough CUT blanks and the rough TURNED blanks. The sealer slows the transfer of the moisture from the wood to the air. The majority of the moisture is lost through the end grain pores. Sealing those areas is really important to reduce checking and splitting. For freshly cut logs (blanks) checking can occur within hours. Sealing immediately can reduce wasted material. If you have purchased precut turning blanks (pen, bottle stoppers, bowls) you probably noticed the blank had wax covering at least part of the material. Dipping the end grain (or entire piece) in molten wax seals the pores and slows the drying. This method does require a way to melt wax in a large enough container to dip/submerge the blank. Using a sealer that is already viscus, reduces the prep time and equipment needed. There are several commercially available products for sealing by painting the liquid onto the blanks. One that has been around for a long time is Anchor Seal- a wax based emulsion. It is available from many places and is the choice of a lot of turners. A similar product is available from Craft Supplies USA. Theirs is called "Tree Saver" and it’s a special blend of poly vinyl acetate. Turners are typically "thrifty" individuals. Many have turned to using already available materials for sealers. One very popular substance is latex paint. A heavy coating (or two) can seal the end pores. In addition to sealing, using different colors can pretty up your wood stash! My favorite sealer is good old TiteBond II wood glue. Did you notice the Tree Saver product is a "PVA" based material. Well, TiteBond is a PVA glue. I paint the glue on the ends of logs to keep them from splitting/checking. I honestly haven't used it on rough turnings, yet. A little different method, but having similar effect, is to cover rough turned blanks with stretch wrap shipping material. https://www.aawforum.org/community/threads/plastic-wrap-for-preventing-bowl-blanks-from-cracking.11885/post-111507 These methods have all been about slowing down the loss of moisture. But, as we know, woodturners are an impatient lot. What about speeding up the loss of moisture? Stay tuned.
-
- 1
-
-
- sealer
- anchorseal
- (and 4 more)
-
Interesting video on using what I would classify as homemade glazes to conceal sapwood in a very high end piece. This guy is a master. The only things I've encountered with polyester finishes are current vintage pianos. At the end he does some wet sanding and buffing to really make the piece shine.
- 20 replies
-
- 7
-
-
-
- paint
- wood grain
- (and 2 more)
-
I wanted to make some different ornaments and my wife wanted me to use Purple Hart. 1.The one on the left is Purple Hart and Yellow Hart with some embellishment. 2.The one in the Center is all Purple Hart, however I used friction burning to get different shades. you have to look closely, the picture doesn't show it very well 3. This was an experiment with coarse grained White Oak. I used Red latex paint, wipe off after a few minutes and sand. Repeat............I like it. The picture as shown here is an extreme close up and you see many things that no one normally sees. Until I saw it, couldn't believe how close it came out.
-
My son has asked me to refinish his kitchen cabinets. I am planning to use Sherwin Williams Sher-wood Kem Aqua plus white for the doors and drawer fronts. This is the product I used for the small additional cabinet I made for him earlier this year. It is a water base material. If I skuff the door/drawer fronts with P220, is this enough prep for the SW product to adhere to the oak wood? They will be cleaned with Murphy's soap prior to sanding. The end panels are not wood, but a plastic laminate. Can I use the SW product? If not, what is needed? Will the end panels need skuffed? Appreciate your input. Thanks in advance. Danl
-
I had one small block of ugly ply that I haven't used because it is ugly. Drab colors and it didn't seem to be worth working with. It was among several blocks that I received as a gift. So I again tried to make a difficult, time consuming project. (Covid 19 isolated shop work) As I progressed, it didn't get any prettier and remained ugly. Then I got the bright (no pun intended) idea of using paint and glitter on the inside. Worked good. I added a center swing ball and it started to look better. It is actually a lot brighter than the picture shows. I prefer natural wood, but thats all of the UGLY colored ply left
-

DANGEROUS PAINT~On Harbor Freight Tools
Cliff posted a topic in Machinery, Tools, Research, Reviews and Safety
Whatever poisonous garbage the Chinese are putting on Harbor frieght chisels is dangerous stuff. I smoked just a little of it off welding the bases of their 4" brick chisels. The stuff made my shop all smoky and like when one burns rubber there were weird floaties of black goo floating in the air. Then the sickness set in. My throat became terribly raw and I have sinus issues. I've never had a paint do this. I can't even guess what they used. -
I think I will let the moms and dads worry about teaching them where the other two lessor states are!!. Gloss and glitter used on the states and satin used over the acrylic paint around the states. The glitter shows up more than the picture shows......
-
How do I paint a floating panel without effectively gluing it to the frame? I've seen many such panels split by humidity. Is it nothing more than paint it, then score the paint with a knife?
-

Stained doors and door trim and baseboards but all white windows
Michael Thuman posted a topic in Finishing
For our house remodel we found the windows are preprimed white over pine. They are still is great condition and no drafts or moisture so replacing them is not in the cards. We are going to be changeing the doors, door trim, base molding and shoe molding to be all stained oak. But the Windows we want to leave white. What do you guys think? I am a little aprehensive. -
We have a house new to us and it has painted wood trim (pine) white that does not fit the character of the ranch house. I am replacing that trim with the following. Doors flutes, rosettes, and plinth blocks Windows flutes, rosettes, jamb, sill Baseboards , plain board 4 to 6" tall then quarter round on the floor and cove molding on the top. In your humble opinion should I invest in real wood mouldings (oak stained and dyed to highlight the grain) or MDF painted white. The investiment will be substantial and I need to know which this community would like to go for. IF natural more detail work to get everything tight and looking good. If mdf (cheaper than oak) and white trim can be flubbed with caulk.
-
Best to invest in a good hard wood trim or mdf painted white?
-
Have you ever seen this technique for applying paint? https://www.youtube.com/watch?v=enFSoiCo-lA&feature=youtu.be Herb
-
I wanted to try using latex paint to fade from one tint to another. I used the multi color ply and some maple. I kept tinkering until I liked the effect and sprayed it with poly. The one thing that is missing is the wood look, but I guess if I turned it, it still counts.
-
Hi, my name is Artie, and I’m new here (maybe 2 months) and new to woodworking. This is my first post on the finishing forum. I just made my first scroll saw project (that story is on the scrolling forum LOL). I made a shamrock, with it being Saint Patricks Day, and all. It is 3/8 Baltic Birch from Woodcraft. Do I sand with a fine sand paper (grade/number?) ? Or as I read somewhere else, do I not sand because the plus are so thin on 3/8? Prime with an interior primer, and then paint with an interior house paint? Latex? Oil based? I was thinking a Kelly Green, semi-gloss. Any thoughts/opinions/advice anyone can throw my way is appreciated. Thank you All, Artie
-
Folks, I have some nice poplar boards, and I am going to make another vanity with the boards, for another bathroom in our home. The entire vanity will be poplar, the outside will be painted a cream white or off white, and the inside will be varnished. The poplar I have has those wonderful dark green and dark streaks, I have heard that poplar colors will bleed through most paints, what can I do to prevent the bleed through, or is what I have heard and read a myth? Thanks!
-
...what does the Great Eye say?" "We have work to do..." Soo, as for that langdon mitre box.. Need a hammerdrill to loosen the bolts that held these feet in place....rusty & krusty. Used a bowl to hold all the bolts coming off of the box.. Had already cleaned a few of these parts.....frame is quite nasty, dirty, and a touch rusty... I already have cleaned the quadrant scale. As for the two plates that make up the deck? Wire wheel to clean the painted sides up, sander to clean the non-painted sides...can of RED paint.. I intend to get some good out od this old stand..... Ooops...oh well..compost happens. Bit of a breeze today. Decided to go ahead and paint all the surfaces on the two plates....not too worried about leaving the plates out there, we have security.. 1/2 of the "team".. And the other half. need to wire wheel all the rusty parts, and give them a coat of Black paint. Bolts will get shined up.. IF I can see them... Some of these parts are already done......some will need a shot of black paint. Bright parts will stay "bright". Might take a day or three...stay tuned ( the quote at the start of this page? Comes from the "Two Towers")

.thumb.jpg.573d1497d0675219908c85aabefd797a.jpg)


.jpg.de7a79e30eb44775b4a4d806c1372033.jpg.f3fcd458b43976202cdbd296311c58ec.jpg)


.png.71ab8bad861620208c869215bf066709.png)


