
Search the Community
Showing results for tags 'miter'.
Found 18 results
-
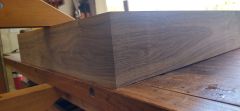
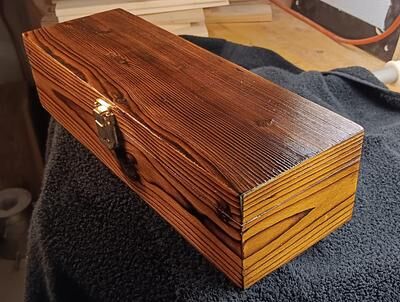
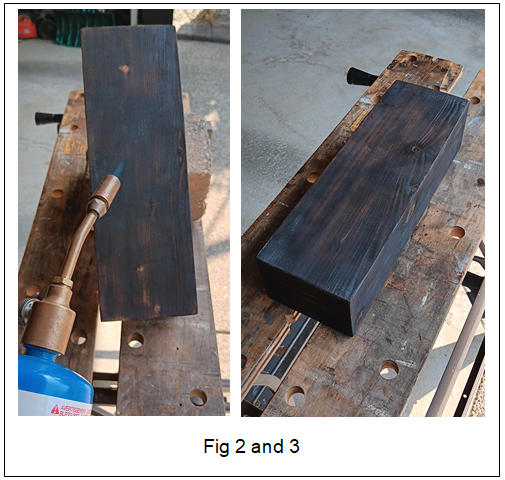
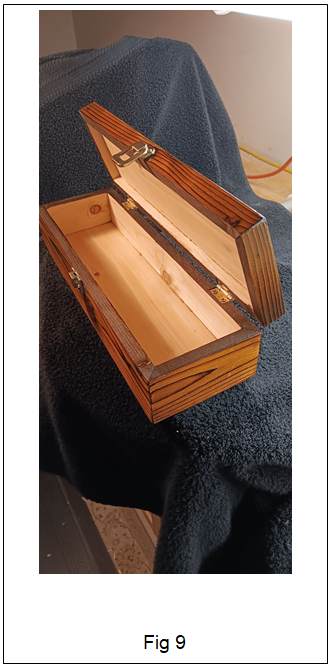
INTRODUCTION It's been a long time since I made a fully, all sides, mitered box. As miters go, It is the ugliest box I've ever made. I mean "butt ugly"! Okay...okay...maybe not that bad but challenging! I think many of us may take mitering for granted and sort of dismiss making a whole box this way. To tell you the truth, I don't know why I did and then to add insult to injury I decided to finish the surface with the Yakisugi technique or "Shou Sugi Ban" as we call it in North America). MAKING THE MITERED BOX I started by cutting all sides on my tablesaw. Yes!... my table saw! As hand tool crazy as I am, I couldn't imagine doing all these miters and bevels by hand (hereafter just called "miters"). My blood pressure is high enough. And then I still could not get the miters as perfect as I wanted all around. Even using my tablesaw! LOL. Then it dawned on me... I'm going to torch the thing so perfect miters may not matter! It is highly likely there will be some separation from burning and minor gaps on the corners. But it will add to the rustic look I was after with this technique. We'll see. Next... I glued it all up. I'm usually very strategic and meticulous gluing up. However by the time I completed mitering, I didn’t mind being messy and just slathered it on. Here it is ..... "Plain Jane" in Fig 1. BURNING THE BOX So why am I doing this? I dunno. I like challenges or maybe I'm just "bonkers"! Next, I started the "Shou Sugi Ban" process and torched all six sides, edges, and corners. I wasn't after a deep "alligator skin" burn but rather an even medium surface burn. Some alligator skin char was acceptable. The look I was after was the "Kimo - Tora" as some call it. This is a good site to see the different ones. See Fig. 2 and 3. WASHING THE BOX With the grain, I then brushed away as much of the dry blackened ash surface as I could on all six sides. Next I washed all sides with the hose and brush cleaning away the dirty surface. See Fig 4 and 5. APPLYING THE STAIN After it completely dried out, I decided I wanted to give it a yellow dye stain followed by shellac. I went everywhere looking for a small size can like 236ml. Do you think I could find it? And on top of this the ones I did find were like $15 -18. But no yellow or orange. Man 'o man!... things have really gotten expensive and limited. The heck with it!! Anyways I made my own using Tumeric. One coat on all sides was all I needed. However Tumeric is a fugitive stain. Though you wouldn't agree if you got some on your clothes or the rug not to mention your hands. LOL. See Fig 6 and 7 FINISHING WITH SHELLAC To prevent future fading it was sealed with four coats of blonde shellac. First coat was a one pound cut. Second, third, and fourth coats were a two pound cut. Then brass hinges and clasp was added. Here's the results: See Fig 7, 8, and 9 Hope you all enjoyed this!! Feel free to comment, ask questions and thumbs up if you like it! CHEERS! MrRick

- 4 replies
-
- 3
-

-
- miter
- shou sugi ban
- (and 2 more)
-
The latest chapter. (BTW, I had spinal surgery yesterday and "avoid strenuous activity for 6-8 weeks. All my Xmas projects are done, so you might see more of my posts here). Why do people think dowels, dominos, or biscuits are necessary for edge-to-edge glue ups. I can understand some assistance in alignment when needed but there are other ways. Dowels, in particular are fussy with alignment and don't add strength. Dowel joints are not very strong. I read a FWW article years ago about why. Boiled down to two reasons: minimal glue surface, most of which is end grain and differential expansion of wood. I have reglued dozens of chairs where once I removed the corner blocks, the pieces just pull apart. Why is a miter saw on the top list of things for a newbie? Unless you are doing construction or on site work, you can do most anything with a table saw. And it has limited types of cuts it will make. Unless you do a lot with sheet goods or live edge planks, ditto for a track saw. Why do people put so much glue on that there are puddles of it running out once clamped.
- 28 replies
-
- 10
-

-
-
- glue up
- edge to edge
- (and 11 more)
-
A couple of weeks ago I was asked how I cut the angles on my flag cases. Well, today I cut 3 out for my online store so I grabbed a few pictures. Keep in mind that I”m a big advocate of using a digital protractor so that my 45 degree angles at the top are truly 45 degrees and my 22 1/2 degree cuts on the lower corners are truly 22 1/2 degrees. I cut these angles with a tenoning jig. The last picture shows how I join the angled corners. Filament tape is strong enough to let me pull the joint together.
-
This was harder than it looked!!! Had to go back to woodworking basics - cutting angles, especially the 22.5 (youtube vid made it look so easy) needed for the base. Plus the slot for the acrylic and notch for the back. Then put it all together and hoped the flag would fit. I've seen better folds but this is what was used. Made a lot of firepit fuel and probably have enough pieces cut and laying around to make another one or two boxes. Makes one appreciate "old school skills." Tip: unlock the head on a compound miter saw before trying to use it. Works a lot better. This is for my wife's step dad who adopted her kid brother when he was 10 and raised him. Going to give it to him this afternoon.
-
With the club's long time charity deciding they don't want wooden toys any more, we needed to find a new place. One current place is the local children's hospital taking 30 small boxes a month for the patients to decorate while there and take home. So I started making some. The first batch (6 of them) was mitered corners with a sliding lid, used keys on the corners. Second batch (5) finger-jointed and solid top rabbeted. Looking for something a little more efficient in production. Third was a prototype with an inset lid held with a brass rod as pivot hinge. Ok, but finicky. Forth was today. Mitered corners and inset plywood top and bottom panel. Biscuits to reinforce the miter joints. I did another groove on the inside near the top. Then once the box was assembled and glue dried, did another pass with the 1/4" bit on the router table. This made a double rabbet to hold the lid in place. Saves having to do an inner layer insert. I'll do a run of these when I get some more lumber and plywood. I talked to a local furniture shop last week and they told me the set out their scraps on Monday afternoon for the trash man. I was there and picked some of their cutoffs from the scrap bin;. Most of it was 1/2" poplar, probably drawer sides. A bit of maple and some cherry. In another adventure, I got a bunch of leftovers from red oak flooring (one time find) . Well, started today to rip off the tongue and groove edges so I could do glue-up. Then I thought, hey, the ends are going to be hidden by miter joints, just use them to align the glue up and rip off only the top and bottom edges. Lesson learned. It appears that the groove side is slightly wider on the top than on the bottom. I'm thinking that's so the top joint is tight and the bottom does not matter so much. I got a lot of "cup" in the top that I needed to get out with cauls and now I looks like there's a gap on the bottom of that joint. Well, nice try. Wait for the glue to dry and rip them apart. On the other ones, I will try just trimming off a bit on the groove side to align it up.
-

From the album: A Wedding Cross
24" by 24", it will have a top and bottom, the miters will be secured by glue blocks at the inside corners.- 1 comment
-
- 1
-
-
- wedding cross
- walnut
- (and 3 more)
-
From the album: A Wedding Cross
Cross base with wrap around grain. -
While waiting for some finish to dry today, I decided to upgrade my 30 year old miter key jig that's starting to get worn. In addition, I read an article recently about making a jig to cut spline mortises in box corners. And I've admired using dovetail keys on corners. So off we go. Raided the pile of plywood cutoffs. Glue is still drying so the thru cuts will be done when I need to use them for the first time. (in my terminology, a key is across the joint line and is visible, so I use contrasting wood. A spline is inside the glue line and is not usually visible from the outside) One for keys that are straight. I can use a rip blade for 1/8" keys, or a dado set for something larger. One for the router table for straight or dovetail keys. I will remove the fence and the guides will slide in the miter gauge slot And one for stopped splines. Put down stops and drop the piece into the bit and side to the other stop.
-
I thought I'd change the blade on my General 10" scms. Unfortunately when doing so I mistakenly disassembled the housing which houses the blade fence return spring. After hours of trying, I have yet to figure out how to reinstall that spring. Seems various brands have different set ups and after trying to get help on line, nothing matches my saw. I've seen what is supposed to be this model of my saw, but the spring configuration and setup is totally different . Please help!
-
Some basic gluing videos by one of the PopWood survivors https://www.popularwoodworking.com/experts-guide-to-gluing-clamping-wood/?fbclid=IwAR02zssWUnzXJClxG3seSDmLnE8QffcD-ynNyC2a0KlaHm3xmq3kOVr7o5Y
-
took a couple of pictures of this saw and miter box - still in the previous owner-built box. didn't see any marks on saw blade and the whole thing appears to be in fairly decent condition. have not priced and put on floor yet at the restore. someone will get a deal i suspect.
-
Picked a Craftsman Miter box, for $5 at a barn sale. A bit on the rusty side, seemed to be a home for wayward spiders Lovely, ain't it? Sitting on my Saw Bench, too. Well, I took the saw itself out of the box/base. Took the tote off. Shined up the three bolts. Medallion just says CRAFTSMAN. Sanded the tote a bit to clean it off. Wire brush in the drill press to get rid of the top layers of rust on the plate. Brought the plate back out to the saw bench, hooked up a palm sander and some 220 grit. sanded down to bare.clean metal. Wasn't worried about any etch. Too rusty, and Craftsman used a silk screened logo. Set the pieces to dry a bit, since I used a pad of Never dull under the sander as a last step. Buffed that out. put the saw back together Yep, it is a biggie. 22" saw. Maybe 11 or more tpi. Looks a little better? Ok, next the base. Old broom to evict about ten resident spiders, and demolish their homes. Had a sprayer cleaner from odd lots, gave the base a good soaking down. Then a wipe down. Couple places had some rust going on, sanded that off. About time to put this saw back together Does look just a little better, don't it now. As for the base Yep, you can read every degree on that scale. Rollers work nice and smooth. Still learning about all the locks this thing has. The levers seem to lock the rollers in the "up" spot. That thumbscrew thingy seems to be some sort of depth stop? No, I haven't found a motor under there, nor a place to plug in a battery. Not too bad, for a $5 saw?
-

Kreg KMS7102 Miter Review
Ron Dudelston posted a topic in Machinery, Tools, Research, Reviews and Safety
My table saw is a 1947 Delta Uni and is extremely accurate. I had been using a digital Craftsman miter and it did the job well but I wanted to upgrade my miter. I looked at several Incra models as well as the new Kreg KMS7102 and after reading the Kreg reviews, I opted to buy it. The pricing wasn’t hateful at $140 and I was hoping that it would be as accurate and repeatable as promised. The assembly took about 20 minutes and wasn’t rocket science. There are 5 adjustable nylon set screws that you tension the slide in the miter slot to get a nice tight but movable fit. In my mind, the best option on this miter is a flip down stop that really makes short work of accurate and repeatable pieces. I cut 4 3” pieces of oak off the stop and checked the lengths of all four with a digital caliper. There was only .006 difference in the length of all four. I can live with that. The angle of the miter cuts is set with a pin that drops into a pilot hole. That is, you turn the miter to say 45 degrees, slip the pin in the pilot to secure the position and the lock down the miter. I cut a 22.5 and a 45 and checked them with a digital protractor. Both angles were spot on. The only potential negative that I can see is that you must be careful not to lose the brass locking pin. Or buy a spare. My final word on the miter is that it proves to be as good as the reviews and it is made in the USA. Another plus.
-
Hi, new to this forum. Have been working on restoring hand tools and developing skills for a couple of years. Thought you might be interested in a project from last year. These Eleven Grooved Boxes are made, with the exception of preparing the original stock, entirely with hand tools. A big Stanley miter box, planes 4, 5 1/4, 18, two 45s, and a round side 606. Love them all.
-
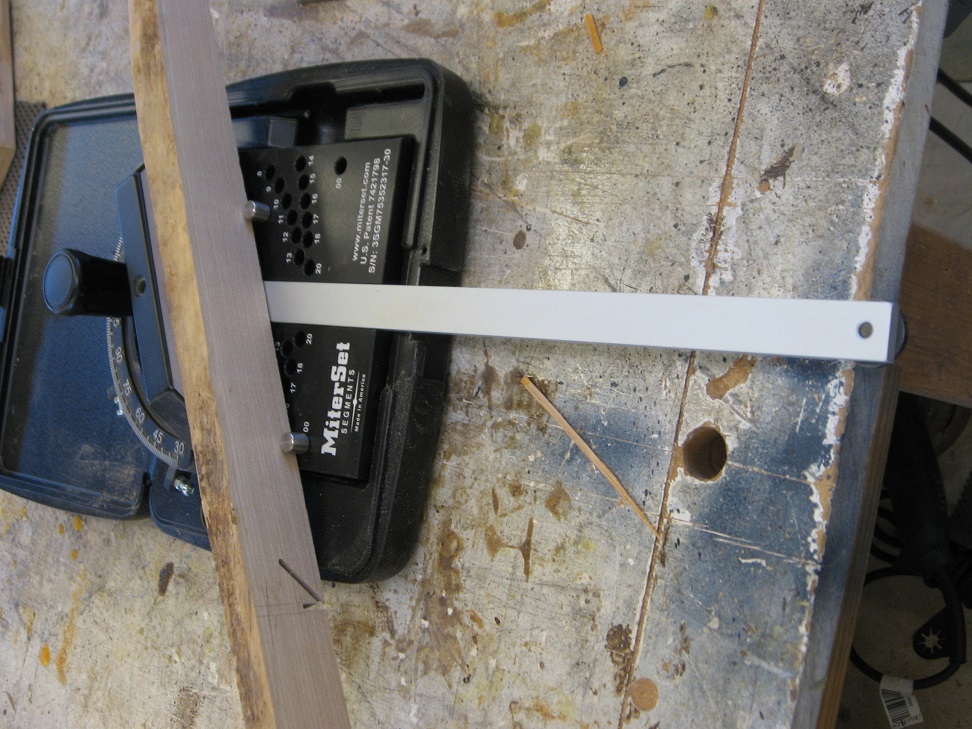
I found out about this MiterSet jig on another forum and had to get one. https://miterset.myshopify.com/pages/demo?AFF=41 Yesterday I tried it out and wish I would have had one years ago. It took me seconds to set the miter gauge and 5 minute max to cut and glue up a 7 sided polygon. There are formulas on the web if you know the radius they will calculate the length of the sides of any regular polygon. I worked in metric, it is easier to set up for say a 3.462" side by setting the stops on the table saw at 8.793 cm. https://www.calculatorsoup.com/calculators/geometry-plane/polygon.php Don't worry about a "T" slot miter gauge as the MiterSet goes in the middle, it worked for my craftsman, Bosch "T" slot, and Incre 2000 too. the slot is .733 for a shopSmith but will fit just about any miter gauge. If the bar is a little worn it can be shimmed to one side with a thin shim, no biggy. Herb
-
Got some Christmas money to spend-- Help Me
- 19 replies
-
- 1
-
-
- incra
- incra 5000
- (and 1 more)
-
I received my new Incra Miter today. My old miter had no slot adjustment and too much slop. It was also cheaply made. I decided to do the full adjustment cycle on the blade angle, blow and clean the adjustment screws, etc. The Incra was easy to set up and I did some testing and it was very accurate with simple adjustments. The slot adjustments seem OK, but cheaply made. After ripping some angles and checking them, I do like it. I was using a thin kerf Frued blade. When you cut angles or you really want very good close fit, is it better to use a thicker blade? I would see a very smooth area and then an area that showed some slight roughness Probably time for a new blade
-
Anyone who has been wanting an Incra 1000HD miter gauge but balked at the $200 price tag here's your chance. Rockler has them on sale from 10/1 to 10/28 for $129.99. I bought mine about 5 years ago when they went on sale for under $100 and totally love it. With the adjustable miter bar it fits my 1986 Craftsman saw perfectly.


.thumb.jpg.573d1497d0675219908c85aabefd797a.jpg)


.jpg.ff6e5c0d0f72259151f304de0a713be8.thumb.jpg.977c61240eff1de107eef329c3ebb18c.jpg)