Search the Community
Showing results for tags 'dowel'.
Found 17 results
-
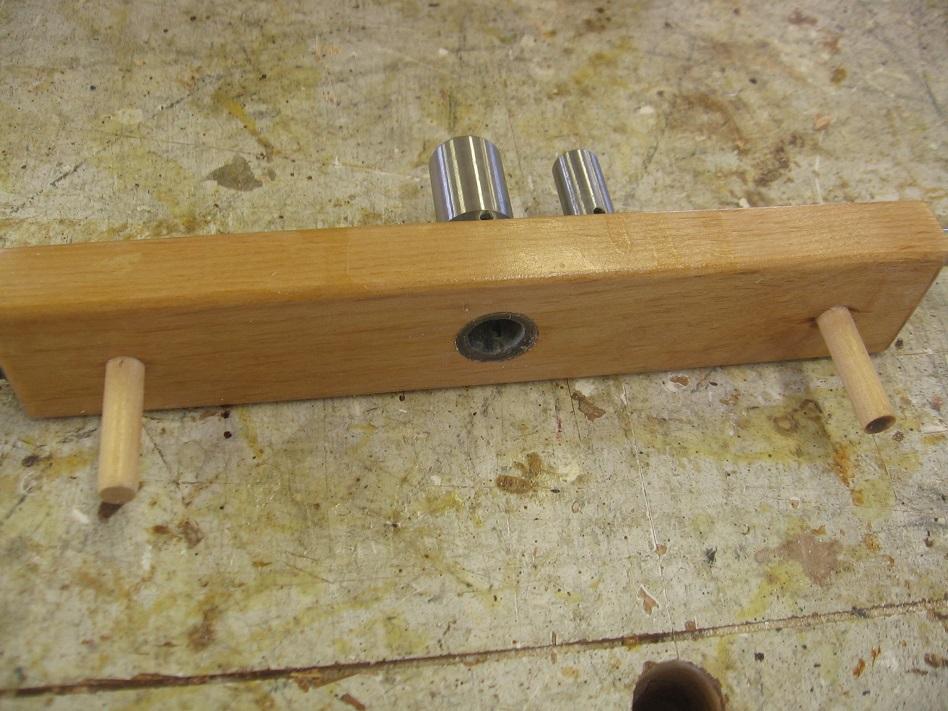
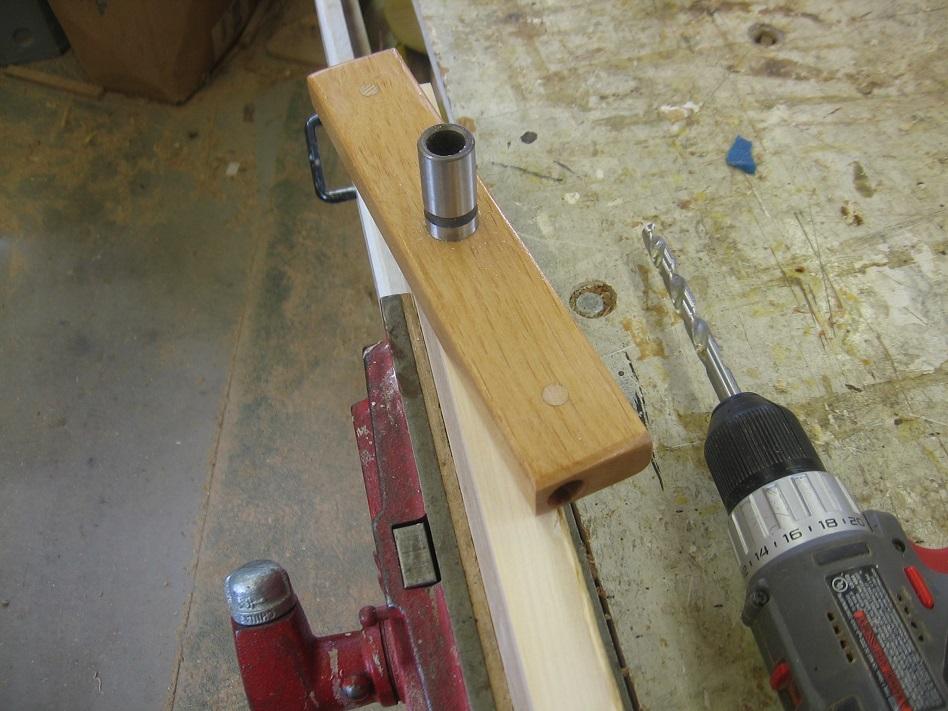
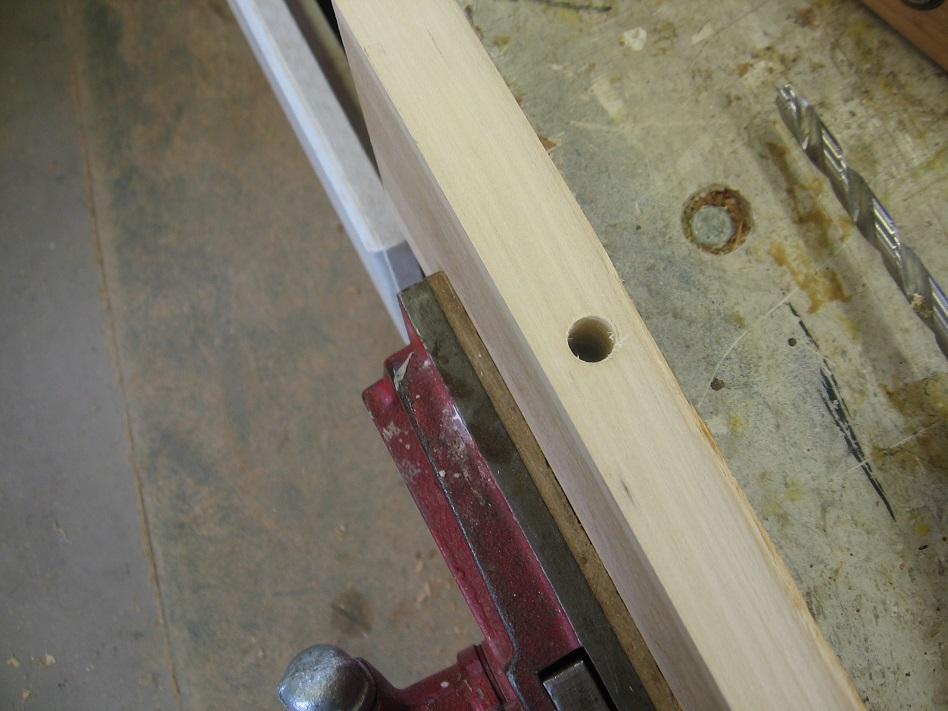
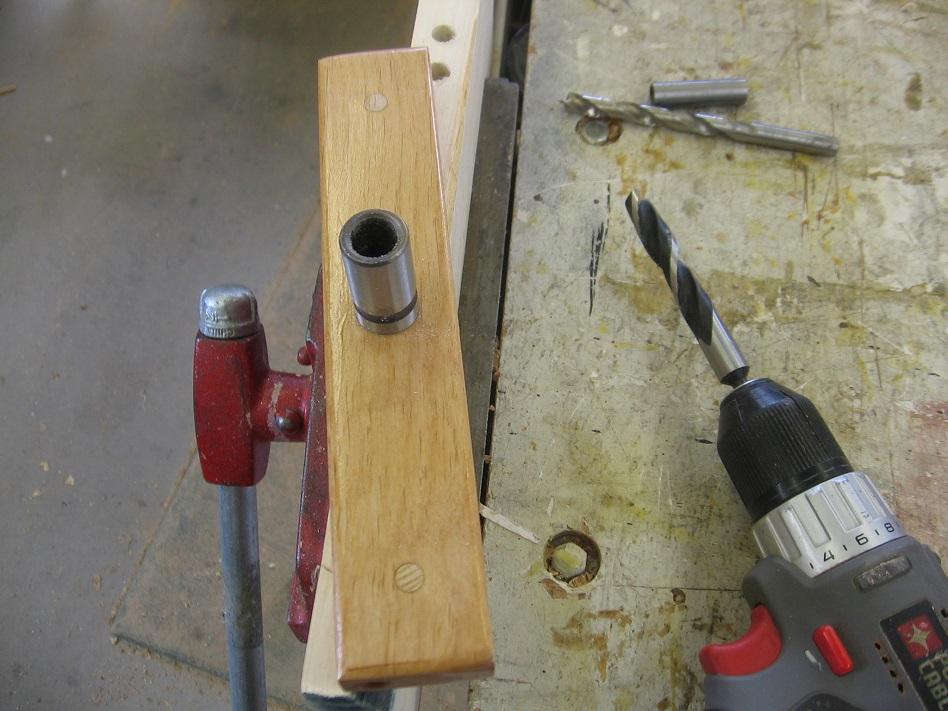
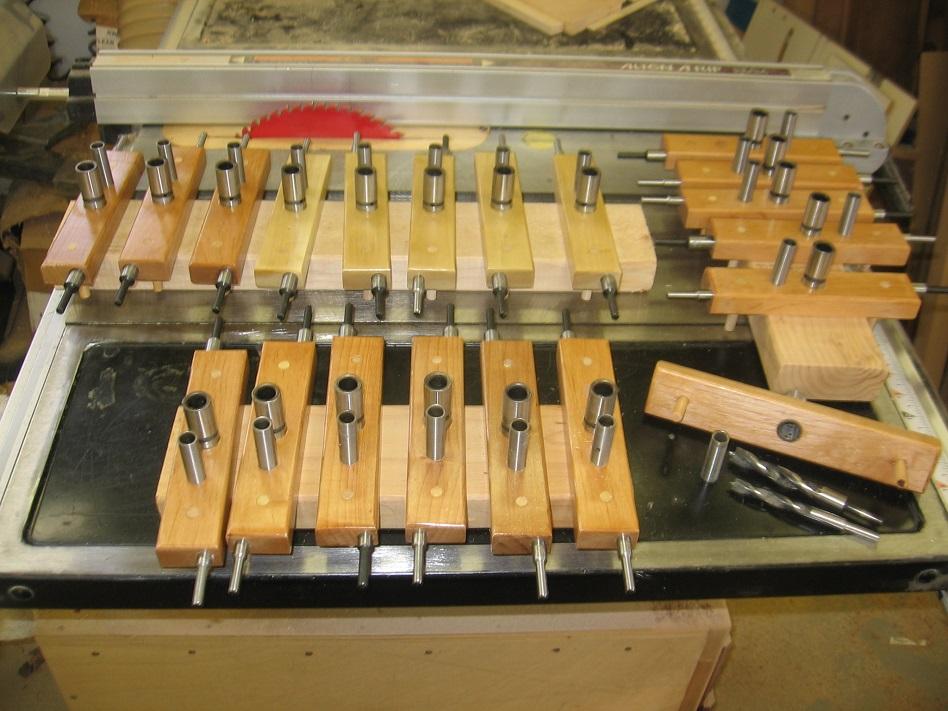
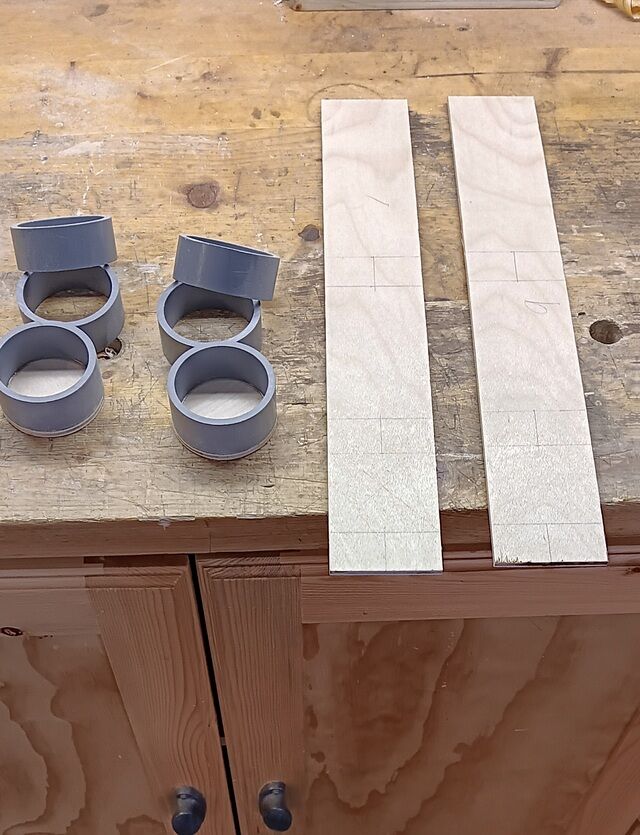
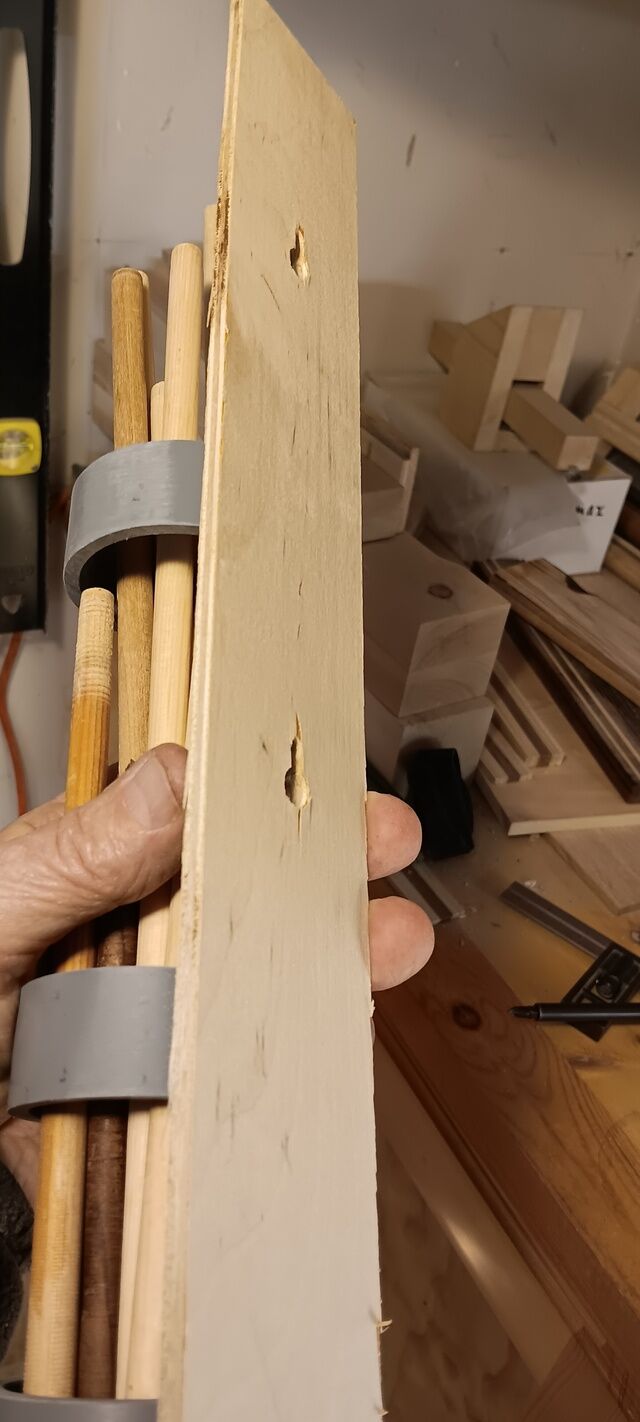
Gads!! With all the dowels I already had plus all the ones I've been making lately trying different methods of making them, I realized throwing them at one end of my bench isn't cutting it as storage!! What a colossal mess!! So I decided to make storage for different size dowel. Mainly for 1/4", 3/8", and 1/2". Here are the pieces for each storage unit cut up. There will be three. Each storage unit is made up of 1/4" baltic birch plywood as a backer board and three 2" diameter x 1" pieces of scrap pipe. The 1st ring is the bottom. I used 5 minute epoxy to adhere a piece of Baltic Birch on and flush trim routed it. Vertically the 2nd ring is spaced 3" on center to the 1st. The 3rd is spaced 5" from the 2nd. Then I epoxied these on the backer board as shown here. This spacing of the rings allows for different dowel length storage. I can store as small as a 2-1/2" long piece and as long as 36" or longer with these storage units. Here's an overall dimensional view: On the back of each one I made a couple of keyhole slots which enable me to quickly pluck each storage unit off the cabinet if I need to for any reason. Thanks for looking! Feel free to comment, ask questions and " thumbs up " if you like it! Cheers! MrRick

-
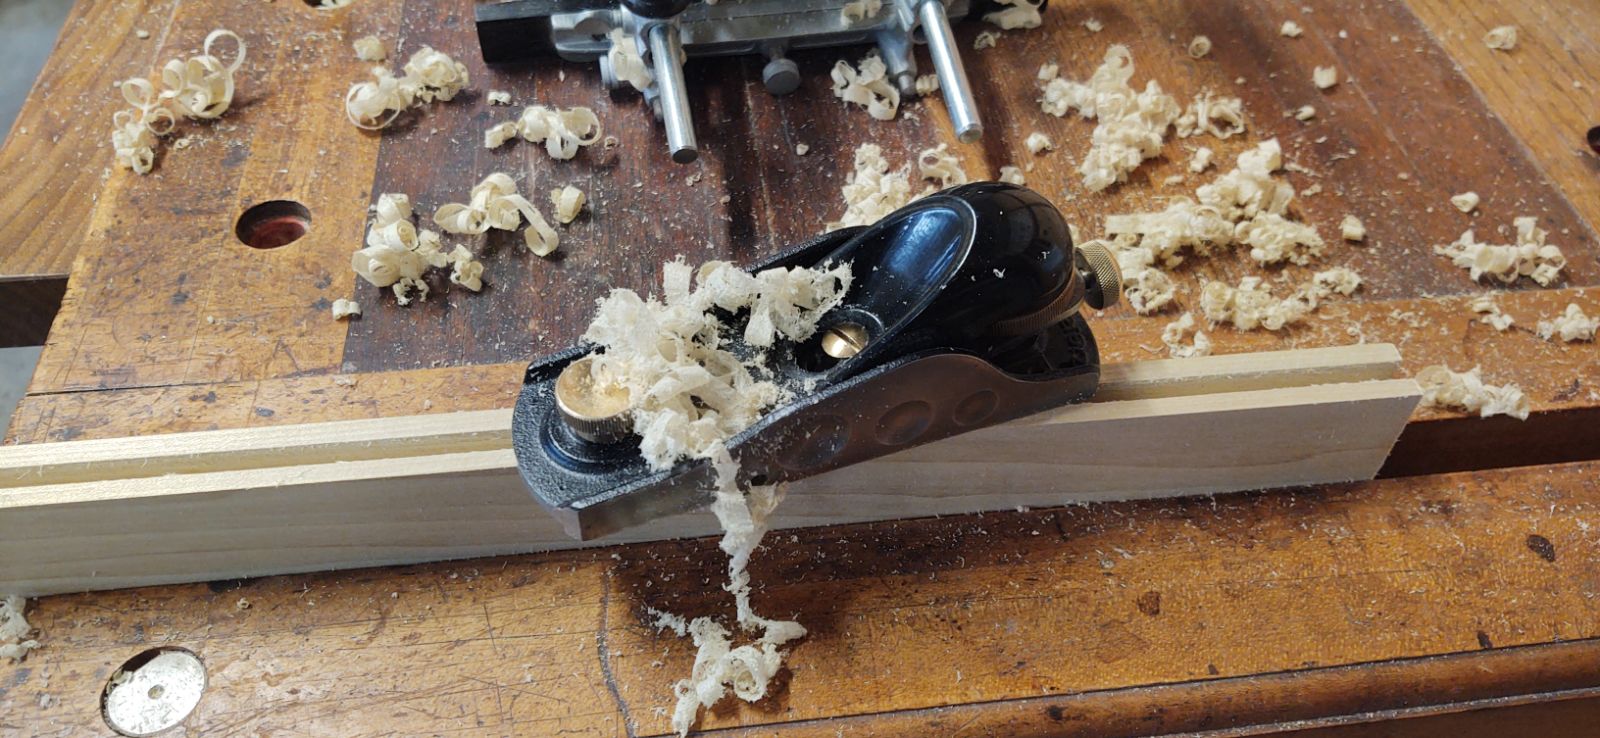
The latest chapter. (BTW, I had spinal surgery yesterday and "avoid strenuous activity for 6-8 weeks. All my Xmas projects are done, so you might see more of my posts here). Why do people think dowels, dominos, or biscuits are necessary for edge-to-edge glue ups. I can understand some assistance in alignment when needed but there are other ways. Dowels, in particular are fussy with alignment and don't add strength. Dowel joints are not very strong. I read a FWW article years ago about why. Boiled down to two reasons: minimal glue surface, most of which is end grain and differential expansion of wood. I have reglued dozens of chairs where once I removed the corner blocks, the pieces just pull apart. Why is a miter saw on the top list of things for a newbie? Unless you are doing construction or on site work, you can do most anything with a table saw. And it has limited types of cuts it will make. Unless you do a lot with sheet goods or live edge planks, ditto for a track saw. Why do people put so much glue on that there are puddles of it running out once clamped.
- 28 replies
-
- 10
-

-

-
- glue up
- edge to edge
- (and 11 more)
-
Ever since reading R. Bruce Hoadley's article (44 years ago), I have not been a fan of dowel joints. In addition, there is no room for error when doing multiple joints in a piece. They need to be spot on. Compare that with biscuits or mortise and tenon where the mortise is a bit longer than the tenon. And after getting into the furniture repair business, I have re-glued dozens of chairs with dowel joints. Once I get the corner blocks unscrewed, they almost always just pull apart by hand. Last Tuesday, I was taking a bunch of dorm desks donated to the furniture bank and converting them to a mini-dresser / nightstand by disassembling and sawing off the kneehole section, leaving a stack of 3 drawers in a cabinet. The ones I worked on then had a stretcher along the back about 10" off the floor. All the other stretchers and drawer supports had dowel joints and came right off. But that stretcher would not budge. So I started to saw off the joint and hit metal. Turns out there was one screw on the outside panel that had a wood plug to conceal it and another from the inside of the cabinet. Result: The one screw was holding much better than all the other loose joints with two dowels glued in. I got a BeadLock jig that I have sometimes used as a dowel jig, but very rarely. I have a few hundred 3/8" dowel pins that I bought to replace non-functional dowels on chair reglues. They will be in my estate sale. I see people doing "tests" of strengths of dowel joints. In my opinion they are flawed for two reasons: they only test one type of stress. There is compression, tension, racking, and shear stress. They test one, usually racking. Two, they are done shortly after assembly and not after several seasons of humidity change (ref: Hoadley) and not accumulated stress. i guess the best thing you can say about dowel joints is they have slow failure and not fast failure. If you are sitting on a chair with dowel joints, it will get loose gradually and not just dump you on the floor unannounced. https://www.finewoodworking.com/project-guides/joinery/the-dowel-joint
-
- 4 replies
-
- 5
-

-
- pocket screws
- dowel
- (and 1 more)
-
Got one of a set of nesting tables from a friend that had a leg broken off. Process of repair: Take off one end of legs with the damage Work apart the joint on the other end since the dowel pins were at right angles Find broken off pieces and glue and clamped them back on Removed broken off dowel pin. Cleaned out holes Filled remaining missing piece with stick epoxy, let cure a few minutes then chisel and sand down to flush Glued in new dowel pin and reglued the rest Lighty sand top Apply a bit of touch up marker where needed Apply a couple coats of shellac, then a coat of lacquer Before Putty with overfill Putty after sanding Glue up Back together
-
A few weeks ago mama decided she wanted a cabinet to store her arts and crafts supplies that are taking up floor space in our upstairs hallway. She went shopping online and found a cabinet she liked for 230 bucks, and it was the typical particle board white surface type of stuff. So I told her I'd be happy to build it and the materials would be less as well. So she and I went to our lumber store and picked up some 4/4 poplar, poplar because she wants the exterior painted white, and I want the interior natural finished. We will be using General Finishes Milk Paint for the exterior. Also, I am going to build saw tooth shelf supports as well. This is our hardwood lumber dealer "Reel Lumber", about 30 miles from home, it's full of all kinds of stuff, from pine to oak to exotics and everything in between. Our Poplar was running about 2.70 a board foot. I spent about 150 bucks, and with the Milk Paint, we are going to come under budget from her online cabinet she wanted, and we are going to have a piece of furniture to pass down to our kids, and their kids. Got the boards home and had to size and join them. Note: if you look behind my Makita CMS, you'll see a cross with a flame in a heart plaque, when I was going through some serious health issues a year ago, my friend Jess @Smallpatch, sent me this very special and inspiring gift, it lifted my spirits enormously, and when I felt I needed a little nudge from the Lord while working in the shop during that rough time, all I had to do was look at my plaque, and I felt it. To this day I cherish it, and I feel the Spirit in it. Just a board on the bench, laying out dado's. Glued up. I built the face frame with a Kreg pocket screw jig, and then glued the frame to the case, and bored holes in the face frame for 1/4" dowels, 1 1/2" long and glued and driven in to the case, then a flush cut hand saw and cut the dowels flush and block planed them smooth. Since the case is going to be painted, I thought adding the extra strength of the dowels would be good since you won't see them below the paint. I also mixed up some two part epoxy and floated it over each dowel, let dry then sanded smooth, just so there weren't any issues with the end grain of the dowels sucking up the paint. Joining boards for the raised panels. Getting the rails and stiles ready for the raised panel doors, I was playing with my Stanley 45 yesterday, and after a few tweaks here and there, she purred and plowed, making some wonderful clean 1/4" wide by 3/8" deep grooves to accept the raised panel. The grooves turned out very nice. After running the grooves in, I used a block plane to take a whisper shaving off the top to clean up the surface. Within an hour I had two rails and one stile done, and I was starting on the second stile when mama called me in for dinner last night. Here is where the case is as of today. The backed boards are beveled and nailed off on the back of the cabinet. Today I am gluing up the door panels. I'll keep the images coming, and thanks for looking! My very special cup, that a friend gave me, and also a cup for mama too!
- 81 replies
-
- 13
-
-
- general finishes
- poplar
- (and 6 more)
-
Doing some Googling and found an old post, it looks like one I wrote, and in 2015 "Stick" copy and pasted into another forum. It was part of a study I did on various joint strengths. Repeating here because I cannot find the original ------------------------------------- All the data I see on dowel joints test against "young" joints, not one that's been through several seasonal variances in humidity. I thought R. Bruce Hoadley put this one to bed 40 years ago in Fine Woodworking... As he says, "If good dowel joints aren’t the oldest joints ever made, loose ones must be." Preview - The Dowel Joint - Fine Woodworking Article tests run on "fresh" joints. And the tests are "racking" stress only. And I am skeptical of anyone who says, "500 pounds of pressure" Force is measured in pounds, pressure in pounds per square inch, and torque in foot-pounds (or the metric counterparts). "For every complex problem there is an answer that is clear, simple, and wrong." (H.L. Mencken) Joint strength is a complex problem.... There are variables in the material Variations in wood species, moisture, density, propensity to split, wood movement indices, etc. etc. Lumber vs. engineered wood Variations in wood axes - Anisotropic – Orthotropic properties of radial, tangential, and axial planes (Hooke's Law) Fit / gaps (is a "weaker joint" that fits well better than a "stronger joint" that is ill-fitting?) Surrounding wood failure (even if the "joint" A is 10 times as strong as another type of joint B, if the wood fails first on both, it's a moot point) Depth of penetration of joint from one component to another Another of the complexities are the types of stress. I identified 6 kinds o stress on a joint -- shear compression tension racking cleavage peel. Did you ever see a dovetail on a chair leg or a half-lap on a drawer? There are also different ways the wood is joined side-grain to side-grain (at 0 or 90, or some other angle) end-grain to end-grain end-grain to side-grain end-grain to face-grain Joints also have multiple attributes Speed to make Appearance Cost, especially if new tooling or special per-unit materials involved Strength And there are multiple stress-failure considerations Soft fail (gradual loosening) vs. hard fail (fails with a crash) flexibility vs rigidity Repairable vs. non-repairable (the "shear pin" factor) moisture fluctuations over time, differential contraction's effects on the joint Dynamic (sudden) vs. static (continuous) stress Most every test is done on a "fresh joint" not one that's gone through multiple wet-dry seasonal cycles. (one of the dowel jig vendors that claims they're the strongest joint specifies materials & their dimensions, type of test, and other considerations to tip the scale. Unless you have end-grain to end-grain (a very uncommon joint in practice), the wood will be moving in different directions and tend to break the glue joint in at least one side of the joint You have minimal glue surface (on a round dowel) and most of that will be end-grain to side grain You have limited penetration distance if you are using dowel pins (usually max at 3/4 to 1" each side) And the big question is, "Is it strong enough?" You have different strength requirements for a chair and a picture frame.
-
Better than any gizmo I've seen to buy. I did try the Veritas one for $300 sent it back. Junk
-
I have been making Christmas ornaments for a dozen or more years as a give away item. This year i made icicles and they were also good for a lot of skew practice. They will definitely get to a family and a few friends but because of Covid most will not be given out until hopefully next year. Made 60 of these and used 5/8" birch dowel rod for the blanks. Here is my tree with all those that I made over the years.
-
https://www.finewoodworking.com/2020/04/28/awesome-joinery-for-diy-projects
- 12 replies
-
- 7
-
-
-
- biscuit
- pocket screws
- (and 3 more)
-
When I was turning all those lighthouse ornaments I was using pieces of dowel rods. When I chucked them up sometimes they didn't run true. I remembered a trick and used it to get the blank the straightest and therefore using less material. Here is a clip from a video I ran across that shows how it is done.
-
I made a couple of these for my family and got another request for a couple more. I made them out of Cedar fencing boards and painted with some fence stain/preservative. I made each finger and then joined with glue. After the glue set, I made a cut thru the knuckle and put in a spline. I also drilled all the way thru the fingers and glued in a small dowel to hold the fingers together. The childrens sunglasses came from the Dollar store
- 12 replies
-
- 10
-
-

-
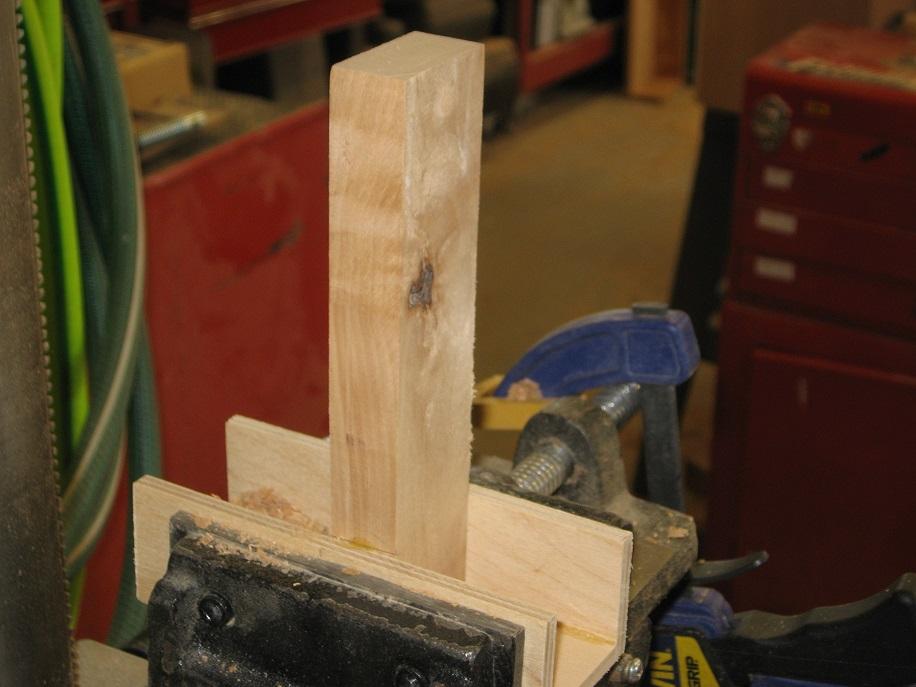
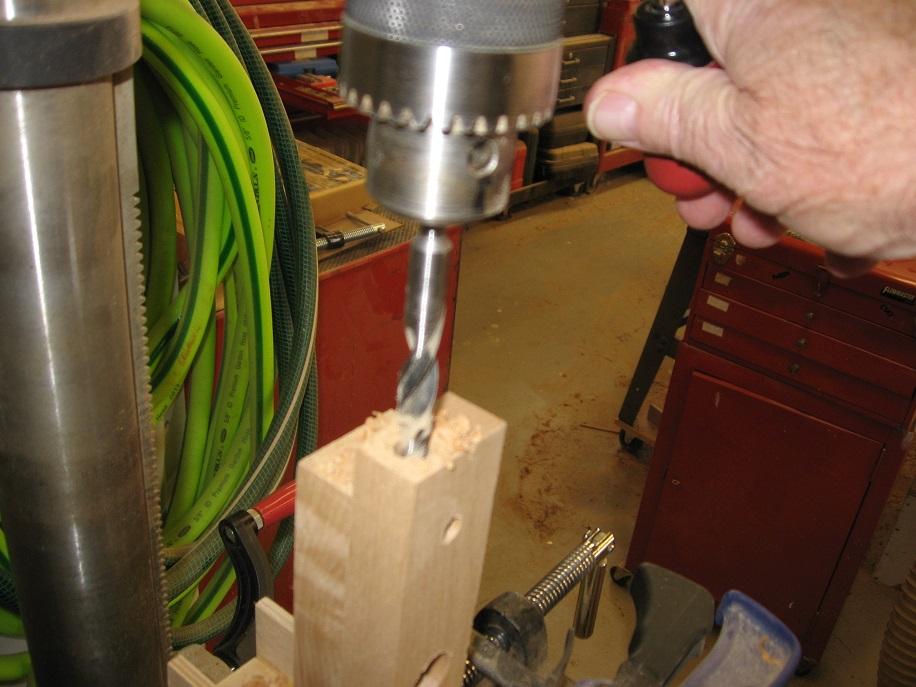
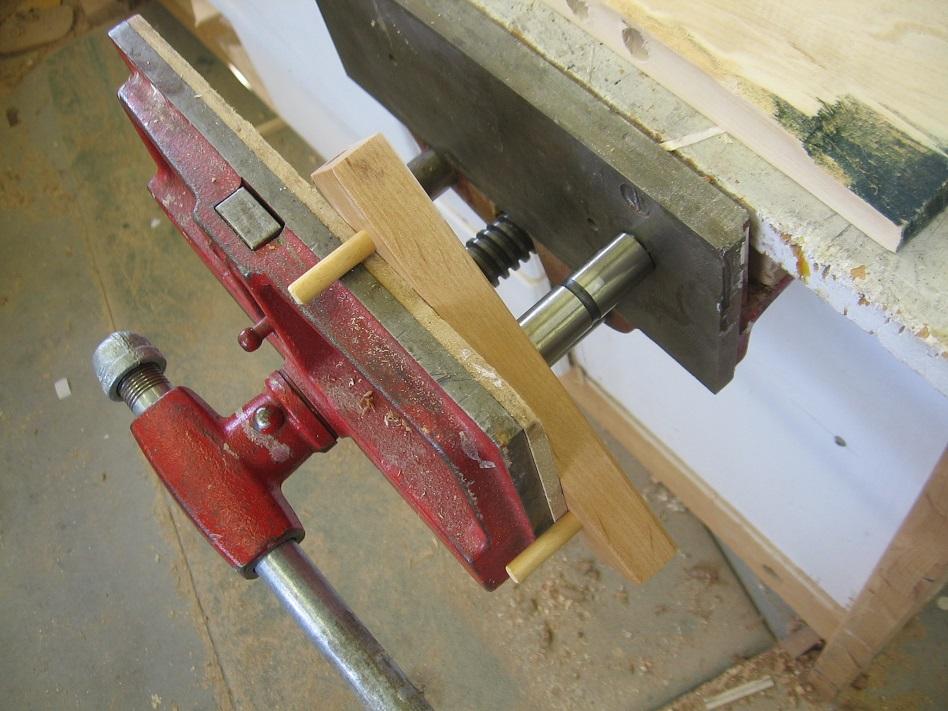
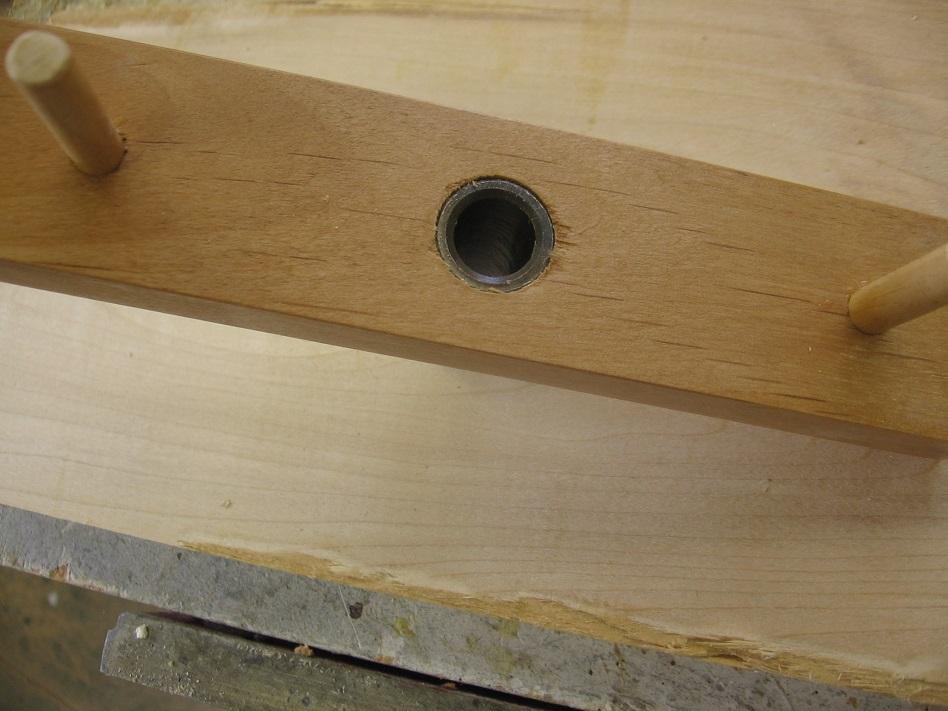
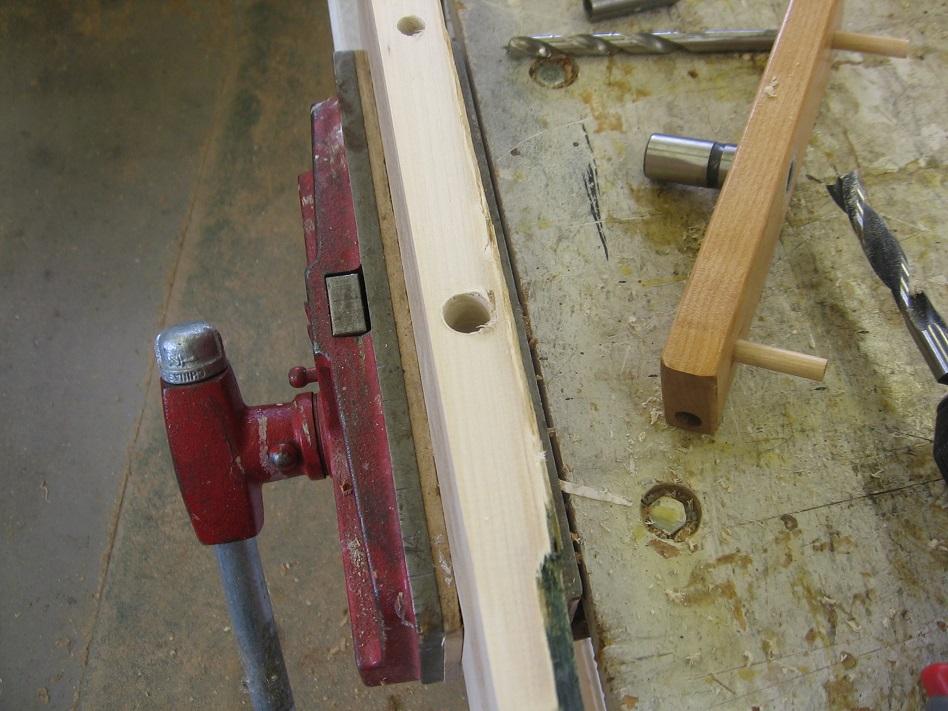
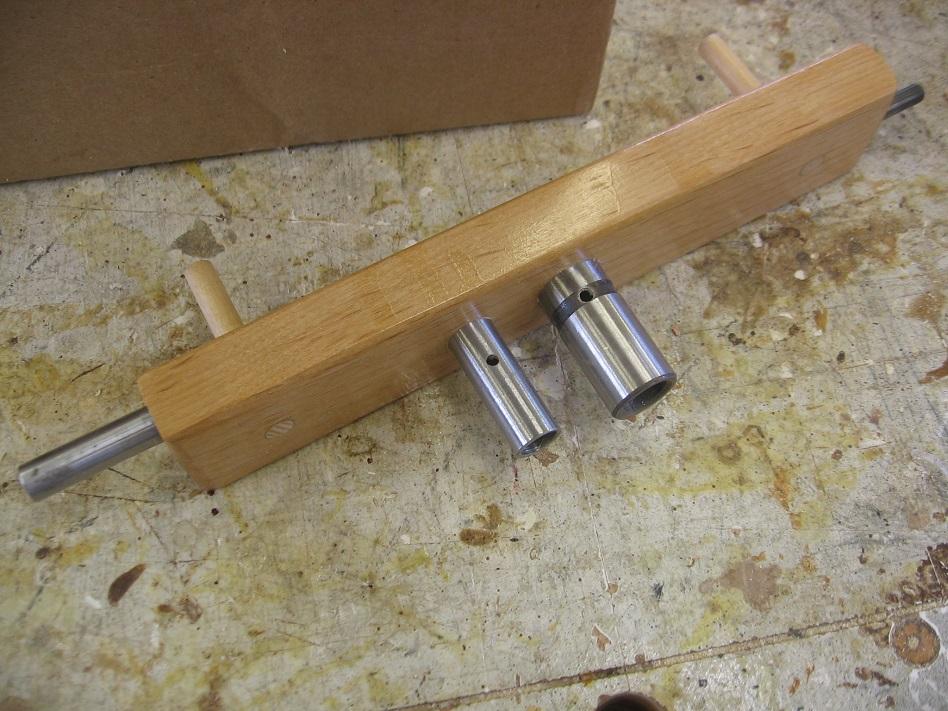
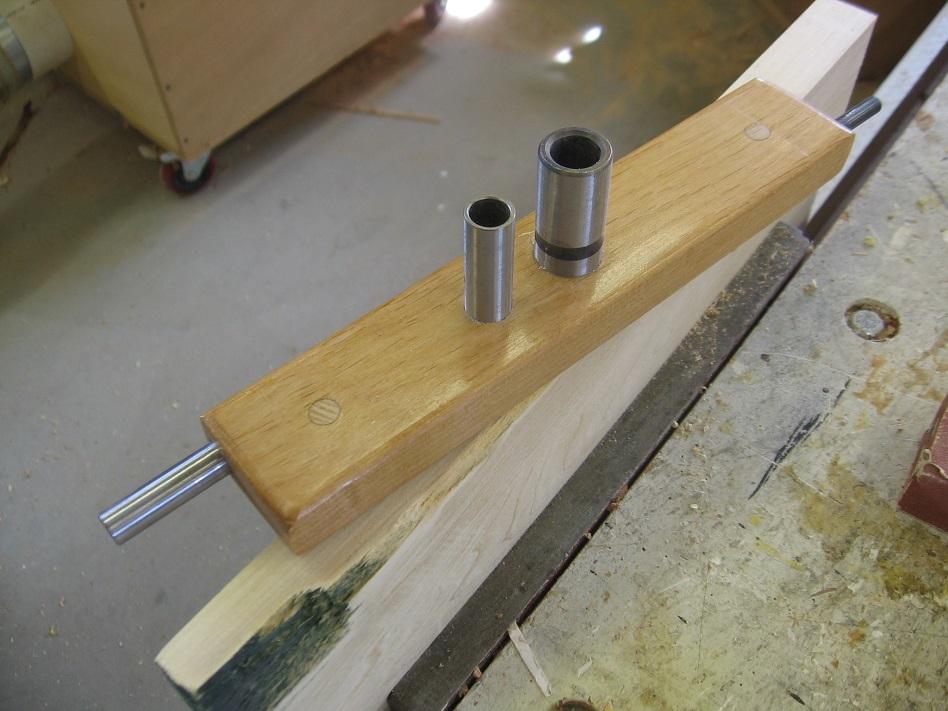
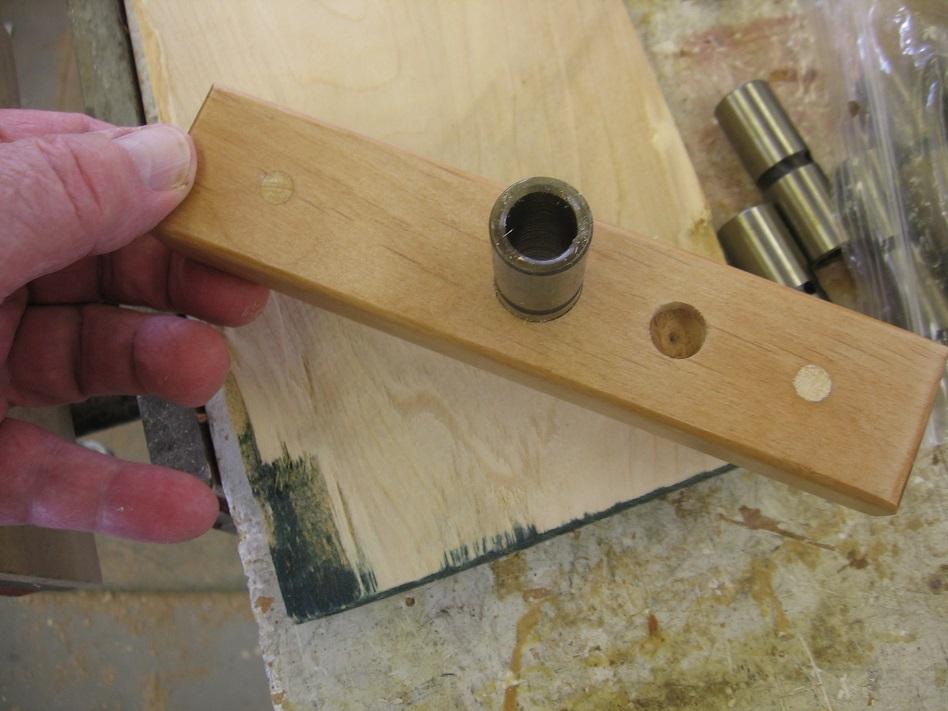
Well it that time again coming up on the Dec. Woodworkers club meeting I always have made some little thing for the members, we usually have 15-20 members show up. This year I made a doweling jig. Here are the picture of the build. Herb
-

Its been shown before but still questions
Smallpatch posted a blog entry in Small Patch Musings and Such
this is not the same box but is the way I start building one. I have to print out 10 exact patterns. The tenth one is just solid with no holes for drawers. All the pieces I cut out for the drawers are later glued together except for the front of the drawer and the back of the drawer. I use dowels to line up everything . If I don't use the dowels when clamping two pieces together it could slip just a hair one way or the other and cause lots of extra sanding or cause for the trash can. Each set of holes has to be in a different place than the next side of the pieces. And you can't drill the next side until the first side is marked and drilled and glued. Drawers are somewhere around 5 1/2 to 6" deep. The body being one solidly glued up mass with no cuts joining each drawer keeps it all from warping from season changes.. I use brasing or stainless steel rods for drawer pulls before I start spraying the clear lacquer so they will stay looking good and not tarnish. I also put a wider drawer front on to cover up the possible gaps from sanding and creating a back looking mess. And here also the dowels help to line up the drawer fronts. So far, all the sawing was with the scroll saw so the reason I call my boxes scroll saw jewelry boxes. Now before I glue the front of the drawer on and the back of the drawer on I first mark where the cavity of the drawer will be and cut that area out with a band saw. Then using the dowel holes I first pt in the pieces I can now glue the on and they will have bee lined up before the cavities of the drawers were sawn in... Its not a good idea to be drinking beer when all this is taking place for all these holes I drill has to have a stop set on the drill press or else... There is way more preparation in one of these boxes and a few more weeks involved.. I cut the last 4 boxes I made out outside my motor home while sitting in an rv park in Colo.. I had all the wood glued together for each piece I needed and would only glue on one pattern one at a time as I started to scroll saw each piece out... Gluing a pattern on two or three days before the sawing takes place the pattern will shrink and stretch and some might ruin to not be usable. I always took two or three extra patterns and pieces of prepared wood just in case... I have also found two different printers will make different size patterns even though I use the same pattern in two different printers..Not good when I am having to make multiple patterns and needing some more away from the printer I first used. When cutting out this many of the same thing and needing them as close to each other as I can get them, I find I have to start my scroll saw cutting from the same place and go in the same direction on all the pieces... Going two different directions on two different pieces a person has a tendency to lean or push the wood just enough to make differences and I get get bad line up problems and then add that many more pieces it gets too wild....Yes it ruined my very first wide box because of this... Using the dowel system where at least 3 dowels and most of the time 4 dowels on each side of all the pieces I can get things more manageable when its time to sand it all smooth on the inside and the outside and all the drawers.. All these have to stay in line as to how they were sawn so lots of marking goes on and off. Don't even know if this is understandable or not?? And I can sure see the difference in my sawing from starting in the morning or just before I quit at night. Those lines can sure get wavy. Jess -
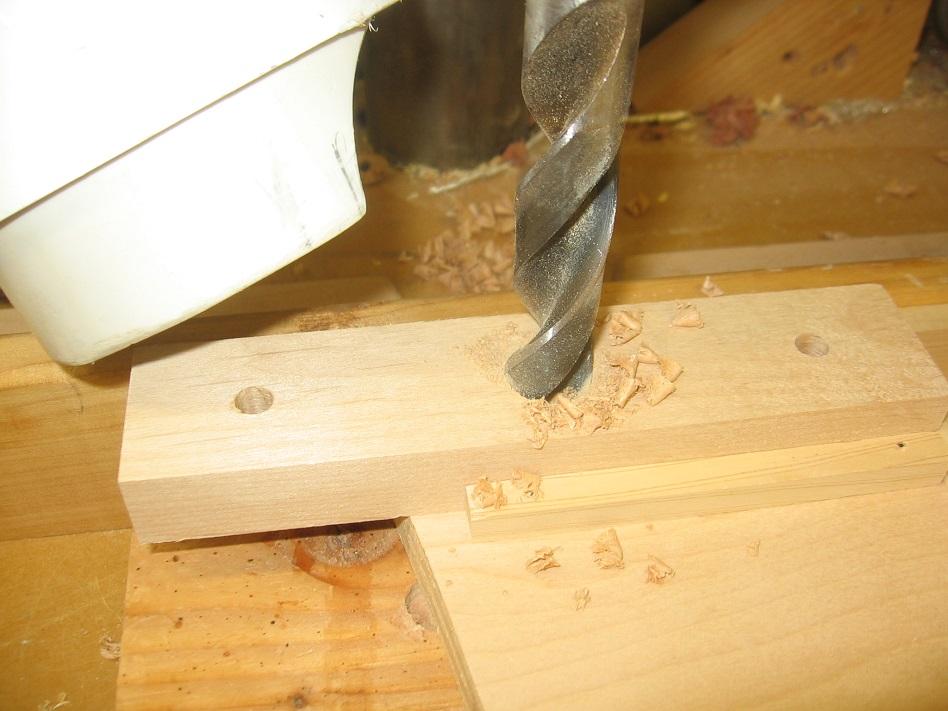
I recently made a thread cabinet for a sewing friend of mine. The spools were to be placed over dowels to keep the thread spools in order. I needed 168 four inch dowels. Decided I need 20 four foot dowels to come up with the number needed. Couldn't see myself making 168 cuts so I came up with a plan to wrap them all together with some plastic stretch wrap and give that a whirl. Marked off the a dowel every four inches and wrapped the dowels together in between the marks stretching the plastic nice and tight and put them through the table saw. Worked nicely. Got them all cut quickly and smoothly.
-
And I got a day more to go. The things I do.Well point is I bloody well didn't want to buy 2" diameter dowels but I needed 'em, For most of the day it was not going as well as I'd hoped. I was getting a horrible surface finish - - all choppy. I was getting inconsistency of about 0.020" from end to end but I dialed that in to about 0.010" error I'm using a router on a lathe. On my lathe I built a very stout rig from 1.125" maple that supports a wide board about the same thickness above the drive and and tail stock center much like the guy has in this video only doing it in the lathe better because it's on bearings and I can adjust the height and location of the board. But my router cutter is not giving me a nice finish it's all choppy. I built two different slow speed rigs one gave me about 60 RPM and the other 20 and neither improved the result. They let me product a finer finish but there were other problems. The slow speed produced a very coarse threaded-like surface unless I moved the router at the speed of a clock's hour hand. I had been in the middle to lower range of lathe speeds before so I decided to crank it to ELEVEN and see what transpired.. Success~!! A pretty good surface that a little 80 grit paper was able to fettle up nice as a baby's bum. I got to make three of these dowels They are going to be split down the middle and put in the planer on a jig just for them then glued back together to produce a shape ( seen from the end) like this: That is the inside part of a tripod leg. My lathe is a little Walker Turner Driver line. The motor that came with was the original. I couldn't stand it because it was weak, so I replaced that with a 1HP 1750 Baldor. Now nothing stops it. It's a sweet little lathe, but I yen for bigger & badder.


.thumb.jpg.573d1497d0675219908c85aabefd797a.jpg)