
Search the Community
Showing results for tags 'plane'.
-
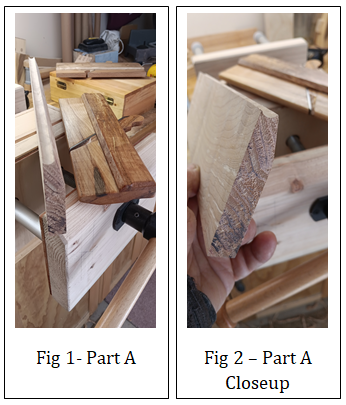
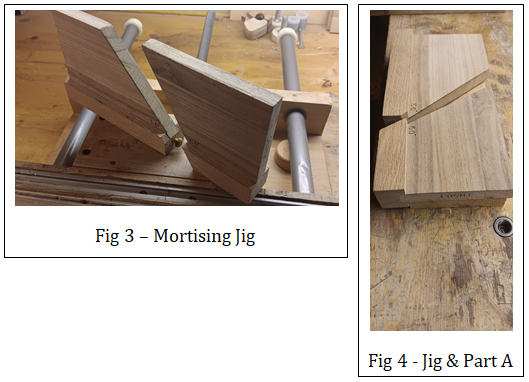
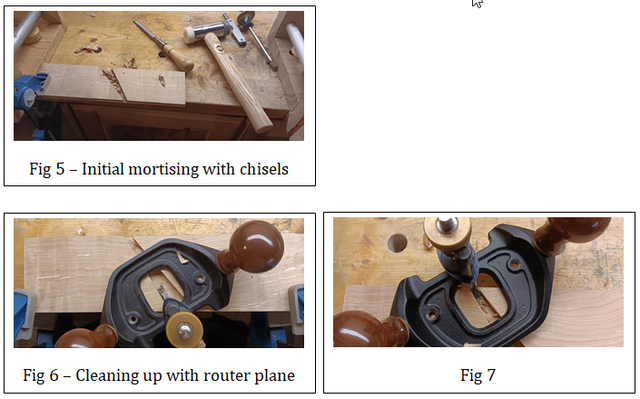
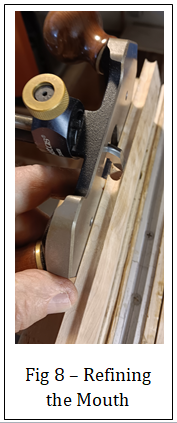
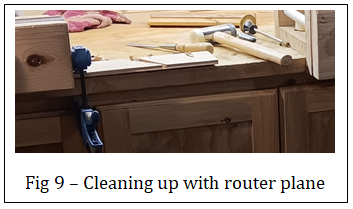
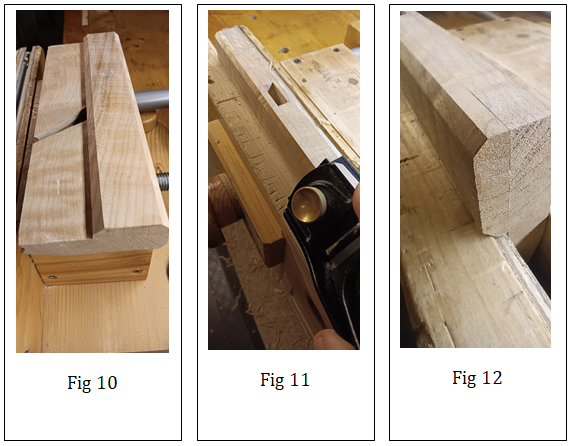
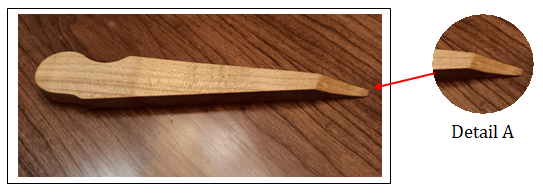
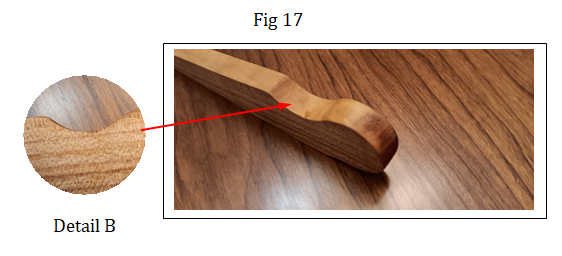
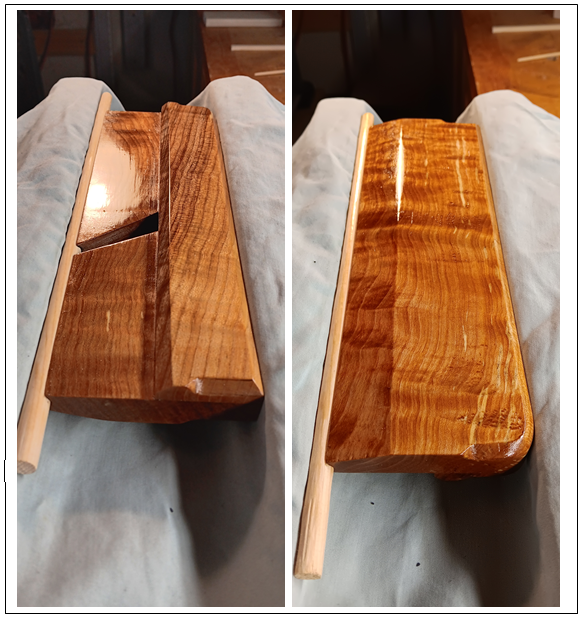
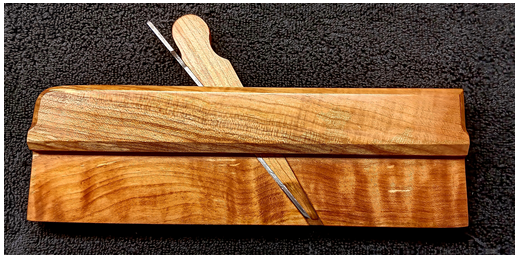
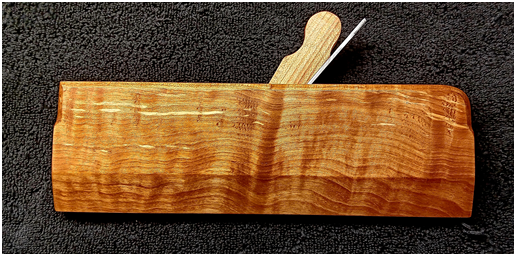
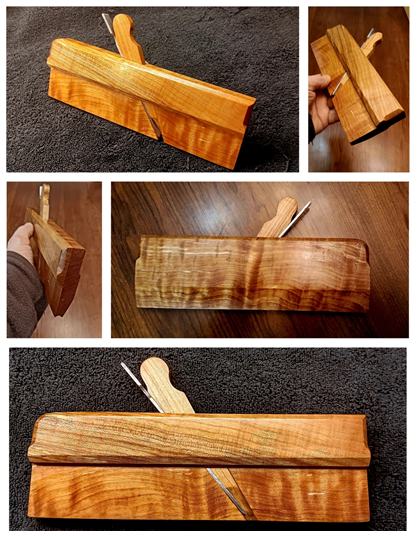
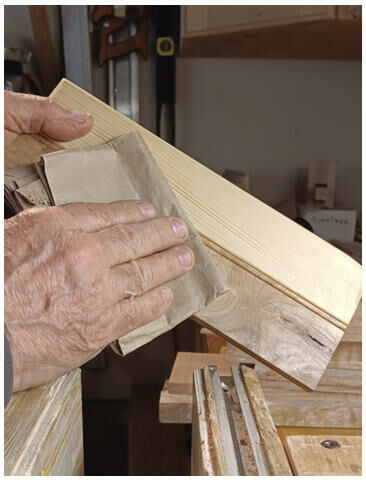
Introduction I enjoy doing most of my wood working projects with hand tools. I feel that I've become adept roughing stock with handsaws and squaring all four sides by hand planing. I've also become much better at joinery over the years with my favorite being handcut dovetails. One area that has intrigued me is creating mouldings with hollow and round moulding planes. Pursuing this has taken me down the road of making moulding planes. It has been a delightful pursuit. In addition, I make the blades or cutters and go through the whole heat treatment process. The Beginning I started by cutting two finished blanks out of Spalted Maple. These two blanks make the complete body of the plane. The first one (Part A) was milled to 5/8" thick x 3-1/8" high x 10" long and is the main body and left side in one piece. The second (Part B) was milled to 3/8" thick x 1-9/16" high x 10" long and is the right side that is laminated to the first piece. This plane will be a No. 2 ( 1/4") Round Moulding Plane. In Fig.1, it's mating plane, a 1/4" Hollow Moulding Plane sits on the right. It was used to make the 1/4" round groove as shown for the new plane on the left. When done this will make a matching set of 1/4” Round and Hollow Moulding Planes. See the closeup of the new plane's bottom in Fig 2. Mortising the Escapement Area Now it's time to mortise the escapement area for the blade's bed, cheek, throat, mouth, etc. I made this jig, see Fig 3 below, that I use for locating the bed angle at 50° and the wedge face at 60° on Part A. The jig has an adjustment screw that allows me to fine tune the mouth opening for Blade and Wedge. I can explain further how I use this jig if anyone is interested. Once I have the jigs placed where I want them (see Fig 4), I clamp them down on Part A to the bench and scribe the mortise cavity to be cut. Initially I cut the mortise cavity boundaries using my chisels (see Fig 5) Then I use my Lee Valley Veritas Large Router plane to excavate the cavity as shown in Fig 6 and 7. Here in Fig 8, I’m refining the mouth with the router plane. Fig 9 shows how I’ve clamped it to the bench while mortising. Laminating and Shaping Next in Fig 10, I laminated the Right Side (Part B) to Main Body (Part A). I then started chamfer detailing . In Fig 11 - 13, I am chamfering along the top edges and bottom edge of the Right Side (Part B). In Fig 14 & 15, I have done Stopped Chamfers for the front and back corners. The Wedge Next I shape the wedge Per Fig 16. As mentioned earlier the bed angle is at 50° and the wedge face at 60° on Part A. The wedge will be a 10° angle and is approx 6” long. Making the angle slightly larger initially then fine tuning to fit the mortised area is advisable. Detail A shows the curvature required for the shaving to climb up and out as you are planing. Fig 16 Per Fig 17, this is the notch, Detail B, for assisting in wedge removal. Blade This is the complete 1/4” round blade per Fig 18. I didn’t go into detail here with the whole process of shaping, heat treating, honing, etc. Again if anyone is interested and has questions please let me know. Fig 18 Finishing To start I coated all the plane body (except the bed) and the wedge with two coats of 50/50 cut Tung oil. Per fig 19. I let this cure for one week. Fig 19 Then I brush coated with two coats of Shellac and allowed to dry overnight. The actual sole is left only with the tung oil coating. After this, I French polished with shellac to make the grain “pop” per Fig 20. Fig 20 Finally per fig 21, I coated and buffed eveything with wood butter except the bed and bottom of the wedge. Here’s the completed 1/4” Round Moulding Plane per Fig 21 and Fig 22. Fig 21 Fig 22 Thanks for Looking! Cheers! MrRick

- 7 replies
-
- 3
-

-

-
- plane
- moulding plane
- (and 3 more)
-
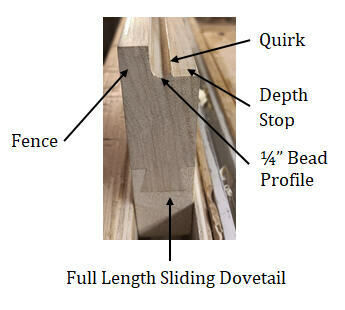
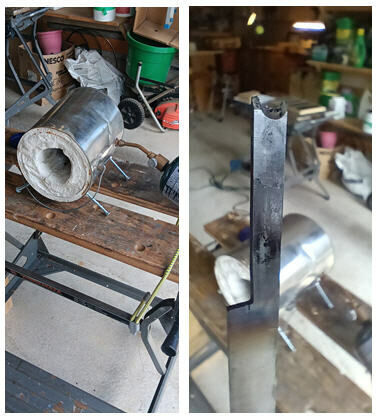
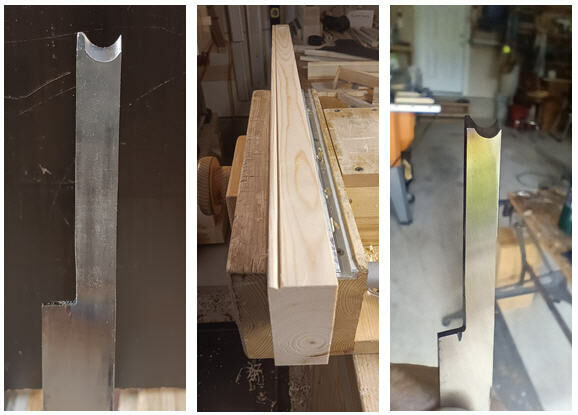
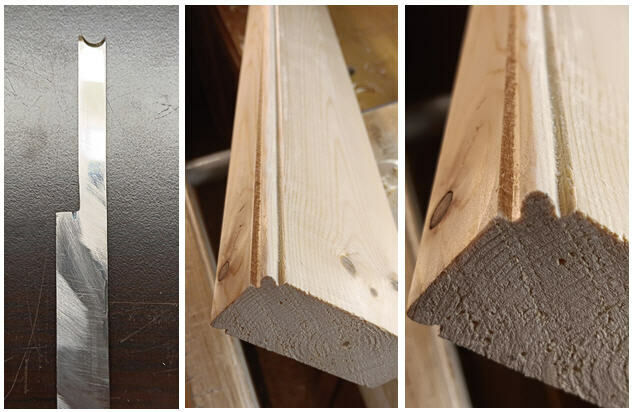
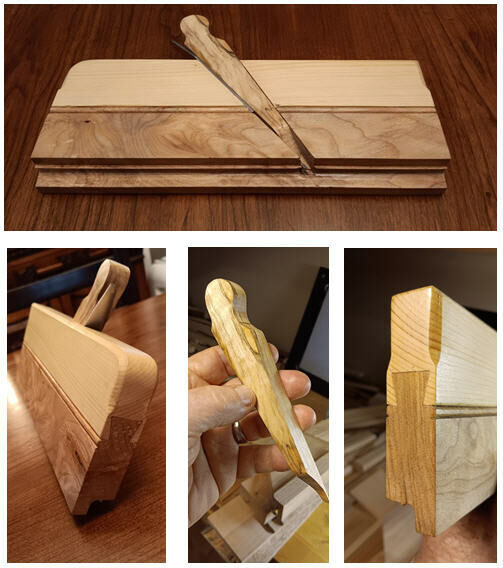
Introduction - Why Use Moulding Planes? Moulding planes are extremely effective tools- quick to setup and easy to use. They can take the place of most router bits and leave a much cleaner surface. Plane irons shear wood fibers, leaving a perfectly smooth surface ready for finishing. A router bit, no matter how sharp, leaves a scalloped surface behind. Now, if you are running 1,000 linear feet of crown molding, a router/shaper is the way to go. If you want to quickly add a bead detail to a door or table apron, tweak a rabbet, or cut a few dados, you can grab a moulder and have it done in seconds. It's also much easier to quickly wreck a piece using a power tool than with a moulding plane. Not to mention the dust, noise, and danger inherent in power tools. Moulding plane blades were normally bedded at 45 degrees to the sole of the plane, though British planes commonly used 50 degrees (York pitch) or higher. As the bedding angle increased, the action of the plane iron becomes more of a scraping action, and less of a shearing action. This is the same effect as increasing the effective cutting angle of a bench plane. The benefit to a higher pitch is that the plane will perform better on hardwoods with difficult grain. The cost is the plane may be harder to push and has a reduced usable edge life. On the other hand keeping the blade sharp goes a long way to making it very effective. The Concept I started by selecting a piece of Spalted Maple and Pine. The idea here was to mate the two together vertically where the top half will be the Pine and the bottom half will be the Spalted Maple. Pine has a nice soft comfortable feel in the hand. So I wanted to chance using it for where the hand rests on the top half of the plane. I needed the structural part on the bottom where the bead profile, quirk, fence, and depth stop will see the wear. So instead of getting into boxing solely for structural benefit of the bead profile itself, I decided to make the whole bottom half Spalted Maple. This side bead moulding plane cuts a bead on the edge of a board. Because of the integral fence and depth stop it is simple to use- hold it upright against the edge of a board and plane until it stops cutting. Very simple. These type of planes are always boxed- at a minimum the "quirk" of the bead is boxed. Better planes are completely boxed. As mentioned, my whole bottom half is boxed. These are very useful planes to have on-hand. A bead detail is useful anywhere you want to add interest to an edge- along a table skirt for example. It also serves to soften a sharp edge, protecting people and the edge from splintering. A bead is also a good idea anywhere you want to distract the eye from a joint where two things meet- along a the vertical lines of a door, or along the edge of a ship-lap back of a case piece. The bead hides subtle variations in the edges from the viewer. Building the Body and Wedge The overall plane dimensions are 1” x 3.5” x 10”. I hand planed the two halves and squared them up all around. Then I joined and glued the two halves with a full length sliding dovetail (as shown). Next, I shaped the bottom full length with the ¼” bead profile, quirk, fence, and depth stop. I then cut out the mouth, cheek, bed, and breast. The Bed Angle is 50° and the Breast Angle is 60°. The primary bevel angle on the blade is 35°. Next, I shaped a 10° Wedge. The final shaping comes after making the blade. Detailing There was some very minor chip out along the mating surface edges of the upper and lower halves, between the Pine and Spalted Maple. So I decided to use my scratchstock and strategically place a bead on both sides at this parting line. I started to use my Lee Valley Veritas cast iron scratchstock but its fence depth was not great enough. So I used my home made scratchstock with the veritas ¼” bead cutter. Surprisingly the scratch stocking was very successful. Spalted wood especially Maple is not easy to do but can be if you monitor your pressure and speed. Making the Blade It’s now far enough in the build that the blade needs to be made. I assembled the rough cut out blade stock into the plane so that it was just poking out of the mouth and scribed the bead and quirk outline on it. Next, I setup my homemade forge. I showed this in a previous post. I then annealed the blade to remove the hardening. Next, I cleaned up the blade and gave it the first grinding, shaping and honing. Then I re-hardened the blade. Before going too far, I wanted to make a test cut to make sure I had made a functional plane. I didn’t want to push cutting too much because the blade at this stage is brittle. The test cut was very pleasing. Then I fired up the forge again and tempered the blade. A straw color means it’s perfectly tempered. It softens the steel a bit and readies it for final honing. Lastly, I did the final honing to the blade. I used my DMT Diasharp diamond stones 600, 1200, 8000 and final polishing with a Shapton Ceramic waterstone 16,000. It came out very very sharp! Then a quick final test cut pass confirms the blade is ready for use! Preparing for Final Finish After the first coat is dry, I go over with a brown paper bag. This is an old woodworker’s technique that many seldom hear about. It de-nibs, lightly sands and buffs the wood. IMO it’s better than steel wool, costs nothing really, and cleaner for the surface. The Final Finish I applied the final finish. I gave it 3 coats of General Finishes Oil based Gel Top Coat, Satin. Each coat dried for 12 hours. Between each coat I Brown paper bagged it. Then I gave one generous coat of wood butter and polished. Hope you enjoyed this! Cheers!! Thanks for looking! MrRick
- 9 replies
-
- 9
-
-
-

-
- plane
- moulding plane
- (and 1 more)
-
Still needs to visit the water stones, but.. This has now been rehabbed a bit.. Maybe a coat of either dark blue Rustoleum..or...semi gloss Black...this is the Type 2 version...with the stubby tote(toe-less) Also needing a clean up...was what was inside this box.. Maybe I should make a new one? Inside? Handsome, ain't they? spread this mess out a bit... These are for drilling wood , with a Brace Drill....there was 2 others in the box.. But, these were more for drilling metal, with that Brace Drill... I cleaned up the smaller bits.. Which seem to be Irwins...a #5 and a pair of #4s...these are measure in 1/16" so a #4 is 4/16" ( 1/4") and that #5 would be a 5/16"... I also cleaned up the Jennings bit.. Stamped as a Russell Jennings #13......13/16" Will work on the rest of the Irwin bits later... Stay tuned..
-
Wanted to show off the Christmas gift my crew at work got me. 26” wooden jointer plane. Complete with iron, chipbreaker and wedge. Needs a little work to get it back in shape but pretty sweet. The iron shows Providence Tool Compay and is bimetal, cast iron to carbon steel. Not sure if it’s original to the plane but it’s about right for the period.
- 13 replies
-
- 8
-
-
-
-
- wood plane
- plane
- (and 5 more)
-
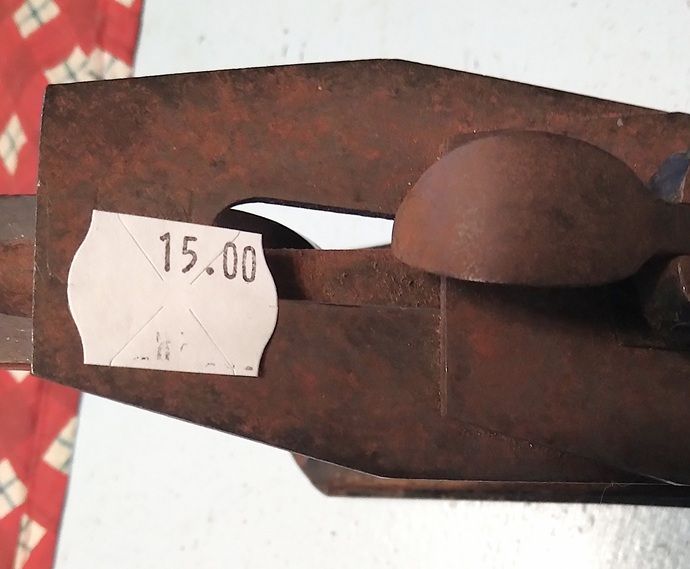
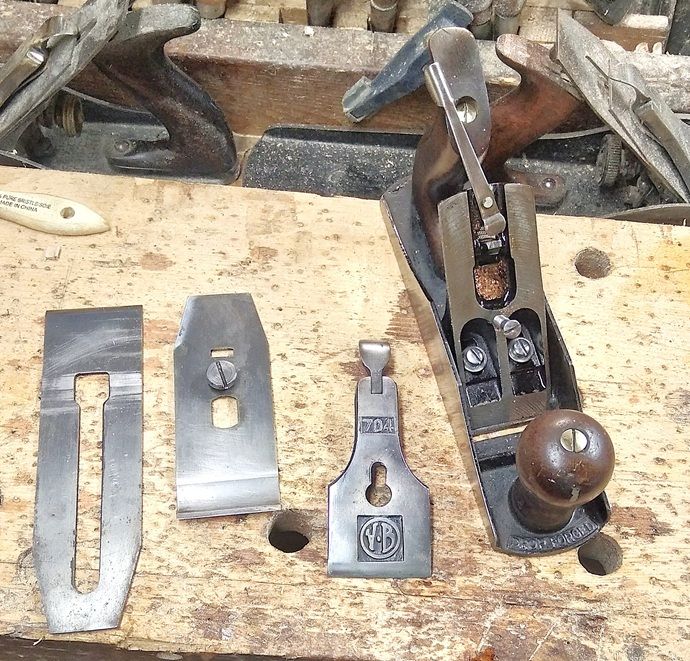
This is the price tag.. $15, for a #4 sized Hand Plane! Hmmm.. No..it is NOT a Stanley Bedrock No. 604.... Something else....Vaughn & Bushnell No. 704 After just spending a dollar Bill for a Shelton No. 4....this was a bit expensive....both are the same size.. Took the #704 apart to clean it up... About an hour later... Have taken the iron upstairs, to where I keep the water stones..once the iron has been sharpened up..it should be about ready to go to work.. Stay tuned..
-
Curious, has anyone here tried the EC Emmerich hand planes, they've always fascinated me and I've been tempted quite a few times. But each time I ambush the effort. I am not interested in the mechanical Primus planes they sale, but the more traditional planes with wedge and iron.
- 6 replies
-
- 3
-
-
- ec emmerich
- plane
- (and 1 more)
-
I found this young mans video entertaining, while building his Tea Cabinet. At first when I saw his shop full of Japanese hand tools, and he starts out by processing his lumber by power, I questioned why did he have all the hand tooling if he's only going to process by power, but he quickly transitions to hand tools and displays his skill with the craft. I do love the simplicity and minimalist design of the cabinet. On a side note, I recognize that Hitachi F1000A combo jointer surface planer he has, I had one just like it, and I do love his little table saw.
- 9 replies
-
- 5
-
-

-
- tea cabinet
- cabinet
- (and 6 more)
-
My daughter gave me this adjustable wooden window sash plane for Christmas. It’s amazing to look at old specialized tools like this and see the amount of wear on it and think about the number of window frames it made in it’s life. It’s all there but would take some work to get it back in running shape again. Might just leave it alone and let it tell its own story.
- 6 replies
-
- 9
-
-
-
- sash
- window sash
- (and 2 more)
-
Well, yesterday, I finished up using a #45 as a Plough plane, to cut grooves with...then it was packed up.. And put back up on it's shelf...This mornings hand tools started here.. Yes, it is a hand tool..as I need to get a few pencils needle sharp.. Plus a square and a mallet..and a bit of sand paper..goal being to work on the drawer sides...They need tails milled on the bandsaw, but... The square and a sharp pencil was need to lay the tails out. Drawer sides were as trimmed to final length..on a "Mitersaw" A "Cordless" one, at that...Langdon No. 72c.. It does a good job of making a square cut.. And it was very busy, this morning.. When I need a mallet to drive these home..yep, we getting better...thanks to those very sharp pencils Jig building, did require a cordless drill.. To build a jig to do dados...Plane is the Stanley #45, Type 4, set up to cut a 3/4" wide dado for the drawer's back to sit in.. Mr. Jackson is there to make kerfs cuts at the entrance and exit points...to prevent any blowouts.. Dados were also cleaned up with a 3/4" wide chisel.. Test fit... 2 dados done...only 14 more to go..
-
How to Make Woodwork Tools - Charles Hayward how to make woodwork tools charles hayward.pdf
- 5 replies
-
- 1
-
-
- woodworking tool
- hand made
- (and 3 more)
-
I found this on my nightly perusal of Youtube
- 2 replies
-
- 7
-
-
-
- low angle
- lie nielsen
- (and 1 more)
-
Had already cleaned up one drill... Which left these 3 items to work on.. Stanley Handyman drill...Craftsman block plane...Fulton Tool Company chisel.. Chisel was cleaned up..where I found the Logo. Overall length is 14"...had to clean and tighten the handle.. Width? 1-3/4" wide...will grind a new edge, someday...to get back past all the pitting... Next up was the Sargent, Made for Sears Craftsman Block plane All cleaned up, iron was sharpened..moving parts got a drop or 3 of 3in1 oil.. Which left this drill A Stanley Handyman No. H1220... I cleaned all the crud off of the drive gear.. Gears cleaned up. Drop of oil in that oiler hole. Chuck shined up..price tag removed..Drill runs nice and quietly. You can even change the speed, by sliding the crank handle.. Opened the red cap And 7 bits slid out... 6 drill "points" and a 1/16" twist drill bit.. So.. These 3 are all cleaned up and ready for work..
-

From the album: John Morris's Hand Tools
I have been blessed with a bounty of hand tools and wood these past few weeks, it's a long story, after returning from my latest trip, and after sorting through the tools, I found this infill plane among many other gems. It's a 1" Infill shoulder plane. At this time I cannot see any markings, the hand plane is ready to use now, the edge is excellent and the body is square and solid. I love this plane, and I'll use it. 7.5" long by 3" tall, heavy with a square sole to side for accurate registration. Can't wait to use it! -
Had issues with the camera I WAS using to read the card....connects broke. Ordered a better card Reader...to where I can just insert the Micro Card from the main Camera into the Reader, and it stays connected to the computer. Decided to take a few photos, and get the Reader to talk to my computer....took a while....comes in as a "new" file, right under the "old" one...so, here goes.. Overhead lights are not quite right for this camera...turns things a "Pinkish/Orange" colour....tried to correct it... under this lid is another label.. Matches the one on the plane's iron.. So..lid is opened. . This is one of 2 such planes Gene Howe sent me a while back. Eric Brown down in Dayton,OH does Nickel Plate work... Assembled, left side view.. And right side view... These a Sargent No. 79, Type 2 planes, sold by Sears.... Before Sargent went with the round disc nicker....Almost too pretty to use? Camera had issues with the lights upstairs...might be a setting in the camera itself....as the shop is lit via LEDs shop lights...not the Dinning Rooms Incandescent light bulbs. Just a test drive to get the Card Reader set up with the computer...so far, so good..
-
"What's It" Basic Rules Reminder For a full run down on this project and rules please go to: "The Patriot Woodworker and MWTCA "What's It" project" Only Patriot Woodworker Members are eligible to participate and receive the award. The MWTCA only accepts a verified source to support your answer, so one should be submitted with your answer, such as a patent, catalog entry, tool book reference, or a respectable website on the subject. Do not let these requirements prevent you from having fun and submitting educated answers on the subject without verification, we can worry about references later. All answers are welcome, as well as healthy debates regarding "What's It". If a verified and referenced answer is not arrived at by the end of each month's "What's It" project, a random draw will be performed for a "One Year MWTCA Club Membership". Only Patriot Woodworker's who participate in this "What's It" topic will be included in the random draw. Additional What's It Rules Unless you are completely sure what this item is, please avoid "definitive statements" that appear that you are without a doubt claiming that you know what the item is. For example stating, "this item is called a "widget xx" used for "insert purpose here". If you are making a definitive statement you must accompany your statement with evidence or proof from a secondary source. An example of acceptable statements within the realm of having fun and educated guesses would be something like this, "I believe it could be", or "It appears it's made for this or that", etc etc etc... Ok ladies and gentlemen, we now have our "What's it" live and ready! The image(s) below is a MWTCA "What's It" image for you to research, and tell us all here in this topic post, just what the heck is it! Project Details The information provided hereon is all the information that is provided, no further information on this item will be added. The tool with a 12 inch (30cm) ruler to give an idea of its size. The reverse side of the tool, perhaps this side creates a groove. Note the curve in the blade.
- 11 replies
-
- 2
-
-
-
- curve
- mwtca whats it
- (and 3 more)
-
I really like Joel's blogs. Another good one. The Stanley 444 Dovetail Plane TOOLSFORWORKINGWOOD.COM I have had a Stanley 444 since 1990. It is definitely one of the strangest planes...
-
I received an email today containing a Newsletter by Hock Tools. The following says: It’s about time for me to re-read Zen and the Art of Motorcycle Maintenance. I rarely read a book more than once, but I’ve read Robert Persig’s profound treatise on the search for the meaning of quality four times, taking something new from it each time. One significant takeaway for me is the elusive nature of the concept of quality. What imbues one thing with higher quality than another? We often know the answer but cannot articulate it. A frustrating intellectual exercise, to be sure. But we know it when we see it, right? I’ve been making and selling blades for hand planes for over forty years. I fell into this high-quality industry quite by accident. That propitious stumble in 1982 suited me; my experiences, abilities, and interests were well served by the straightforward nature of the manufacturing and the eager appreciation of the customers – you. And I’ve been continually dazzled by you for all these years. Our customers are decent, intelligent, high-integrity people. I don’t know how to thank you for your steadfast support over all these years. Linda and I struggled through the start-up learning curve, and the market for hand tools grew, pulling us along to our modicum of success and sense of accomplishment. It would never have happened without Linda, Larry Kellogg in the shop, Julie Burns and Mark Taylor in the shipping department, and the enthusiasm of customers like you. If this sounds like a swan song, it is: Lee Valley Tools is acquiring Hock Tools. Rob Lee has been my friend for many years. And I admire his work and that of the engineers at Veritas. He’s promised to take care of my family name that’s engraved on each product and carry the Hock Tools legacy into the future with the same products, specs, suppliers, etc. Rob wants the transition to be seamless for you, the customer, so we’ll do our best to help him get up and running with our product line. There will undoubtedly be some wrinkles. We ask for your patience while we iron them out. We hope to finalize the transition by the first of March, but that’s a flexible deadline. And we won’t just disappear – come say hi at Handworks. We’ll proudly be in the Lee Valley booth. Linda and I thank you from the bottom of our hearts for your loyalty and enthusiasm all these years. We’re looking forward to new creative pursuits and unstructured time to engage in them. But, for now, I’ll find a copy of Zen and the Art -- and start a new chapter.. Ron Hock Hock Tools
- 1 reply
-
- 13
-
-
-
- lee valley
- hock tools
- (and 3 more)
-
One of my Facebook acquaintances is a trucker on the road most of the time, even as a trucker, his love of woodworking does not escape him, when he has some downtime on the road, he works the wood in his sleeper cab. Talk about the love for it! In this image he is making a wooden hand plane, from the sleeper cab of his truck, hat off to ya sir!
-
While out and about today...decided to stop in at the local Antique Mall here in town.....not much new in the basement, nor on the ground floor....hobbled upstairs to the second floor..looked around...next thing I know, an object had attached itself to my hand...and refused to let go....back downstairs to check out... Well..Sales Tax added a $1.81 to the price....$25.00 for this plane? Millers Falls No. 8 , type 2.. That be a Patent date in the red circle... And, So..ya think I can keep it? After all, I did turn me nose up a TWO Stanley Handyman plane-wannabees
-
got these in recently at the restore and someone decided they had to sell them on fleabay
-
In the process of building that box....had a bunch of resets on the Stanley #45 to do....mainly changing where the fence will be, and whether short or long rods were to be used....decided to make some things a bit..easier to do To change those rods...there are 4 thumbscrews to loosen, and tighten back up, with one too close the the handle area. They all needed a pair of needle nosed pliers to get them to ...move...look right under the wheel to adjust the depth of cut....so... I retired these two (FIRED!) and stashed them away...had a pair of slotted bolts to replace them....instead of pliers, I can just... Use something like this....like on the rest of the plane....which leaves these two... I don't have any to replace these two, they are a lot longer, and have pointed end. About all I could do was pull them both out, clean the crud in the threads, give the threads a drop (a SMALL one) of 3in1 oil, and run them back in....they work a little better,,,still need pliers, but these are easier to get to. Issue came up with the #12 cutter I had been using for 1/4" wide grooves....when I tried to level the grooves bottom with the router plane...the new Veritas 1/4" cutter would not fit in the 1/4" groove.. Measured the with of the Veritas...0.252"....the #12? 0.249" wide....could be a problem? Dug out the other 1/4" sized cutter I have for the #45 plane.. Only marking is a "T"...measured it....0.251" wide. needed a bit of sharpening, bevel was rounded a bit, back needed flattened....then, while the stones were handy, worked on the Veritas as well, had a chip-out in the edge. I also stoned both sides of the cutter to match the 0.251" reading I need.. "New" cutter in the #45 plane, and a fresh groove made....then tried the router plane for size... need a bit of wax, but it did slide right along...Router is set up like this, so it can travel along the jig. Went back to "normal setting" later.. When I had a bit more"elbow room".... Now I have to go shopping for fence bolts.....may just chase the threads and use NEW thumbscrews....IF I can point the edges to match Stanley's bolts.
-
Well, the Christmas Gift Exchange list is out.....I have to find a present for my Grand daughter-in-law...... Bought about 25bft of Quarter Sawn Ash, today.... There are 11 boards in that stack..average width is just under 6"....all are around 3/4" thick. Hmmmmm, how about a Blanket/ Hope Chest build? Frame and panel? Or maybe a "6 board" style? been a while since I built a chest....maybe see what I can come up with? Give things about a week, or so...while the Single Brain Cell Sketch Up works things up into a "Plan" have to work around the snipes, though. grain looks decent enough....fellow did have a rack of these boards, so I might go back IF I need any more... Dovetailed corners? or, Tongue & Groove corners? Raised of flat panels....Bread board ends on a lid? Stay tuned..
- 82 replies
-
- 10
-
-
- project idea
- christmas present
- (and 11 more)
-
I've been wanting to try my hand at greenwood carving, particularly spoon carving. I decided that, to give myself every chance to succeed, I would need a bench dedicated to carving. I checked youtube, carving forums, etc and decided that a log mule/carving bench would fit the bill. It just so happened that my mother, last week, had asked me to remove some downed trees from her yard. Enter this weekend's project. First, stripping the bark from an oak log....... Then, it's time to cut the legs to size......... And then, the shaping begins. Doing this with hand tools only is quite a challenge (a Poulan is a hand tool, right?) And thus, ends the first day of work on the mule/bench.
- 19 replies
-
- 5
-
-
- greenwoodworking
- green wood
- (and 7 more)
-
My next plane will probably be a smoothing plane, not right away, but hopefully not too far in the future. I was looking at the Lie-Nielsen web site, and I noticed that their No. 4 Smoothing Plane is offered in both a bronze and an iron body version. The bronze was $50 more. So is there any advantage to bronze? And if so, is that advantage of any significance to a hobbyist like me?
-
Well I did it. I finally pulled the trigger and landed me one of my dreams, one of my bucket list purchases. Yes, this is a tool gloat, and I am anxiously awaiting my new LN No. 51 Shoot Board Plane to arrive in the mail this Tuesday. I was going to wait till I got her in my hands, then gloat, but my gloating is pushing through my brain right now and I need to let is loose or I'll explode. A few years ago I saw and used a beautiful example of a Stanely No. 51 Shooting Board Plane and I have wanted one ever since. The main drawback of course is the price of the old Stanely Shooting Planes range from 800 bucks on up depending on the condition. I have some planes right now that would work as a shooter, but I really want a dedicated set up, in other words, I am spoiling myself. Here is an old Stanely No. 51 going for around $875.00 and that's a great price for it in the great condition it's in! Here is a fine example of a No. 52 with a hard to find Stanley Shooting Board for around $2000.00 The LN No. 51 for $500.00 and I feel it's a better tool as well, finely machined, a nice 9lbs in weight to plow through the grain, and less expensive than the originals. I looked at Veritas, they have a beautiful example of a Shooting Plane as well but I really like the traditional concept of the Stanley that LN produces. Tuesday, will be my big day, when I get home from my day job and see that box sitting in my shop, mama will receive it and she just throws anything I get in the mail on my work bench, I hope she places this one on the bench and not her usual toss. So that's it folks, my big gloat of the year, it's not often we get something new in the old shop, this is special, and I can't wait to make my own shooting board, already have some pretty good plans for them, and a long grain shooting board as well for accurately planing the long edge of boards. So cool! Links Lie Nielsen Shooting Board Plane My original topic on this plane at Thank you for putting up with my gloat.
- 51 replies
-
- 9
-
-
- lie nielsen
- plane
- (and 3 more)


.thumb.jpg.573d1497d0675219908c85aabefd797a.jpg)


.jpg.92e486a822fdb60b34cdf02173e5f765.jpg)
.jpg.3ecbaf5e2a888844af1a2f2afa285ca1.jpg)
.jpg.2b864f913c8bc1b10caf8b5982369d5d.jpg)


