Hand Tools
Create your hand tools albums in this category.
Image Uploading Suggestions
We appreciate your help in keeping our image gallery orderly and easy for others to research.
Please consider these suggestions while uploading your images.
- Name your images before uploading to our gallery, the generic camera file names just look so messy. "Walnut Desk" looks so much better than "DSC19467je69.jpg". You can also name your images after you upload them to our gallery for your convenience.
- After uploading your images, please consider adding a description so your viewers know what they are seeing and the wood used, the tools used, or even your inspiration for building the project.
- Please consider tagging your images so our members and guests will be able to successfully search for your image and related images. Tags can be inserted into the "Tags" field. An example of tags and their names should be related to your project. If your project images are of a Walnut Desk with dovetail joinery, than tag the image with "Walnut", "Desk", "Dovetail" etc.
Thank you for your cooperation. ![]()
The Management
Albums
-
Select hand tools from the archives, current projects, and into the future.
-
-
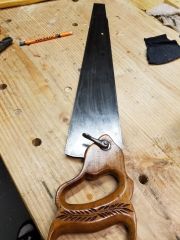
My Neighbor knows I like the old rusty tools that need a home He picked up 2saws for $5 This one might be kind of rare
Sold by HSB and Co. which in early 60's became True value The Ovb(Our very best) logo was likely stamped on by Disston
It is cast metal blade guessing 1930's or so Might have been a "Nest Saw" with interchangeable blades Not sure the species of handle Glad this one made it my way
-
-
I found this drawknife in a box of tools my Dad got from from where he was raised
His Dad was a sharecropper Families were large as most of you know 9 children
I remember Dad getting a box of old stuff out of the shed I was about 5 or 6 at the time
What a treasure
-
-
-
-
Welcome to my little gallery of my woodworking hand tools I treasure and love to use.
-
-
This gallery is a photo montage of leather sheathes created by Leather and Woodworker Kari Hultman. This gallery is a works in progress, the images will be uploaded, then in time captions and hopefully clarified tutorials or explanations will be added.
Thank you for your patience as we build this album.
Hultman Leather Links of Interest
https://www.hultmanleather.com
The following commentary is from our friend Kari Hultman.
For the spokeshave and drawknife sheaths, I made it so the blade didn't "bottom out" in the pocket so the cutting edge does not touch leather. For all the sheaths, except the axe, I used very thin leather, like 1/16".
The axe sheath leather is a little thicker than that, maybe 3/32". I used only veg-tanned leather, but in some cases, I stained the outside. The axe sheath has only neatsfoot oil on it. Veg-tanned leather is very stiff, so in order to bend it, you have to get it wet with water first. Let it dry completely before getting it near your metal tools. I was thinking that the rivets and snaps I used had rusted some of the steel on my tools, but it was a reaction between a snap fastener and a brass knurled knob on my spokeshave. I don't know much about metal and interactions between them, but you might want to let your guys know to look into it.
Also, I included a tool rack and tray in the photos. I thought they might come in handy. Much faster to make than ones make of wood.
-
-
-
-
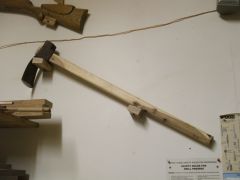
I am on a quest to build some Appalachia style ladder back chairs, or shaker chairs as well, and one of the tools I have been in dire need of is a mallet to strike wood, and chisel with. So after a little bit of research, I came up with my own design, and I had a great time too!
Thanks for looking at my Big Ash Mallet, and no, the title is not original, it was from a Roy Underhill episode!
-
-
-
-
The handplane and torches were my grandpa's just cannot let go of helps bring back memories. The chair was my wifes grandmothers had about 20 coats of paint on it and all the joint were failing. So stripped it down cleaned up all the old glue. Re glued and finishes. My wife loves it and her sister gave a threat of theft.
-
-
Needed a box to replace the broken old box. Tried ti duplicate all the details...except the labels. Poplar 3/8" thick boards, and a bit of plywood. Hand cut finger joints. I think I got pretty close to the original box...
-
-
-
-
-


.jpg.a3737d8bc6b7cdec1aa0cfe2aa049cfd.jpg)


.JPG.5ec3c6729bd59033a9575a867f61614b.JPG)
.JPG.5d96f04ed40c0fbb8cdcc123450b4ed5.JPG)
.JPG.39ec7d7083941e2d4e4075a65b12d9a0.JPG)
.JPG.fc887f67cc3d076dae4d9acc64f264ea.JPG)
.JPG.f16976265de88300c5a75a387c377dba.JPG)
.JPG.a3b4260daec48a5b84bb6aaf0334c8a9.JPG)
.JPG.4e4e851b9f05e6746be0a256b65d7745.JPG)
.JPG.41d4d36746dbf8a01111e4dd9489972f.JPG)
.JPG.0e38ec3827571f5c72e6cd238a6df0ed.JPG)
.JPG.46f8229a553fb318fb2c63aa9a648fa7.JPG)
.JPG.52af042629af6dc8e71d78eae6a1334f.JPG)
.JPG.9c8cc8bc9d462ba211a9b614cfd9e9e6.JPG)


8 images
-
By CDave · 3 comments
-
By CDave · 1 comment
-
By John Morris
-
By John Morris · 7 comments
-
By John Morris · 3 comments
-
By John Morris · 2 comments
-
By John Morris
-
By charles schmitz · 2 comments


Gallery Statistics
- Images 3.3k
- Comments 3.2k
- Albums 352