Search the Community
Showing results for tags 'turning'.
-
Just does not feel right to post finished work in the on the lathe post so I am creating this to post finished works. Please feel free to add yours. Walnut a friend gave me with Watco danish oil. vase from my shelf with three carved feet. Aldo Watco danish oil. Spalted pecan. Ruth Niles Can Tab Pull with I think Indian Rosewood and buff with Renaissance wax. new design for phone amplifier in Crepe Myrtle. Lacquer finish

- 556 replies
-
- 17
-

-

-

-
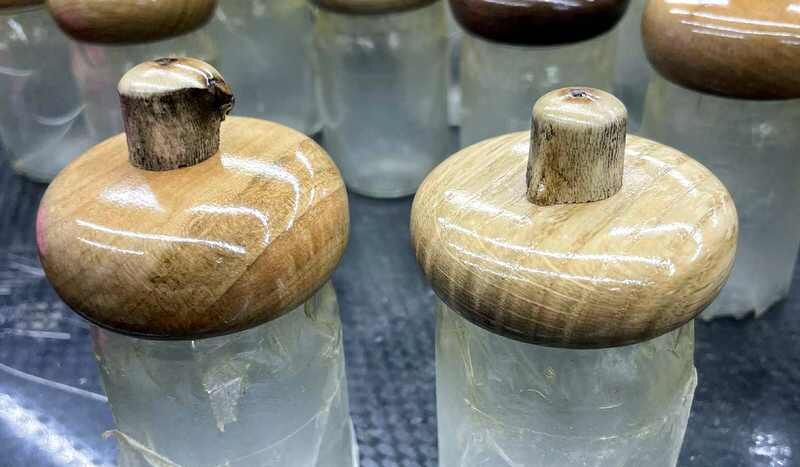
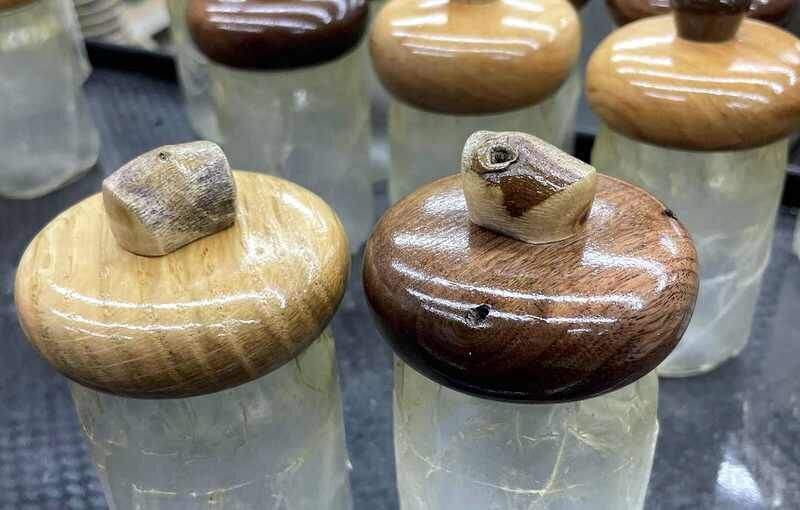
Just finished these little lids, they are small. About 2.25" or just less than 60mm in diameter. The gift shop they go to sells loose tea and herbs in bulk. The owner wanted these little lids to dress up 4oz mason jars. Sycamore limbs are ideal for making a natural or live edge knob and the trees are always providing material to work with, always. The natural edge knobs go quickly and it occurred to me to try doing some of the knobs cross grain. Pretty happy this look and anxious to see what Cindy (shop owner) thinks of them.
-
Not sure what kind of wood this is, it sanded easily which is good because I had some deep end grain tear out. Worth the effort as it has a lot of character.
-
If you’re looking for a fantastic price, Rockler’s clearance has great price on Robert Sorby TurnMaster turning tools. Check them out. Steve
-
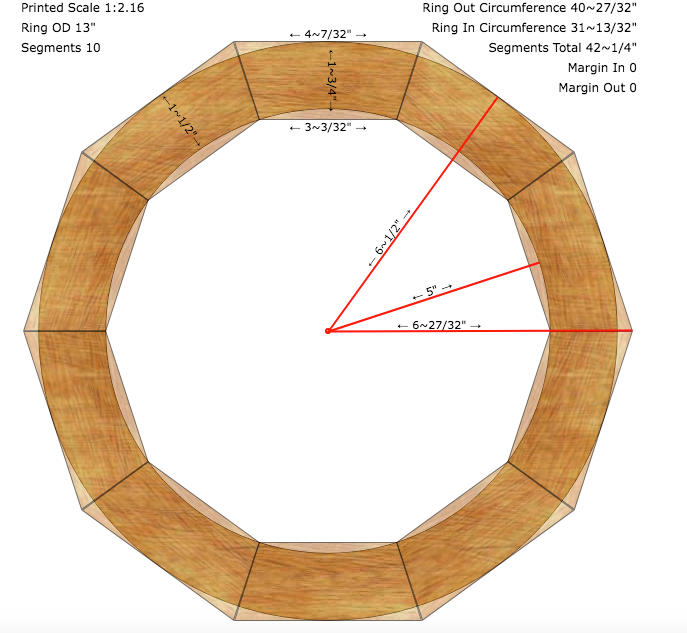
I want to make some display frames for the Famous Women's Quarters being issues by the mint. I want the frames to be round and made of segments, so here is what i came up with (suggestions and criticisms welcomed). First, I had to cut the segments and I didn't want to make or buy a sled just yet, so I used my miter gauge. This is an Incra 300 and measures angles down to 1/2° so I wasn't worried about that part. To keep the lengths correct I made a fence with a stop and adjusted it to cut the right length...then I cut 22 of the segments (2 extra, just in case) out of some cherry I had. Here's how I decided (right or wrong) to turn the ring. There will be 2 layers overlapping to make the joinery easier and I started by making a backer out of floor underlayment (1/4" ply) and gluing (sparingly) the first ring to it. Then put the second ring on top of it. Then to mount it to the lathe I made 3 pieces, one was a chunk with a tenon to put in my chuck, the second was a back support that got screwed to the tenon piece. Then a front support to clamp the underlayment backer down tight. You can see how these went together on the lathe. I drilled holes in the center of everything to allow me to align everything as an assembly. I put a 1/4" bolt through the holes and then screwed the pieces together. Now it was time to turn, and since I didn't know what tool to use I went with bowl gouges and an EZ wood rougher. I've never done anything that generated this many chips, I was buried in them by the time i got it roughed out. In this pic, you are looking at the bottom of the frame, the rebate is for the inside piece that holds the coins. So I sanded the outside and then had to remove the backer to finish it up. I took everything apart and put the frame in some cole jaws to cut off the underlayment backer. This was a little tough, plywood really dulls tools fast. I had to sharpen my gouge 3 times to get the dang thing cut off. Once the backer was removed I had to clean up the face of the ring and trim some more out of the inside. But I finally got it done. It's easy to see this isn't perfect, but it was more of a test to see if my plan would work. I want to make 4 of these, one for each year of the program, so I now have a way to go about it. One thing I didn't do was make the rebate for the bottom deep enough, I think I may use the router table to cut that a little deeper with a rabbiting bit. I also don't have a way to put a cover on this, like glass or plexi. I just couldn't come up with something that I thought was manageable. Sorry to drag this out, I hope you could make it to the end.
- 17 replies
-
- 11
-
-
-
-
.thumb.jpg.573d1497d0675219908c85aabefd797a.jpg)
The Moulthrop Family Turning Video (PBS Craft In America)
John Morris posted a topic in Wood Turners
I have watched this episode many times and I still love it. About a minute in is when the spotlight on the Moulthrop family begins, and what a family! I am amazed at the turnings the patriarch of the family created, and the younger is an absolute genus with his turnings. My favorite is the sticks in the bucket with epoxy he does, then turns the blanks to create these incredible multiple species turnings. Take a look at the video, and have fun. Craft In American Video (Moulthrop Family of Turners) Click on the image below to go to their studio website and enjoy. -
I'm collecting the famous women's quarters and want to make a display for them, and I'd like to turn this on my lathe. Bear in mind I'd have to make 4 (one for each year of the distribution). I haven't seen any other display designs for these so I concocted my own. Here's what I'm thinking. There will be a circular frame that holds a piece of plywood with an attractive veneer covering it, probably 1/2" thick. Each display will hold 10 quarters with a brass plaque in the center with their names engraved on it. The frame will be 13" OD, 10" ID and composed of segments. I'm thinking 2 identical rings (1/2" thick) with the segments offset to have the seams centered on the adjoining segment...that allows me to skip splines or some end to end joinery on the segments. So here's my question: how would I hold this on a lathe to turn it round and then turn some embellishments on the face of the frame. I could easily do this with a router but the lathe would be more fun. I have a set of cole jaws but not large enough to hold that size ring. Maybe glue (or fasten with short screws) the ring to a piece of plywood and fasten that in some fashion to the chuck, then cut it off after the turning is done???? Anyway, my sketch of the basic, the ring segment calculation, and the segment are shown. PS: hope this made sense.
-
Hey all, kinda new... mostly a creeper but I'll start partying. Anywho, any of you guys or gals have a bead on where to get blanks that don't cost 40 bucks for a chunk of cherry or something? I saw the firewood block post from another buckeye on here, I might have to take a drive too. Someone around here has to be a producer, where do you get your stock? Thanks all!
- 19 replies
-
- 8
-
-
- turning
- wood blanks
- (and 2 more)
-
A member of the club turned an inset for a handle and since aluminum is cheaper than buying an insert I decided to give it a try. Bought a 1.5 inch bar on Amazon. Cut off 5 inches. Chucke it up in 35 mm jaws. Drilled a thru a hole I think it was two sizes over 3/8 so tool can be reversed. Picked what I thought was a nice piece of pecan but the holes running down the side were nothing compares to the one I almost center of end so that is the end chucked. Drilled 3/4 for insert and then. 7/16 deep enough for the gouge to go in almost completely. Turned the handle just a little larger than most others. Not as easy to turn aluminum as you might think. Wish I had bought 1 inch Aluminum.
-
I needed some more tool handles for some tools I am making. The cheapest adapters are $22. I had a piece of 1” aluminum round bar in my tool box from where I used to work. I was a beater bar to tap bearings and things you didn’t want to damage. I cut the mushroomed ends off and got two 12” pieces. I drilled the appropriate hole in the end for the tool, and drilled and taped two holes for the Allen screws. Then I put a piece of bicycle tire tube to make it comfortable. Really happy with how they turned out. Put a scraper I made in this one and the balance was really nice. I can but two 1” by 11” aluminum bars for under $20. I might be making more of these in the future.
-
- 1 comment
-
- 2
-

-
-
- turning
- wood turning
- (and 2 more)
-
Sometimes we as woodturners and woodworkers will find a design or form in wood that was buried until we uncover it. Not just curl or feathering but something we do no expect to find. I will start with this one. So now what have you found in your wood pile??
-
I have always wanted to turn some sycamore. I saw a tree cut down and went to check it out, nobody home. I went back on our way to dinner and they were home. I asked the guy if it was sycamore and he said yes but it was spoken for. I told him that was ok and what I wanted it for and I only need a couple of pieces. He said go ahead and get a couple, he doesn’t know anything. I got two 12” pieces.
- 10 replies
-
- 8
-
-
- turning
- species sycamore
- (and 1 more)
-
I went to SWAT this year and finally got a chance to hurried go thru the gallery and take pics of most everything. I did this back in 2021 but there was not as much there then after COVID. Hope y'all enjoy and get some ideas for your next project. Lots of clutter in some pics due to the tags but you get the idea.
-
I have 3 sets of speakers in the shop and when placing the pair at the lathe a few years ago which are small Boston Acoustics I dropped one. I was able to repair it with tape. Well while looking for repair speaker came across on eBay a pair of Boston CR9 at only 150. . This is a large speaker and had not placed it in shop due to size as I already had a set of Pioneer floor speakers there. Decided these were no good in a closet so to the shop and then the display decision. Decided on tall stools so easy to move. one of the seats in spalted Pin Oak. Forgot to get pic of the legs on lathe. Had this piece of Live Oak sitting awaiting becoming a shower stool so used it as the other seat. legs are walnut and there is a story in that too. Originally picked a piece that turned out to be highly figured but it broke when turned so now have a couple of highly figured 1.5 inch cylinders. also used Pin Oak for legs. I left off stretchers considering the intended use. There is little to no taper inlegs and I think they look like large milking stools. Will cut the tenons today and try Tung oil as finish.
-
Looking to get a McNaughton center saver bowl coring system.
- 15 replies
-
- 3
-
-
- mcnaughton
- turning
- (and 1 more)
-
The park where our club is has a fair every 4th of July. Anybody in our club can sell in our meeting room. We have around eight people that take advantage of it, we are just required to work. I will apologize in advance for all of the pictures. The two lathes we have members turning full time. The kids love it because they get free tops.
-
This is kind of a departure from my usual turning as root balls are more difficult to find. This is a Japanese Yew root ball that succumbed to cold winter. Used Chestnut Stain's and Chroma Craft dyes. Finish is
-
Got to thinking about this project and decided to put it all together. My DIL’s father died about 4 weeks ago and she asked me to do an urn. I did a bit of research and found a design not ordinary but not too fancy. o A friend came by and said it was really big. Size is calculated as one cubic inch per pound of weight. This calculated out to 17 cups. Some like to use rice but I had sand so used it. It was almost a perfect fit for a gallon jug. Once turned I funneled the sand in and it was almost perfect fit . For the lid I tried plumbing pvc fitting but the one I bought did not work. So I ordered an insert in bronze from Ruth Niles bottle stoppers. Embellishment done and black due added. Upper part carved with a reverse cone bit. Dots burned in with diamond ball loaded so it burns. Then dry brush the upper with two shades of blue. The next ring got a brush of pearlescent white. this is the result. Now it goes to get engraved and then final finish.
-
I am a lefty and I have started to recently understand things like bowl gouges to some limited degree. For the record, my handedness doesn’t have anything to do with the understanding, but rather the application. In previous turning endeavors, like spindles and handles, I am able to hold a gouge left hand on handle and right hand on tool rest. This makes sense and is comfortable to me. Enter the bowl gouge and a push cut…. The positions required to have this hand configuration is a contortionistic impossibility. Maybe I could have pulled it off when I was a young rubber person but that ship has sailed. So it appears the only sane way to do this and be able to achieve any sort of bio-mechanical sanity is to reverse my hands, left hand on tool rest, right hand on handle and shift bodyweight into the cut while maintaining proper cutting angle. Is the solution to this just learn how to turn with either hand forward or is there a completely reverse lathe setup that lefties adopt?
-
WARNING:This is a turning related post . No turning will be done. I picked up a stand that used to have a grinder on it or the upright only. Friend kept the upright and thru out the stand with wheels. I finally had the idea to make a stand on wheels to move the heavy JaHo jig. Had to cut off the back end of the metal stand , drill for new place for fixed wheels. Put a block in front for a larger rotating wheel set. Small wheels don’t move well on pads. Then put together a box for upper stand from some dirty ply I had to run thru the drum sander to clean up . Left this with the 80 grit sanding marks. Painted black to hide some bad spots. Top was of pine shelves “Previously painted.
- 7 replies
-
- 5
-
-
- ringmaster
- stand
- (and 3 more)
-
Started this project as a way to use small pieces of wood and add to product line. Got started with Spalted wood and it seems I have a lot in the shop. So I turned some plain buttons for the JaHo also. Started trying to use JaHo today and after starting found that the chuck holding par was too big to go all the way around so more tomorrow when I get couple screws. Oh also experimented with gilding wax and liming
- 21 replies
-
- 10
-
-
-
- jaho ornamental jig
- magnets
- (and 1 more)
-
some of the 2 dozen bowls cut and glued this week. this weekend I begin the sanding marathon LOL. I learned a few things along the way. A big one was don't set the angle for 1/4" thick sides when using the 5/16" index plate. Oh well, I only created 2 blanks worth of custom cut kindling before the light went on.
-
Two weeks ago I finally pulled the ringmaster off the shelf and fired it up. was so careful taking down that I managed to break the top off the toggle switch. lol. quick rewire to bypass the switch got me able to run it using a high-capacity outlet strip. All that aside this is my first bowl made on that lathe. More will be coming soon as we hope to carry an inventory of 50-75 for upcoming art shows.
- 7 replies
-
- 11
-
-
-
-
- turning
- ringmaster
- (and 1 more)
-
First project on a bowl . Wood is Spalted Bradford Pear and I was well pleased with the results of dying. Applied lacquer to bowl after dying. The the black liming wax goes in the cuts made by the jig. These are before and after pics. Now which do you prefer?