Search the Community
Showing results for tags 'dye'.
-
Looks like southern PA was once again spared the "big one" as far as snow is concerned. Still mighty cold out, however. Our Patriot Turners- Member @Gordon posted a question about using dyes on a turning. Specifically. he was asking about bleed through. Several of our turners posted their thoughts and advice. Maybe you could help Gordon with your input. Please check his post at- @Headhunter added a post in our Ringmaster Subforum. He made a jig to aid in measuring angles when cutting the rings. Check out his post at- We have had several entries to our "ON/OFF" the lathe this past week! From ON- Thanks to @Gordon and @calabrese55 for their gorgeous turnings! You can see all of the comments and more images at- And from OFF- @calabrese55 and Lew posted vessels, both lidded and open. Love the knob on this lid! Lots more images and comments at- What’s Coming Up- Click on the images for links to more information and registration- For The Newbies- From Craft Supplies USA, a video on fundamental woodturning safety tips- Turning tops is a great way to practice tour spindle turning skills and create some neat toys for the kids, grandkids or neighborhood kids. Mike Peace adds a new twist to the mix! Expand Your Horizons- Basket illusion turnings always seemed very daunting to me. I think this one from Carl Jacobson is one I might consider tackling. How do you measure the wall thickness of your bowls? This is how Richard Raffan does it! New Turning Items- Not new but on sale. For the coffee connoisseur in your life. The Niles coffee tamper kit for their espresso machine. https://nilesbottlestoppers.com/product/coffee-tamper/ Everything Else- From Ron Brown's newsletter: You Will Never Fail If You Never Try Failure is a part of trying and is needed for success. If you’re going to be successful, you need to try more than once and usually fail more than once. If you never try, you will never fail. You will also never accomplish anything. Fear Of Failure Can Paralyze You Go ahead and try that new project or method. You will probably fail the first time or two. That is how we learn. Persistence is one of the most powerful forces in the universe. As someone who has been given a certain responsibility and a pretty broad platform to shout from, I have come to realize that no matter what I do or say, someone is going to be offended. I could avoid negative comments by never saying or trying anything, but although I have the right to remain silent, I do not have the ability. For every 100 encouraging and uplifting comments I receive on this weekly column, I will receive one that is less encouraging. These comments provide opportunities to practice what I preach. Some comments are very harsh simply because they disagree with something I’ve said or implied or because I believe differently from them. “Don’t throw them away” was the advice recently given to me by a good friend. When people say something nonsensical, you can only control how you respond. I’ve heard it said the greatest commandment is to love your neighbor as yourself. Nobody will agree 100 percent of the time, and in the wood-turning world, there are almost always many ways to accomplish the same thing. I choose to practice what I preach, especially when responding to someone who disagrees with me. As you evaluate someone else, realize they might see things from a perspective different than your own. That doesn’t make them wrong; it makes them different from you. Safe turning

-
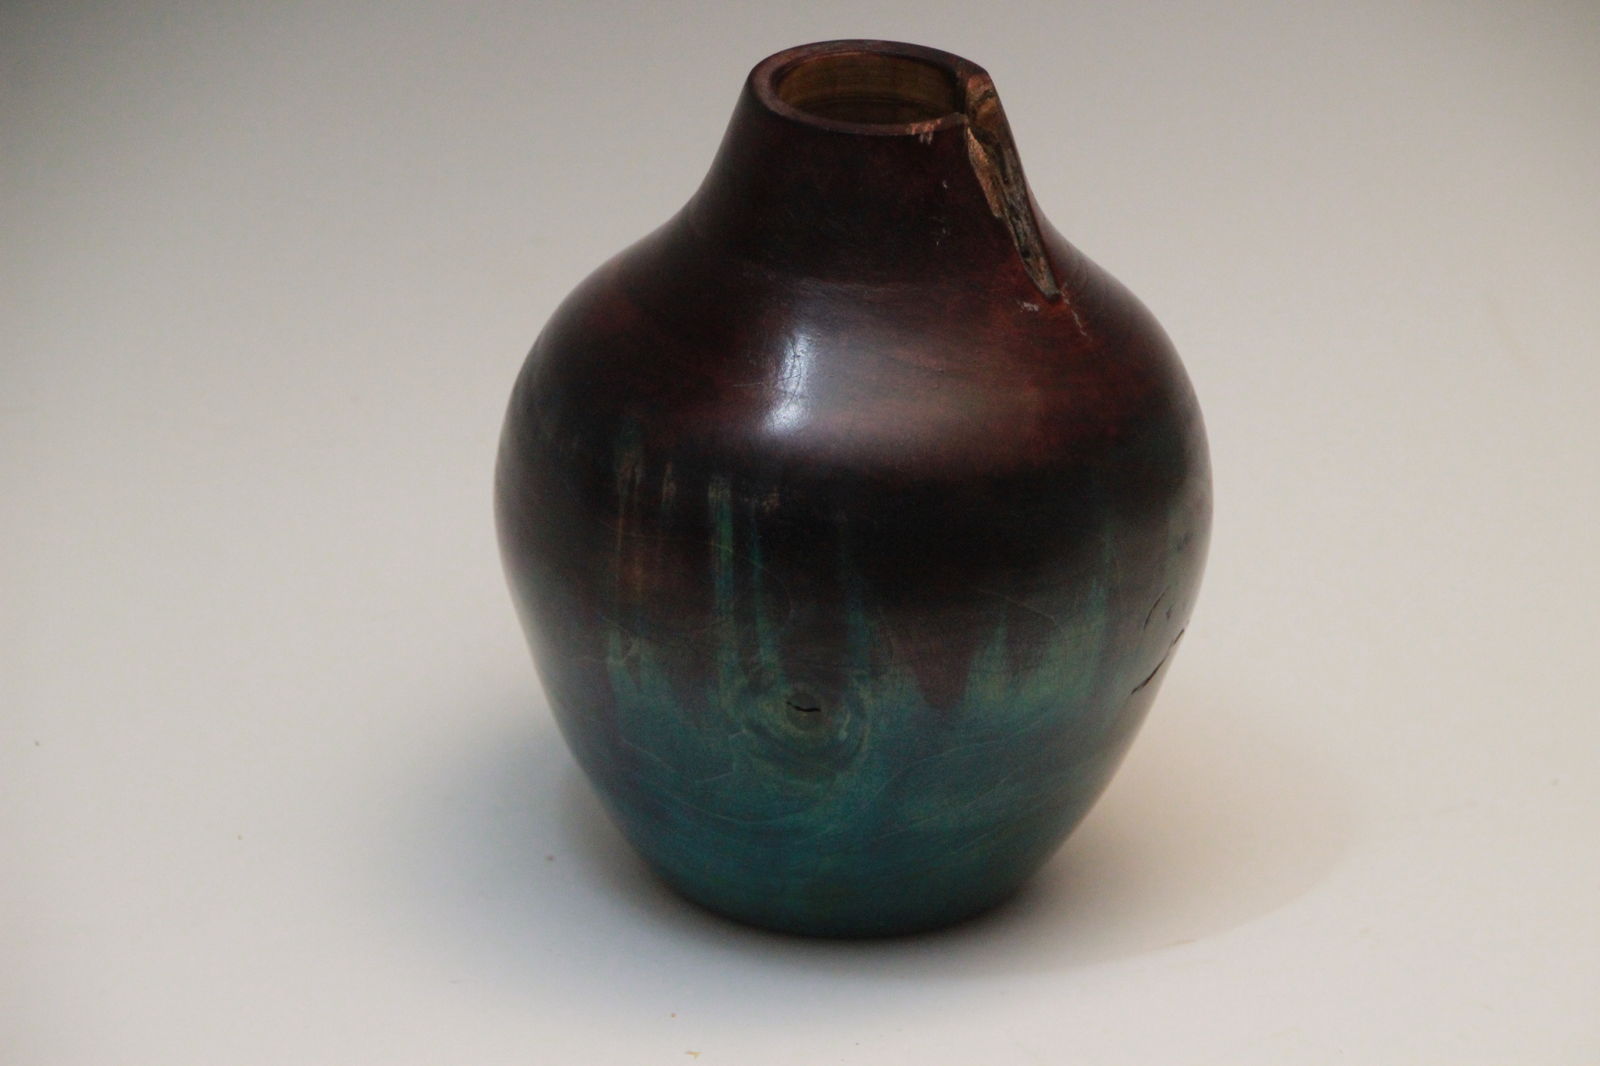
I did this bowl from a piece of maple. The wood grain is very slight, so I thought about playing around with some colored dyes on the outside then finish with lacquer. I’ve never used any dyes before so I have a few questions and advise from those who have experience. I’m looking at the Mixol pigment , my thought is I could mix it with denatured alcohol to blend the colors or (plan b) go with a solid color and mix it with shellac. any thoughts or advise?
-
First project on a bowl . Wood is Spalted Bradford Pear and I was well pleased with the results of dying. Applied lacquer to bowl after dying. The the black liming wax goes in the cuts made by the jig. These are before and after pics. Now which do you prefer?
-
https://www.popularwoodworking.com/finishing/staining-wood-101/?utm_campaign=PWW - NL - Sunday Newsletter&utm_medium=email&_hsmi=277384524&_hsenc=p2ANqtz-9FVpygW9KrrQc9dGF46UDW97IAan5HAcvdgPKs-GyQBxuHhIWymUqFLWq2In6bdCzx_pJt-K9IJXZEk7vCXQzeRpxpDUyPMtszIml_76mv24m-sKE&utm_content=277312178&utm_source=hs_email#
-
From the album: Old English Plate Shelf
Finished and ready for delivery. My go to finishing schedule for most of my flat work is water based dyes for color, followed by a coat of boiled linseed oil, then oil based varnish. I still love the warmth and glow of oil based varnishes, it has a warmth that I love.© Courtland Woodworks
- 7 comments
-
- 1
-

-
- curly maple
- dye
- (and 6 more)
-
Here is a decent comparison of pigment (what he calls "dirt") and dye colorants. I use a slightly different terminology in that anything that colors I call a stain and there are pigmented stains and dye stains. One reason for that is that some of the canned products have both pigment and dye in them. Here is another article on the subject (the "friend" is me). I was doing a finishing class and could not find the chart that I had in one of my books classifying Minwax stains as pigment, dye, or both, and wanted to do a hand-out. https://www.popularwoodworking.com/flexner-on-finishing-woodworking-blogs/is-there-pigment-or-dye-in-minwax-stains-does-it-matter/ My most recent Minwax experiment was their (new?) "true black" stain. It appears to be dye-based and comes out really black.
-

From the album: Bowls and Platters
Aspen bowl required more than usual sanding. The dye ring applied with a brush -

From the album: Bowls and Platters
Curly maple done in the Clewes style with rim dyed with Chestnut Stains layered in blue sanded down, then yellow and green. Finish on front is lacquer gloss. -

From the album: Bowls and Platters
Cherry stained and added golf wax -
An interesting short video. I do a lot of layering of color, in fact, most things. Whether it's dye followed by a wiping stain, or wiping stain followed by a glaze. I think it really makes a difference.
-
A good article on layered finishes. Wipe-and-go is not always the best approach for adding color. I should add that years ago, my buddies at PopWood found General Finishes Java a good stain for QSWO, too. https://www.popularwoodworking.com/finishing/arts-crafts-oak-finish/?hss_channel=tw-27657236#
- 3 replies
-
- 2
-

-
- arts & crafts
- dye
- (and 1 more)
-
Here is another oak hollow form with black and orange dye. Was supposed to have a collar but it warped too much so opened the top a little. It is about 4 inches in diameter.
- 5 replies
-
- 6
-
-
- oak
- hollow form
- (and 1 more)
-
Finally got around to making some photos of my new turnings. This one is Bradford Pear dyed with Chestnut Stains. Finish is lacquer. I tried something different on the dye because I got the idea when applying the stain . I applied a full width application all the way down the piece and then started only going part way down the side to get the effect you see in the picture looking like a run down the sides. That gave me the idea to do the whole thing that way so I had to sand off the first full pass. The wood was almost burned because that void at the top was rotten into the center.
- 5 replies
-
- 5
-
-
- dye
- hollowform
- (and 2 more)
-
Just when I thought I saw the light at the end of the tunnel, I realized it was a long freight train heading in my direction... Our Patriot Turners- @Gerald Showed us a hollow form to which he added color. He received lots of questions and compliments about this piece. Please check out his post and see how he did this- @HandyDan shared a really neat design he found. If you have ever struggled with moving you lathe (or any heavy piece of shop equipment) this might just be the ticket. Check Dan's post for additional concepts- Last week's post, from @FlGatorwood, concerning the skew heel vs. toe discussion generated lots more comments. If you missed the post or want to see what others had to say- @Ron Altier gave us a heads up on a really cool video. Lots of turning being shown, as well as other types of woodworking. What’s Coming Up- The Rocky Mountain Woodturning Symposium is coming up! September 13th- 15th. Click on the above image for the link to more information and registration. For The Newbies- @Gerald provided us with a link to a nice sanding disc holder. Check out Gerald's post for the link and some of the comments- If you are thinking about buying a lathe, Mike Peace posted a video that may help you. Expand Your Horizons- Off center turning can create some really interesting shapes. Sam Angelo demonstrates turning a teardrop shape. New Turning Items- If you have a "Work Sharp" machine and wanted to be able to use CBN sharpening wheels, you are in luck!! The folks over a Woodturners Wonders now have just what you've been looking for!!! Two sided discs in various grits. Check them out at- https://woodturnerswonders.com/collections/cbn-discs-for-work-sharp Everything Else- Rick Morris (Rick Turns) recently moved into a new shop. In this video, he shows us that even a new shop can't prevent Edward Murphy's Law from being applied- Safe turning
-
Was looking for something new for my booth and decided to get into mushrooms. I did some natural edge and some in a traditional shape. All colors are either Chestnut stains or Chroma Craft dyes. Finished them off with semi gloss lacquer. All wood is Crepe Myrtle.
-
a video going into details on what the differences are between dye and pigment stains. It also tells you how both react to different kinds of wood (e.g., maple vs. oak). If you buy a can of stain off the shelf, try to stir it with a paint stick. If there's sludge on the bottom and little color on the top, it's pigment only. If there's no sludge, it's dye only. And if there's both sludge and strong color on the upper part of the stick, it's a bit of both. The can won't tell you (and the customer service is unlikely to know, as I found out).
-
Got my new stuff put away and decided to go in a different direction on a piece I had started. This pecan bowl looked like a good candidate for a colored rim. First layer with black and sand off. Second layer is red and sand. Next is yellow sand and then touch up with red. Now for lacquer. Using Chestnut Stains on this one. More May take a day or two since the winter gets here tomorrow.
-
I was looking to do some Christmas ornaments, and wanted a green color. I like dyes, so you can see the wood grain, but couldn't find any to suit. My sister (an artiste at crafting) suggested using acrylic paint and diluting it. Walmart sells about a billion different colors for about a buck each. Dilute the paint with about 25% water, and I got a really effective dye. Opens a whole new world.
-
Can't say I'm half way through but at least I'm started on her stained glass Nativity Scenes. A little brighter color with clear lacquer. Each stand has a different width groove plus gluing in a plug on each end so the pine, yuck, don't close up as the seasons and humidity changes. Time it takes to do 130 or so boards is about 15 minutes total time for all pieces....so Howdy Duty will have to wait..
- 8 replies
-
- 6
-
-
- stained glass
- nativity
- (and 2 more)
-
Well for several weeks I have posted some pictures of this chest and I am happy to report to you that it is finished. Just a recap. Started with a visit to the Wood Stash and hand picked some of the best looking Cherry Boards from the stack. Cut them to size, ran them across the jointer and then through the planner. I then took the cherry boards and edge glued them together to make the panels for the front, back and both ends of the chest. Then I put two of these panels together to make a four board panel. Then I put the two four board panels together to make one large panel. Actually one of the panels had five boards.. Using my 50" Bessey clamps to hold the two panels together. So I had two long panels for the front and back and two short panels for the ends. Then I started working on a sample for the trim or molding to go around the top and bottom. After a few adjustments to the bits, I settled on the way I wanted to make the trim and started routing the pieces. First a couple of passes with the curved bit in the router and the with the round top bit and then a 1/2" round over bit. So I sanded the trim and then started on the feet for the chest. They are double boards so the chest actually sits on one board and the trim sits on the other board. There are blocks behind the feet to attach them to the plywood bottom. So everything is now trimmed up, miters cut and ready to put together. Now it is time to move it to the spray booth and put the water based dye on. I purchased an Antique Cherry dye and I really love the look it gave the chest. I sprayed it on and then took a damp paper towel and smoothed out the finish. If you get a bit much in a spot it is okay, you still have time to smooth it out. I put two coats on and then sprayed on five coats of General Finishes Enduro Var. It was them rubbed out with 0000 steel wool and Johnson's paste wax.. So there you have the Cherry Blanket Chest from start to finish.
- 27 replies
-
- 6
-
-
-
- general finishes
- dye
- (and 4 more)
-
My neighbor had some limbs cut and I picked up some of the pieces thinking firewood, but decided to turn some. Started doing hollowforms and then went on to try dye. It does not show well in the pic but there is violet sanded off and then yellow and then red. Used Chestnut spirit Stains and finished with lacquer. I turned this piece all the way to finish in one sitting and got no movement out of round and this is one of the smallest entry holes I have done so far.
- 9 replies
-
- 6
-
-
- live oak
- hollowform
- (and 2 more)
-

From the album: Hollow Forms
Live Oak dyed violet, then red, then yellow.- 1 comment
-
- 2
-

-
-
- hollow form
- turning
- (and 2 more)
-
One of our club members made a telephone amplifier so I searched and combined several ideas . The prototype done in pecan was not loud enough maybe due to thickness . The second done in Bradford pear is thinner and is the loudest. When I turned I left the tenon on so I could use it to glue into a backboard so it will not roll. Thought of maybe a flat on the bottom instead but that may reduce the resonance . So the last one I cut slots in and the sound is almost as loud but because of the slots there is a smoother sound.
-
Though I would give a step by step on the dye for this platter. Turn the platter back and finish. Reverse and turn the rim leaving center. Now for the dye use dark color or black and sand that back. On this case violet. after sanding apply second color , red. Now after sanding with more emphasis toward the center and apply yellow. oh there is a groove on the outside of the color to define the color line. Then time for finish applied before turning the center and more layers of lacquer.
- 6 replies
-
- 3
-
-
- bradford pear
- dye
- (and 4 more)
-
I had an ornament with a plain look and decided to try dye. The piece had been finished with lacquer . I applied Chestnut stains dye over the lacquer. This dye has shellac about 5% in it. After the dye was dried with heat gun I applied lacquer. Now for the question will this treatment lead to finish failure?


.thumb.jpg.573d1497d0675219908c85aabefd797a.jpg)