Search the Community
Showing results for tags 'blo'.
Found 15 results
-
If you ever have a doubt, check out this video at about 26:00 mark . At least it wasn't in the shop at 2 AM
- 3 replies
-
- 2
-

-
- spontaneous combustion
- fire
- (and 4 more)
-
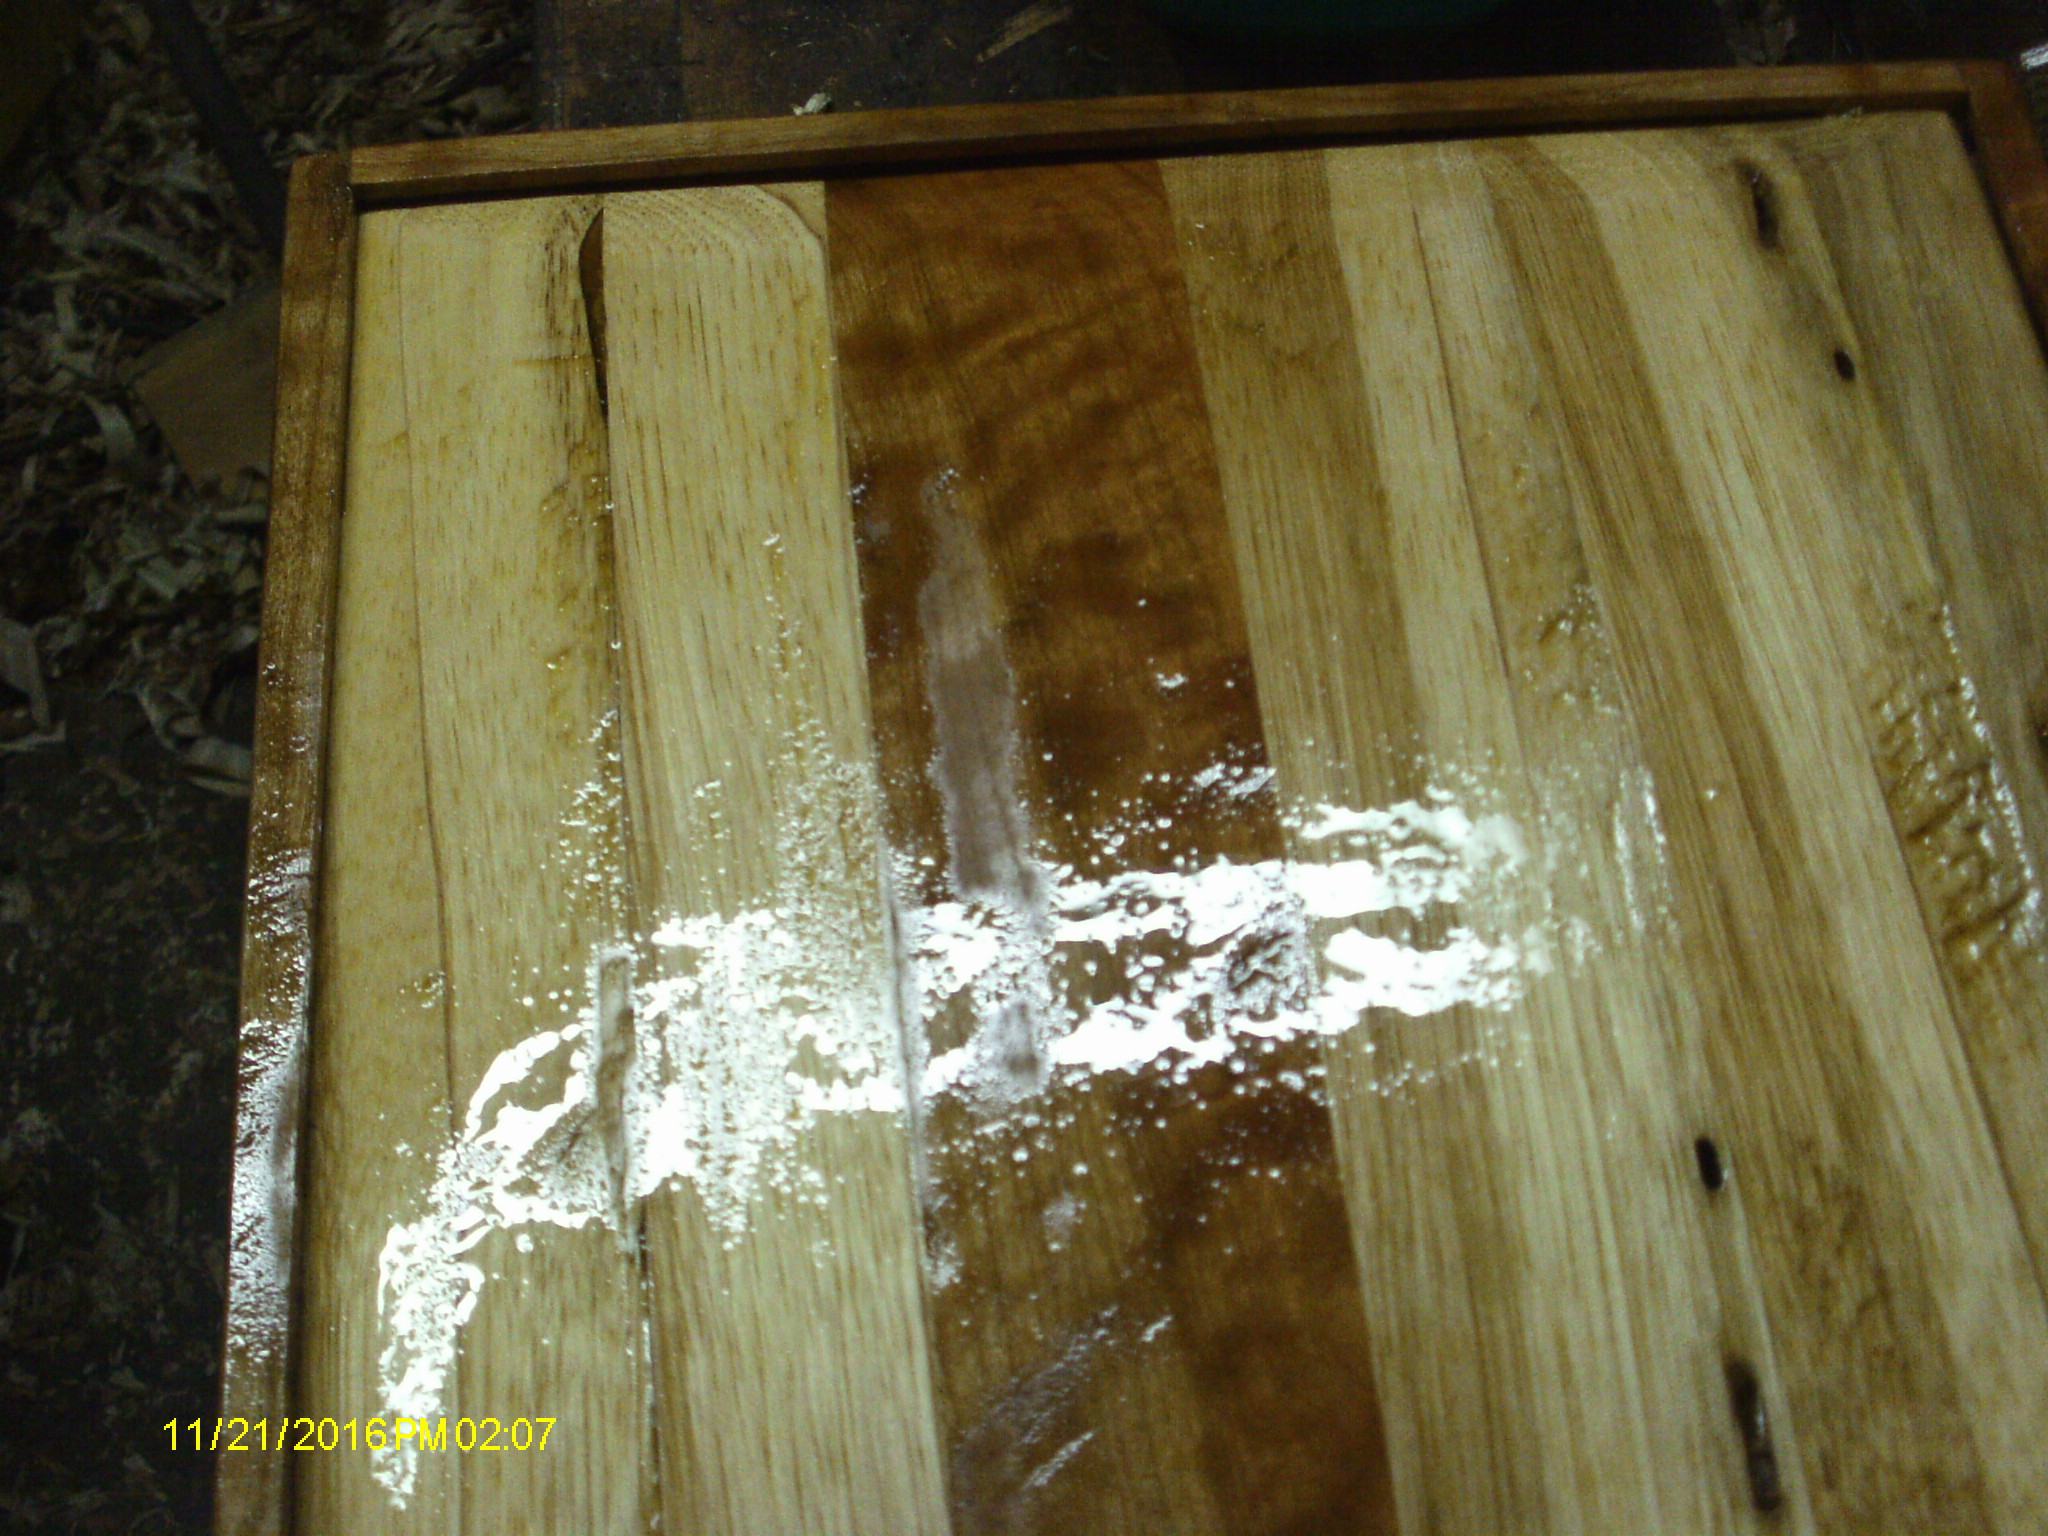
My wife and a good friend have a birthday coming soon and I wanted to make them something different/special. The 3/8” thick tray sides are splayed 20 degrees with box joints. The splayed box joints are inspired from a project in a 2009 Woodsmith magazine. The woods are walnut and cherry. The finish is (1) coat BLO and (2) coats clear shellac. Thanks for looking. Danl

- 12 replies
-
- 14
-
-
In found this can of Mary Carter Linseed Oil in an old building we were going through the other day. Made by Mary Carter Paint Co. Any of you know anything about Mary Carter Paint Co without Googling it? The Company was the successor of a company started in 1908. In 1958 the company that would be Mary Carter paint started and soon bought out several of it's competitors. Victor Paint Company in 1962 and Atlantic Paint Company in 1963. Where it really turns interesting is there move into resorts. http://www.fundinguniverse.com/company-histories/resorts-international-inc-history/ http://www.sptimes.com/News/073000/Business/From_paints_to_Paradi.shtml And this one is really interesting. http://soundproofsuite1850.blogspot.com/2008/01/homework-assignments-on-mary-carter.html You just never know what story a can might tell.
-

color difference with and without BLO.jpg
Wichman3 posted a gallery image in Scroll Sawing and Intarsia

From the album: small basket
-
Down to the detail work now.....clamped the two parts together, and planed, and sanded them to at least look like they matched just about every toy sitting there was used. Finally got all four sides done...I think. Spread around some of that SMELLY BLO to act as a seal coat.. Not a top coat, just something to seal the wood up. As for the sides? This will be the hunge side, and the "right" end of the box.....the "Latch" side? Or..it might be the other way around. Not sure just yet. Decided to just have a single bead, as two would have been a bit too "busy".....now I need to go out and get some hinges, and a latch... Waiting on the BLO to cure out, and quit smelling the shop up....
-
I had fun with these, but I hope someone will help me remember what the heck type of wood I made these from! The name is at the tip of my tongue, It is an exotic, not cocobolo but something along those lines, very dense and heavy. The plank I used had a partial live edge so you'll see some of them with rustic edges, I love those the most. I finished them the night before the event, which was yesterday. My youngest daughter belongs to a Gymkhana club, barrel racing, speed poles, and more. We meet every third Saturday of the month and I volunteered my lumber and time to fabricate the plaques or trophies. They fund the engravings and horse head medallions. For a look at the last ones I did CLICK HERE. See the plaques I made and delivered yesterday morning to the event! They loved them! The stand about 8" tall by 7" wide. I sanded the plaques to 400, and applied a generous coat of BLO and let sit for 15 minutes, then I wiped them off. I re-visited the plaques 4 hours later and wiped them down again as the oil does leach after the initial wipe. The engraved plates came from a wonderful out fit here in town, just as the last ones I did, they came from Anady's Trophies. They are great folks, ready to help, and their quality and attention to detail is un-paralleled. We shopped around and found plates cheaper, but that's the operative word here, cheap, they were cheaper for a reason, the print was lasered on, it looked just like black print smooth to the surface of the plate, very un-classy. After all the work I put into these, I do not want cheap plates to grace the surface of these. So Anady's is the only way to go. Excellent quality and precision engravings. Also, how can I finish this topic without sharing some images of our day yesterday, the first image is my girl holding up here First Place ribbon in the Bi-rangle competition, Division 3 Junior. Her riding partner is sitting behind her, they are great friends and love riding with each other. And my lil girl getting ready to enter the competition area for the Birangle event. The horse she is on is a Mustang named Bubba Joe. He is 26 years old, that's almost a hundred in horse years, but folks, he is fast! The only reason he is living this long, and staying this strong, is he is being used as a daily rider, he gets love and attention, and he is not left in the stable for days on end, he feels needed. Lastly, my girl standing next to her instructor after the competition. The two of them have formed a wonderful friendship and our daughter loves riding with her, and she looks forward to Fridays as that is her lesson day. We had a great time folks. We always do. You cannot get more American then with these events out here in the west. The atmosphere is great, family, American, country music, kids laughing, parents fully involved in all facets of the event, and we all volunteer our time through out the day, yesterday my job was at the registration table, signing folks up for each event, and selling raffle tickets. Just good ol fashioned fun! Thanks for looking, thanks for putting up with my gloating.
-
.thumb.jpg.573d1497d0675219908c85aabefd797a.jpg)
Equestrian Trophies/Plaques In Progress (Finished w/Updated Photos 11/15/13)
John Morris posted a topic in General Woodworking
I volunteered to build some plaques/trophies for my youngest daughter's horse club she belongs too. She has been taking riding lessons since before summer and her instructor fired up a wonderful club for the youth of the valley and adult riders as well. We have a club event coming up next Saturday and the trophies are to be presented to the top riders in their divisions and class. We wanted to keep them simple, yet elegant. So I grabbed slab stock I had in my shop from other jobs leftovers, and commenced to free styling some work, off the top of my head, and working with what I had on hand. I also received some valuable feedback from one of the mothers of the club who stated that she had way to many wall plaques from previous sporting events, and that one more plaque she could do without, so keeping that in mind, I went ahead and made them so they can stand on a coffee table, or a shelf, or heck, they could even become book ends!!! I had some Walnut left over from one of my rockers I built, and some California Live Oak as well. I cut them out in blocks, leaving the thickness intact, and keeping any imperfections or cracks in place as well. I then hand sculpted the edges and then sanded them all down to 800, then a coat of Boiled Linseed Oil to finish them off. The first image below is one of the plaques with a horses head medallion laying where it should go, below that will be the name plate with the event engraved and the bottom of the trophies will be lined with felt. This was fun, and I was so glad to be able to help out a great group of horse people in our local community. I made a total of ten, 5 for overall champion in each age division, and 5 for reserve champion in each age division. No two are alike, each one is original and unique, as are the riders who will receive them. It was really quit surprising how long these took to make!!!! Sanding them all to such a fine grit and getting all the nooks and cranny's in the sculpted edges took a day alone. But it was fun, and for a great cause! Here is my girl at her last event with our club. She is getting ready to enter the arena for her Gymkhana timed event. Here is mama and our daughter with awards in hand for her efforts. They were all so proud and all the younguns did so wonderful. I will head on down to our local trophy store where I placed the order for the engravings this coming Thursday to pick them up, and once I get everything mounted on the trophies I'll post back here for some final images! Thanks for following along Patriot Woodworker's! UPDATE Photos (11/15/2013) I delivered the trophies today to the club and they loved them. I am very happy with the trophy company's work on the plates too, it is first rate work and the customer service is awesome. If anyone here lives in the IE Riverside CA, you really need to look up Anady's Trophies and do business with them, one step into the front of their shop and you know you are in good hands and the place reeks of quality work. Thank you Anady's! So here is our finished product! Thanks for looking folks, now the big catch is, my equestrian daughter is out of commission for the next couple weeks! She has been down with a wounded knee for the last two weeks and she cannot have an activity on it for another few till after Thanksgiving. So she'll miss the debut of her dad's trophies with the club. -

From the album: Walnut Rocking Chair
The grain really pops in these chairs when the first coat of oil is applied.-
- 1
-
-
- boiled linseed oil
- blo
- (and 5 more)
-
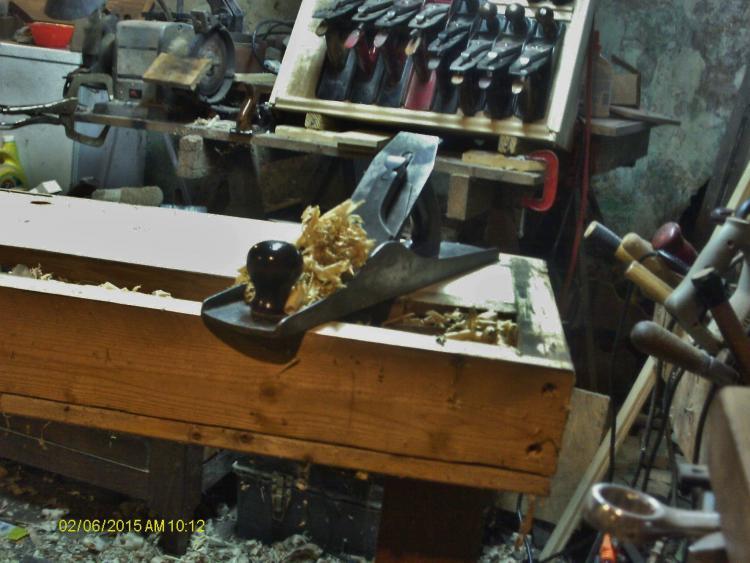
Got the dovetails all planed smooth, even added a bit of round over. Final sanding is done. One coat of that SMELLY BLO is on. Brush on, wipe off. Soooo, drum roll, if you please.... Full side view. Splay is @ 22-1/2 degrees. DTs were spaced by eyeball-Mk1 has a solid oak floor! Note that the handle does not go all the way to the floor. Allows some tools to slide under. Speaking of tools.. That be a full length handsaw, sitting very compfy in there, You can almost see the slight bit of round over on the corner. Plane and a sander did most of that. Over all length is 33-1/2", with a width of about a hair over 12". handle tops out about 7-1/2" tall. weighs about the same as my Stanley No.7c. more pictures in the Gallery.
-
Got this thing almost finished, waiting on the BLO. Second coat is on. Hinges are on have a latch installed on the front.. made a rack to hold the bits in place.. Merely notch some metal angles, then screwed them in place. Test fit to make sure the bits would fit. Old chisel to adjust a couple for width. Drawer liner mesh to cut down on the rattles. Side view. Grain looks decent enough. lid will actually stay opened, on it's own... Got MOST of the bits in there. Will just have to do, for now. Waiting to see how many more coats of BLO I'll need...
-
Well, just a short feature. Nails and glue to hold the thing together long enough to slap a coat or two of finish on. Found four white knobs in the spare parts drawer. Had to cut the bolts down a bit. Walnut stain and BLO as a finish. After a wipe down, brought it upstairs (whew!!) and loaded it up... this was before I loaded it up. Still awaiting the Boss' approval..... Have a nice stack of thin boards still in the shop.......might be some other little project to do? At least it beats trying to get a bandsaw fixed back up..... Might try to glue up the old rack, Might pass the time with that..
- 1 reply
-
- 2
-
-
- spice rack
- walnut stain
- (and 1 more)
-
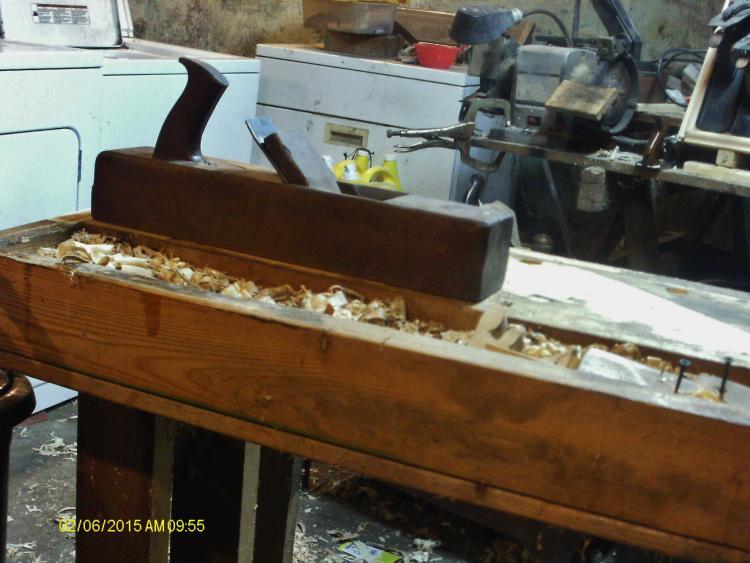
After drilling a few holes in the work bench's top for those B&D Workamate dogs......got to looking AT the bench's top a bit...... After over a year of use, and abuse, it was starting to look a little bedraggled. Pine top had "moved" a bit, was in dire need of a clean up. Cleared all the stuff off the bench, that took awhile, right there! Then grbbed a few wood bodied fore planes,,, Had to drag the bench out away from other things, got tired of the planes hitting things. Went at the top at a diagonal to the grain. Even had some end grain to plane down, as the legs go all the way through the top. Used a 22" long try plane as well. Then, once the top was cleaned off and almost flat, got out the iron bodied small jointer plane And level the "Playing Field" a bit. had a few scallopped areas that needed smoothed over, so...a smooth plane was used a bit Now, since all that bare wood was shinning up, and a cup of that SMELLY BLO stuff was handy..... Gave things a decent coat. I also drilled two more dog holes. Still debating about a second row of them.... Dryer "BUZZED" as the clothes were dry. Loaded them up, and went upstairs. That way, I don't have to smell the finish drying.... Bench might be good for another year or so???
-
a little tool chest varnish/BLO/walnut stain. insides are filling up quick. Might just be a decent chest. From a pile of old bed parts
-
Awhile back, picked a Scioto works #8 coffin style smooth plane at an antique toy store. Missing a bolt to hold the iron and chipbreaker together. Missing the strike button on the backside. So, Found a tap that was close to the size i needed to make a new thread in the chipbreaker. Turned out to be a 10-1.5 Metric plug tap. Ok, we have the matching bolts at work. Brought one home that I found on the floor. It came out of the shelving system they use. Takes a 6mm allen wrench to loosen. Ground the head down a bit, to almost flat. And still leave a bit for the wrench to grab into. Shorten the threaded part a bunch. had to clear the wedge. Sharpened the iron back up, adjust the chip-breaker for a better fit. Beltsander and sandpaper on a tile to sharpen the iron. A look at the back side Soaked the wood body in a BLO/ Varnish/ Walnut stain mix.....about ten coats. Wood was VERY dried out. Markings on the iron are from Ohio Tool Co. Thistle Brand Made in USA Took a handplane to the sole for a tune up. nise was worn quite a bit. Got the sole nice and flat, and gave it a coat Yep, there is a crack in the heel. Right where the missing strike button USED to be. Guess that is why it is AWOL. Decided to make something to take it's place. Didn't like the idea of a carriage bolt stuck up in there. Didn't have a big enough bolt, so, a washer of sorts was made, and a smaller bolt added. Filled the hole with glue, and tapped the parts in place Almost like a Lincoln's spare tire..... Got everything back together for a test drive The shaving is the full width of the pine scrap I was using. Had it set a bit deep, though. Not too bad for a $5 plane
-
Commissioned trophy case. 32"wide, 30 1/2" high 11" deep Adjustable oak shelving Sliding glass doors. Red oak carcass with red oak ply back. Finish is 1 coat of 50/50 BLO & poly and two coats of 80% poly and 20% BLO followed by Paste wax. This is one heavy box, and with the 1/4" thick glass doors it's really heavy. It's weight is the reason for the modified Freedomcleat on the back. The top half of the cleat is placed 1/2" from the back. The lower half has a piece of 1.24 MM BB attached to engage the cleat. It looks like a lighted cabinet. It's not. That's a reflection of a florescent behind me.


.JPG.5abd73a1dd79c0d131197f693153e41c.JPG)