Search the Community
Showing results for tags 'scrollsaw'.
-
View File Tree of Life This file is donated by @TJ Brown. A finished tree of life is seen below, enjoy! Submitter TJ Brown Submitted 01/01/2024 Category Scroll Saw Patterns
-
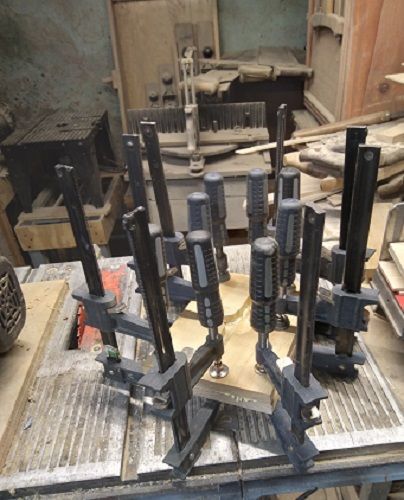
As it would be a nice place to store these things.... Has to be out of pine...Oak would corrode these...Need a scrollsaw.. And 3 pieces of 1 x 6 pine...like this one.. This one will be the lid of the case...planed because it is cupped a bit. May have put too big of a blade in the scrollsaw, was hard to make a few turns.. Will clean this up and out, tomorrow. Kind of hard to see..but... I wanted a solid glue-up.. as these 2 were also cupped,,,so I glued the cups together. Letting this sit until tomorrow..then plane it down smooth and square... I found a bit for a Brace drill that is a hair oversized...So I can drill out a spot for each Die....haven't decided whether I remove that one Die from the holder, yet. Still have these boards available.. 1/2" x 6" x 24" planks...Maybe a case for the "New Chisels"? Stay tuned..

-

Version 1.0.0
117 downloads
This file is donated by @TJ Brown. A finished tree of life is seen below, enjoy! -
My grandson, who is 8 and lives 750 miles away, loves my CNC machine and spends most of his time with me and it whenever he visits. So I figured maybe get him started with a scroll saw. I have his dad's (my son) Delta from 30 years ago here, but it needs basically the whole blade thing that extends off the arm. Now, am I better off trying to get that one fixed (and who do i call) or just buy a new cheap, I mean budget friendly, one to see if he takes to it. And if so, what would be a good beginner one? Also, is it advisable to try and find a used one?
-
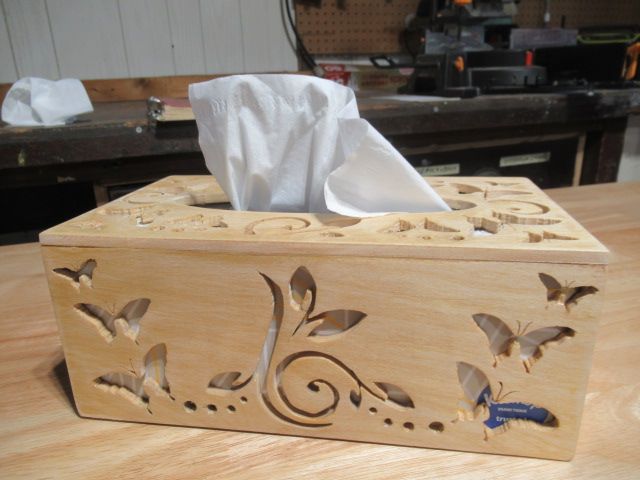
Since my working with power tools has had to be considerably reduced because of health issues, I have gotten in the shop for some smaller projects. One is a model build of a Chris Craft speed boat and another is a scroll saw cutting and assembly of a tissue box cover. The Chris Craft did consume a bit of time. The whole hull assembly was done in two layers, the first layer using balsa wood strips' and a second layer using mahogany strips. The tissue box was cut using 1/4" birch plywood. This was my first attempt at using the Delta scroll saw for anything more than practice.
- 18 replies
-
- 11
-

-

-

-
- scrollsaw
- tissue box
- (and 3 more)
-
All pieces have been sawed out except the dragon or what ever he is called. So now I am trying to figure out how to go about carving the small pieces I turned this hunk of maple in to. The object is to cut the pieces apart where by design the saw cracks will disappear. And you might know it I did flub up a few times and it is hard to adapt those places in to something presentable. I never attempted a dragon before so I don't even know what color those things should be? I'm showing where I'm at right now and there will be lots of shaping and grinding for a few more days. I'm running out of time on the temporary glue for it don't take long for it will come un glued so to speak. The better brands will give a slow poke more time to do the sawing. It will be more shop time when its over 100 so this might go faster than I had originally planned.. And for those who have never tried to scroll saw a piece of paper that is not sticking down is almost impossible to cut accurately.
-
Started it up and heard a loud knocking sound. Totally disassembled it. Found the cause. A loose nut. Tightened it and, reassembled it. Took about 6 hours, over 3 days. Those with more mechanical aptitude....and, the proper tools... coulda done it in far less time, I'm sure. But, it's all together, now. And, runs like a top. It came to me with several old, used blades. I put one in to just run it. Now to order a selection of flat and spiral blades. I'm anxious to start the long road to semi proficiency.
-

From the album: firefighter logo
Not finished yet, I'm waiting on the moisture to go down before I spray clear. -
I just printed two different sizes of this guy, a ten and a twelve inch model. Don't know when or if I ever carve this guy but I got it in my pictures for when I get around to it. I do have the wood but these pecans been working the fool out of us. He sure won't look like this though. I like my indians with skin and hair and feathers!
-
Live and learn. Fred can you take the measurements from the times you made the other bowls and use them or get close? The bowl in the middle was the first one I made right after I got my new Dewalt in 99. All I had was a little picture from an old magazine. It looked to be about 3 or 4 inches in diameter so I went three or four times larger and got close to what it originally looked like. Around the top I used small drawer pulls and for the feet, hose are air tool parts for I used to repair the tools I sold while being a Mac Tool distrubutor. They still have the O rings on each foot... It is made of oak which I despise for it gets my blood pressure up , not because of something in the wood, its because I hate to work with oak..The other two are ash... Al the curves were made using a french curve set... I made a few different styles back then of different shapes and lots of different tops and all the tops were the same diameter so the ladies could pick which top they wanted with the bottom they chose.. The scroll saw cut out every thing. I remember using lots of different router bits. The dowel in the middle of the top on the right bowl or basket was only their until the glue set on on all the outside thingies but after the glue set up the dowel was stuck so it ended up in the design un stained but hey its now in the plans. There is a trick to making all those slats on the tall baskets. There are two sizes slats in each bowl. The smaller slats is actually both sides of what was left from the waste after sawing out the main slats.. I took both sides of one slat and glued them together. This is why the curves are identical to each other. Another trick is after I sawed out the front shape of each slat I then used double sided tape to attach those pieces back together then turned the slats over on the side and using the scroll saw again I saw out the sides. Taping the pieces back to the main body gave me a flat surface to the saw out the pieces of the pattern I had drawn on the each side. After taking the tape off I ended up with the curved slats you see here. If you can enlarge the picture you can see the glue lines in the middle of the smaller slats...
-
I made a couple of new bowls for a customer at church.
-

From the album: MISC
A special order map - Measures 72" x 52". 1/2" SandiPly background, 1/4 Baltic Birch map, 1/4" Lexan cover, with 8/4 Basswood frame.© Fred Wilson AKA Pop's Shop
-
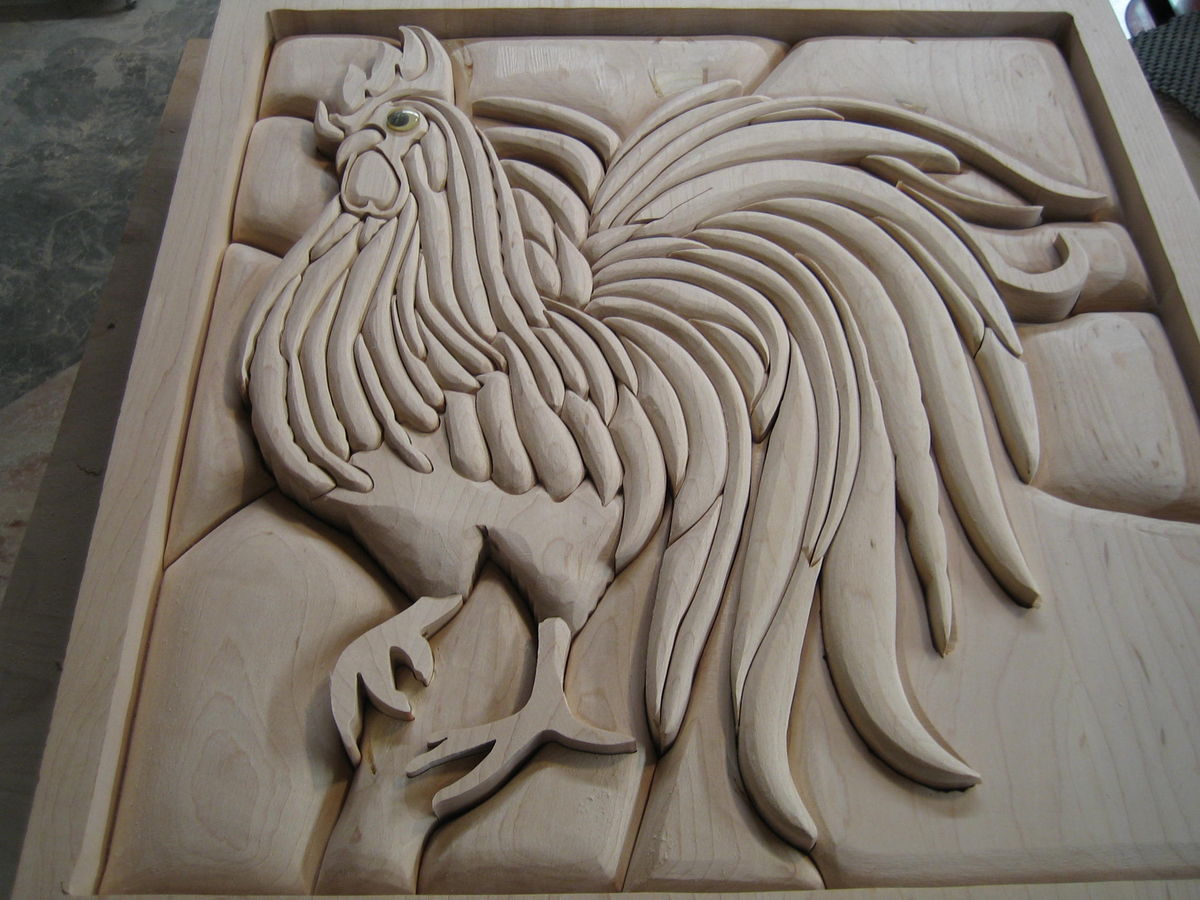
When finished with the last one I immediately thought I could do better..not just in a place or two. Maybe because it was easier than most of my projects. But maybe the reason I already had glued up and prepared the slab for the next project...and I think I wanted more wild color for the ole rooster to stand out in that crowd. So I'm at this stage right now.. I had already used biscuits between the boards so I am starting to see the row of boats again. I tried to stay above them but the edge tapering is bringing them out.
-
This morning I looked over what I did last night by bringing up the man chicken to the top. When I do things I have no plans for the next step as Paul Harvey would say.. I show what I mean by not thinking...See the parts of three biscuits up top inside the frame..I put them 1/4" from the bottom of the 1" thick maple.. All these pieces will be glued on to the 1/2" BB which I installed to the back side of the frame so I can have something to carry around as I go from station to station doing all kinds of shaping of the pieces of wood..I didn't need biscuits to start with but that's just a habit I acquired when edge joining all my wood.. So whats my plan?? Don't know till I get back out there and see where I can do the least amount of damage and make it look like I am always under control... Now I am thinking I can make these funny shaped things look like UFO's have invaded the fowl ranch.... Another strange thing happened this morning...I took this picture this morning.. I down loaded it this morning then after eating breakfast I come over here and started this post and tried to find the picture..No luck so I go back out to the shop and take another picture and come in and load it. I tried to find it to post here and couldn't find it.. Come here wife and help me for this computer is being strange this morning....I screw around for an hour or so then I looked down and notice the date is Feb 1,,,,,, so that is where my pictures went for I been looking under January... and they start a new series of pictures each month. Like I said I am slow and sometimes I am dead stopped...Now I am sorry to say all these feathers will all be different when I get through playing and as I said before I have no plan.. so as long as the colors and stains last I will keep having fun experimenting. Never done a man chicken before so I hope I shape things in the right directions.. Got to look up UF0's before I go to the shop.. I got some round dowels I could turn in to wheels and tires but not too many pictures of them being built that way???
-
So how do y'all attach a backing to a fretwork piece? Specifically, how do you apply the adhesive so that it dosen't get on the finished sides? Additionally I would like to use a waterproof glue (Welcome sign for the front door), polyurethane comes to mind but it seems to be pretty messy and ugly if too much is applied. Thoughts?
-
Finally get to deliver this today and exchange it for an older model!
- 19 replies
-
- 12
-
-

-

From the album: small basket
This is a small item I make to use up scrap and provide an anti suicide message. I give these away free at craft shows to anyone who wants or needs them. Look up the semi colon initiative. -
To start the "Tips and Tricks" off on a good note, I thought of what basics we should all be aware of and some tips to make the best cuttings we can. Remember, guys and gals, there is NO right or wrong answer to any of our topics. What best works for you is the way it should be. That being said, I think we can always learn a little from our fellow scrollers. Please chime in with your suggestions of your ways of doing things. It will always be appreciated by all. BLADE ALIGNMENT We all realize that the blade should be perpendicular to the table unless we are doing angle cuts. Great blade alignment is "required" in stack cutting (which we discuss later). What we don't normally check is front to back alignment, "fore/aft" movement of the blade, and "wobble". Â Let's take them one at a time and see what we can come up with. LEFT/RIGHT ALIGNMENT I have seen several ways, over the years. Â Most of them work pretty well. I use a machinest's right angle to set my blades. Â However, for some reason, this doesn't always work on my machine. Cut into a block of wood, back it out of the kerf, move the cut to the back of the blade and see it lines up. Using a scrap piece of 3/4" stock, cut a piece out, then move the cut side to the opposite side of the blade and see if it is aligned. Cut a small circle out of 3/4" stock and see if the bottom and the top of the hole are the same size. FORE AND AFT ALIGNMENT I generally use the machinest square for this one. BLADE WOBBLE This is when the blade moves either left or right from the top to the bottom of the cut. Problem could be either rails bent, misalignment of machine, or as simple as alignment in the blade holders. Need much more help on this one. YOUR IDEAS ? ? ? ? ? ?? The Eclipse scroll saw is the only saw that I know of that has solved the above problems. This saw design has gone back to some "ole timey" machines. Belt driven, with a "perfectly aligned" plunger system.
-

From the album: dresser mirror
-

From the album: dresser mirror
-

Its been shown before but still questions
Smallpatch posted a blog entry in Small Patch Musings and Such
this is not the same box but is the way I start building one. I have to print out 10 exact patterns. The tenth one is just solid with no holes for drawers. All the pieces I cut out for the drawers are later glued together except for the front of the drawer and the back of the drawer. I use dowels to line up everything . If I don't use the dowels when clamping two pieces together it could slip just a hair one way or the other and cause lots of extra sanding or cause for the trash can. Each set of holes has to be in a different place than the next side of the pieces. And you can't drill the next side until the first side is marked and drilled and glued. Drawers are somewhere around 5 1/2 to 6" deep. The body being one solidly glued up mass with no cuts joining each drawer keeps it all from warping from season changes.. I use brasing or stainless steel rods for drawer pulls before I start spraying the clear lacquer so they will stay looking good and not tarnish. I also put a wider drawer front on to cover up the possible gaps from sanding and creating a back looking mess. And here also the dowels help to line up the drawer fronts. So far, all the sawing was with the scroll saw so the reason I call my boxes scroll saw jewelry boxes. Now before I glue the front of the drawer on and the back of the drawer on I first mark where the cavity of the drawer will be and cut that area out with a band saw. Then using the dowel holes I first pt in the pieces I can now glue the on and they will have bee lined up before the cavities of the drawers were sawn in... Its not a good idea to be drinking beer when all this is taking place for all these holes I drill has to have a stop set on the drill press or else... There is way more preparation in one of these boxes and a few more weeks involved.. I cut the last 4 boxes I made out outside my motor home while sitting in an rv park in Colo.. I had all the wood glued together for each piece I needed and would only glue on one pattern one at a time as I started to scroll saw each piece out... Gluing a pattern on two or three days before the sawing takes place the pattern will shrink and stretch and some might ruin to not be usable. I always took two or three extra patterns and pieces of prepared wood just in case... I have also found two different printers will make different size patterns even though I use the same pattern in two different printers..Not good when I am having to make multiple patterns and needing some more away from the printer I first used. When cutting out this many of the same thing and needing them as close to each other as I can get them, I find I have to start my scroll saw cutting from the same place and go in the same direction on all the pieces... Going two different directions on two different pieces a person has a tendency to lean or push the wood just enough to make differences and I get get bad line up problems and then add that many more pieces it gets too wild....Yes it ruined my very first wide box because of this... Using the dowel system where at least 3 dowels and most of the time 4 dowels on each side of all the pieces I can get things more manageable when its time to sand it all smooth on the inside and the outside and all the drawers.. All these have to stay in line as to how they were sawn so lots of marking goes on and off. Don't even know if this is understandable or not?? And I can sure see the difference in my sawing from starting in the morning or just before I quit at night. Those lines can sure get wavy. Jess -

-
We have 3 church families, 2 with son's that are deployed overseas and 1 lady that beat breast cancer 9 years ago. I have some left over 1/4" BB plywood and with the weather and the shop warm enough to get out I cut these for them. We'll give them out Sunday.
-
Here is a family of Easter Bunny banks that I made for a customer for her daughter. My customer is teaching her daughter to save so there are banks for Pennies, Nickles, Dimes, Quarters, Dollar Bills and Foreign Coins. The purple bunny is bigger than the rest it is 10 inches tall x 14 inches long x 5 inches wide. All the other are 8 inches high x 10 inches long x 3 3/4 inches wide. DW
-
I've been following some other Scroll Sawing forums and it sounds like Mike has retired and sold his business to Wooden Teddy Bear. It sounds like it was on his terms so enjoy your retirement, Mike!