Search the Community
Showing results for tags 'ash'.
-
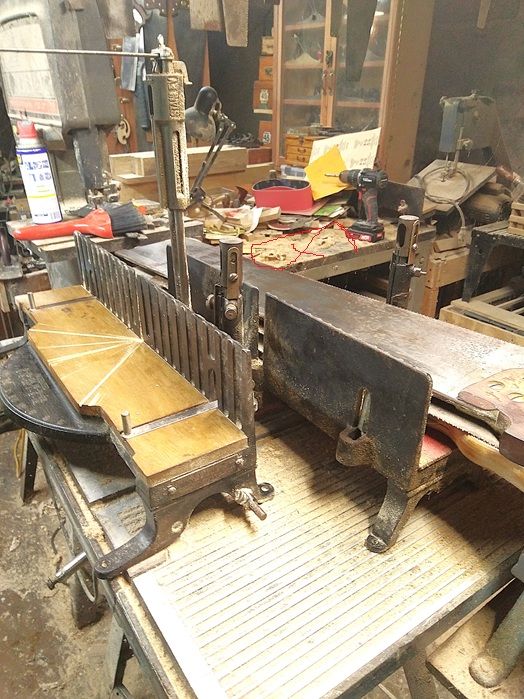
Decided to clear off a spot...donated an un-used MitreBox and saw...that was just sitting around and getting rusty.... Had 2 to send over to the Lutheran's Thrift Store...the area back there in the red circle...needed cleaned off.... Thing with a motor? A Wen Power Planer..about the size of a Stanley #5 Jack plane, and 3 times the weight... Had a stash of Ash planks I was going through, cutting out the bad areas....I sorted through the stacks...found enough to lay out... Imagine the ones laying flat as Drawer Fronts, and the ones standing up on edge as the dividers between the drawers...this gave me a measurement as to how TALL a case I needed to build...20"...then from there, I got a depth of 16" and a width of 24"...roughly... Next, find enough parts that were long enough to make a panel for the top, and 2 panels for the sides.. Cross cut a few for length...and laid out for the top panel.. left stick needed ripped down a bit(Didn't feel like lowering the saw blade just yet) Ripped that extra off, along with the defects along the outside edge...rearrange a few boards...some needed to be jointed.. We have ways... worked my way through, until.. Last edge...then set up for a glue up..(lowered the saw blade, this time) Spread a bead of glue along one edge, rub that edge against the next edge..repeat as needed...1 clamp on top, 2 clamps underneath..let this heavy mess sit a spell... Sorted out enough boards for one of the 20" long/tall sides... These will need cross cut, and the one on top need ripped down a bunch...then repeat for the other side panel... Same here, these need cross cut for length, jointed and maybe one ripped for width.. Plan at the moment...top corners will get through dovetails...and maybe a slight round over...Bottom divider, will be the "bottom" of the case...and sit in a rebate...may add feet of some sort. Maple runners for the drawers to slide on, front "dividers" out of Ash...both the runners and the dividers ( other than the bottom) will be in sliding dovetails...back of case is to be 1/4" plywood, glued and screwed into a rebate along the sides and the underside of the top... Then, build 5 drawers.. Should be fun, stay tuned...

- 60 replies
-
- 11
-

-
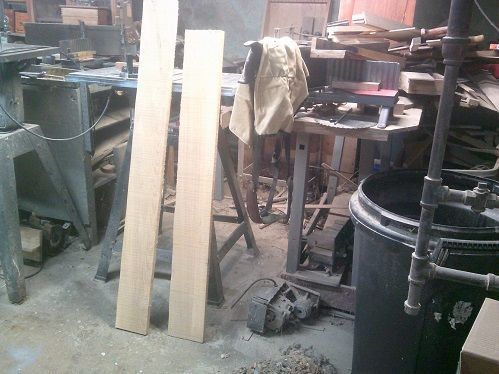
Been ripping and a-cutting on a few planks...and a Project has been started... Some of the parts.. Then a few more parts.. Some other parts needed a little help.. So...we help it out a bit..with a bit of Cardio thrown in.. The goal was to get rid of all the wane, and BIG knots...and fuzzy edges... One plank used to be a 1 x 8 x 6'...took a while...but.. One board was rejected..wonder which one? Had a replacement handy... And..just to make the panel a tad wider... That "small knot"? might get shifted to the outside, and then sawn off.. Other parts.. 5/8" thick Soft Maple for the sides and back of a drawer...Ash for the 3 aprons and a drawer front...which leaves.. Needed for of these...to make tapered legs with...let them sit overnight, then... De-clamped them...set up the rip fence to just skim two faces...one to remove the glue lines, the second one was to skim of a face, to get rid of the "Fuzzies", 90 degrees to the first pass Passes #3 and #4..fence was reset to 1-1/2" width...and the other 2 faces were run through... Will have to trim the ends square..then decide which two faces to cut the tapers on... Until then.. I'll leave then clamped together. Need to joint a few edges... And get these 5 glued up into a top for a table.... Stay tuned..
-
Tool Cabinet is done...so.. ....to be continued....
-
When my daughter Grace was younger my Aunt gave her this puzzle with her name on it. I decided I should put in a frame to preserve it for her. I made a box for the cardboard box the puzzle came as well. I’ll probably hold on to it until she has her first child. Hopefully that’ll be awhile. Don’t think she’ll be much on it now since she’s just turning 16.
-
Ok...this is going to take a while...seems after the last 2 Projects were done...I still had a stash of lumber.. Ripped the worst defects off the edges, or tried to....reset the tablesaw.. Placed the best ( straightest) face against the fence...fence was set at 1/2" width. Takes 2 passes but... Some were not quite as wide as most of the rest....sorted through for the best looking of the bunch.. Planed away the saw marks.. And lay things out a bit... Joint a few edges.. And glue up a few panels... What WAS going to be a "Lid" became the "Front"....another was cut in two equal sections, to make the 2 "ends"...the "New" lid became a 3 piece affair... Then it was a matter of cutting things to size.. But, these needed jointed, again..because.. None matched the other 3....Finally.. I think I was ready to start the joinery...I also had both the Lid, and a Base cut and milled to roughly the size I needed... So..Project Started...Next episode? Finger/Box Joints! Stay tuned...
-
That stash of leftovers...that was resaw down to 1/2" thickness (more or less ~) Went through the mess, picked out a few pieces, and made a few panel glue-ups.. While trying to match up the grain a bit better.. These will be the end panels...so.. 2 ends, and the lid...I also glued up another panel for the "back" of the box..edges needed a bit of jointing, before the glue and clamps..so.. Stanley No. 4-1/2c and Stanley No. 6c were put to work... Let the panels sit overnight.. Stay tuned...
-
As the "old" doors were looking rather bad.. Flat, plywood panels...someone had tried to make a bifold out of the bottom 2...hinges are junk...jambs are chewed up...and these do not match the rest of the cabinets in the Bathroom.. So..Moose & Squirrel Delivery LTD dropped of page #1 of The Plan... For one of the 2 bottom doors,,,details.. Going with Raised Panels...for a Frame & Panel Door....since the main doors to the Bathroom .... Are also 4 panel Frame & Panel doors Decided to at least mill the raised panels first...from a pair of 7/8" x 9-3/4 x 61" planks.. Need 16 raised panels, for all 4 doors Means I had to haul those two 1 x 10s to the shop..and cut both down to 30" lengths.. Circular saw tried...but, between holding the saw and support 31" of cut-off...we can do better.. Then trim the nasty stuff off the bad ends.. Handsome, isn't he? next..I needed to rip these 4 slabs down a bit.. Then run the cut-off through, as both were tapered a bit..stack these aside for a bit.. While I reset the saw...need to cut these exactly in the center... And stack these aside for a bit.. Live edge MIGHT still get used, we'll see. Reset the saw quite a bit.. Raised the blade all the way up, lay the Zero Clearance Overly over the blade...tilt the blade 15 degrees...add the rip fence at 1/2" away from where the blade comes up through...make sure the fence is square..we are able ready? Stand each blank vertically on an end, run the blank through, rotate 90 degrees, run a long edge through ( straight through, do not pause nor slow down,,you will get burn marks) rotate, run the other end through, and finally..run the other long edge through..repeat the above 15 times.. And wind up with 16 Raised Panels...which will get a rebate all the way around on the "inside" face... Next up? Stiles...hauled 2 planks to the shop, trimmed the bad ends until each plank was 45" long...then, rip right down the center.. And wind up with 4 stiles...clamped up to keep them as flat as I can...will be part of a Road Trip...taking them and 6 other planks to a Friend of mine's Barn...where he has a 12" Delta Lunch Box Planer...as all of them are way too thick...need all to be planed down to 3/4" thick... We have work to do.. Page #2... And, I am waiting on Page #3... Stay tuned..
- 103 replies
-
- 8
-

-
-
- ash
- raised panels
- (and 1 more)
-
Since I went out and bought a Stash of Ash, again.. 15 planks, some good, and some not so good. $25..... In our Living Room, the couch sits almost against the south wall...there is the Boss' Wheel Chair that she doesn't use any more...and about at least a foot of space between the Back of the couch and the wall,, Thinking about a "Sofa Table" that can sit back there..maybe a lamp or 2 on it.. Most of the tables in the house are Shaker STYLE tables...may go that way or...maybe try a Mission Style sort of thing ( Daughter stole the last one I made..and painted it BLACK!) Won't have any room to open any drawers...and not sure about a shelf down near the feet... Top will be a glue up, and so will the legs.. letting the Stash get used to the house.... Stay tuned...
-
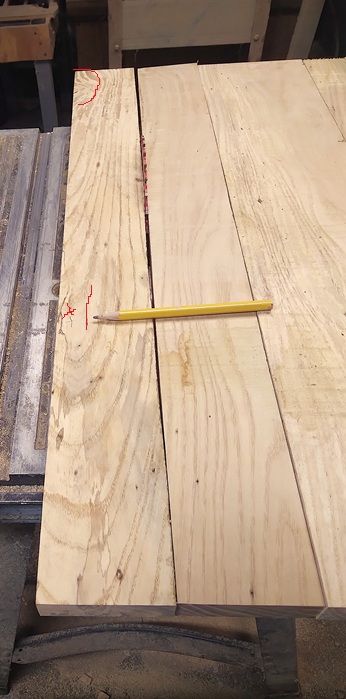
Looking around for ideas, found this one sitting in the dinning room window sill... Along with a writing desk...figured IF I change a couple details...like make the drawers 4" deep...and the sides into Frame & Raised Panel...hmmmm.. There is a Mystery board in the latest stash.. Is the 1 x 8...Ash..or...White Oak? Them be Ray Flecks... Have a few defects to work around... At least in the 1 x 6 shorts...and one end will need trimmed up. Yep, THAT one.. Next, decide which to use.. As either raised panels, or, the 4" deep drawer fronts...either way, both will be 4" wide...have to decide how LONG to cut them... Will need 4 stiles, just have to figure out how TALL this case will be...and then how long to make the rails... Starting tomorrow, when I haul a couple 1 x 6s to the shop...and the "Timer" set at 90 minutes...we'll see how much cussing will be needed.. Stay tuned...
-
Had this cut in a 2" ash slab. Finally got up the nerve to try and finish it.
-
This is my first attempt at a "beads of courage" box. It's also the first time I've turned something using staves. There are no miters as we normally think of them. Rather, the pieces are joined using a birds mouth bit. I think it came out just a little too big but I like how the walnut and ash look together. I left the flats on the inside of the box. Two reasons, first and most important, it was easier that way!! Secondly, I liked the way it looked. It's hard to see how the staves nest together in the finished picture so here's some cutoffs to show that. It's a neat method, they nest together without the slippage of a normal miter joint and provide a little more surface area for gluing.
- 8 replies
-
- 8
-
-

-
-
- birds mouth bits
- stave
- (and 3 more)
-

From the album: Bedroom Chest of Drawers, in Ash
-

From the album: Bedroom Chest of Drawers, in Ash
-

From the album: Bedroom Chest of Drawers, in Ash
-
Ok..first two planks have arrived in the shop... Need to be cut down a bit...to 41" strong... As they are both too long...will be a rough sort of cut, for now.. Speed square to mark out @ 41"...the cut-off? Kind of "Fugly"? other board was only 8" too long..but the board was tapered...so, I cut the wider end...Next Finished length will be around 40" or so...this allows me to trim the ends square. These were run through as a rip cut..rip one edge, with the "better (Straighter) edge" against the fence...then flip the boards over, move the fence a blade's width closer to the blade..run run the freshly sawn edge against the fence...result is what you see here. Next, find the center point..5-1/2" divide by 2..= 2.75"..set this from the fence to the center of the saw blade.. These will be the 4 corner posts of the case. a 32nd shy of the 2.75..but they all are the same.. Letting them get used to the shop...as I need to figure out the sizes of 6 pairs of rails...and 10 raised panels... The corner posts? This is from another SMALLER chest of drawers, also built for the Bedroom..I have to mill the rails, and the raised panels, yet....more planks to the shop Right now, the Dryer is making the shop a bit too warm to work in. Looks like I have had a BUSY day, so far? Stay tuned..
- 94 replies
-
- 10
-
-
- project start
- ash
- (and 1 more)
-
I posted a couple weeks ago about a shop contacting me to make drop spindles which are used in spinning wool. There are two basic components, the "whorl" which is pretty easy and quick to do. The shaft, which is a little problematic. The shaft needs to be about 12" long and around 5/16" diameter. Kind of difficult and tedious to turn and with a small margin I need to turn them as quickly as possible. Looking for options I bought a dowel jig that uses a drill motor to create a dowel. It works but I got more tearout than I liked, especially on woods like oak or ash. I then did some searching and watched some videos about using a table saw to make dowels. You read that right, you can make a dowel or spindle using your table saw. It works, and it works pretty darn good. Pretty nice finish which will require just a little sanding and it's pretty consistent as far as diameter Produce_5.mp4
- 10 replies
-
- 7
-
-

-
- woodturning
- spindle
- (and 8 more)
-

Project Post, Organizer and ruler.JPG
steven newman posted a gallery image in Small Crafts, Boxes, Picture Frames, and Lighting

From the album: Benchtop Organizer,2 drawers
-
- 1
-
-
- organizer chest
- resaw
- (and 1 more)
-
Project Post, Back corner.JPG
steven newman posted a gallery image in Small Crafts, Boxes, Picture Frames, and Lighting

From the album: Benchtop Organizer,2 drawers
-
- 1
-
-
- organizer chest
- resaw
- (and 1 more)
-
Project Post, Front corner.JPG
steven newman posted a gallery image in Small Crafts, Boxes, Picture Frames, and Lighting

From the album: Benchtop Organizer,2 drawers
-
- 1
-
-
- organizer chest
- resaw
- (and 1 more)
-
Project Post, Height 5.5 in..JPG
steven newman posted a gallery image in Small Crafts, Boxes, Picture Frames, and Lighting

From the album: Benchtop Organizer,2 drawers
-
- 1
-
-
- organizer chest
- resaw
- (and 1 more)
-
Project Post, too big.JPG
steven newman posted a gallery image in Small Crafts, Boxes, Picture Frames, and Lighting

From the album: Benchtop Organizer,2 drawers
-
- 1
-
-
- organizer chest
- resaw
- (and 1 more)
-
Project Post, Lid has a chain.JPG
steven newman posted a gallery image in Small Crafts, Boxes, Picture Frames, and Lighting

From the album: Benchtop Organizer,2 drawers
-
- 1
-
-
- organizer chest
- resaw
- (and 1 more)
-
When last seen...this pile was needing some work ( Rehabs got in the way) So...today's Tasks was to dovetail the back corners...and see about a base for it to sit on.... Lay out a few pins...saw a few pins.. Chop out the waste...outside face first... Chop down about halfway...flip over.. The chopping was done on a piece of 3/4" plywood.....that needed flattened once it was tied down to the bench.. Put to work fresh out of rehab.... Used the completed pins to lay out the matching tails....bandsaw the waste out between the lines..ON the WASTE side of the lines.....the more of each line I leave, the tighter the joint.. First dry fit.. Not too hateful? Repeat the above for the other corner... Getting better? This is to be the back of the case...the front will have a couple shallow drawers, and the front of a tray under the lid. Will fit up the drawers next time.....while I am getting the panel for the base square up and leveled...right now? It is waiting on glue to dry....6 strips, resawn to ~5/8" thick, edges ripped square and parallel... Double cauls to try to keep things close to flat.....toes were starting to cramp up, Mountain Dew Zero was about empty....time to stop for the day... Stay tuned....it just night get "Very Interesting"...
-
While Norm used Teak for the bench he built in the New Yankee Workshop....I just don't have his budget.....so.. I think Ash will do nicely enough...as this bench will reside in the Gazebo, instead of Russ Morash's Garden..... Need to clean off the bench in my shop, first...then some layout work for the 2 back legs....need 4 pieces, as I will be gluing the legs up from 2 pieces. have to figure a good height for the seat....to locate where to start the bend for the back of the bench.... Stay tuned....
-
Sorted the last of the Ash scraps...resaw most of it down.. Sorted out for 4 slabs at the same thickness....ripped those to the same width...as for squaring the ends... Mitre gauge set to 80 degrees? 2 long sides, and a pair of ends....10 degree bevel complicates things a bit, though.. Guess I can't use this square...have another to use.. Also to lay out through dovetails... Gave an old saw another try... Jackson Backsaw... then chop out the waste... Trace around these Pins, to lay out the tails...saw and chop...dry fit.. Then repeat for the next corner....until... All 4 are done. Stay tuned, more to come...
- 11 replies
-
- 3
-
-
- spoon tray
- spoon
- (and 3 more)