Search the Community
Showing results for tags 'trim'.
Found 13 results
-
Folks, I’ve made and sold a ton of cutting boards and cheese slicers over the years but I’ve hit a snag. I’m building stock for the 2026 Christmas sales and I decided to mix up my inventory of cutting boards by buying some acrylic templates and make some with fancy smancy handles. I’m having mixed results because of router bit grab and tearout particularly on the inside of the handles and it has to be the bit selection. I’ve used 2 fluted flush trim bits, spiral up feed flush trim and even compression flush trim bits. I’m ready to buy a new Whiteside 2 fluted 1/2” diameter, 1/2” shank but I thought I would reach and ask for your input.

- 22 replies
-
- 2
-

-
- router bit
- router
- (and 7 more)
-
With the base finished, all that was left to do was trim out the top with the walnut edge trim. Glue, clamps and some pin nails. I forgot to take photos of the top to apron mounting system but this Sketchup drawing should explain what I did. These are simple wooden clips with their tabs captured in slots that run around the perimeter of the inside of the aprons. The slot is 1/4" wide by 3/8" deep. The clips are cut from 3/4" thick maple and the tabs sized of a snug fit in the slots. Screws are used to secure the clip to the top. The hole is slightly over-sized and the screws are the type used for pocket holes- nice large heads. The finished table is awaiting pickup- The church members are going to apply the finish. If they send a picture, I'll add it here. Thanks for following along and the very kind comments that have been posted along the way.
-
Had to laugh reading an article from Fine Homebuilding. Emphases mine "Finish carpentry makes the eye work hard and skip over imperfections. At this point, the framing carpenter has made the house plumb, level and square. Or not. A good framer can ease the finish carpenter’s job by providing plumb walls and plenty of blocking for nailers for attaching trim. Or not. But even if the framer couldn’t read a level and and even if he added no more blocking than was absolutely necessary, the finish carpenter’s job is to make the doors, windows and cabinets work, and to make the house look good." It is said that the framer works to the nearest 1/4", The trim carpenter to the nearest 1/16", the cabinetmaker to the nearest 1/32" and the boat builder to the nearest boat. When I first started working at the furniture bank, one of the guys there called us "carpenters." I had to correct him and say we were "woodworkers," not "carpenters." I find that's a better term than "cabinetmaker" who then assumes you work on kitchen cabinets or "joiner" of which they have no idea what you do.
-
We have a house new to us and it has painted wood trim (pine) white that does not fit the character of the ranch house. I am replacing that trim with the following. Doors flutes, rosettes, and plinth blocks Windows flutes, rosettes, jamb, sill Baseboards , plain board 4 to 6" tall then quarter round on the floor and cove molding on the top. In your humble opinion should I invest in real wood mouldings (oak stained and dyed to highlight the grain) or MDF painted white. The investiment will be substantial and I need to know which this community would like to go for. IF natural more detail work to get everything tight and looking good. If mdf (cheaper than oak) and white trim can be flubbed with caulk.
-
First of all, when I use the term "trimming", to me, it means making the cut just a little bit wider. In scrolling there is no "untrimming" Let me put a picture up that might help: The red line is the blade and the blue line is my cut. I am cutting on 3/4" maple with some pretty hairy cuts. The blade I chose is a Flying Dutchman UR3. As you can see, the needed cut is a little over twice the width of the blade. My first cut is down the left side from A to B. Then I back the blade up and "trim" the right side from A to B. This was working great until, all of a sudden, this didn't work any more. Couldn't perform the task. SOOOOO, being the resourceful guy I am (and cheap) - (ops - meant frugal), instead of changing the blade I tried reversing the procedure. First cut down the right side and then followed up on the left side. Worked like a charm. OK, guys, what changed??????????????
-

From the album: New family room
Home made trim around windows showing large window sills with shelves above windows with attached curtain rods, large base trim live edge cherry stove surround. Trim finish- one coat of medium walnut Danish oil for some color toped with 2 coats wipe on poly. 2nd photo shows window to kitchen sink and pathway from kitchen again with large widow sill with selves above. My wife absolutely loves the look butt complains about the dusting to keep up with. I remarked your to short anyway don't worry I'll have to take care of it anyway. LOL. -
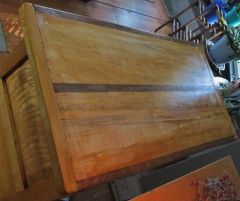
From the album: Maple Chest of Drawers
Top view. Needed a little extra width. Sliding dovetails to hold the bread board edges in place. There is also a hint of the curly maple grain -
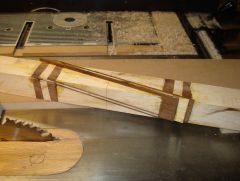
This part will cover the glue up and trimming of the inserts for the rolling pin. I found it easier to glue if I oriented the blank with the diagonal cut facing up. In this picture, you can see the three strips to be glued into place. They measure 2†x 10 3/4†x 1/8â€. Test fit the pieces first to make sure they will seat into the slot. I originally used an old restaurant cutting board as a gluing work surface and pieces of the cutting board as culls and pads. More recently, I substituted a Corian counter top cutout for the work surface. It is more sturdy. On my first attempt, I didn’t use enough clamps- using more clamps and culls assured that all of the joints were tight. I probably overdid it with the amount of glue. A liberal coat over all mating surfaces. Clamped up After the glue has dried and the clamps removed, the blank is ready for trimming. I made a special jig that holds the piece above the saw table. Trimming assures the piece will sit flat for the next diagonal cutting operation. Blank is raised above the saw table. Trim the blank, rotate and re-clamp Trim, rotate an trim again. At this point it is a good idea to “sweeten up†the layout lines, if the trimming operation removed them. ALSO: IF YOU USE THIS TRIMMING METHOD PLEASE REMEMBER TO LOWER THE SAW BLADE BEFORE CUTTING THE NEXT INSERT SLOT (don't ask how I know this). EDIT: I found it easier and quicker to do this trimming operation on the band saw. It is just as accurate and doesn't require a change in the table saw blade height. Now it is just a matter of re-mounting the blank on the diagonal cutting jig and repeating the operations for making the second diagonal slot. The diagonal slots, glue ups and trimming operations are the same for each of the remaining three sides. A slightly different pattern can be made by changing the sequence of cutting the slots. I cut the slot on side 1 first, then rotate the blank to cut side 3, then side 2 and finally side 4. After the four sides are cut, glued and trimmed. On the lathe, ready to be turned. The final dimensions on this rolling pin were: 20†long; diameter at the center: 1 9/16â€; diameter at the ends : 1 1/4â€. I have tried two types of tapers. One started at the center and continued to the ends. The other starts at the ends of the ellipses and continues to the ends. Personal preferences will determine the tapers. In Part 5- turning with a special taper jig.
-

From the album: Celtic Knot Rolling Pin
Third Trim Step -

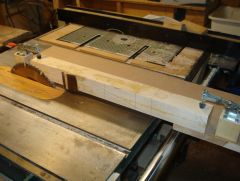
From the album: Celtic Knot Rolling Pin
Second Trim Step -
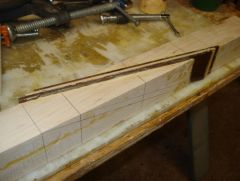
From the album: Celtic Knot Rolling Pin
Last Insert Ready To Trim -
From the album: Celtic Knot Rolling Pin
First Trim Step -
From the album: Celtic Knot Rolling Pin
First Set oF Inserts Ready To Trim