Search the Community
Showing results for tags 'spalted maple'.
Found 12 results
-
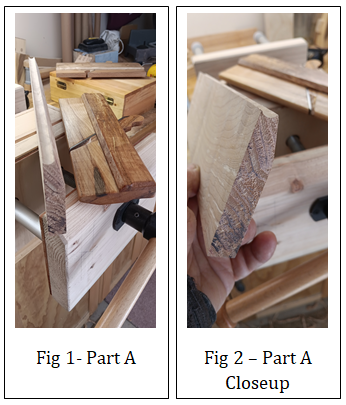
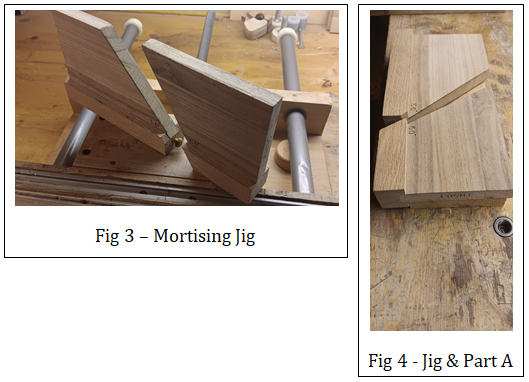
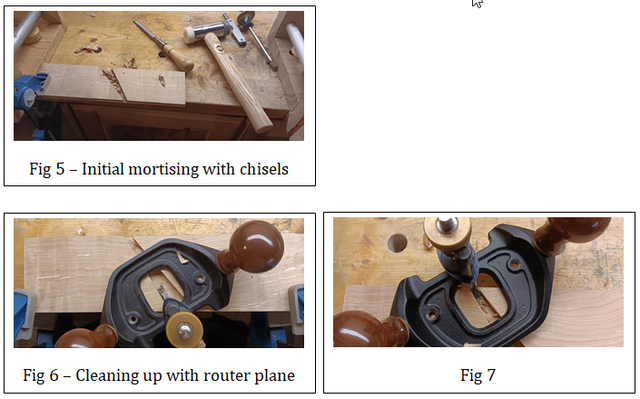
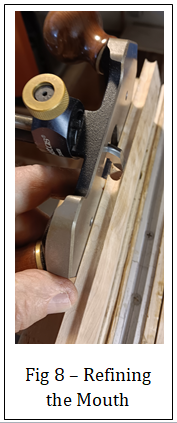
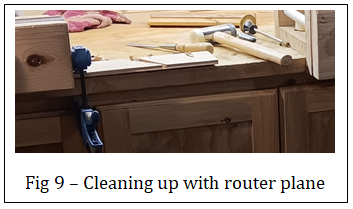
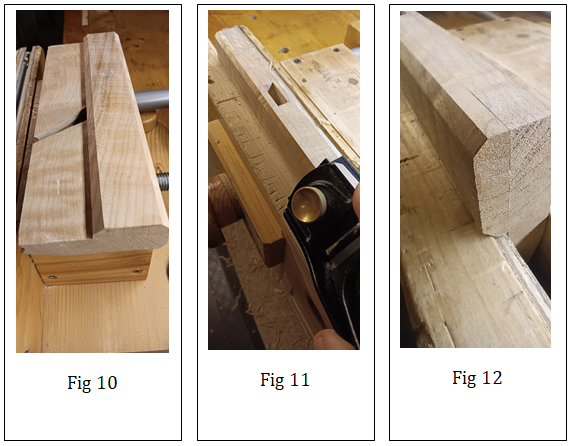
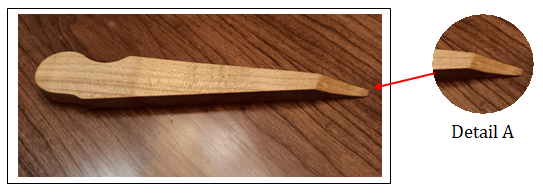
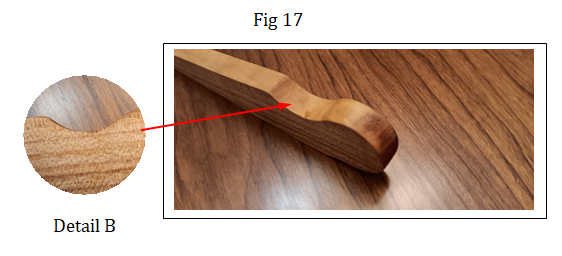
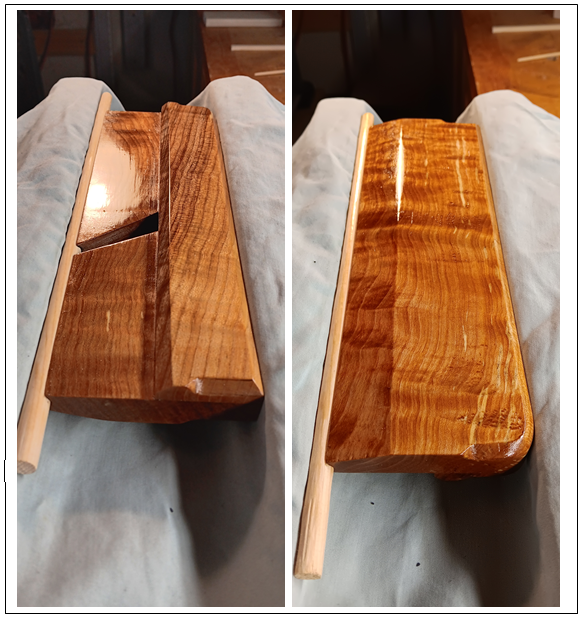
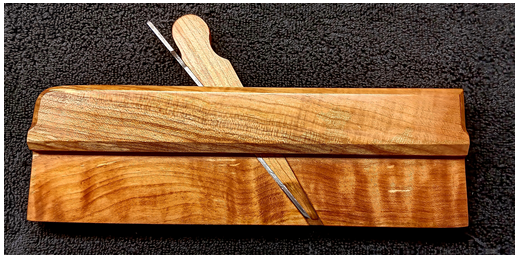
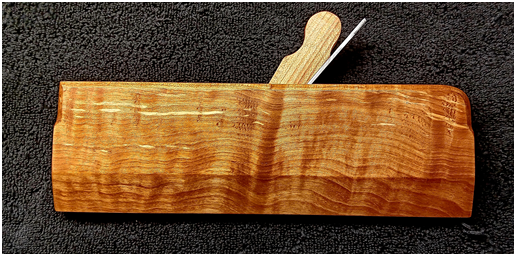
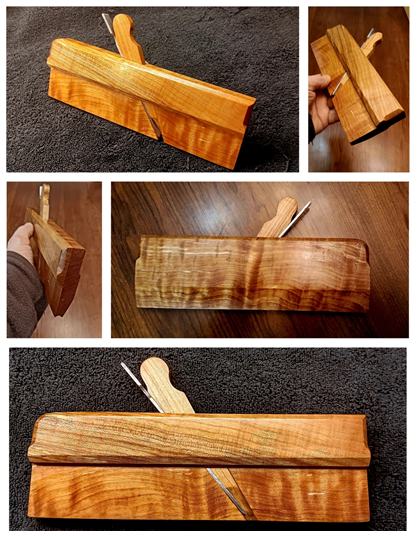
Introduction I enjoy doing most of my wood working projects with hand tools. I feel that I've become adept roughing stock with handsaws and squaring all four sides by hand planing. I've also become much better at joinery over the years with my favorite being handcut dovetails. One area that has intrigued me is creating mouldings with hollow and round moulding planes. Pursuing this has taken me down the road of making moulding planes. It has been a delightful pursuit. In addition, I make the blades or cutters and go through the whole heat treatment process. The Beginning I started by cutting two finished blanks out of Spalted Maple. These two blanks make the complete body of the plane. The first one (Part A) was milled to 5/8" thick x 3-1/8" high x 10" long and is the main body and left side in one piece. The second (Part B) was milled to 3/8" thick x 1-9/16" high x 10" long and is the right side that is laminated to the first piece. This plane will be a No. 2 ( 1/4") Round Moulding Plane. In Fig.1, it's mating plane, a 1/4" Hollow Moulding Plane sits on the right. It was used to make the 1/4" round groove as shown for the new plane on the left. When done this will make a matching set of 1/4” Round and Hollow Moulding Planes. See the closeup of the new plane's bottom in Fig 2. Mortising the Escapement Area Now it's time to mortise the escapement area for the blade's bed, cheek, throat, mouth, etc. I made this jig, see Fig 3 below, that I use for locating the bed angle at 50° and the wedge face at 60° on Part A. The jig has an adjustment screw that allows me to fine tune the mouth opening for Blade and Wedge. I can explain further how I use this jig if anyone is interested. Once I have the jigs placed where I want them (see Fig 4), I clamp them down on Part A to the bench and scribe the mortise cavity to be cut. Initially I cut the mortise cavity boundaries using my chisels (see Fig 5) Then I use my Lee Valley Veritas Large Router plane to excavate the cavity as shown in Fig 6 and 7. Here in Fig 8, I’m refining the mouth with the router plane. Fig 9 shows how I’ve clamped it to the bench while mortising. Laminating and Shaping Next in Fig 10, I laminated the Right Side (Part B) to Main Body (Part A). I then started chamfer detailing . In Fig 11 - 13, I am chamfering along the top edges and bottom edge of the Right Side (Part B). In Fig 14 & 15, I have done Stopped Chamfers for the front and back corners. The Wedge Next I shape the wedge Per Fig 16. As mentioned earlier the bed angle is at 50° and the wedge face at 60° on Part A. The wedge will be a 10° angle and is approx 6” long. Making the angle slightly larger initially then fine tuning to fit the mortised area is advisable. Detail A shows the curvature required for the shaving to climb up and out as you are planing. Fig 16 Per Fig 17, this is the notch, Detail B, for assisting in wedge removal. Blade This is the complete 1/4” round blade per Fig 18. I didn’t go into detail here with the whole process of shaping, heat treating, honing, etc. Again if anyone is interested and has questions please let me know. Fig 18 Finishing To start I coated all the plane body (except the bed) and the wedge with two coats of 50/50 cut Tung oil. Per fig 19. I let this cure for one week. Fig 19 Then I brush coated with two coats of Shellac and allowed to dry overnight. The actual sole is left only with the tung oil coating. After this, I French polished with shellac to make the grain “pop” per Fig 20. Fig 20 Finally per fig 21, I coated and buffed eveything with wood butter except the bed and bottom of the wedge. Here’s the completed 1/4” Round Moulding Plane per Fig 21 and Fig 22. Fig 21 Fig 22 Thanks for Looking! Cheers! MrRick

- 7 replies
-
- 3
-

-

-
- plane
- moulding plane
- (and 3 more)
-
Hi, I suck at telling a story, but I promise I'll try to get better. Instead I thought I'd just post a few gratuitous pictures of some recent work/progress on an instrument build. Specifically, carving the back braces. Instrument is Cedar top over spalted maple.
- 144 replies
-
- 14
-
-

-
- guitar
- instrument
- (and 4 more)
-
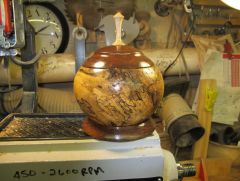
From the album: Easy Wood Tool
Lidded vessel turned with easy wood tools. -
Wood turning club meeting is coming up and the presidents challenge this month is to turn a goblet from scrap or cutoffs. This will be my offering. No finish on it and not sure if I will finish it. It's small, only about 6" tall, kind of a shot goblet I guess. In keeping with the theme to use leftovers the top is made from the pieces left in the chuck from turning the goblet. Beads were done with D-way beading tools.
- 6 replies
-
- 10
-
-
-
- lathe
- spalted maple
- (and 5 more)
-
Had 3 planks IN the shop....decided to trim them down to size... Cut the bad, Barky board down a bit..from both ends.. Which left.. This much "good" wood...not keeping the barky stuff.. Set this aside, for a moment...the other 2 planks had some spalting going on...cross cut to get the most..and set the rest aside.. All 3 now needed the rip fence set up...to dress up both edges....The 2 plain jane sections also were edged.. Along with a few scraps from the last Project.. So, MAYBE a Lap Desk in there, somewhere? Have a parts list of pieces to choose from...depends on how fancy to make the lid/writing surface... Well, it IS a start....just that amount of milling..and the toes started to cramp up...while I am on Laundry Detail, this evening... Stay tuned..
-
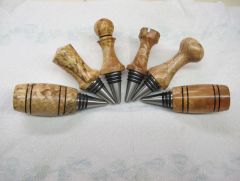
From the album: Bottle Stoppers
Spalted maple with Ruth Niles stainless steel stoppers© Lewis Kauffman
- 4 comments
-
- 3
-
-
- maple
- bottle stopper
- (and 2 more)
-
To start off with, this is for a customer that wanted a darning egg to fix socks & things. Well she also wants to be able to hide her needles in the egg itself. So this is going to take a bit of ingenuity on my part and any ideas are welcome. I had thought about drilling a 1/2" hole about 2 to 3" deep in the wood to accommodate the needles and then use the handle as the plug for the hole in the egg itself. Assuming (and I hate doing it, "assuming") that I can get it to work, it should be a really great project. My issue is this, the customer says she has a bundle of needles about 3/4" in diameter. but my handle stock is only 1 3/16". If i can get a tenon turned to 3/4" or whatever makes it tight enough to hold in place, then i'm good to go. Otherwise I will have to make say a 5/8" hole to start then widen it to 3/4" with a chisel after it gets about a half to 1" in. that shouldn't be too hard either, so we'll see how it goes and what comes of it The head looks like spalted maple or box elder. The client wanted totally maple but the handle will have to be something else I think what I have here is cherry (old) but not sure.
-
Been dealing with some family issues and haven't been in the shop very much. I did finish a couple pieces yesterday and today. Both are maple and both are right at 12" diameter. I think these two pieces really illustrate just how versatile is maple. First is a shallow bowl or deep platter, would probably work either way. Next is a platter, my attempt at a "traditional Irish platter" from the Glenn Lucas DVD and this is also one of the things a person will turn during his class. This is wormy, spalted, maple. Actually, in the interest of full disclosure and truth in advertising, this one is wormy, spalted, maple and superglue, a ton of it. Thanks for looking. Steve
- 8 replies
-
- 6
-
-
- maple
- spalted maple
- (and 7 more)
-
This is my latest BS box. I can't take credit for the design. Saw it on a pinterest ad and drew it on a piece of graph paper to the size. The wood is Caribbean Rosewood with spalted maple handles;
- 14 replies
-
- 7
-
-
- bandsaw box
- rose wood
- (and 1 more)
-
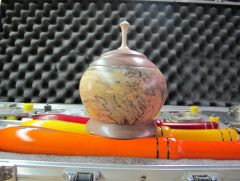
From the album: Easy Wood Tool
Lidded vessel turned with easy wood tools. -

From the album: Easy Wood Tool
Lidded vessel turned with easy wood tools. -

From the album: Easy Wood Tool
Lidded vessel turned with easy wood tools.