
Search the Community
Showing results for tags 'steam box'.
Found 11 results
-
This seems fitting for today- Supposed to be damp, cold and miserable the remainder of the week. @Steve Krumanaker asked for opinions on a metal working lathe/mill combination from Grizzly. He received several responses. If you have any experiences with this unit, I'm sure he would appreciate your input. @Ron Altier has been experimenting with a new style of ornament. He is using epoxy as part of the construction medium. Ron posed a question concerning finishing the hardened epoxy. Several members offered suggestions. Maybe you can give him some ideas. @Cliff ended up with a warped bowl. He has a theory that steam can be used to "un-warp" it. Check out the steam box he has constructed for experiment. The Segmented Woodturners organization is holding their 6th Segmented Symposium on October 12-14, 2018 in St. Louis Missouri. Registration information is at their site- http://segmentedwoodturners.org/?album=1&cover=0&occur=1&photo=39 Usually a turner, posting a video on YouTube, will edit out any mistakes. Rick Turns posted a video "attempt" at making a birds mouth vase. Rick kept the mistakes. I hate to admit how many times I've made the same ones. Mike Peace posted a very short video showing his turning jigs for gauging spindle diameters. Maybe some ideas here you haven't considered. Not sure if I posted this in the past. Sometimes I'd like to get an idea what a turning will look like before starting the actual process. Sketchup will work but there's a nice, FREE software program called LatheMagic. The software is not completely intuitive but does come with tutorial videos and instruction manuals. You can download the software from- http://www.lathemagic.com/ At the same site there is another program called ShapeMagic that can be used with 3D printers. I'm finally getting the manzanita turning done. The last coat of poly is slowly drying in the basement. I call this one "hidden in my heart". Mimi was in the basement when I opened the box of roots and said this piece looked like a heart (she's a nurse), thus the name. These images were take before the final coat of poly. It's a little more shiny now. Also the finial wasn't seate completely. It needs glued in place once dry. The finial was made from a piano ebony key. A buddy salvaged them from a trashed instrument and gave me a couple. I really need to refine my finial shapes. Maybe I should have used that software! @Jim from Easy Wood Tools this was turned completely with Easy Wood Tools! Safe turning

-
.jpg.9b60265909b8620d90d3040629d4ff59.jpg)
From the album: Shaker Furniture
After about an hour of steaming the chair posts, the joints in the box starting acting up as I expected. They expanded and warped, but surprisingly maintained a seal. The box held up wonderfully. -
.jpg.9600d6d45e9eab7bc13f005afa1550e1.jpg)
From the album: Shaker Furniture
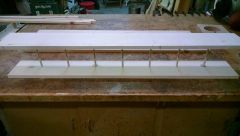
My set up is a pine box 6"x6"x48" with an Earlex Steamer. -
.jpg.719d061568e9f001e2bf72eb2c255587.jpg)
From the album: Steam Bending Wood
I drilled a small hole to insert a meat thermometer that I found in our kitchen drawer. -
.jpg.3c2350fb736f81bc3f8edbf8f83e526e.jpg)
From the album: Steam Bending Wood
The fitting was drilled in with a half inch bit, and a nut was threaded on the inside of the end cap before I screwed the end cap to the box. -
.jpg.1ba4570a423723b42026c7cbcf1da4f6.jpg)
From the album: Steam Bending Wood
I have some ash sitting around so I decided to add a little weight to my box by adding some ash feet to bottom. -
.jpg.1ac19c75727d46e757e89c2fa8dd5581.jpg)
From the album: Steam Bending Wood
The box is finished and I set my new Earlex steamer up for a shake down cruise. -
From the album: Steam Bending Wood
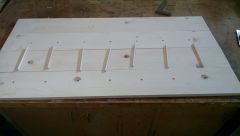
The bottom is in place, time for the feet next before the top is set. -
From the album: Steam Bending Wood
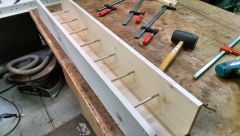
I am building a steam box for bending shaker chair parts. This is the first progress picture. -
From the album: Steam Bending Wood
The dowels are drilled in and in place. No glue for the entire box. -
From the album: Steam Bending Wood
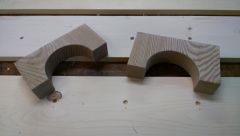
Ash feet. One is taller than the other to allow for condensation to drain out of the box.


.thumb.jpg.573d1497d0675219908c85aabefd797a.jpg)