Search the Community
Showing results for tags 'pine'.
-
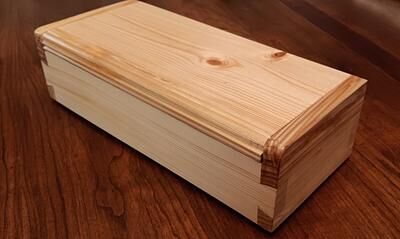
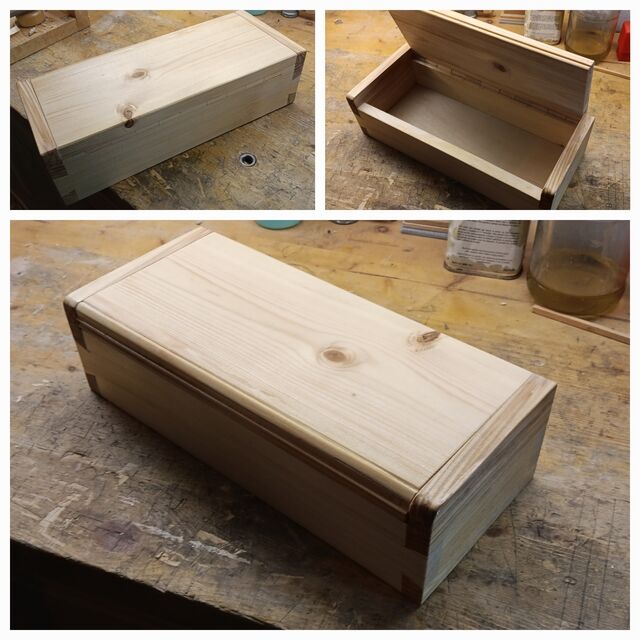
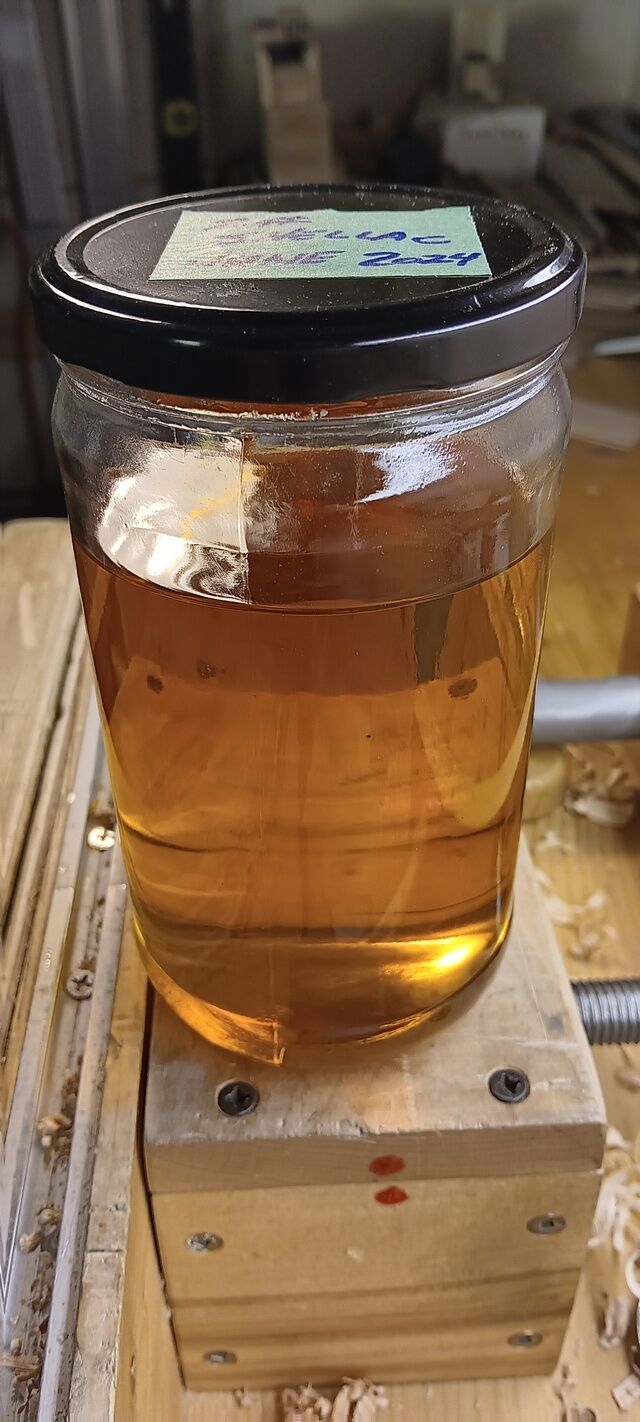
It amazes me how shellac can transform a box into a beautiful gem. A simple pine box. All done with hand tools. I used a LV backsaw, chisels, moulding planes that I have made, and a smoothing plane. The hinge is a flush invisible hinge. Corners are dovetails. Before My beautiful elixir (shellac) I buy shellac flakes from Lee Valley and mix up my own. Usually a 2lb cut. After (the complete finished shellacked beauty!!) Thanks for looking!! Cheers! MrRick

-
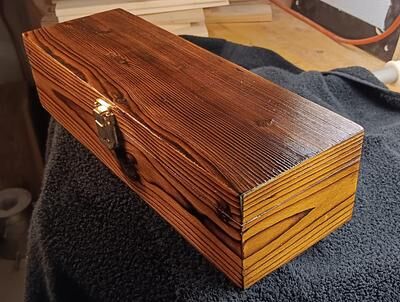
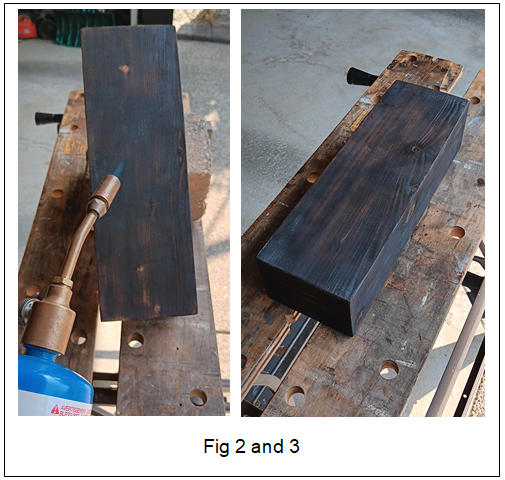
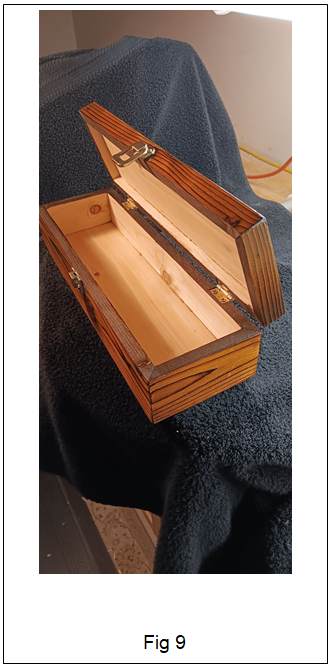
INTRODUCTION It's been a long time since I made a fully, all sides, mitered box. As miters go, It is the ugliest box I've ever made. I mean "butt ugly"! Okay...okay...maybe not that bad but challenging! I think many of us may take mitering for granted and sort of dismiss making a whole box this way. To tell you the truth, I don't know why I did and then to add insult to injury I decided to finish the surface with the Yakisugi technique or "Shou Sugi Ban" as we call it in North America). MAKING THE MITERED BOX I started by cutting all sides on my tablesaw. Yes!... my table saw! As hand tool crazy as I am, I couldn't imagine doing all these miters and bevels by hand (hereafter just called "miters"). My blood pressure is high enough. And then I still could not get the miters as perfect as I wanted all around. Even using my tablesaw! LOL. Then it dawned on me... I'm going to torch the thing so perfect miters may not matter! It is highly likely there will be some separation from burning and minor gaps on the corners. But it will add to the rustic look I was after with this technique. We'll see. Next... I glued it all up. I'm usually very strategic and meticulous gluing up. However by the time I completed mitering, I didn’t mind being messy and just slathered it on. Here it is ..... "Plain Jane" in Fig 1. BURNING THE BOX So why am I doing this? I dunno. I like challenges or maybe I'm just "bonkers"! Next, I started the "Shou Sugi Ban" process and torched all six sides, edges, and corners. I wasn't after a deep "alligator skin" burn but rather an even medium surface burn. Some alligator skin char was acceptable. The look I was after was the "Kimo - Tora" as some call it. This is a good site to see the different ones. See Fig. 2 and 3. WASHING THE BOX With the grain, I then brushed away as much of the dry blackened ash surface as I could on all six sides. Next I washed all sides with the hose and brush cleaning away the dirty surface. See Fig 4 and 5. APPLYING THE STAIN After it completely dried out, I decided I wanted to give it a yellow dye stain followed by shellac. I went everywhere looking for a small size can like 236ml. Do you think I could find it? And on top of this the ones I did find were like $15 -18. But no yellow or orange. Man 'o man!... things have really gotten expensive and limited. The heck with it!! Anyways I made my own using Tumeric. One coat on all sides was all I needed. However Tumeric is a fugitive stain. Though you wouldn't agree if you got some on your clothes or the rug not to mention your hands. LOL. See Fig 6 and 7 FINISHING WITH SHELLAC To prevent future fading it was sealed with four coats of blonde shellac. First coat was a one pound cut. Second, third, and fourth coats were a two pound cut. Then brass hinges and clasp was added. Here's the results: See Fig 7, 8, and 9 Hope you all enjoyed this!! Feel free to comment, ask questions and thumbs up if you like it! CHEERS! MrRick
- 4 replies
-
- 3
-

-
- miter
- shou sugi ban
- (and 2 more)
-
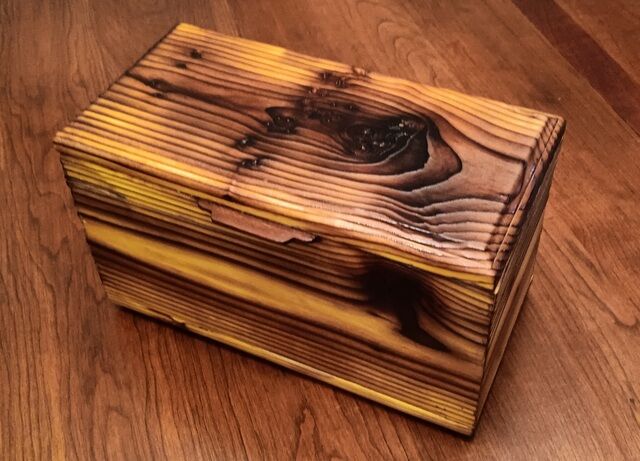
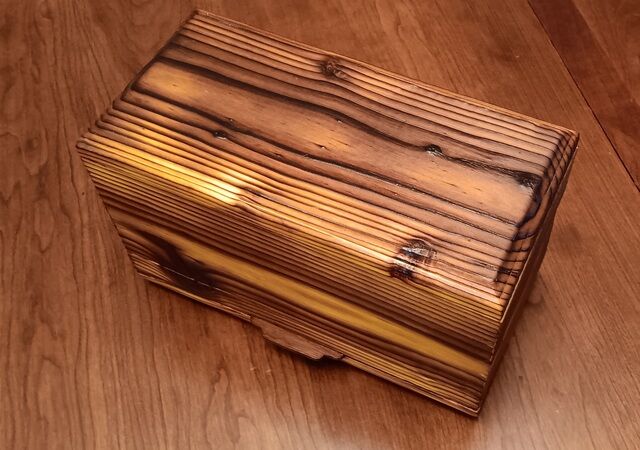
The Japanese have a wood burning process called " Shou Sugi Ban" With this Shou Sugi Ban process, I did a "Deep Burn" on a fully mitered Pine box. Then wire brushed it Zoom in and check out the grain. I then dyed it. Afterwards, I gave it three coats of 2 pound blonde shellac. I made a lift handle.... look closely. Installed brass hinges.... Here's a view of the bottom. Feel free to comment, ask questions and thumbs up if you like it! Thanks for looking! Cheers! MrRick
- 9 replies
-
- 7
-

-
-
- box
- shou sugi ban
- (and 3 more)
-
 The Tree The Eastern White Pine, the king of all trees east of the Mississippi, and upon which the lumber industry of the United States was founded, is a stately tree growing to a height of 100 to 150 feet and occasionally over 200 feet, and 3 to 6 feet in diameter. It has a straight trunk gradually tapering its full length with comparatively light straight limbs, and forming a rather open irregular top. The dark gray bark is deeply furrowed in long ridges. The needles are a bluish green 3 to 5 inches long, and are borne in bundles of five. The slender cones are from 5 to 10 inches long, usually curved and mature at the end of the second season. The white pines are very susceptible to the White Pine Blister Rust disease and large expenditures are made annually to combat the disease by destroying the alternate host, the wild currant and gooseberry bushes. Stands of this wonderful tree are gradually being depleted. From 1875 to 1895 sale of White Pine lumber made countless millionaires in the Lake States and New England. In 1873 a boom of White Pine logs containing 600 logs averaging 42 feet long and 4 feet in diameter. A million board feet of lumber, was taken from Muskegon, Michigan, to Chicago. Few of the larger specimens of this tree remain. In 1945 in Wisconsin a White Pine was found 140 ft high, with trunk circumference of 16 1/2 feet and containing 8,000 board feet of lumber. The tree was estimated to be about 400 years old. Common Names In Use Eastern White Pine (trade) Apple Pine Balsam Pin (N.C.) Canadian White Pine (trade) Cork Pine (Mich.) Minnesota White Pine (trade) Northern Pine (S.C. and trade) Pumpkin Pine (Mich. and trade) Sapling Pine Soft Cork White Pine (trade) Soft Minnesota White Pine (trade) Soft Pine (Pa.) Soft White Pine (trade) Spruce Pine (Tenn.) Weymouth Pine (Mass., S.C.) Wisconsin White Pine (trade) White Pine (Me., N.H., Vt., Mass., R.I., Conn., N.Y., N.J., Pa., Del., Va., W. Va., N.C., Ga., Ind., Ill., Wis., Mich., Ohio, Ontario, Nebr.) Eastern White Pine cone Eastern White Pine tree bark Growth Range The natural growth range of Eastern White Pine is from Newfoundland to Lake Winnipeg in the province of Manitoba, Canada, southward through eastern Minnesota to the south eastern section of Iowa; eastward through Wisconsin and Michigan with scattered stands in Illinois, Indiana and Ohio; from Maine southward through the New England states, and the Appalachians along the Allegheny Mountains as far south as northern Georgia. The Wood The heartwood of Eastern White Pine is a very light creamy brown or tan slightly tinged with red, turning somewhat darker after exposure to the air. The sapwood is usually narrow to medium wide and a creamy white or pale yellowish color. The texture is fine and very uniform, straight even grained, nonporous, soft, not stiff, with little or no figure. It seasons well with very little warping and is relatively free from resin. It is the carpenter’s delight as it is very easily worked,glued, carved and finished. It takes and holds paint well, nails easily but is only average in ability to hold screws and nails. Does not split easily in nailing. Stays in place when well seasoned. Uses The Eastern White Pine has long been famed for pattern making because of its clear uniform straight grain and soft fine texture. It has a very wide variety of uses from matches, sash, doors, general construction, signs, interior trim, shade and map rollers, caskets, wooden-ware and novelties, toys, dairy and poultry supplies, boxes, cabinet making, boot and shoe findings, conduits, dairy, poultry and apiary supplies and hundreds of other uses. Bibliography Shelley E. Schoonover (American Woods) 1951 (Watling & Co. ) Santa Monica, CA
 -
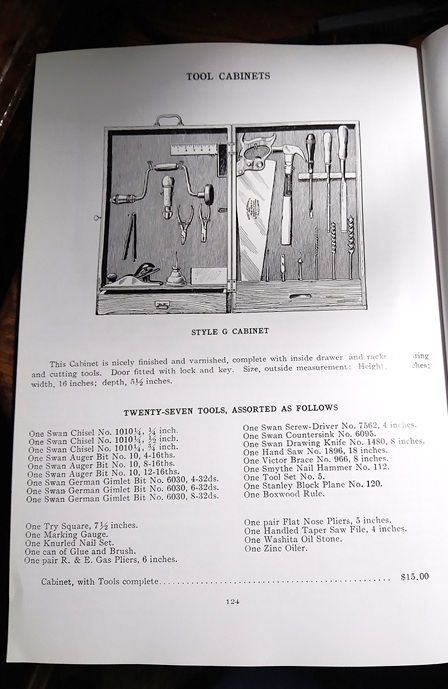
Seems I NOW have a Challenge ......Since I made that crack about doing a cabinet better than North Bennet Street School did... Tool Cabinet? Was pictured in this 1911 Catalog...back then, you could order complete tool sets....The one in the Challenge? About as Basic as you could get...27 tools and a lockable wood cabinet to hold them all. So...decided to start out with thin stock.... Here is half of them... Just over $5 per board...have bought 10 of them...so far.. Goal is to finger joint the 4 sides...add solid wood panels and then...split the box into 2 halves....Add a shelf or 2...and build a small drawer... First order of business...is to glue up 2 panels.... Stay tuned..
- 41 replies
-
- 9
-
-

-
- kiwi pine
- tool cabinet
- (and 1 more)
-

-
.JPG.9cb2389bd60956fece4385cb5ea13b6d.JPG)
-

-

-

-

I read so many times where folks that sets out to darken wood goes crazy
Smallpatch posted a topic in Finishing
This is a frame for the last supper we are working on.. The wood is southern yellow pine. Neighbor just had a large deck built on to his house and after it had sat there about 30 days everything started warping big time.. He made the builder replace all the crooked stuff with more YELLOW PINE....and the carpenters painted it about three days after they finished building it! Capenters piled it up close to our house. Ah- ha, went and asked the home owner what will they do with the bad wood... we will burn it if you want get it before they come back, load it up. I now have a large stack of yellow pine.. This is the first use of some of the pile..... It will turn a little darker but wife wants it dark walnut and some 2X on top of this will keep her happy. My spray booth is the top of the table saw using a lazy Susan so I can keep my spray going towards the exhaust. Putting a finish on wood is just not that complicated if a person does it the right way. I really think some wants to make it seem impossible and I do feel sorry for those that still get blotching and all them other bad comments..
- 2 replies
-
- 6
-
-
- last supper
- southern yellow pine
- (and 3 more)
-
Could have sworn I started this a while back....oh well.. Seems I was getting tired of getting poked with chisels, while reaching for a plane.... And this rack was a bit too long.. To be swinging on just that single hinge...time for something different to be made.... So...this will get a make over....went out and bought a few thin planks of KIWI Pine... Clamped this flat for a few days...KIWI Pine? Next item...was to work on that old rack a bit... Set this aside for a day....and figure out where to make a few cuts... Had too many slots, anyway...only needed 11....Mitersaw next.. Racks were a bit too thick...resaw one side a bit, trying to avoid all them screws.. Once these were removed, I could remove the counter bored strip, and a matching strip from the other edge.. The face I did not resaw, needed leveled a bit Test fitted a few of the larger Mortise Chisels.. Square is showing where I needed to trim this rack for length, as there was one too many slots...the narrow chisels? Seem to be flopping around in the slots....we have ways.. 1/2" forstner bit...just enough for the chisel's bolsters to fit in. with come back later with a countersink bit, to accommodate the socket chisels... Problem...as this will be attached to the back of a case, and NOT swing out, needed a way to reach into the case and pull a chisel straight out, which is why those slots were opened up But, how to keep the chisels in place? A Hinged "keeper" should do the trick... so.. Racks are almost done...Need to build a box/case to hold them. Stay tuned...
- 14 replies
-
- 10
-
-
- pine
- mortise chisel
- (and 1 more)
-
It's not to late to have some simple fun before Christmas!
-
I have to get rid of these pine cones one way or the other
Smallpatch posted a topic in Wood Carving
A new way of Santa delivering toys and gifts!!! And the Texan cow girl snow lady thinks its a great way and since we had a go-cart track we built in 1984 , it might have happened!! And she had some fun trying to get in the cart?? At least I think that's what happened. It took longer to apply over 30 different colors on the trees than the rest of the pieces.
-
 The Tree The Western White Pine, known as the Silver Pine in the Northwest, is very different in appearance from the Eastern White Pine, although similar in the character of the wood. Western White Pine is a symmetrical tree towering to a height of 175 feet with a trunk diameter up to 5 feet. It ranks as one of the most important soft wood trees of our country. It has a very long clear trunk, slender drooping branches, needles of pale bluish green 3 to 5 inches long, in bundles of five. The bark is comparatively smooth, thin and uniformly broken by medium furrows forming oblong blocks. The cones are 6 to 12 inches long, slightly curved and slender. This tree is still a very important one in the lumber industry. Young trees are very susceptible to the White Pine Blister Rust disease which kills large areas of young growth each year. The pine bark beetle also does widespread damage. The specific name MONTICOLA means mountain-dweller. The Western White Pine is a beautiful forest conifer, and being the official State tree of Idaho, it is quite commonly known as the Idaho White Pine. It attains its best growth in Idaho. Common Names in Use Western White Pine (trade) Norway Western White Pine (trade) Finger-cone Pine (Calif.) Silver Pine (Northwest States) Idaho White Pine (trade) Soft Pine (Calif.) Little Sugar Pine (Calif.) Soft Idaho White Pine (trade) Mountain Pine (Calif.) Western White Pine Mountain Weymouth Pine White Pine (Calif., Nev., Oreg.) Growth Range The growth range of Western White Pine extends from the southern region of British Columbia southward along the Cascade Mountains and the Sierra Nevada's through Washington and Oregon to central California, and eastward into western Montana and northern Idaho. The heaviest stands are found in northern Idaho, eastern Washington and western Montana. The Wood The heartwood of Western White Pine is very light cream to light reddish brown or yellow to orange color, and like the Eastern White Pine darkens somewhat on exposure. The sapwood is narrow to medium wide and a nearly white to pale yellowish white. The wood is straight-grained, resin ducts are small, numerous and conspicuous. The rays are very fine and not visible to the naked eye. It is moderately stiff but rather weak, moderately soft, straight, even-grained, very uniform in texture, very free from resin, light weight and easily worked. Glues and holds paint very well and does not easily split in nailing. When well seasoned the wood stays in place and shrinks very little. Uses This lumber has the same uses as Eastern White Pine and is in great demand for pattern making, this being the standard species for this purpose; building construction, matches, fixtures, cabinets, sash, doors, interior trim, boxes, crates and other containers, toys, dairy and poultry supplies, turned articles, and endless other uses where a soft wood of straight grain, non-porous and uniform texture is desired. Bibliography Shelley E. Schoonover (American Woods) 1951 (Watling & Co. ) Santa Monica, CA
 -

-

-

From the album: Eastern White Pine
The Eastern White Pine Cone with the scales beginning to lift and drop seeds.© CC BY-NC-SA 4.0
-

-

From the album: Eastern White Pine
Eastern White Pine lumber, used for flooring, sub-flooring or decking, tongue and grooved.© CC BY-NC-SA 4.0
-
in a building no longer exists....back in 1968..Freshman year...Industrial Arts Class. We were given a "Grade Sheet" of 8 types of wood joints. Each joint was shown as a drawing...with 2 _ _ areas beside it...when each joint was completed, you put in the date, and the Teacher recorded the grade...you had to pass each step...BEFORE you could use anything besides these tools.. To include the bench vise. You went to the tool crib, and signed out the day's tools you needed....at the end of the class, they were returned to the crib. You also spent one class period IN the tools crib...keeping track of all the tools. Joints? Simple Butt Joint Mitered corner joint half lap joint Bridle Joint Rebate joint Mortise and Tenon joints Dovetail joints ( one dovetail as a half lap joint) Dado joint Each day, you'd sign out the tools, put on you blue denin work apron....lay the sheet on the bench and get to work....IF it was shop time...other days, you would be taking a drafting class.. This evening...I went out to Lowes, spent just under $20 on 3 boards..(2) 3/4" x 2-1/2" x 4', and (1) at 3/4" x 2-1/2" x 6' Plan is to re-create that wood working test...boards will be hand sawn to 6" length...to include laying out that cut, and sawing it. The Butt joint? may or may not do that...the Miter joint..will get turned into a mitered half lap ( to keep you on your toes) IF this sounds like something you'd like to see, AND DO....Class will start next week... Let me know..
- 47 replies
-
- 14
-
-
-
- wood working joints
- pine
- (and 1 more)
-
Ok, This is a mess.. And so is this.. Broom is needed.. Both here, and the work area.. Fancy planes have to be put away.. And closed up to stay clean.. As for that Messy Bench? "Clear For Action!" Take a good look, as it won't stay like this very long.. Pine that is available right now? Needs a Project?...Maybe build a case for... With this as a "Tool Kit"? Very Interesting Maybe I can get two people to try to get this.. Up to the Fire Pit? Yeah, right... Will leave these for later.. Panels to make bottoms for Cases... Stay tuned...
- 15 replies
-
- 7
-
-
- clean shop
- case work
- (and 1 more)
-
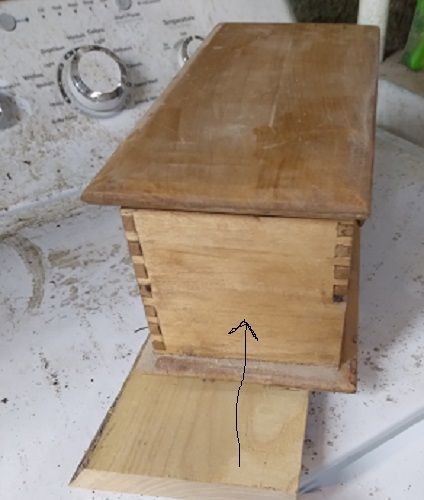
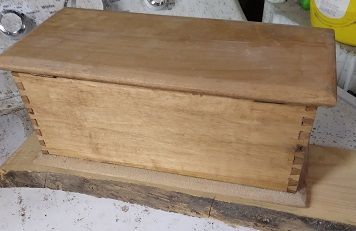
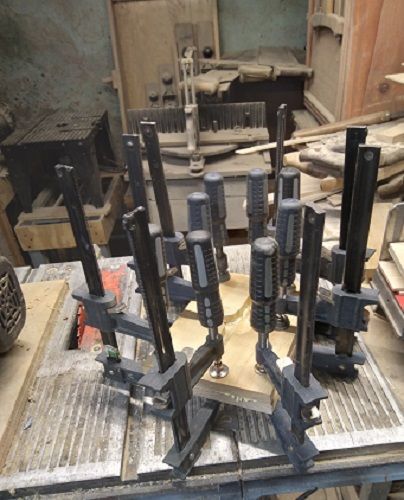
Decided to build a case to stash a few chisels in...maybe keep them organized a little bit better? Box that will be a Pattern of sorts.. Is just a smidge too small...so.. I did have 3 of these in the shop...1/2" x 5-1/2" x 24" Pine...this third one will be a lid, and the rest of the drawer parts... First few cuts, were for a back, and two ends... The board underneath was from the second board.. And will be the "Base" of the box....and on which the drawer will slide on. Couple more cuts.. Drawer front, and the front of the case...was trying to match up the grain.. Came close? Turns out that 5-1/2" was a bit TOO tall...decided to lower things about 1/2" or so... While making sure the fronts stay lined up... That was about it for today...my "Get&Go...got up and went..." Next time in the shop? Have some joinery to do...starting with the ends....and connect them to the back.. Then connect the front top...then a groove to house the floor of the top compartment...then drawer building 101.. Might take a few days? Stay tuned..
- 50 replies
-
- 9
-
-
- dovetailed box
- chisel storage
- (and 1 more)
-
As it would be a nice place to store these things.... Has to be out of pine...Oak would corrode these...Need a scrollsaw.. And 3 pieces of 1 x 6 pine...like this one.. This one will be the lid of the case...planed because it is cupped a bit. May have put too big of a blade in the scrollsaw, was hard to make a few turns.. Will clean this up and out, tomorrow. Kind of hard to see..but... I wanted a solid glue-up.. as these 2 were also cupped,,,so I glued the cups together. Letting this sit until tomorrow..then plane it down smooth and square... I found a bit for a Brace drill that is a hair oversized...So I can drill out a spot for each Die....haven't decided whether I remove that one Die from the holder, yet. Still have these boards available.. 1/2" x 6" x 24" planks...Maybe a case for the "New Chisels"? Stay tuned..
-
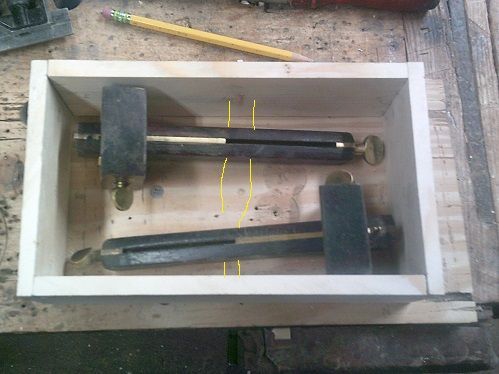
Remember these? That have since been resawn down a bit.. Faces flattened.. Marking gauge, the "New & Improved" one..to lay out for dovetails... Then a little bit of layout work.. Yep, I do "Pins First" then a wee bit of a saw... Chisels and such to chop out the waste, mark the tails by using these pins to trace around...saw and chop.. First dry fit... So, in 90 minutes of shop time today...rinse and repeat, until.. the other 3 corners are done... So, what will be going into this case? these 2 Stanley No. 77 Mortise gauges....yellow lines? I need to make a holder/rest for them long arms to sit on/in...will add 2 notches. Need to also cut a bottom panel..and work on the lid a bit After that? I might just see how fancy I can get? Stay tuned...
- 12 replies
-
- 9
-
-
- box making
- dovetails
- (and 1 more)


.thumb.jpg.573d1497d0675219908c85aabefd797a.jpg)