Search the Community
Showing results for tags 'inside out'.
Found 9 results
-
Was talking with @Stick486 before Christmas and he posed the question, could inside out earrings be done? I didn't know if there would be enough glue area in a small turning and at the time I didn't have time to give it a try. Decided to give it a whirl this week and this is my first attempt. I could probably get a little fancier on the next set. I piut a few quarters in the picture for size comparison.

- 13 replies
-
- 14
-

-
I'm TRYING to expand my skill set!!!! I'm looking for any insider tips on inside out turnings. I've looked at a couple of youtube videos and have accepted the challenge, howsoever I'm not interested in damaging anything in proximity to the lathe (me). Books, techniques, suggestions, tools, etc. Regarding the tools----any particular size better than another? All comments welcomed. Thanks smitty
-
This is the care package that I made up for my classmate friend. I hope this puts a smile on her face and some bounce in her step. This was fun for me. Rolling pin made of scraps of cherry and pear. Writing pens, one of pine, one of pear, and one of mahogany. The ornament is mahogany. Those of you with a Shopsmith, show us what you have. Looking forward to seeing your posts of "made on a Shopsmith" real soon.
- 10 replies
-
- 16
-
-
- classmate friend
- inside out
- (and 2 more)
-
It's been computer madness here so far this week! I think I need a vacation!!! Our Patriot Turners- @AndrewB used a glued up poplar blank for a pepper grinder. Looks really nice. He shows us some progression shots in this post- Andrew has found a new source for turning blanks. He gives us the low down in this post- @RustyFN gave us an update on the platter he started last week- Check Rusty's post for additional pictures and the start to finish thread- Rusty has also been busy with his segmented work. Here's another one of his beauties- This one garnered lots of positive v=comments! @Ron Altier received a request from his daughter. As always, Ron's projects are fantastic and use a variety of wood species. Lots of great comments about this on- @FlGatorwood received some sad news from a classmate. He decided to brighten her day with a "care package". Steve originally posted this in General Woodworking forum but I thought our turners would appreciate seeing what he made.- @Gunny puts a lot of us to shame with his organizational skills. He posted a utilitarian project he made on the lathe. Those projects that help us get things done are great to see (and steal)! Check out Curtis' post to see what this is used for. @Gerald finished up the coffee bar for his Mrs. He called it a coffee bar but I think it's more of a Coffee Shrine! Judging from the smile, I think she is happy. The entire project can be seen here- What’s Coming Up- https://www.woodturner.org/Woodturner/WIT/WIT-Presents-Registration.aspx Mike Waldt is changing the format of his live presentations. A short video explaining what will be happening- For The Newbies- If you have decided to get into resin casting, Alumilite has free online video course to help you get started- https://www.alumilite.com/learn/casting/101?fbclid=IwAR3ngaxsteCcXRNZaKdNWel1wI6hFyvrFWOt2fld02AHzFiGfggv6zKM1_g Expand Your Horizons- Buying turning blanks can be expensive. Cutting your own blanks is fairly easy but is you can't turn them immediately they will deteriorate quickly. This PDF document, from the AAW, explains how to prepare and store the freshly cut blanks- Save turning blanks.pdf New Turning Items- Not really a new item, but Mike Peace covers the subject of Collet Chucks- If you are considering adding carbide tools to your arsenal, our sponsor Woodcraft, has Easy Wood Tools products on sale for the month of April- And they also have turning kits and supplies on sale- Ruth Niles' newsletter came this week. Lots of images of the items made by other makers. Some really great ideas. A cute idea from Rebecca DeGroot- You can sign up for Ruth's newsletters https://nilesbottlestoppers.com/ Everything Else- Rick Turns list of YouTube woodturning videos from last week- Safe turning and stay well
-
Had a request for an ornament with a cross showing on it. Decided to make two at the same time and glued up a blank. Here it is with the two crosses drawn on it. I turned the area with the cross down to where it was just round all the way around. I was able to achieve some nice crisp edges with the East Wood Ci1 Square cutter. Since it is turned just round anything I take off from here will open the window. I want a 1/4" opening for the uptight so I have to reduce the diameter 1/8" remembering that whatever is removed is doubled since the 1/8" is cut in all four adjoining pieces. Next it is time cut the cross bar. A 1/4" wide cut needs to be cut deep enough to form the bars but not too deep. In this case go as close to this arc as you can but stay far enough away because when the pieces are split and turned around this is the largest possible diameter that can be achieved. If you have to go deeper the risk for failure becomes greater. Once done split it in half and lay the pieces out and check your work. Split them all apart and, spin them around and glue them together. Then mount them on the lathe for the final turn and sanding. The usually look best if left in cylinder form so as not to mess with the opening for the cross upright. Get the finish on and your hook to hang it and you're good to go. See below red arrow. This is the critical area. It gets thin quickly. Any questions? Ask away.
- 25 replies
-
- 9
-
-

-
- inside out
- cross
- (and 1 more)
-
I was reorganizing some storage in the basement and ran across some pieces of copper pipe and the light bulb in my head lit up. Could I just use a piece as an insert in a vase. The answer is, yes I can. I cut a piece and put it on the lathe and polished it up, made a plug for the bottom and used a piece of plastic counter top to make a bushing/spacer for the top and polished it. This is a much better idea since it can be cut to the length of the wood on hand and no searching for and altering vases to fit. Any tubing can be used such as copper, brass, aluminum and stainless steel. When turning the inside I goofed up and knocked the corners off what was to be the top of the vase. I thought no big deal I am going to put a hole there for a vase. I got it glued together and found putting it between centers wasn't going to work because the center was gone. My solution was to cut a piece of Masonite and stick it on the top. Worked out perfectly. Got it rough turned and cut the spigot for the chuck. Mounted it in the chuck and finished turning it. Put the finish on and here it is. Used the copper foot from the vase in the tutorial. Note that the base can also be made of your choice of wood.
- 13 replies
-
- 9
-
-
- vase
- inside out
- (and 1 more)
-
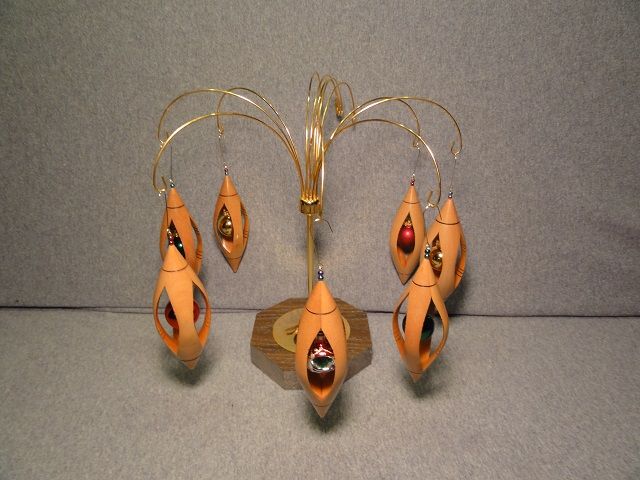
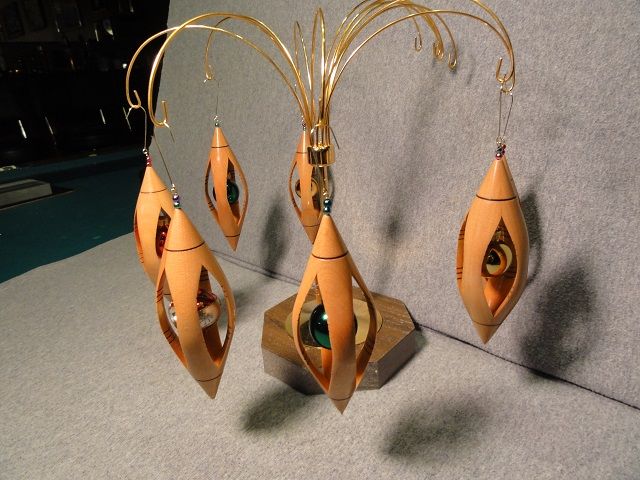
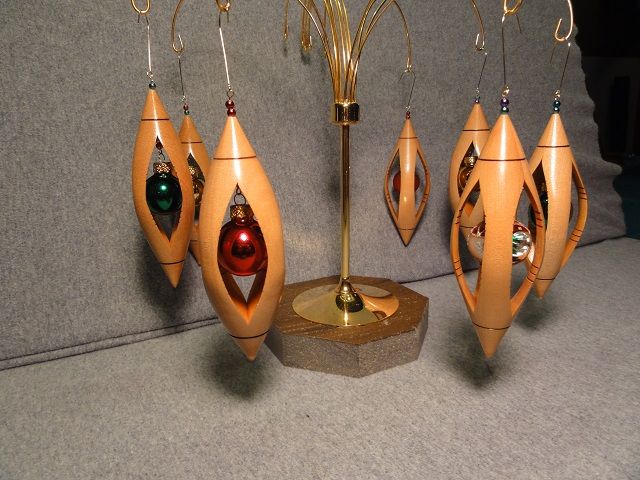
I cruised the after Christmas sales last year and bought some one inch glass bulbs for future use. I have been making some inside out ornaments with them in between cutting grass cutting and other Summer chores. Here is a sample of them.
- 12 replies
-
- 7
-
-
- inside out
- ornament
- (and 3 more)
-
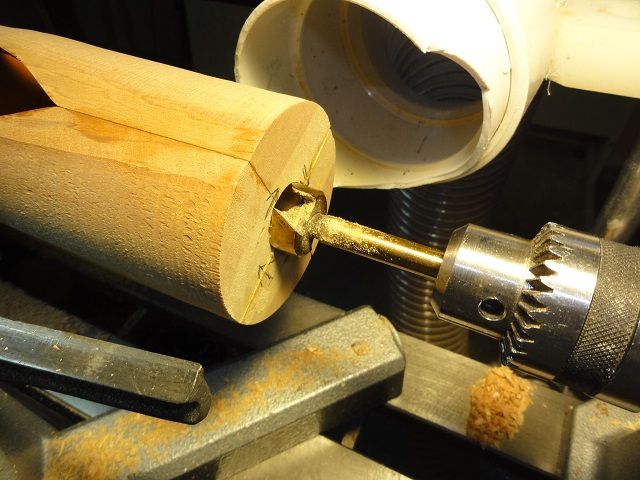
Getting started I like to use a piece of straight grained wood wide enough that it can be cut in two square pieces and long enough to cut it in half and for the length of the vase. It takes four same size pieces to glue up a blank. Pick up the pieces and mark the ends. This is how the pieces will be oriented for the final turn. For the first turn twist the pieces so the inside corners face to the outside corners and glue them together. It takes just a small amount of glue on the very ends. Remember these pieces will have to be pried apart after the first turning. The marks should look like this and be glued in this manner. I like to use Vise Grip welding clamps. The pieces need to be as accurate as possible and I get less sliding of the parts with them.I add some quick clamps when the parts are stable. A strong tape can be added for extra hold. I have never experienced any breaks. You will also want to get the vase to use as an insert. I chose this copper vase. The bottom is bigger than the top so I chucked it in the lathe and cut the base off leaving a smaller foot. Now it is time to mount it on the lathe between centers and mark where the vase insert bottom will be. I usually give the top some wiggle room and turn the wood back to fit. I decide where I want the window to be and mark that. It was about five inches from the bottom mark in this case. Measure the vase diameter and cut half that distance deep from the corner. This will create a platform for the vast to sit on and capture it from moving. You want to turn completely round the part in between the marks too. I left a 1/4" shoulder for the vase foot. Right now the windows are still closed. Anything turned of now will open the windows by "twice" the amount turned off. I want an oval shaped window so I marked the center of the oval and used the parting tool to cut the depth I wanted. Now finish turn the half oval and sand it. Now you can add some embellishments such as burn lines and apply the finish. The inside can be coated with finish when the vase is done but it is more difficult. When the finish is dry split the pieces apart. I like to use a thin knife for this operation. It is time to turn the pieces back to their original positions and glue them. Use all the available surface area as they will stay this way now. Here is half of it and you can see the platform for the vase foot. Once the glue is dry mount it on the lathe between centers. Turn the corners off and form a spigot on the bottom for the lathe jaws to grab onto. Remove it from the lathe, install your chuck and mount the piece in the chuck. Drill a suitable hole in the end for the vase and then use your turning tools to fit the vase. A little tip. Sanding sleeves from the oscillating sanders work well for holes your fingers don't fit. Bring your tail stock up with the live center and turn the vase to the shape you want. I added some burn lines and fit a copper foot to it. Put the finish on and you're done. When turning the inside of the vase you can go as deep as you want. Just remember the remaining wood vanes get smaller the deeper you go making it more fragile. Too far is when the blank brakes and that happens when you hit center.
- 13 replies
-
- 11
-
-
-
I made this ornament today and liked the method so well that I am planning another one soon. That is Curly Maple and Padauk


.JPG.d32ad410297d377022fa44f0c8a8b5c4.JPG)