Search the Community
Showing results for tags 'board'.
Found 10 results
-
So a friend of mine said he would like an end grain cutting board. So, I have never made one but thought what the heck. It would put to use the Bacon Padauk I picked up a couple of months ago…first glue up today.

-
Well I have discovered the solution for that board too short. Article from American Woodworker from Summer 1987
-
In preparation for building that box drawn with Sketchup, I was rummaging through the lumber rack. On the bottom shelf, buried under some miscellaneous boards- Red oak.
-
I saw an interesting way to glue a cracked board. The piece was cracked at the end with a crack about 8 inches long. The guy had opened it just enough to get a piece of dental floss thru. He put glue in and on the crack and ran the floss back and forth to spread the glue thru the crack. I will have to try this one, I think it can work.
-
Most people prep their boards this way. 1. Joint one face 2. Joint one edge. 3. Plane to desired thickness. 4. Rip to Width. Here is my method. 1. Joint one face 2. Mark the Jointed face so that the grain is orientated to way I need it for my project and mark in chalk my board width. 3. Band saw the chalk lines. 4. Joint once edge. 5. Plane to desired thickness 6. Rip to width. You do waste more wood but you get much better looking projects. How do you do board prep?
-
Boy these Cornhole games sure are popular. Our neighbor's daughter is getting married this May and they asked me if I could build a couple Cornhole boards for them, they are going to have games at the wedding reception. I only first heard of this game because of @John Moody, John is the resident Cornhole builder in our community. So I know what little I do know by John's work, and I just scanned the internet really quick to get the regulation sizes of everything and I set to building their boards from wood I had left over from other projects. I have not had a full day in the shop in two years, really, no kidding, life has been quite a challenge and I was so happy to just get this day to make some dust on such a basic project, I loved it. I had my folk music going in the shop, a little bit of Johnny Cash, some Del McCoury and Bill Monroe, and tapered the day off with Hank and Waylon, man what a joyous day. It was just one of those days that lined up perfectly to do some "me" time and the family was completely ok with it. Also, I got to really get into my Shopsmith! And what a blast I had with it. So, I know they are just Cornhole boards, but what's more important, is that I had a day of fun, so if you want to see some boards, read on! I set up my outfeed table configuration to handle some mid size panels for the Cornhole boards. Ripped a couple pre-prefinished 3/4" panels I had left over from a prior project, I am getting used to my Shopsmith today. I then set up my outfeed table to handle ripping some narrow boards, the table needs to be set at the center of the table saw or in line with the blade, it was a quick operation, part of using these Shopsmith's is knowing what they are capable of, and how to maximize their ability, I am not there yet, I am only discovering the surface of what these machines are capable of. I pushed the oak boards through with minimal effort. Then I joined each board just to clean up the edges and to have a nice mating edge to the underside of the surface board. I need to align my Shopsmith fence as you can see a tad burning on the oak edge. I have not adjusted my Shopsmith yet since I purchased it, the gent I bought it from had it sitting in his garage for 15 years with no use, so no doubt I need to tune up the alignment. I have however oiled the sheeves and other areas and I tensioned the drive belt to specs before I used it. I used good ol pocket holes to mount the sides of the boards up to the surface board. I drilled out all my pocket holes first. Then I set to screwing the boards to the underside of the Cornhole deck. I swear Shopsmith and Rigid have a secret relationship, because my Rigid Shopvac hose is the perfect size for the table saw dust port, and the jointer dust port. I cut a small radius on the end of the back cornhole board legs, so they'll fold up and down easily. This bandsaw is really nice, I can't believe how something small and seemingly very simple in design, is so accurate and easy to use. I aint kidding folks, I like it better than my 15" Grizz I had. A very strong feature of the Shopsmith is the Drill Press operation, it's sweet, I like it, I am happy. Quiet, accurate, with an adjustable table for in and out, and up and down and of course since the power head operates the Drill Press, it's variable speed. Drilling the holes out for the carriage bolts. The back folding legs are mounted, you flip them up and lock them down by tightening the wingnuts, I used a 5/16" carriage bolt, washer and wingnut. Legs up. I still have to cut out the 6" diameter Cornholes, but mission basically accomplished. Our neighbors should like them, she is going to paint a mural on the deck of the Cornhole board, I think the LA Dodgers symbol. Any my baby put to sleep, she did well today, I was please with the operations, and I became more efficient at the changeovers, I am getting good at operating my Shopsmith, and it's turned out to be a great machine for my purpose, and, mama gets to park her car in the garage now! I hope John Moody approves of the way I made these boards, and if anyone has any tips on the building Cornhole boards I am all ears, I may do some for my family as well, not sure yet, depends if the kids want them or not. If you want to build your own boards, here is the site that John Moody directed me too, they have all the information and specs for them there. https://www.playcornhole.org/ Thanks for sharing a part of my day with me folks.
- 28 replies
-
- 16
-

-
- drill press
- bandsaw
- (and 7 more)
-
-
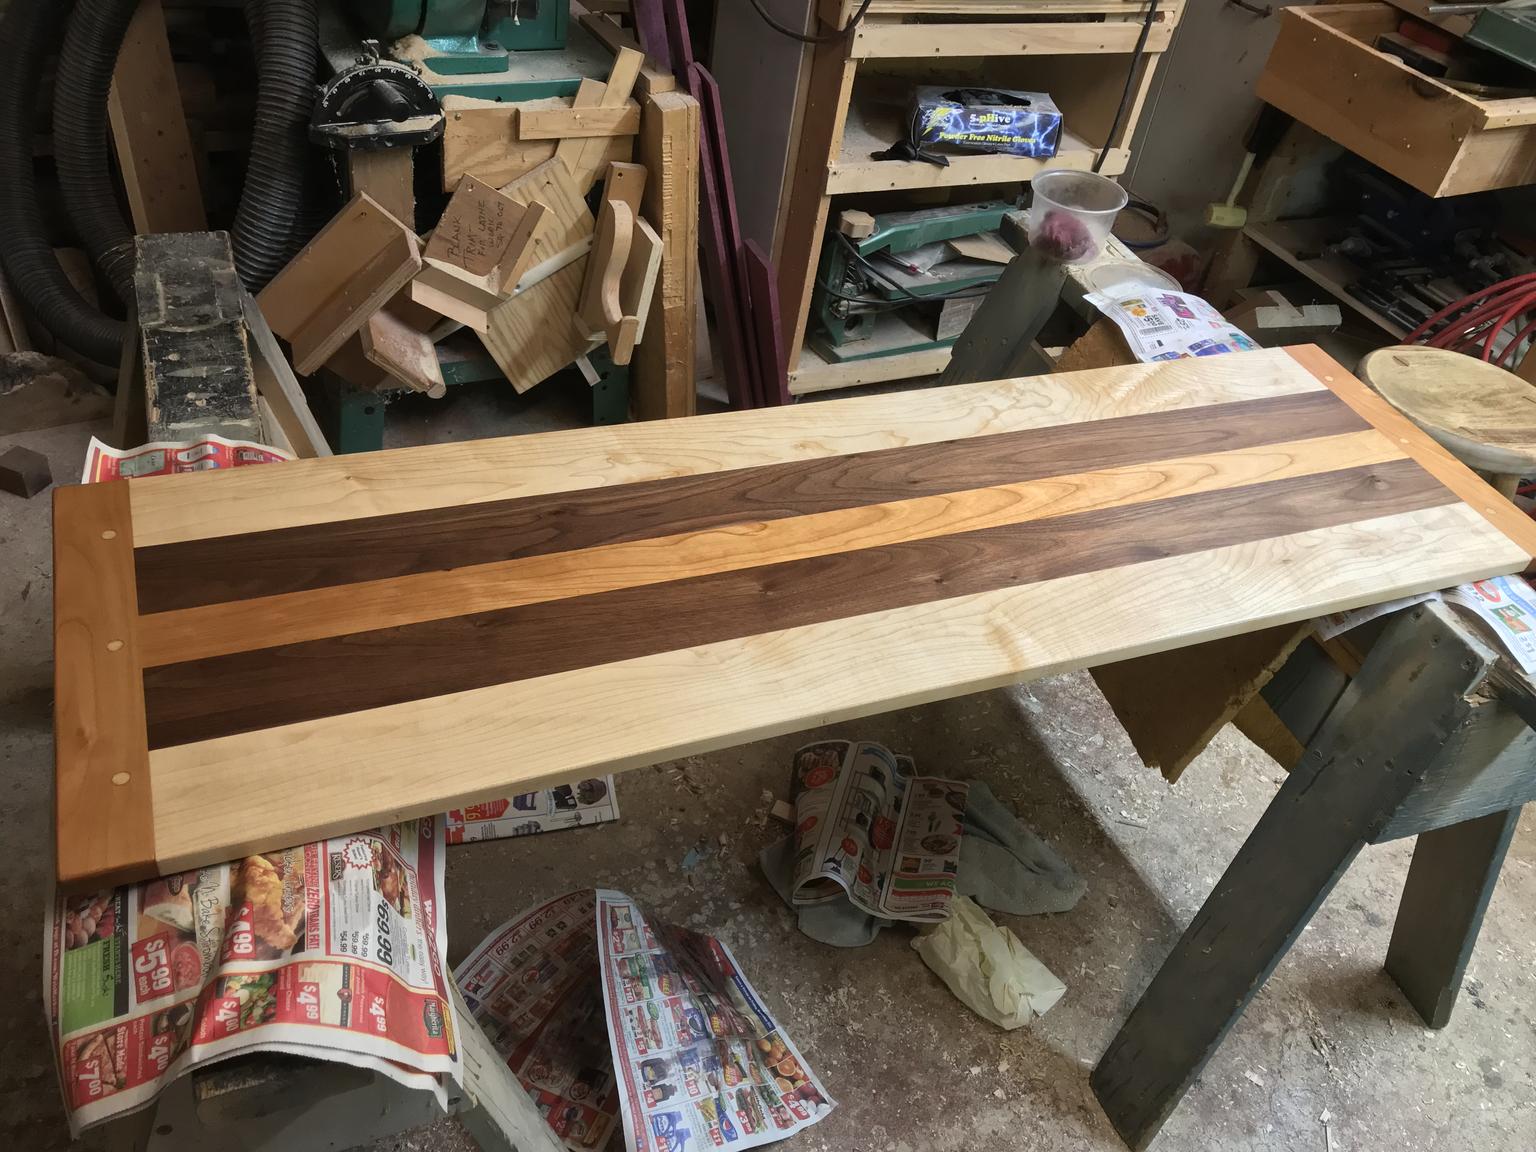
Well, this was new to me- an "Appetizer Board". Apparently you load it up with finger food and place it in the middle of a table so party guests can serve themselves. Made from maple, walnut and cherry. Breadboard ends pinned with poplar dowels. 14" wide x 48" long x 5/8" thick. Finger holds in each end to facilitate lifting. Small rubber feet at the corners. Finished with mineral oil and beeswax. Hope the recipients send me a photo of it in use!
-
From the album: Odds and ends
This still all from broken down fence -

From the album: Chess Board
Finished chess board


.thumb.jpg.573d1497d0675219908c85aabefd797a.jpg)
.jpg.41d9df91c81e2d29cde6e234b7b803bd.jpg)
.jpg.fa46ea6b1e17dda6fd1e53992f79f15b.jpg)
.jpg.feb8f898c799c0e33b3a3a9125fdfdb3.jpg)
.jpg.6b744cc00d6fecc4093f1a72b2c9a011.jpg)
.jpg.649b2287627710c0faaa6d45d3c28875.jpg)
.jpg.3314eac43545eafbacc8dd3062b5fbd4.jpg)
.jpg.334a355dfb2f45688045959420cd3729.jpg)
.jpg.d569dedb3cd96b8eda6e7eab7fc2d8f4.jpg)
.jpg.62ea8c39ff4be11b8ce87cb32f7a521e.jpg)
.jpg.e73a3dc877a6dd78111542afc80dceb1.jpg)
.jpg.e698e31af748011a317cec5e3bcf75b5.jpg)
.jpg.86237b3b4a7b2a3fa6367924c68ea7e4.jpg)
.jpg.a225dd8670b69b8e314005a0531d0b7e.jpg)