Search the Community
Showing results for tags 'finger joints'.
Found 18 results
-
Thin scraps of Pine, ASh and 1/4" Plywood...and have 2 days to build it? Start with the Infamous Full Sized Drawing... . Besides a square..needed a full sized "Bottle" to lay out the spaces.. Lines are drawn to the thickness of the scraps... about 1/4" thick, or so...layout square, two of them.. Lay out and mill 2 ends out of the Ash blanks.. Use the lay out lines to lay out for some slots.. And then layout for the matching slots in the dividers.. Then decide on HOW to attach the dividers to the ends.. Finger joints at the corners...not sure what to call the half lap joint... And that was just an hour last night...have all the other notches to mill this afternoon. And..decide on a handle of some sort.. Stay tuned..

- 19 replies
-
- 7
-

-
- pine
- bottle carrier
- (and 1 more)
-
Sorted through a stack of resawn scraps...found 4 that might just work to make a small box with. . One I could cut in half to make the box's ends.. Once I had planed it flat, that is... All 4 needed a little bit of plane work... was finally able to see what kind of a box these will make.. maybe try to get the grain to wave all the way around? been doing a lot of dovetails, lately..so..how about something a bit different? Involves using a chisel to lay the joints out.. A square to help carry the marks around to the other sides of a board.. Chisel is a 6mm wide mortise chisel...turns out, that the spacings will leave a double finger...maybe use that to saw a lid free from this box? Another layout tool.. Marking gauge..to mark out the baseline...set to the thickness of the boards in use...next...a marking knife to make a knife wall to start the chisel's chops.. Then, set one board aside, for now, set the other board a bit low in the vise... And grab a saw... And make a few cuts.. You can also see the knife wall. Ok, set up to do some chopping.. I have a 3/4" thick piece of plywood ( to save my bench from the chisels) and after deciding which will be the outside face...make a few chops..maybe 1/2 way down, leave a little front porch for support...then flip the board over... And complete the chops...careful, them little squares tend to fly straight back at you... Will use this to lay out the matching fingers... Right now, the Boss has errands she wants to run..NOW! Stay tuned for part 2...
-

Key Safe, side view on wall.JPG
steven newman posted a gallery image in Small Crafts, Boxes, Picture Frames, and Lighting

From the album: Key Safe
-
Key Safe, scrollsaw key.JPG
steven newman posted a gallery image in Small Crafts, Boxes, Picture Frames, and Lighting

From the album: Key Safe
-
First coat, all the feet.JPG
steven newman posted a gallery image in Small Crafts, Boxes, Picture Frames, and Lighting

From the album: Key Safe
-
Key Safe, hooks installed.JPG
steven newman posted a gallery image in Small Crafts, Boxes, Picture Frames, and Lighting

From the album: Key Safe
-
Key Safe, Open for business.JPG
steven newman posted a gallery image in Small Crafts, Boxes, Picture Frames, and Lighting

From the album: Key Safe
-
Key Safe, Installed on wall.JPG
steven newman posted a gallery image in Small Crafts, Boxes, Picture Frames, and Lighting

From the album: Key Safe
-
Key Safe, door ornament.JPG
steven newman posted a gallery image in Small Crafts, Boxes, Picture Frames, and Lighting

From the album: Key Safe
-
Plane has been rehabbed...needs a case to get stored in, when not getting used, so....bought some thin pine boards... Clamped them up for about a day...to get them used to the weather in the shop. Today's Laundry Detail meant I was IN the shop, waiting on clothes to dry..so.. Cleared off the top of the bench enough to get a bit of work done.. Blue items are brand new bench dogs, from Kreg.. Laid out a few tools.. Sharpened up the pencils. Checked the Winchester square to make sure it was indeed square...laid out a couple cuts for the Mitersaw.. The Cordless one, of course...and cut a pair of sides for the box ( came back later, and cut a pair of ends, too) This used to be a 24" long plank....threw out the scrap. Cord for the tablesaw... Was never plugged in, didn't need it. Got the marking gauge set for the thickness of the Pine.. Used the Narex 6mm Mortise chisel to set the spacings of the fingers...."X" marks the waste ones... First, I had to shoot some end grain...the 2 ends didn't quite match. Then carry the lines around....time to set up a saw... Geo. H. Bishop No. 10 saw. Lowered the bar until there was 1/2" left...test the cut.. To make sure I didn't cut too deep....then went to work...(decided to just work on one side at a time) Needed a place to sit down, anyway ( back was getting sore) so...about 8 full strokes per cut, or until the saw no longer cut.. Doesn't take all that long to do...all I had to do was make sure the cuts were straight.... Then set up to do a bit of chopping.....Dryer was done, so was my back. Turn the shop lights off, load the hamper up, and head back upstairs...one hour was about all I could get in..today. May try again tomorrow...back willing. Stay tuned
- 16 replies
-
- 12
-
-
- pine
- finger joints
- (and 1 more)
-
OK, OK, I'll start it. How do you make them? I've made some using an IncraJig and a router table with a straight bit. These worked well. I can probably make them with my SOB dovetail joining jig, but it's so complex, it makes my head hurt every time I use it . There was a video a couple of years ago about how to set up a guide on a table saw and dado blade. I used it once and it worked well and with little fussing. The idea was you set up an auxiliary miter gauge fence with a key that just fits the cut. Then use that key to offset the fence from the machine's rip fence. I tried it recently on that sewing machine box and by the time I got twenty or so cuts, the cumulative error was enough that it didn't fit all that well. My dado set up was not a precise fractional amount, I think. I have some friends that made a jig that you wind a threaded rod with a nx16 thread so that every turn advanced the guide 1/16" I don't make them often enough to justify a couple of days making a jig. And I call finger joints and box joints the same thing. Apparently, Stick does not. ?
- 12 replies
-
- 3
-
-
- finger joints
- box joints
- (and 1 more)
-
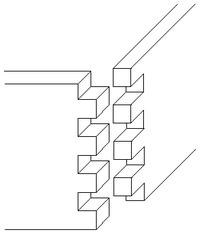
to quell or to add fuel to the fire er discussion what do you guys say... is this a box joint or a finger joint or both??? and this one.. finger joint only???
-
Seems there is a second project tied in with that desk project....A friend of the Pastor has requested a Candy box like the one Pastor has....that I built a while back, soooo Have a 7/16" x 6" board of either Cherry or maple... Had to get five pieces out of this one board...Front and Back, two Ends, and a piece for the lid.. used the old Langdon.. Got my Cardio for the day.....five parts, cut to size.. Used a mortise chisel to lay out the finger spacing... Now,I could do all them little cuts with a handsaw.....NOT. Started to use the bandsaw..heard a strange banging going on inside it.. Lower wheel had a "blow-out" Saw still runs nicely enough without it, and quieter, too. Got the cuts made, time to do a bit of chisel work.. Got out a few tools...the mortise chisel was put away, though... As this old Buck Brothers 1/4" Firmer chisel needed a work out. Just like on dovetails, I chop halfway from one face, flip it over, and complete the chop. Trying to save my bench's top, I clamped a pine scrap under things. Got the fingers done on the front and back parts, need to do the ends....ran out of Mountain Dew IN the shop...BREAKTIME! Maybe later, I can get back to work? Box will be delivered a week from this Sunday, hidden inside the desk. Might be able to get this done be then? Stay tuned,,,here we go again...
- 56 replies
-
- 9
-
-
- cherry
- finger joints
- (and 1 more)
-
Well...Mister Gumption finally caught up to me, there goes playing hooky for tonight. Had a few more grooves to mill.. Fought the grain on both of these....as for the third groove.. It was getting to be a bit of a stretch, so I dug out the cam rest, and gave it a test drive, too. The last two? I had to turn the blank 180 degrees, and come in from the other side.. The grain was a lot better to work with. Made that groove with just a single setting. Groove #5 soon followed. Time to make a holder for the shanks to sit in.. Marked out where each bit was, bandsaw to make a bunch of cuts. Chisel to knock out the waste, and pare things smooth. Test fit on the holder end.. Something like this. I could also mark where to cut the outside pieces at, and then give them a test fit... So I could see what needed trimmed where. Glue & nails, might as well get the glue up started.. Glue and nails, and a few clamps. Kept working my way around, had to trim a few places. Then a forest of clamps... Begining to think I should have done the first two this way......might have been a little easier? Tried out the bits.. Seems to look a little better? Still have enough pieces to make the fourth page... But....I think it can wait a day. Will need to change the cutter in the Stanley 45, first. The blank needs to be flattened out. Scrub plane then a smooth plane for that. Both faces. Yep, it can wait a day or so. Stay tune to this Batty Channel.....same Bat Time.
- 19 replies
-
- 4
-
-
- stanley45
- finger joints
- (and 1 more)
-
Forward, and at one one backwards. Someday, I might just learn how to do woodworking? Morning started out...meh....got a couple things done on the lid's frame.. Bench has been beat up, lately. Needed something for the chisels to bounce off of. There is a second chisel there...because.. It fit in there a bit better, got one end done...I thought.. Including both ends of the long sides, and one end piece. Then the internet had all kinds of problems that I just had to fix.....needed to go out and BUY ( yikes!) new phone line and new CAT5 line. Old ones were breaking down. The CAT5 wound up too short, that is why I had to get a new one. Whew, had to run around with the Boss, for a bit, too..... Finally managed to return to the chopping block....only to find out the lid parts were too long....hate when that happens.. This was after I had trimmed the end piece to length. Couple of marks to show what I needed to remove.. Something like this? Then a few whacks on a chisel to cut away the "extra" stuff. Bummer that the fingers were already done? Not really, make things a wee bit easier. Finally got all four parts joineried.. I think that will do...for now. Still have to figure out how this slab of Cherry will fit in there... Needs cut to fit...but which type of joint to use for it? Might TRY a T&G? Or...just a groove and a rebate? Have to sleep on that awhile. As for dog holes in a bench top....did you know they are good for... Holding a chisel so it won't roll off onto the floor, or worse, stab my foot? The Witherby 3/16" is in one. The New Haven Edge Tool Co. 1/4" one rarely rolls anyway. That old mallet? Turned that a few years ago, out of Spalted Maple. Been pounding on things ever since......Maybe tomorrow..I might get organized a bit better? Nah, then I'd be dangerous...stay tuned for the rest of the story.
- 6 replies
-
- 1
-
-
- chisels
- finger joints
- (and 1 more)
-
Yet another "Simple Little Box" project. Went out and spent $6.99 on two pine boards. 3/8"x 5-1/2"x 24" and 3/8" x 5-1/2" x 36"......A bit of measuring for the lengths needed, mark a line.. Stick it in the vise, grab a handsaw.. It was sold ( and etched) as a Craftsman saw. Get four pieces cut to length.. Hmmm, might be a tad too tall? Laid out some lines, and some tools.. Lines were spaced using a chisel that will also be chopping out the waste, the toys used? Spaced according to that chisel....kept thinking about the height issues, while taking a Mountain Dew break.. decided to mark how much needed to be ripped off.. Pencil points out how much to be removed, Bandsaw this time, was a bit quicker. Planes to dress the edges straight. Clamped the first one in the vise, backsaw to saw on the lines. then a bit of chisel work Then used these two to layout, saw, and chop fingers on the ends pieces, and a test fit.. Then just kept going, until all four MARKED corners were done. Had to mark which was the top ( T) and which corner matched ( #1 to #1) and got yet another test fit Hmm, well, clamps and glue should help...... took the time to see how the two planes will fit in their new home... Snug as a bug in a rug? Well, it is a start, anyway. Just like the last simple box, have a lot more to do....stay tuned to this Batty Channel
- 5 replies
-
- 1
-
-
- pine
- finger joints
- (and 1 more)
-

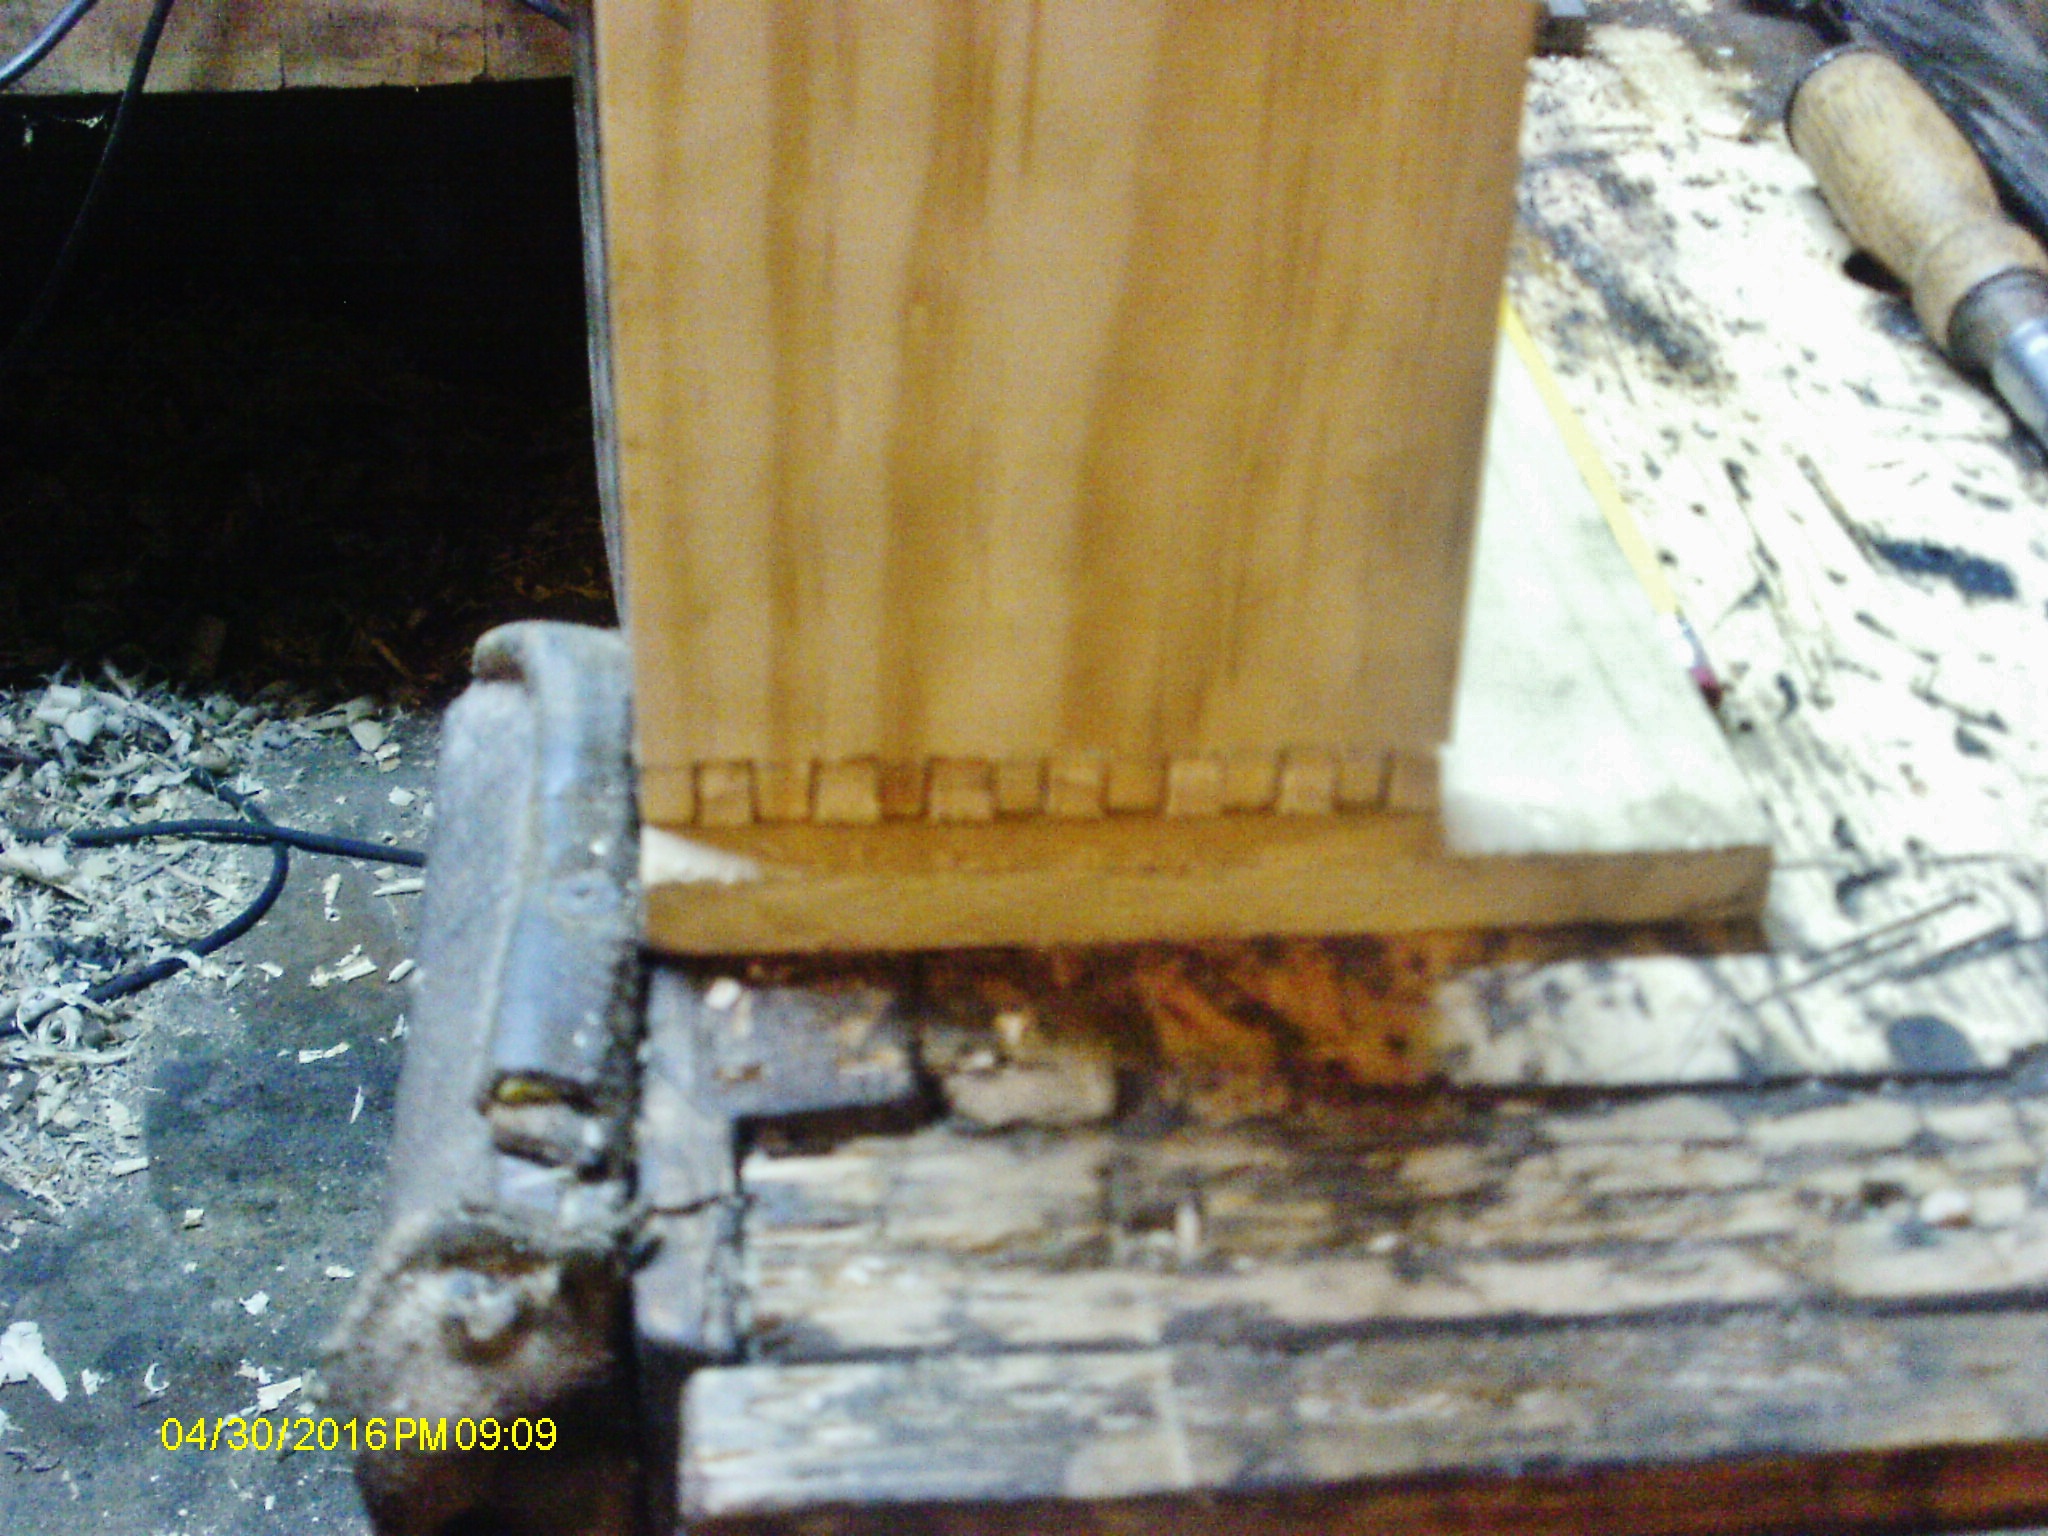
From the album: Box for a Stanley 45
Detail of the corners, a better showing of the handcut finger joints. Top panel is a two piece glue up, set in a rebate cut with a Wards (Stanley) No.78. Took a bit of fussing, cussing , and fitting to get the lid to close just lid the old box. -
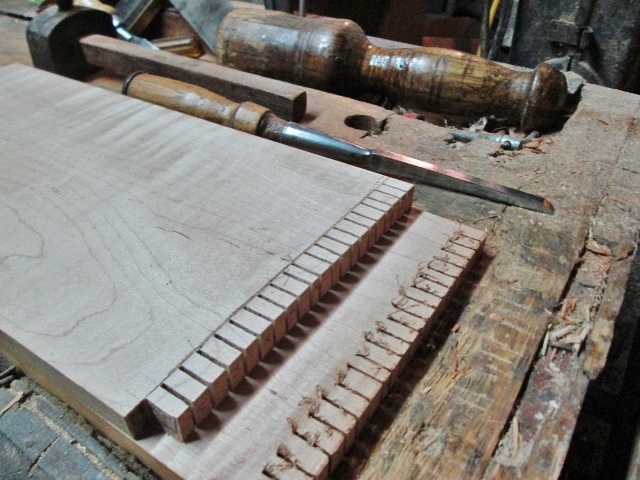
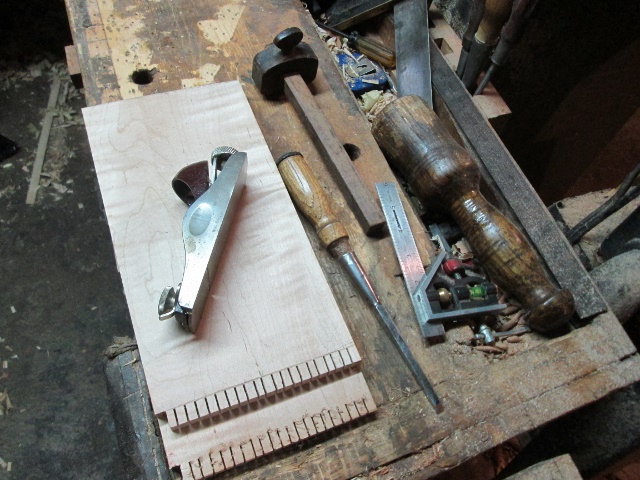
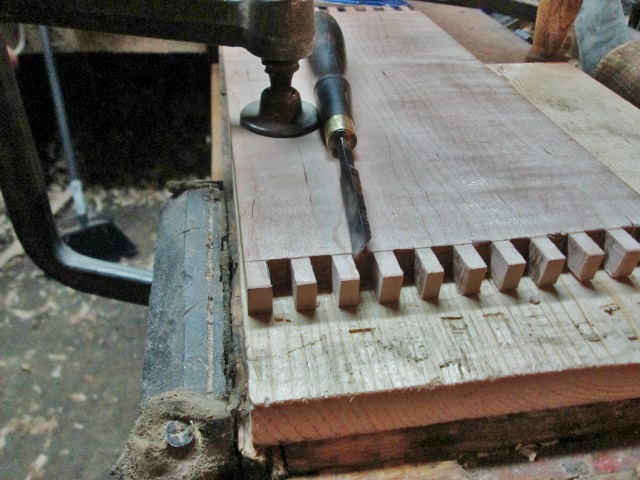
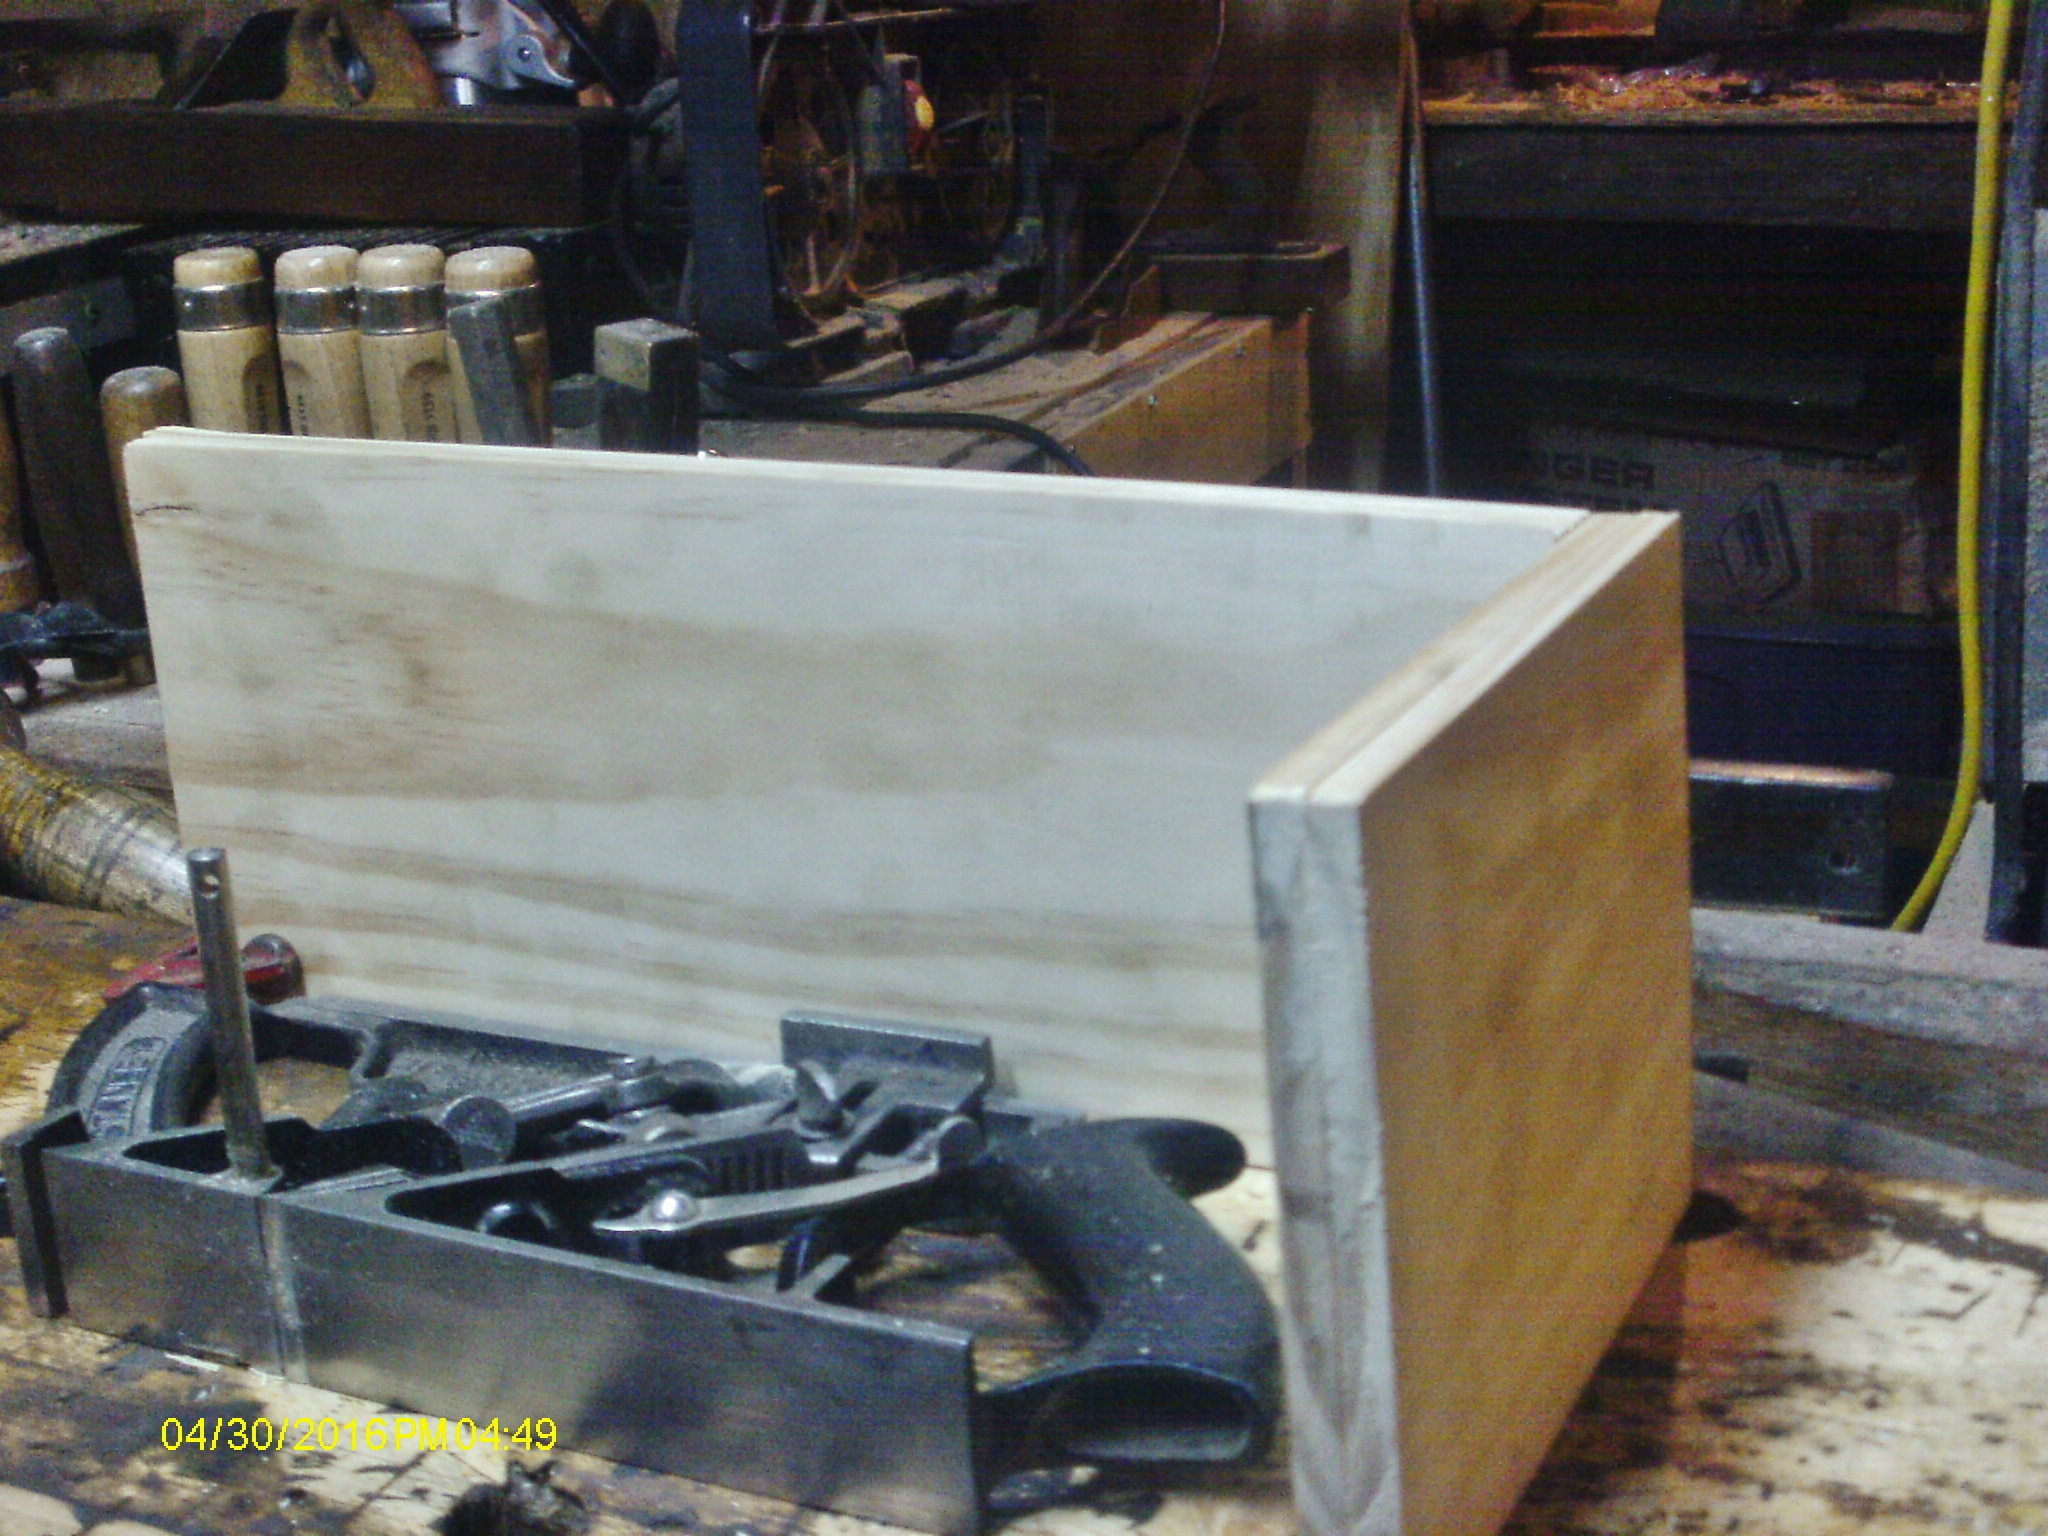
Well, after looking at the box the Stanley 45 came in.....decided to shelve that box, and build a new one to house the 45 in. Picked up some 1/2" by 5-1/2" by 5' poplar. I used the "existing" box to mark out a few sizes. Square a line across, using a fancy marking knife. Clamped the plank in the end vise, and used a Craftsman "Special saw" to do the crosscuts. Then match the front and back and the two ends, clamp the pairs in the vise, and clean the ends with a plane. Laid out a few toys..er...TOOLS Couple of squares, a special chisel, a marking knife ( that curly thing) a marking gauge, and a pencil. Marking knife was used with a square to do the crosscuts. The marking gauge was to mark the ends of each panel, set to the thickness of the board. Pencil is to mark over the knife lines so I can SEE them. The chisel? It set the spacing for a special joint Here you can see the marking gauge line, and the marks from the chisel. A small square to carry the lines round. The "X" is the waste parts. Waxed up an old saw, we had work to do... These are the front and back panels, might as well do them at the same time. LOT of saw work, hand was getting tired, too. Had to keep track of where the waste was. Then I repeated for the other end, but first, there was a bit of chisel work to do ( gave the hand a break, too) One at a time, until all the waste was chopped out. Doesn't take a whole lot, I didn't even have to flip them over. The end without a pin was simply sawn off. Chisel is the same one I set the spacing with. Well after the front and back were all chopped out on both ends, and the inside and top was marked on each part, then I cound work on the ends. One corner at a time, to save any cunfusion from starting. Once I got one marked out, chopped, and cleaned up, I could at least do a test fit.....after I marked up the insides so they would match.... Ok..one corner down, three to go. What you see here is both the box ( bottom 2/3s) and the lid. A couple of grooves to form a lip and seperate the two sections. need more grooves milled for both the top and bottom panels to be housed in. After that? Stay tuned,,,,,ain't even started to do any cussing...yet. BTW, I already did a straight cutter test run.....will need to use a skinny one next time....but shavings have been made with the 45! Just a simple, little box....
- 8 replies
-
- 1
-
-
- poplar
- finger joints
- (and 1 more)