Search the Community
Showing results for tags 'restore'.
Found 9 results
-
The same friend that gave me the nesting table to repair gave me a chair to take to the furniture bank. It needed some help. It had been "sitting in the attic for a while." Seat was a mess and bird poop over many spots. As an aside, I think this is the first piece I've ever worked on that had a wipe-on stain and not just a spray on toner, given the marks on the bottom of the seat base. Procedure: Take off set cushion Clean with naptha, then soap & water The finish had deteriorated around where the hands would be on the arm. This happens with exposure to body oils over time. I tried to clean up, but no luck, so It got sanded off. The upper back was salvageable with a cleaning and light sanding. Apply a coat of shellac to seal over most of the areas. Apply aerosol toner (lacquer with color in it) in dark and extra dark cherry Apply clear lacquer as a top coat Flip the top of the padding over and add several layers of polyfill padding Reupholster the top with new fabric Reattach the seat Before: Atter seat removal and sanding arms New upholstery on seat Finish repairs All done

- 13 replies
-
- 10
-

-

-
Ok, so I didn't even know this was thing!
-

Itemized post-stripping Qs (EZ Low-toxic items/process for chair
JudySmith posted a topic in Finishing
Hi, i'm an amateur interested in restoring my grandpa's chair (see attachments which i've cleaned with 50/50 vinegar/water). I wish to restore it to its original look (sorta like the lacquer of the early 20th century) - because parts of it became weather-beaten, bleached, and stained. I'd like to aim for a Matte look along with minimally-protective finishing. I plan to strip it, but that may cause the wood to become lighter than it used to be originally. So here's my questions: After stripping (for which i hope to use 32-oz QCS spray-then-hose), would you sand or condition (and what Grit or conditioner, hopefully easy & non-toxic)? Should i apply Dark Walnut stain prior to applying vinyl & lacquer - or would vinyl & lacquer be sufficient to darken it to its original look? For health concerns, if stain is advisable, which one would you advise that's EZ & least-toxic? Which vinyl & lacquer are EZ and least toxic (Or is there any least-toxic polyurethane that would not require sanding and sealing? Such as this lady once did: https://designsbystudioc.com/restore-refinish-oak-desk-chair BTW, is the industrial Mohawk very toxic? At minimum, how many ounces (and coats) of each finish would offer passable coverage? I don't seek more than passable. How long to wait between coats? As for protective gear, I do have gloves & onion goggles, but are there any protective face masks that won't squeeze my cheeks due to TMJ-D? In summation, I prefer the simplest, least-toxic and most budget-friendly route I can get away with. If itemized answers are omitted i'll be floundering, because how would an amateur like me know what to order and how to proceed? Thanks!
- 49 replies
-
- 3
-
-
- restore
- preservation
- (and 3 more)
-
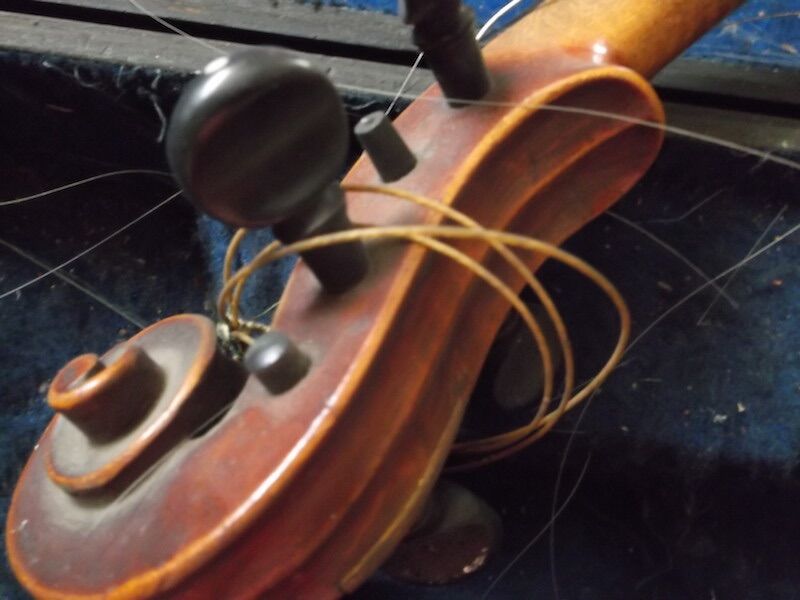
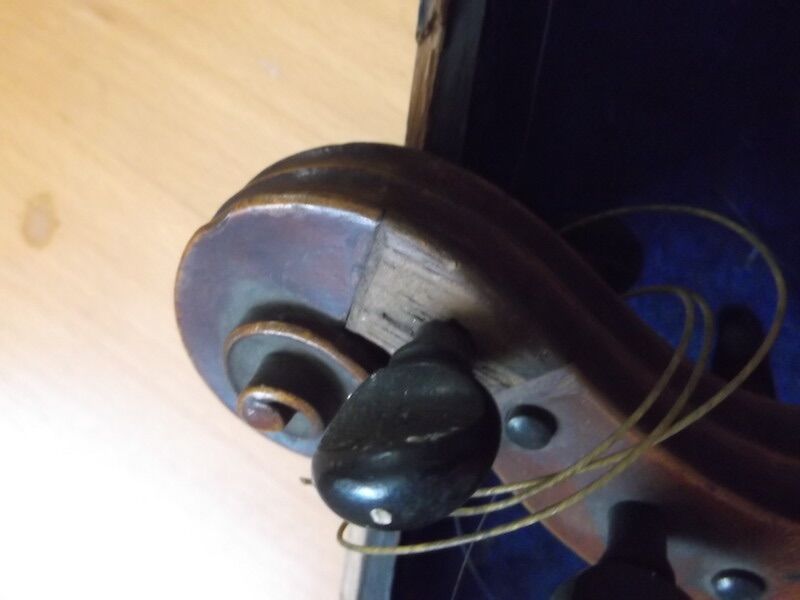
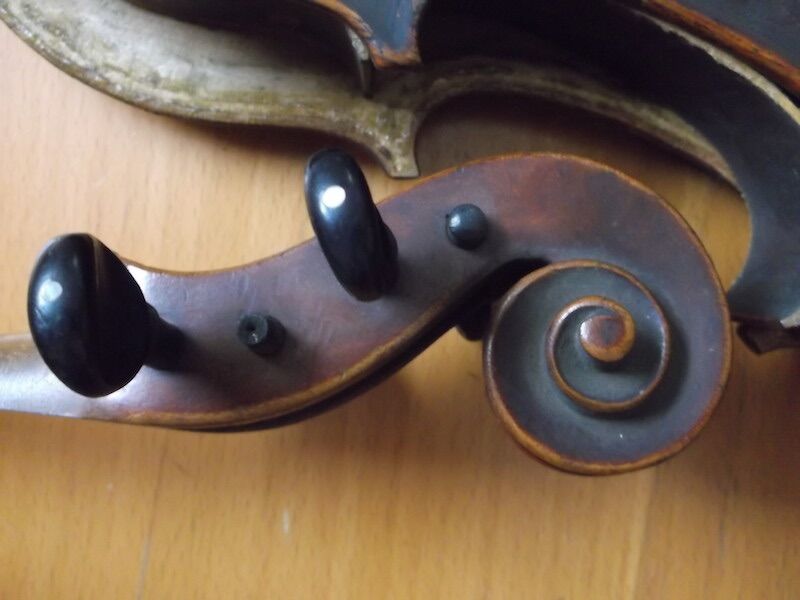
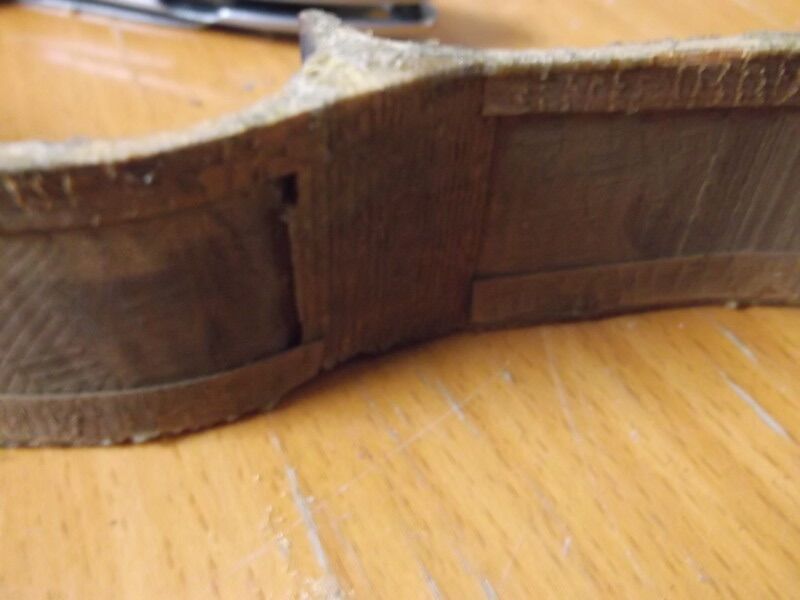
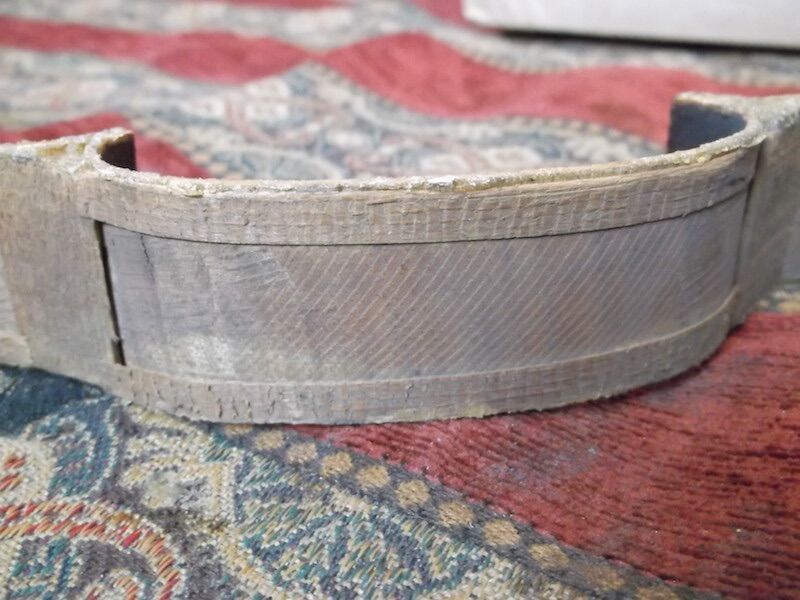
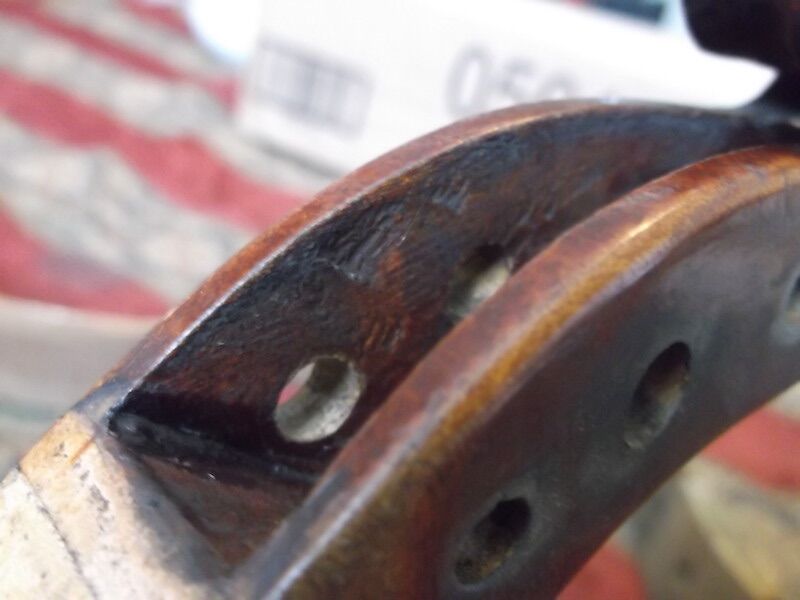
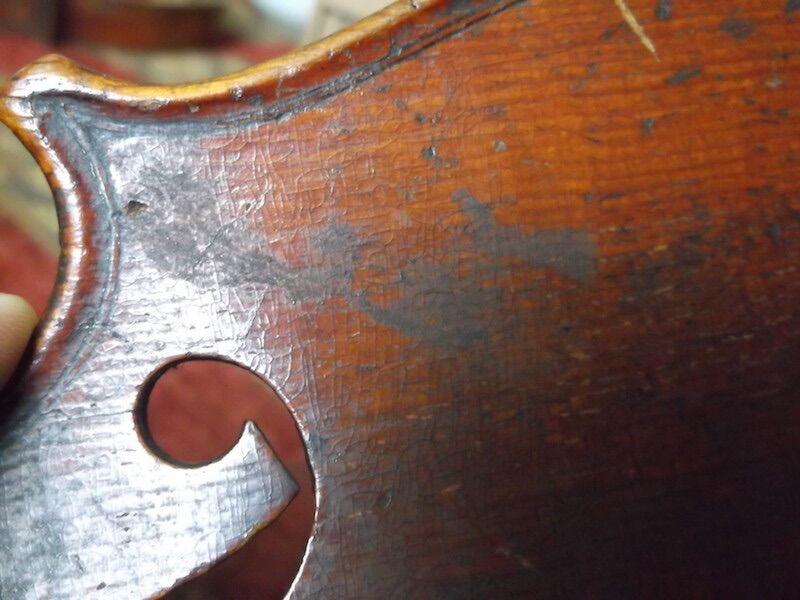
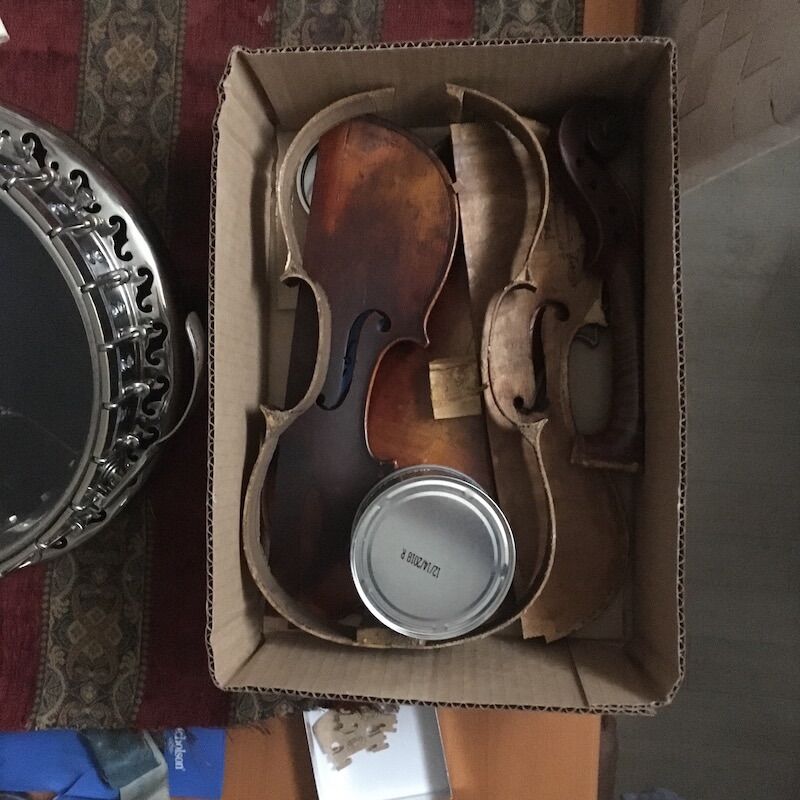
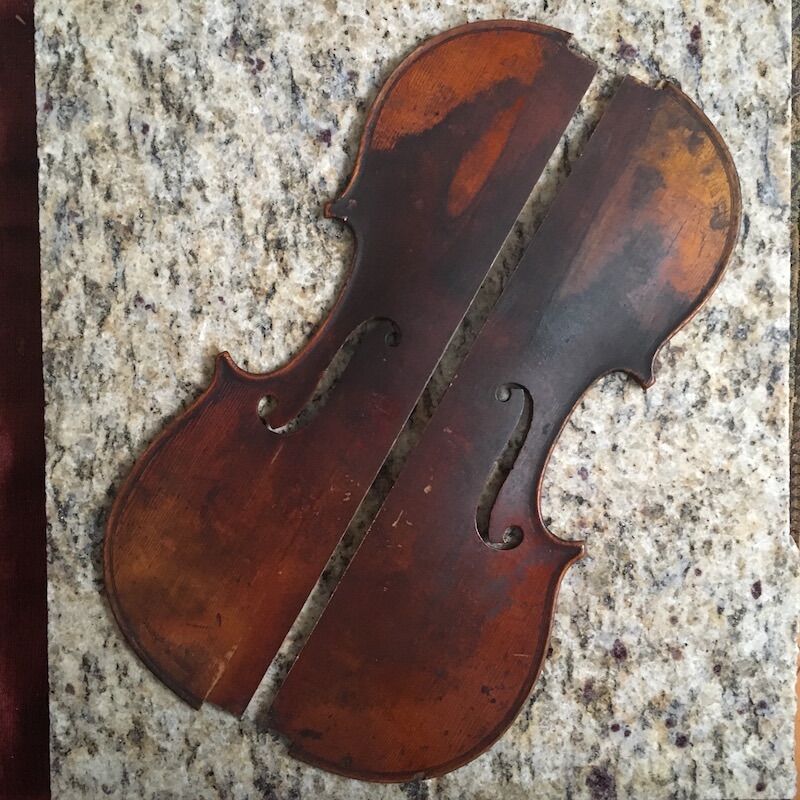
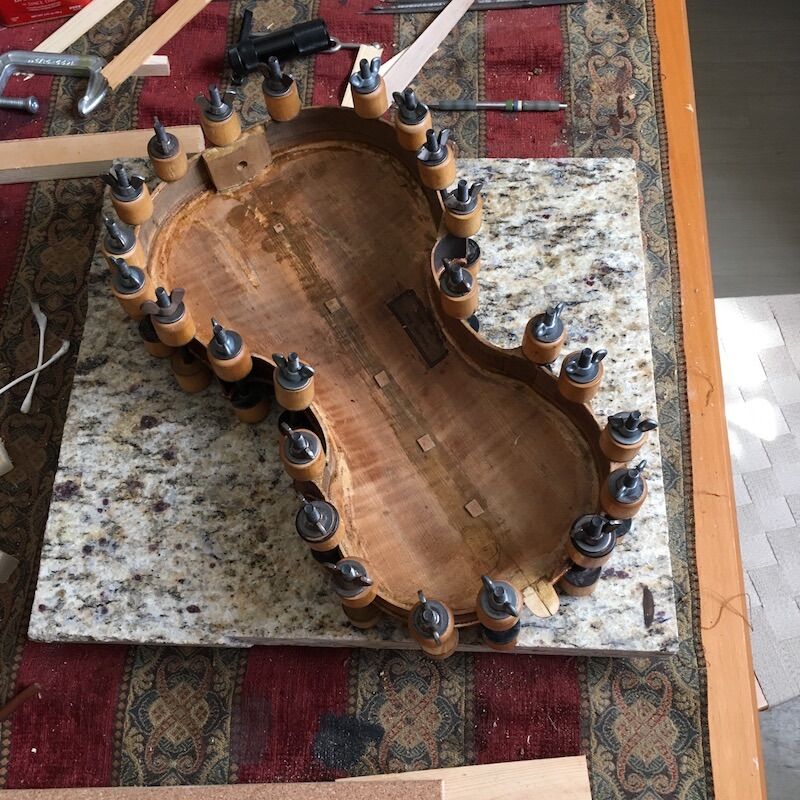
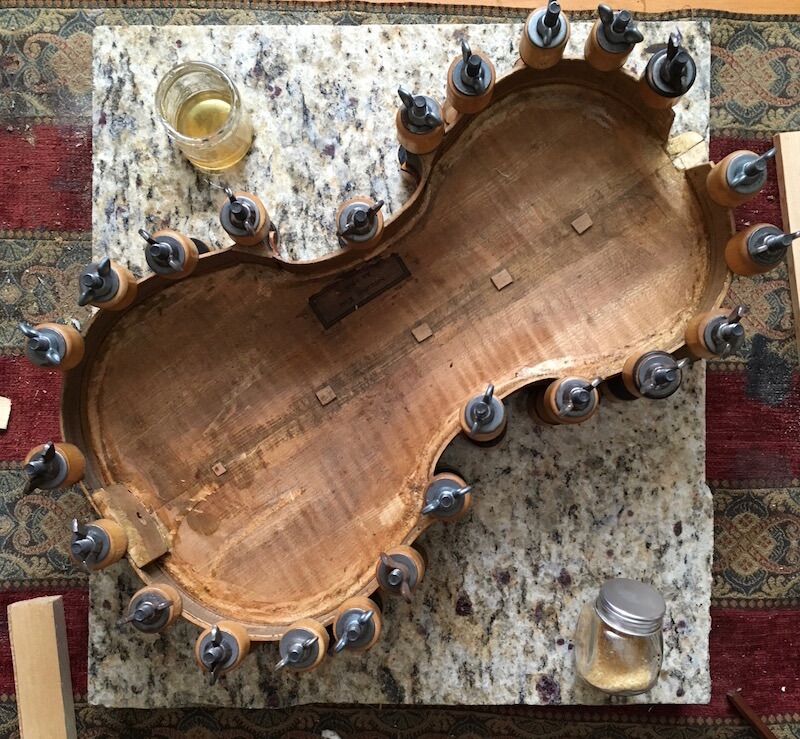
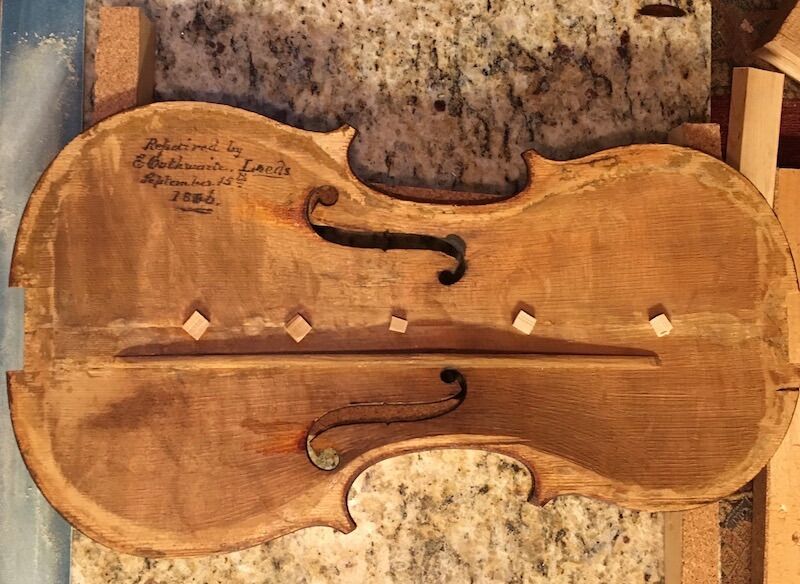
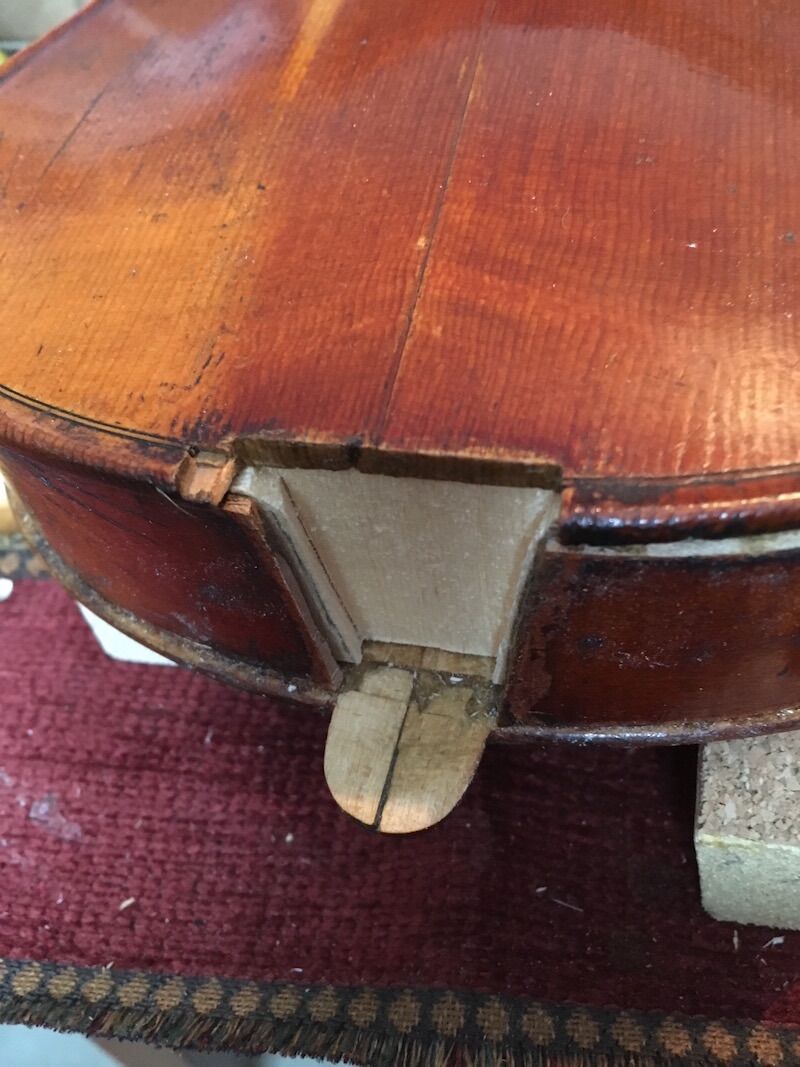
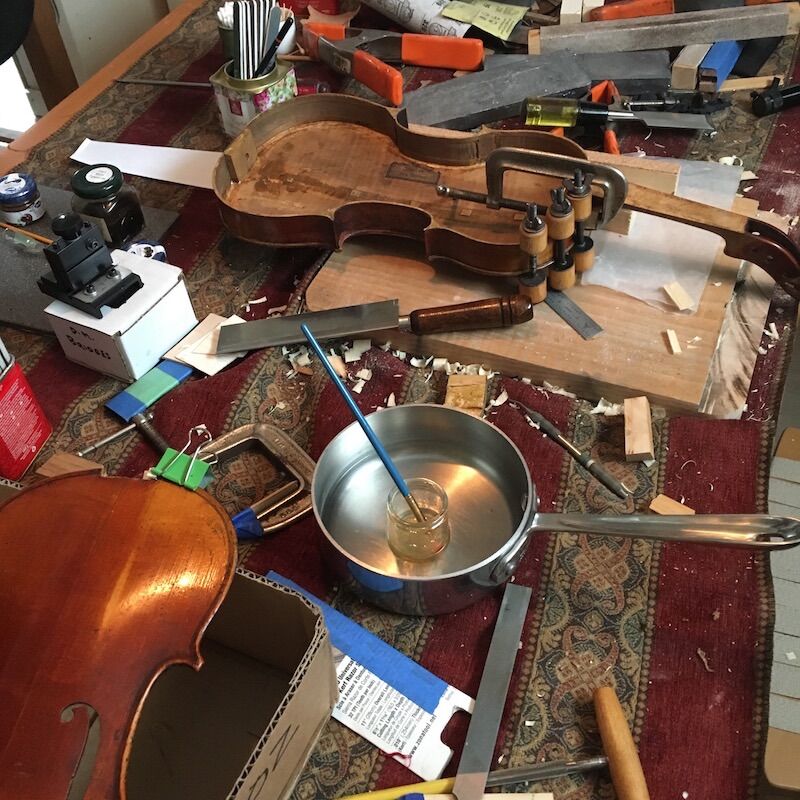
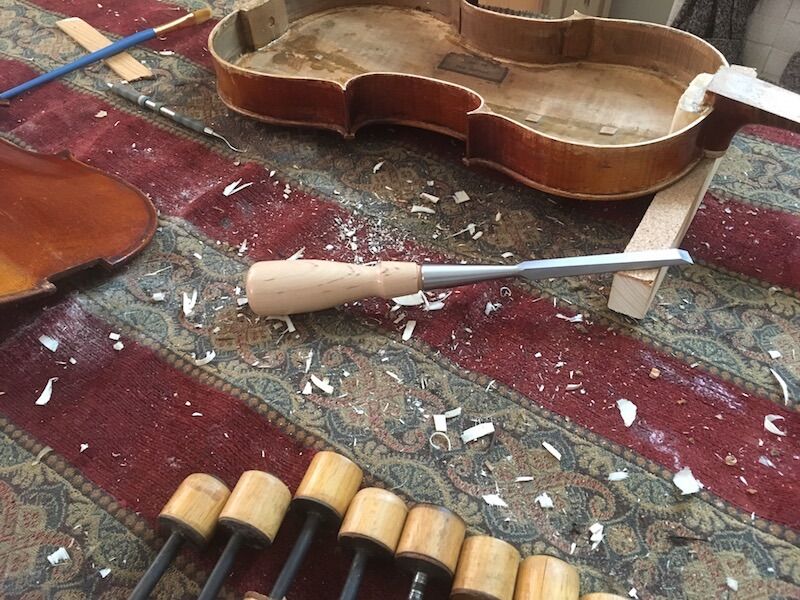
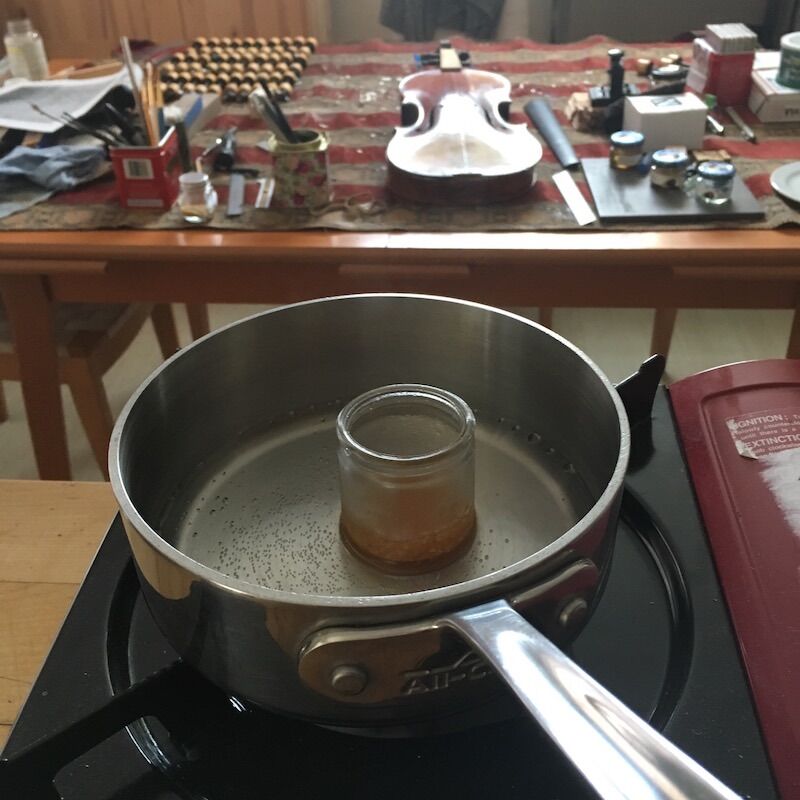
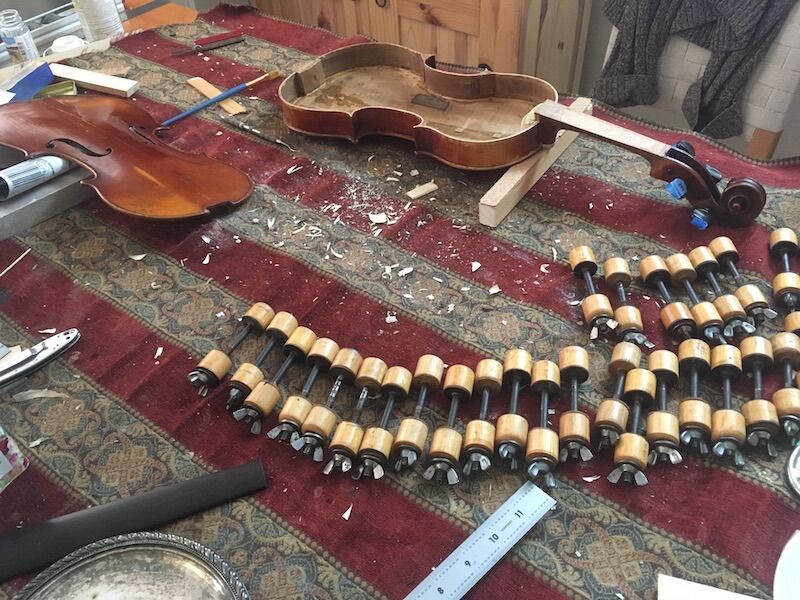
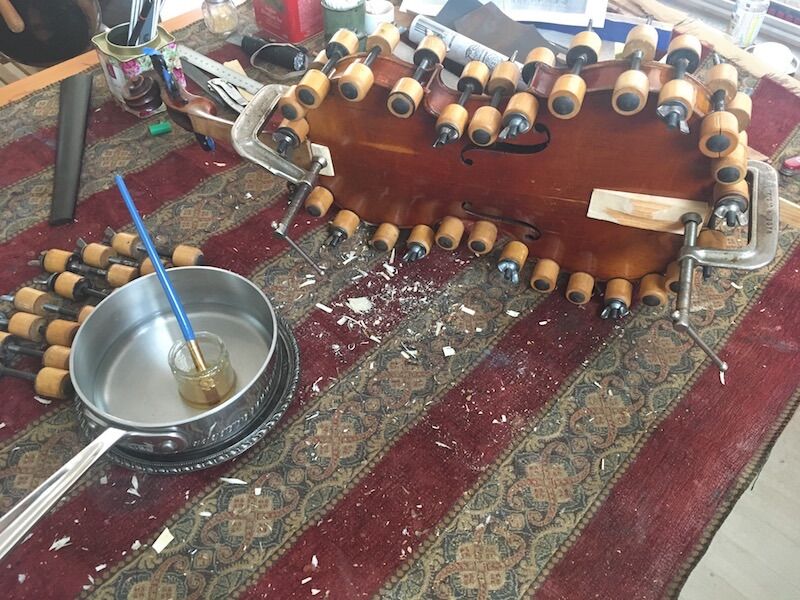
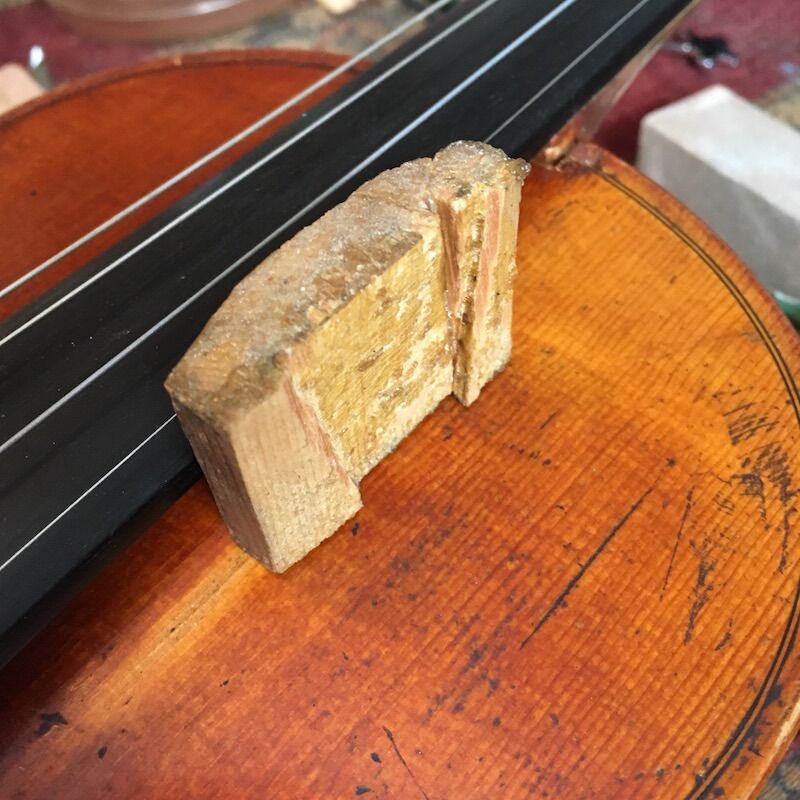
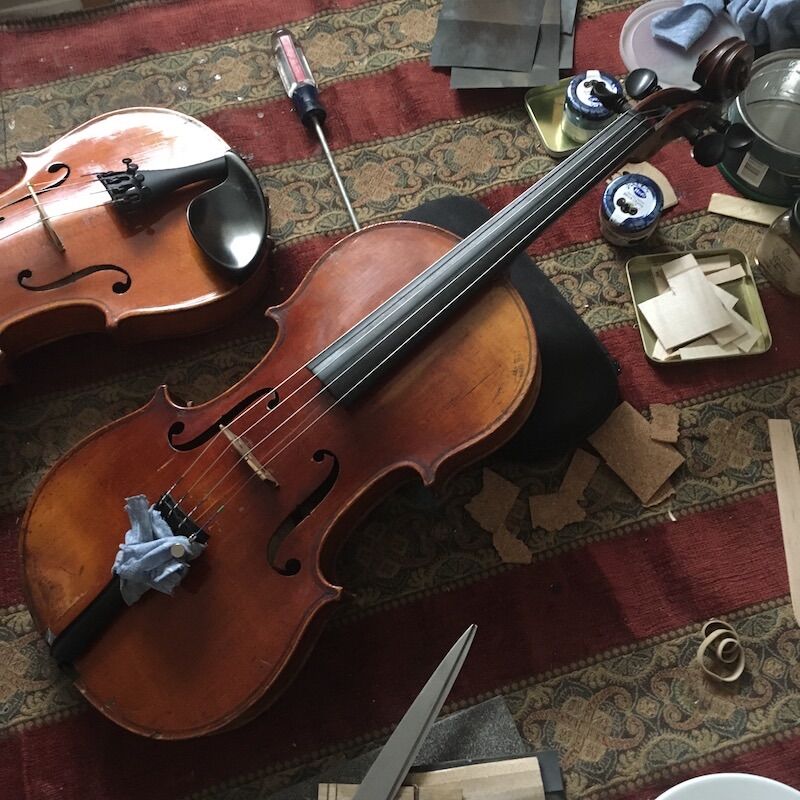
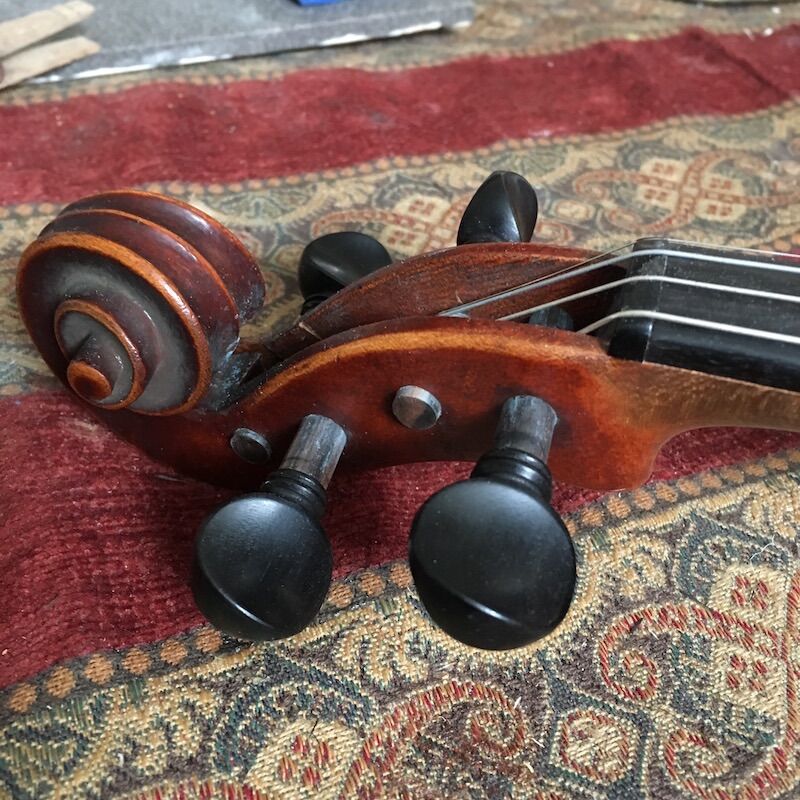
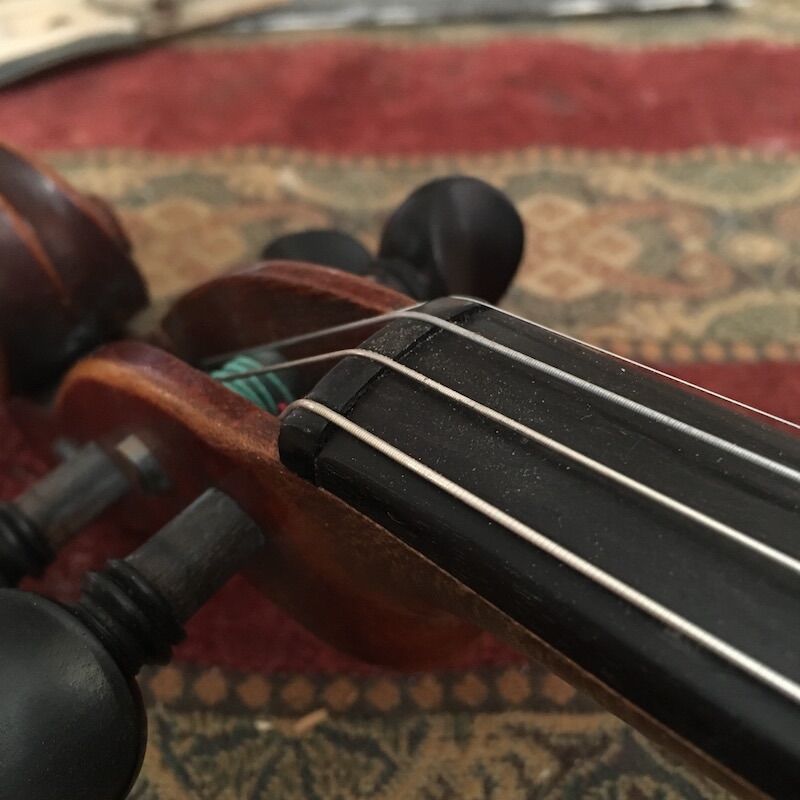
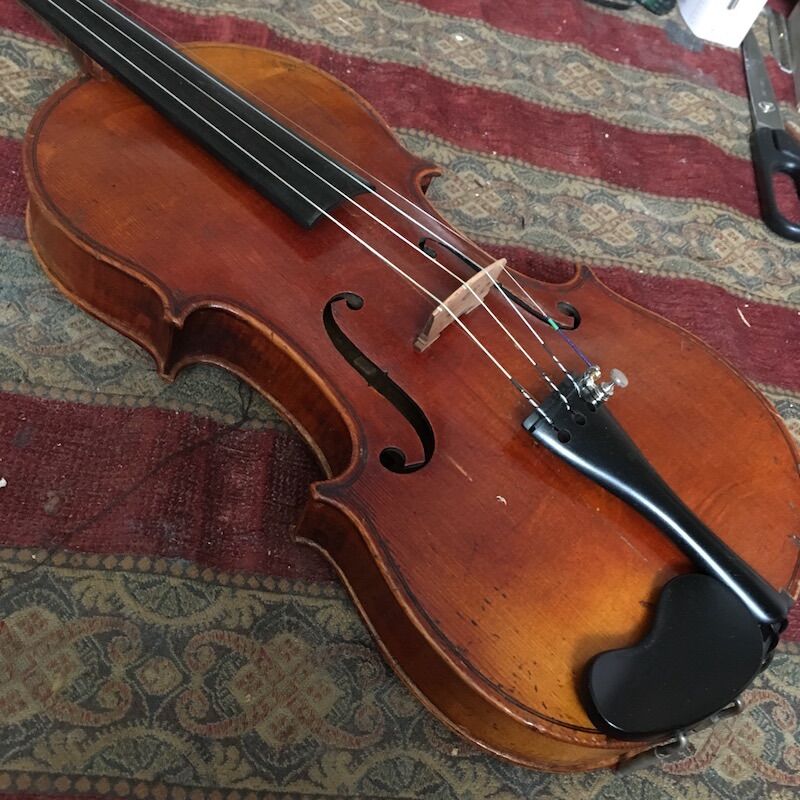
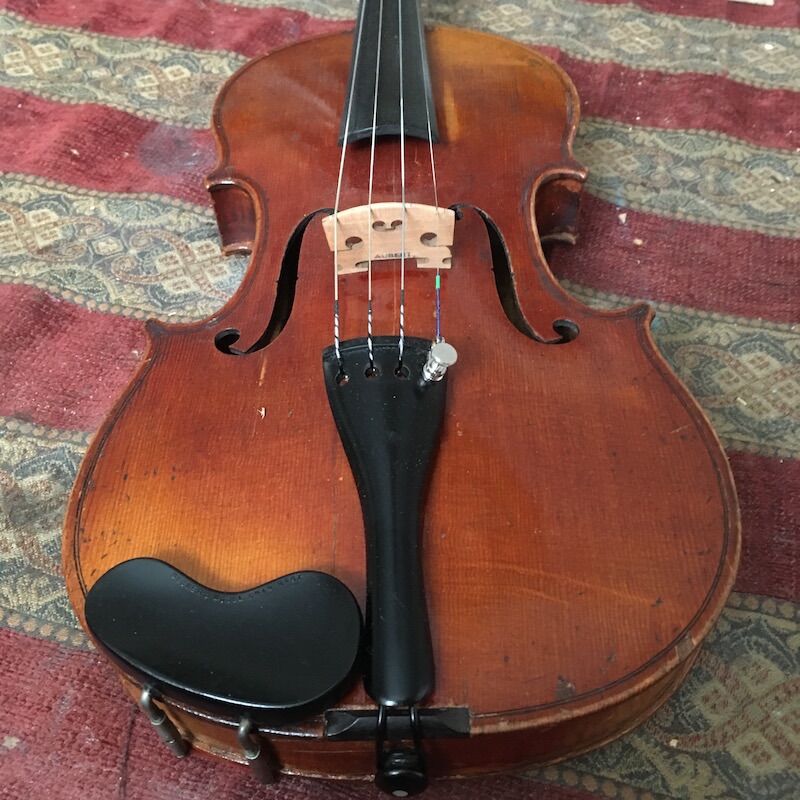
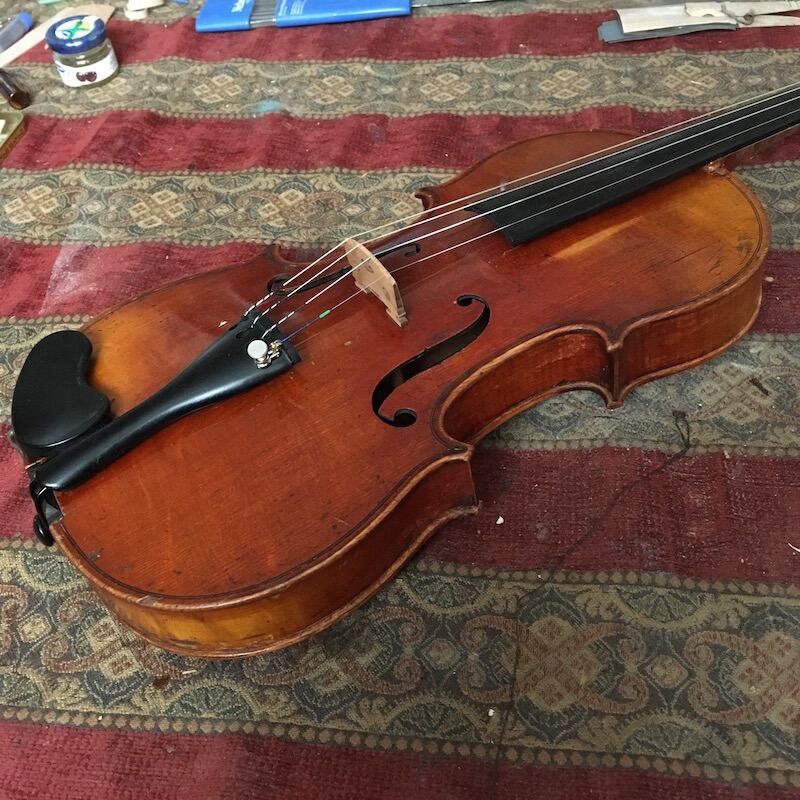
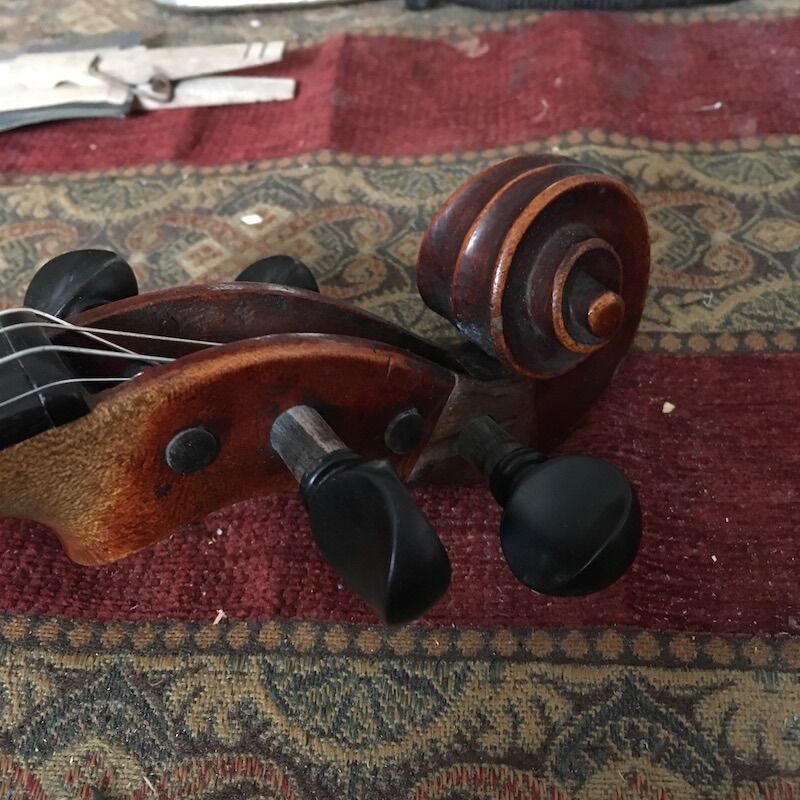
As promised within the Use of an Angle & Taper Calculator in everyday woodworking thread, here's the amateur hobbyist play-by-play of restoring an old violin. This old fiddle came to me in its original or so coffin case and promptly fell apart as soon as I removed the chin rest. The first 20-some images chronicle its condition with attention to tool marks. August 14-15, 2018 Gut strings! Keystone-shaped dovetail-cut pegbox repair, likely c.1880s. Wow, lookie that patina! This violin is not a Kloz, not remotely built as a Kloz, certainly sounded nothing like a Kloz, I've reliably been told. Likely an authentic repair marking, this work failed, maybe around 1920; the glue I removed was oddly sticky with a sharp astringent odor. All of these images are used to date and identify the fiddle. It is thought to be mid-1800s, a build of the French Mirecourt region. Cannot fake this crackled spirit varnish with embedded dirt / rosin. August 23, 2018 Spent some time cleaning up the top, meaning glue edges and whatnot. Then reassembled the ribs to the back. Cleats ("jacks" to the Brits) being glued. I shave them flat and scribble a few notes on them which get sanded off. September 11, 2018 By mid-September 2018, a new end block is successfully crafted after eleven tries. Working backward, I glue the block to the heel neck. Most or all violin neck heels are cut squarely, a big tenon, the end block is a big mortise. This joint is dovetailed, so I keep it as-is - cleaned it up and sharpened the edges. Officially my first "neck reset". Wowwie, look at that neck angle! What about the projected height of the strings !?!?! The violin is back together about five weeks after I received it, strung up with used $80 strings. The old end block on display. A new bridge is on the violin. It is 40mm high, a good centimeter higher than specification. Way too high for a practiced violinist, but bringing the fiddle to a bluegrass circle, I note the higher string angle does produce a great tone. Even, dare I say, a fantastic tone. Mo' downward pressure. But it is not sellable at 40mm. 29.5mm - 31.0mm is the range. My projected height is all off. Image sequence was thrown off, but the top is removed, the end block pried off, and the neck reset. My second official neck reset. Thank the saints I am using my own hide glue through all of this. In this image, which I *think* is in correct sequence, one may see a slight difference in neck angle. Hard to tell, but I was off by a little under 2˚ And she's back together a second time. New pegs in newly-contoured peg holes of the modern** 1:30 taper. New fingerboard and nut all pictured here. ** modern since the early 1900s, replacing 1:20 taper or whatever was traditionally used in the shop. New strings this time. $40 D'Addario Helicores. The pegbox repair was undone, cleaned up, and reglued using the same piece of wood. I *may* have used Titebond on this one joint, as it represented something I never ever wanted to come undone again. All the other joints are hide glue; in theory, a violin may be taken apart and repaired indefinitely. Hope you enjoyed the tour. - jim
- 39 replies
-
- 12
-
-

-
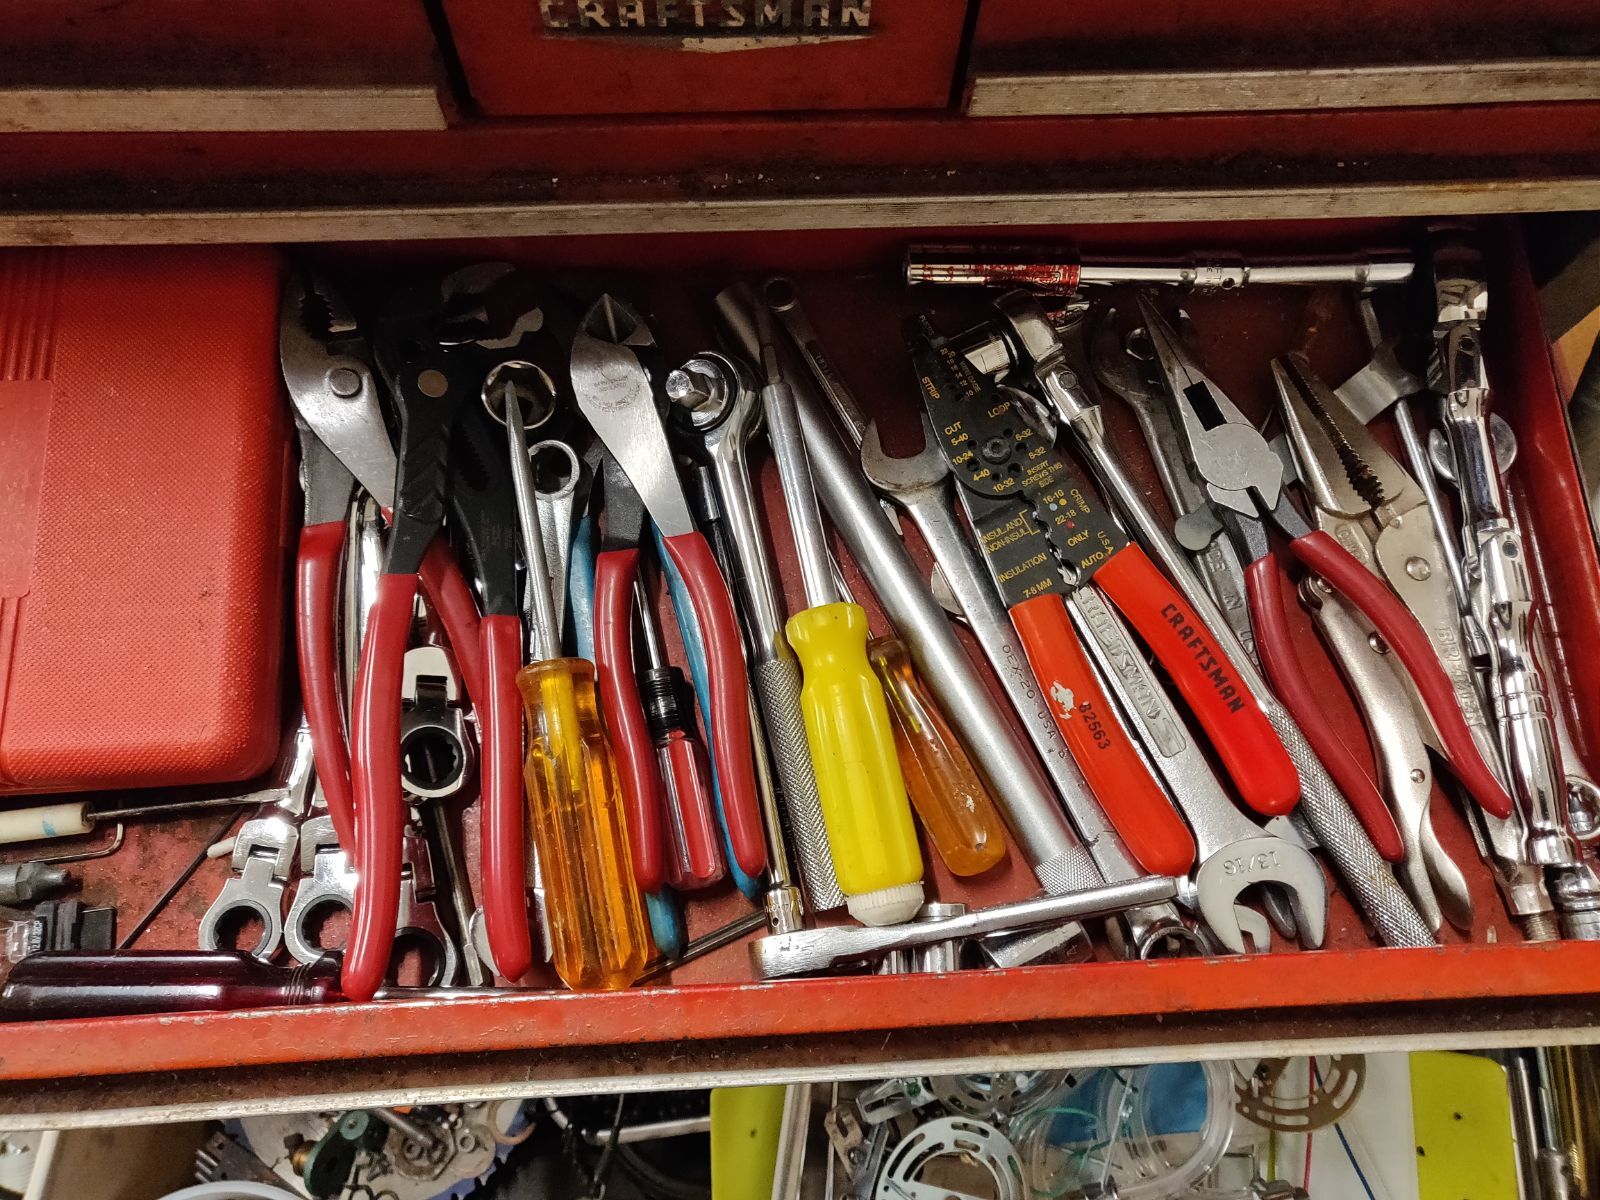
just for the heck of it my primary drawer in the little tool box at the restore with the tools i use most frequently to de-contruct lights, fans, etc for re-cycling of the metals. since i am a volunteer there,all the money we raise from this goes directly into stuff for new homes. included are 12, 13, 14, 15, 16 mm wrenches (with the 14 being the most commonly used on 3/8 pipe nipples holding lamps together. that long tubular job in the middle is a 10" 14mm deep well socket (originally for certain Denso plugs). 1/2" pipe normally held in place with 11/16 nuts. red handle pliers are the HF replacements for my Knipex pliers which i leave at home now. 1/4 ratchet set up with 6" extension and 1/4" 8 point (square tip bolts often used on ceiling fans) and 14mm socket on wrench to right for lamps. various screwdrivers and a box of HF tips to the left. other drawers have my Wilde pin and roll punches, SAE wrenches and sockets, metric wrenches and sockets, cut-off wheels , and a load of other miscellaneous small tools. hammer and large screwdrivers in to as well as a couple of specialty lamp tools (for removing retaining rings).
-
Like the title says, has anyone restored a level? Looking at you, @steven newman and @Larry Buskirk... I needed a 4' level and got a group deal at auction yesterday. This 18" Sweetheart was one of them. If the logo goes along with the SW used on planes, this level would be dated around 1921-1922. It's rough, and likely not worth too much time to clean it up. But, has anyone restored one? Looking at the first pic, how does the vertical bubble get removed?
-
Anybody tried using electrolysis for removing rust to restore old woodworking hand tools? Got several planes and whatnot from my grandfather and would love to restore them if possible.
-
This is my first shot at "picking". Since I picked these up at the local Restore, it may not qualify as legitimate picking, but you get the idea. The brace was $10.00, and the saw was $5.00. The saw looked pretty good, needing only some cleaning. The website Common Woodworking has a guide on sharpening and setting the teeth, so I may be referring to that if needed. My main concern is with the knob on the brace. It spins freely enough, but seems to be very loose and wobbly. Is this normal, or are there some parts, bearings or such, that I need to be looking at? As for bits, if I start looking at used bits at yard sales, etc., once I get past the obvious defects like broken spurs, points, or bent shafts, what else should I be looking for? Any info would be welcome. Here are the pics of what I scored. The saw is 25 3/4" along the teeth.
-
I'm not much of a hand tool guy, but today I picked up a Disston D8 panel saw. It appears to be a 26", 10TPI, crosscut model and really has no damage other than poor care. You can barely make out the Disston markings on the blade, and I'd really like to restore this for occassional use as well as just the cool factor of having it. BTW, this saw cost me the princely sum of $2.50 plus Ohio ransom at the Restore. Is there a way to clean the blade of the rust and not damage the markings?


.thumb.jpg.573d1497d0675219908c85aabefd797a.jpg)