
Search the Community
Showing results for tags 'reclaimed lumber'.
Found 14 results
-

Early 1900s spruce drawers
Woodman posted a gallery image in Small Crafts, Boxes, Picture Frames, and Lighting

From the album: Scrappy spruce shelf
Here's the curb find seen in the rough, summer of 2018. Outside an old administrative building in West Philly. These built-in-place drawers are c.1885-1915. Apparently "kit" drawer parts. The drawer sides are dado'd, the drawer bottoms hand-planed on three sides to fit the dado. Nailed to the drawer front. I only salvaged the bottoms. Oops! -
2022 05 spruce side shelf 7
Woodman posted a gallery image in Small Crafts, Boxes, Picture Frames, and Lighting

From the album: Scrappy spruce shelf
The final. Modern chromed Lee Valley hooks currently conceal the shelf mounting screws. Looking for a couple of c.1925 nickel-plated brass bath hooks, larger, with the rounded tip, to swap in place. -
Spruce Side Shelf
Woodman posted a gallery image in Small Crafts, Boxes, Picture Frames, and Lighting
From the album: Scrappy spruce shelf
What becomes the shelf is being coaxed flat with lead weights. -
2022 05 spruce side shelf 6.JPG
Woodman posted a gallery image in Small Crafts, Boxes, Picture Frames, and Lighting

From the album: Scrappy spruce shelf
Left oblique profile, we see the provenance of the wood. Here the modern hook I used, with an authentic c.1927 nickel-plated brass bath hook before it. I'll likely swap hooks at some point. Maybe . . . -
2021 12 spruce side shelf 5.JPG
Woodman posted a gallery image in Small Crafts, Boxes, Picture Frames, and Lighting

From the album: Scrappy spruce shelf
Done for now . . . The pine strip was a mistake, as it took BLO differently than the old spruce. After the brackets were added, the shelf went into the rafters until I could reconcile the finish mismatch. The issue was eventually resolved. With fresh burr, I scraped everything. Spruce, pine, off with the boiled linseed oil on the spruce, the varnish touchup to the pine, back to flat. -
2021 12 spruce side shelf 3.JPG
Woodman posted a gallery image in Small Crafts, Boxes, Picture Frames, and Lighting

From the album: Scrappy spruce shelf
Planing a strip of wood for reinforcement. -
2021 12 spruce side shelf 4.JPG
Woodman posted a gallery image in Small Crafts, Boxes, Picture Frames, and Lighting

From the album: Scrappy spruce shelf
-
2021 12 spruce side shelf 2.JPG
Woodman posted a gallery image in Small Crafts, Boxes, Picture Frames, and Lighting

From the album: Scrappy spruce shelf
Nudging and coaxing the top and back into a tight square glue joint with clamps, wedges, weights, and more clamps. -
a little tool chest varnish/BLO/walnut stain. insides are filling up quick. Might just be a decent chest. From a pile of old bed parts
-
Had a request for a coffee table, and thought it was a good opportunity to use some reclaimed lumber and auction finds. The pine top cleaned up from several old boards that came as extras from some walnut I bought at an auction, and the legs came from another auction. The phone image doesn't show the color contrast as well as I'd hoped, but the darker legs really set off the amber of the pine once I was done with the third coat of poly. Will
- 3 replies
-
- 1
-

-
- poly urethane
- walnut
- (and 4 more)
-
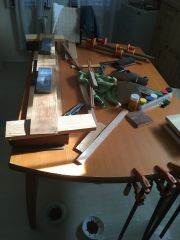
Yesterday I cut out the table top and posted the "how to" here on TPW. Today, we had to make decisions on the design of the apron, pedestal and legs so my sister came over and we chatted about it. I cut an octagonal apron that is 3" high and got the go ahead on it so I don't have to form a circular one (YEA!!!) We also decided on an octagonal pedestal so today, I made a pedestal and here it is. It measures 29 1/2" tall by 10" across. The shape of the four legs has been left up to me but I do know that I have to laminate together four sections of backs from the pews to get the 3 inch oak to cut them from.
-
According to the inventory of the remaining wood stash from the old bed frame: 1 1x6x7' rail in plywood ( soaked) 1 1x 6 x 7' rail might be a glue/lam board, lots and lot of thin plys 1 1 x 10 x7' pine board 2 trim piece from the headboard So, there was just enough for a frame and planel lid. Cross cut to 1 x 6 gl board to just under 34" long, then ripped in right down the center. Front and backs are cut. Cut a section @14" or so long, and ripped it right down the middle. ends are done. Got out the router, and made some grooves. The two short sections needed tenons on each end. Got out the sharpest saw in the shop Hey,it works, ok. A Disston D-8 11 point crosscut saw. Then a chisel to knock off the waste. There is a stop block behind the rail, and another on the end. One to clamp the part to, the other as a stop block for the chisel work. Got all four tenons made. Time to try out some new toys! These just came in the mail a few days ago...REAL Mortise chisels. Since the tenons go deeper than the panel's grooves, time to try these out Another set of jigs. One to clamp the part in place, the other to keep it level in the first jig. Finger clamp to secure things in the jig. I can also raise the parts up, and clamp under them, for the times I need to plane an edge. Chisels worked great, soon had a frame made And NOW I can measure for a panel. I had that 1x10 to bring in to the shop. Cross ut to section to 29" or so. Needed about 13" in width......from a 1 x10??? Ok rip a filler strip to get the width to 13", AFTER jointing a few edges straight. Tried the edges to see which fit which edge, and made a witness mark across the joint. Panel is now sitting ON my benchtop, hogging about every clamp I have While the rest of the parts chill out in a forlorn corner of the shop. LUNCH TIME! Maybe tomorrow, I can make a raised panel, add a frame around it, and add some trim You can barely make out the profile on the trim boards. That old finish needs to go, Stay tuned...
-
This week I'm going to start a project for my sister's church. They are replacing their pews with padded chairs (good choice I might add) but to smooth the feathers of a few members they want to build a 4 foot circular communion table out of a the straight backs of some of the pews. I'm hoping that the backs are solid oak or I'll be gluing some edging. Anyway, I want to put a 3" or so skirt under the top so I need your thoughts. How would you folks do it? I'm thinking about making the skirt about 1/2" thick and kerf cutting the back side to make it bendable. How far apart should I make the cuts? I think I'll inset the skirt about 2" in from the edge so the skirt will be about 44" in diameter. Y'all got any ideas?
-
Last end panel was out of the clamps, so Drill about seven or so counter-bored holes per corner, and try to put this thing together, Seemed to work better on it's top for this part, There is some wood putty that needs cleaned up Once all the corners were screwed together. Added those plastic white feet to the corner posts. Might keep the feet a little dryer... adding a cleat or two to set a floor on. Stay tuned, finish line is in sight....I hope.


