Search the Community
Showing results for tags 'box joints'.
Found 10 results
-
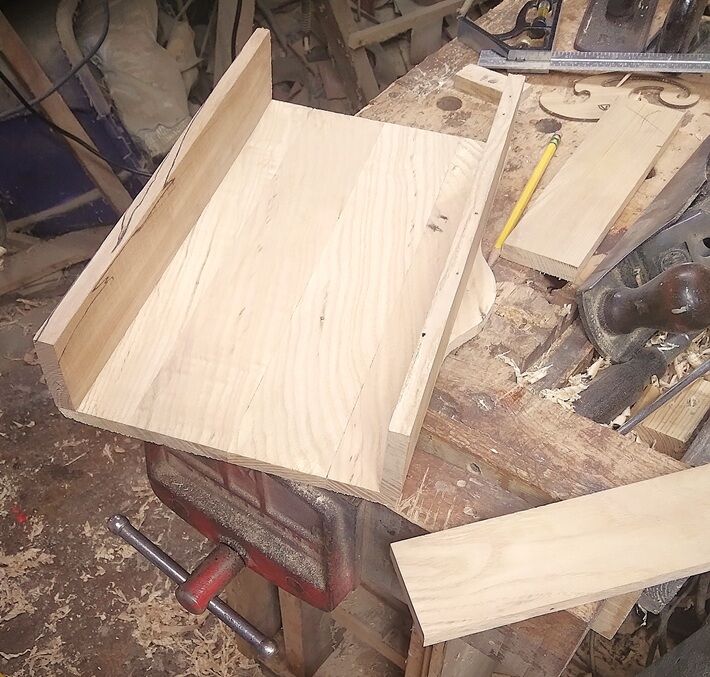
Ok,,teasers are done, for now..been posting snippets for a few days... so.. Had a lot of leftover Ash from the tool chest project...did a lot of resaw work on the leftover scraps...removing bad spots and other junky stuff...settled on working with 1/2" thick parts... There was also a wee bit of maple....one bit of Ash provided enough to glue up a panel.. Wasn't quite as wide as I wanted, so, I added a piece..tried to align the grain across (up?) the panel on all 4 pieces... There was enough "Good" parts.. To give me 2 ends and 2 sides for a box... Needed to clean off the bench.. Then, when the panel came out of the clamps.. A Jack plane to flatten both faces, then.. A No. 704 smoother to finish leveling the lid...checking for high spots, too... Then, I used a side and one of the ends.. Needed to square the ends of the panel, cut the 2 sides to length, and lay out for a finger lift on the front edge of the lid, and bandsaw it.. Which left Part 2...Joinery... Stay tuned...

-
Feeling a little better today and managed about an hour in the shop before pooping out. I decided to try something I been wanting to do for some time and try the box/dovetails joinery system built into the Shaper Origin. No computer work required. It’s all done with onboard software. In keeping with their history the guys at SO made it quick and simple. Had the operator read the instructions a little more completely it would have come out even better. But then again following instructions was never my strong point. Paul
- 11 replies
-
- 12
-

-
- box joints
- maple
- (and 1 more)
-
I built a William Ng Box Joint Jig a few years ago. I was not thrilled with the way you had to adjust the pin, just not accurate enough for me and took way too much time even though William made it look easy. The first thing I did was make a better way to hold the back board to the sled. I drilled a couple of 1" holes and in the corresponding place on the back board I counter bored for 1/4"-20 carriage bolts. I turned some knobs and counter bored for the nut. Now I didn't need to have a clamp in my way when making the box joints and I could adjust the back board very easy. Next I wanted a way to move the back board by a couple of thousands precisely. I took a couple of pieces of 6061 aluminum and countersunk for some deck screws and tapped for a 1/4"-20 set screw. I made sure the screw heads were not past the back board. I used a wing nut and a regular nut to lock the wing nut on the half dog point (flat tip) setscrew. Now I can crack loose the lock knobs and back off one screw a tad and tighten the opposite one and move the back board a couple of thousands. Sure made it easy to dial the pin width to match the dado stack minus glue clearance. I use aluminum but hard wood would work fine but when your a machinist and have a machine shop you can't help using metal. Yes the box joint jig is sitting on my William Ng sled which I use more than I assumed I would. A test box joint. The back board is for 3/8" dado stack and all you would need is another back board for other sizes. The first cuts are on the front and back starting at the bottom. The arrow points to the bottom of the drawer side. The first cut on the sides you reverse the front or back and place it over the pin then make the first cut on the side. Arrows point to the bottom of the drawer side on the left and front on the right. This gives you a perfect fit on the side. By cutting this way you don't have an holes in the side of the drawer from the bottom dado cuts. I just happen to have an unfinished drawer to show how that works. It almost seems like this should go in a general woodworking jigs and fixtures sub section... JT
- 13 replies
-
- 12
-
-

-
- box joints
- jigs
- (and 1 more)
-
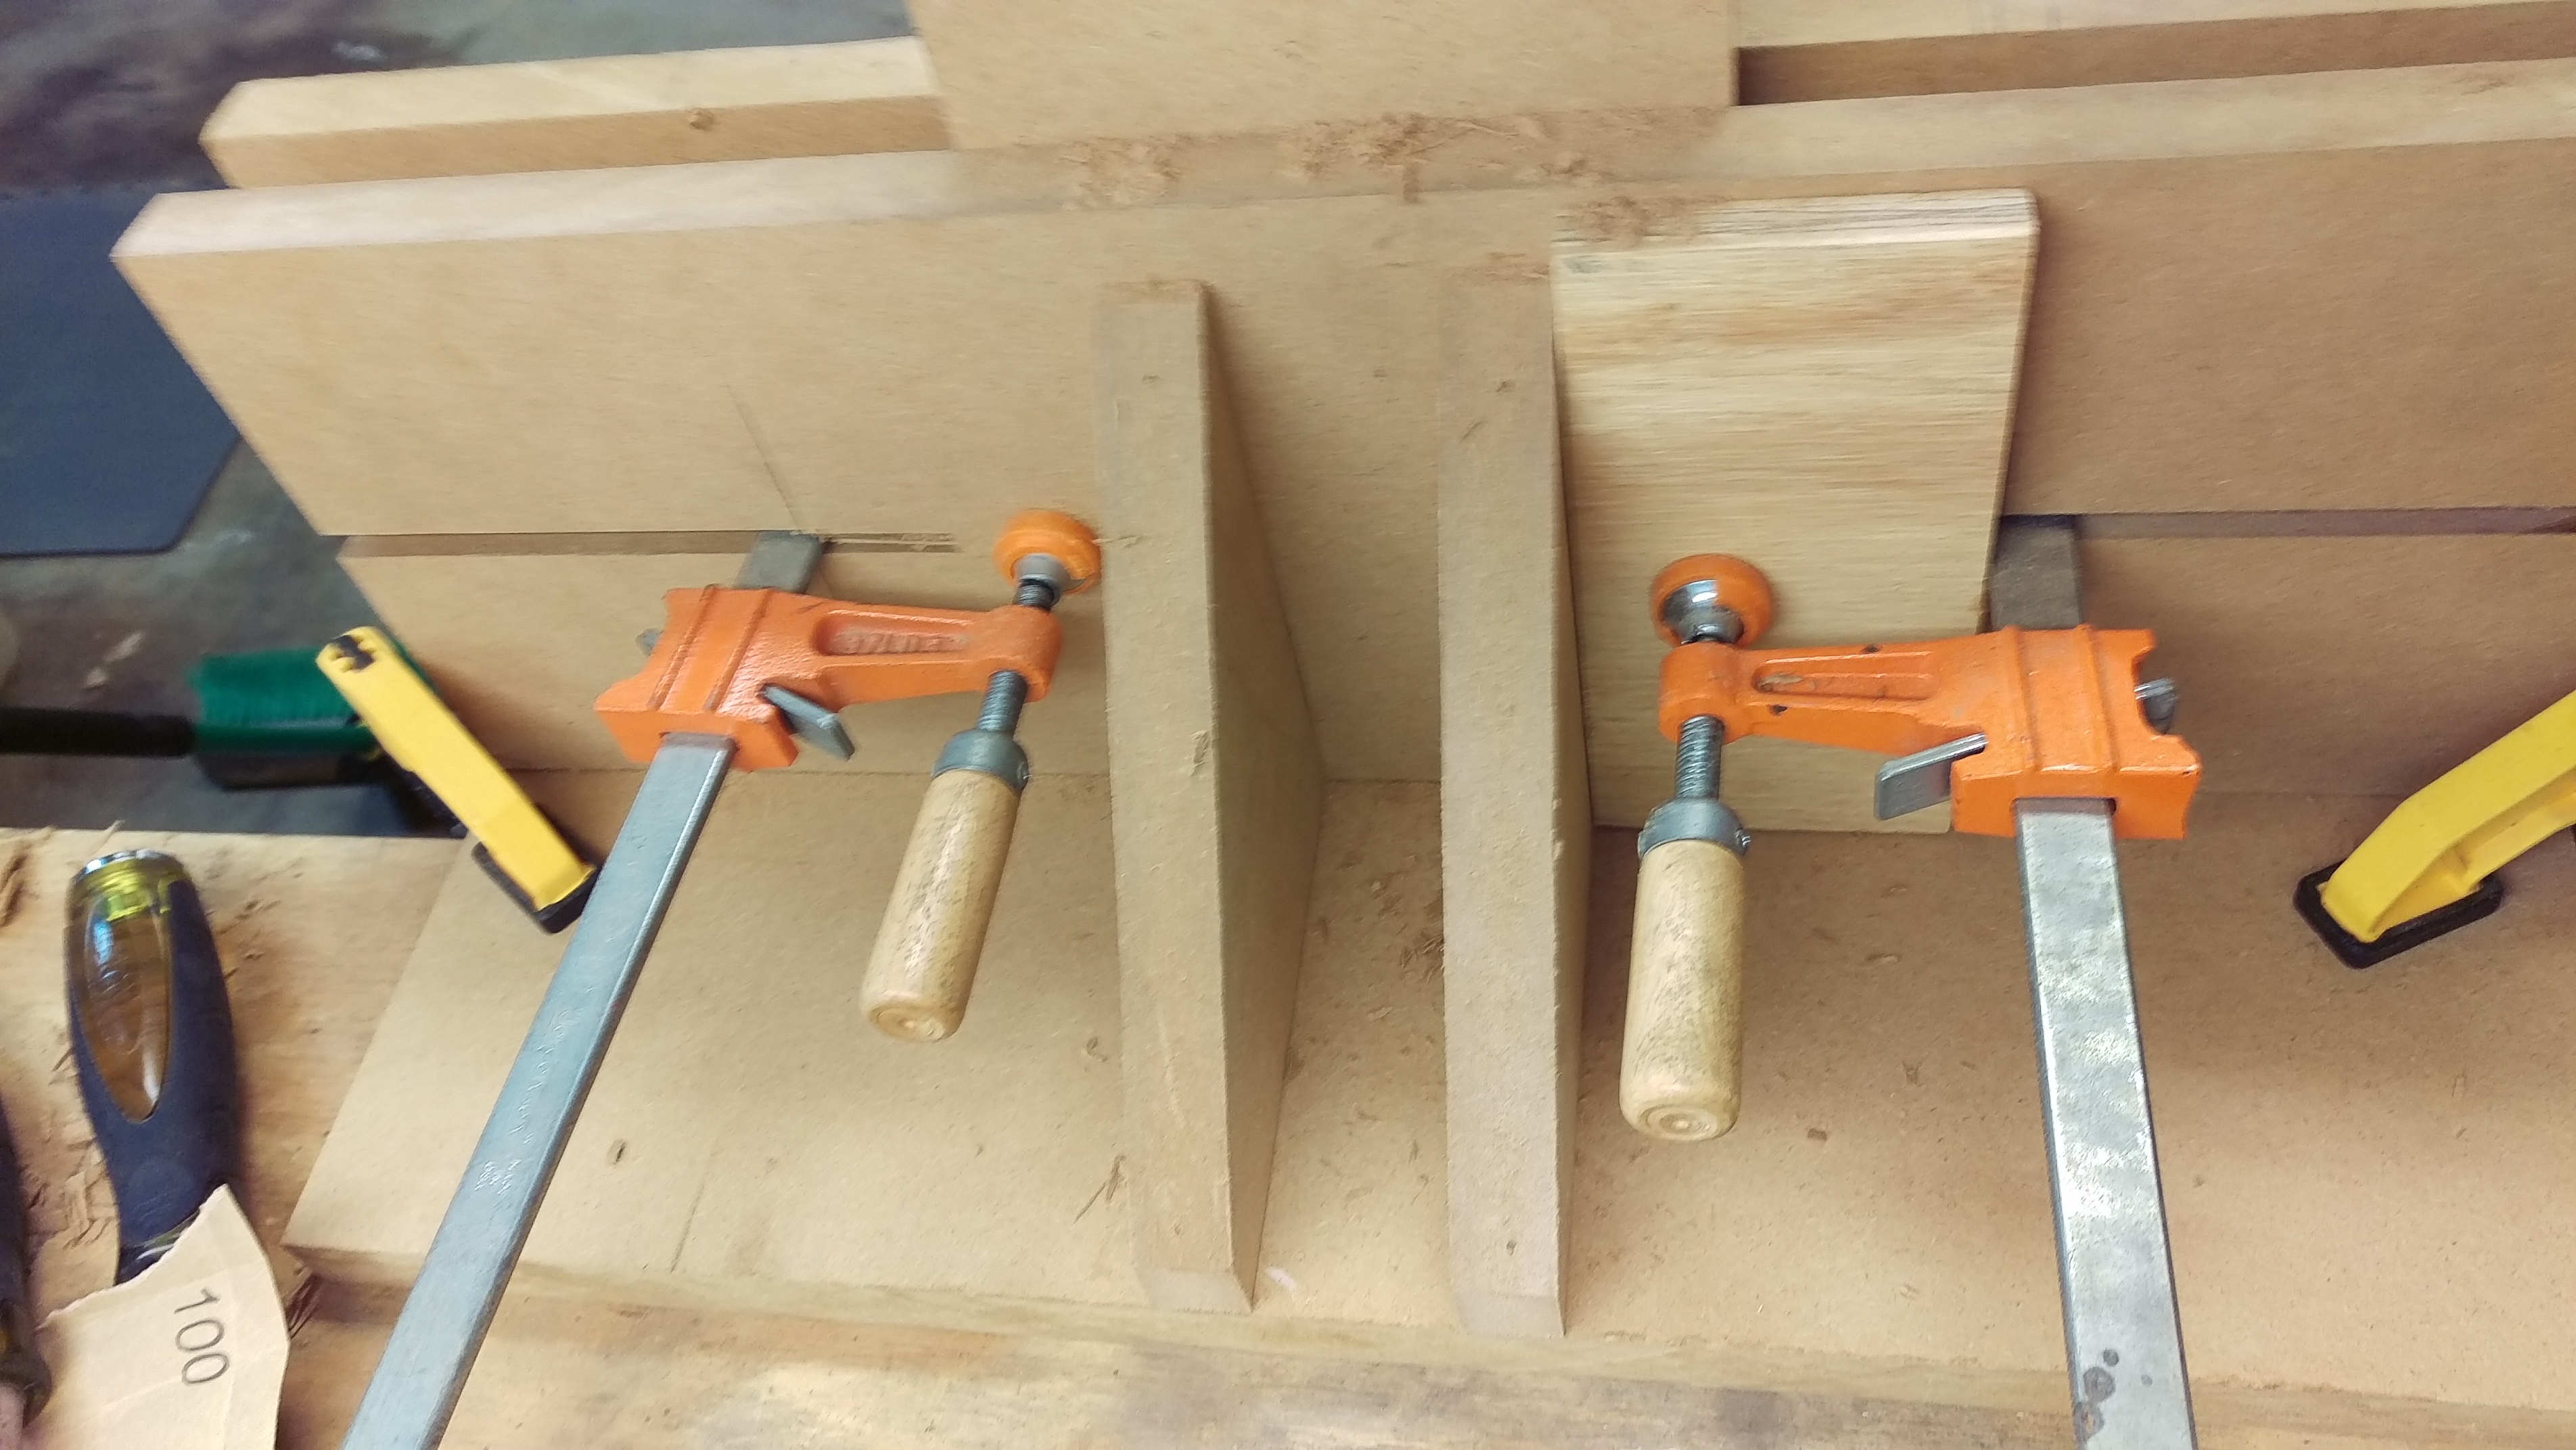
In an odd moment or two, I though there would be a better way to make a jig for box joints rather than the jump over a spacer version that you can use on a router table or table saw with dado blade. I figured if I made a jig with a bunch of guides of the same width and just ran a zero-clearance router bearing router bit down each side, I'd get well-matching finger joints. With that in mind, I cobbled the jig below. Ripped a piece of maple and glued it together, offsetting each side. Stop block at the end and just a piece in the middle to hold it down. You can do two adjacent sides in one clamping. It worked OK, nothing fabulous, nothing failure. I'd rate it a B+ Like most box joint jigs, it's got a fixed spacing, but that's OK, I can make more if/when needed.
- 10 replies
-
- 11
-
-
- box joints
- diy
- (and 2 more)
-
Put the hardware on the totes this morning. One each for two of my grandsons and one for me. Roughly based on Frank Klausz's article in PopWood a few years ago, with lots of thing to be decided by the builder (only went from rough dimensions, and a note that if he made another, he'd make it smaller). and a picture or two. https://cdn.popularwoodworking.com/wp-content/uploads/YourFirstToolkit.pdf Around the edges are spots for screwdrivers, awls, chisels, nail sets, pencils, etc. Inside is a removable till for whatever and can be centered, or pushed to front or back. Realized too late what those little telephone pole thingies on the side were for -- I think it was to lock the drawers in place, but I'm not really sure. I normally make a box a one piece, then cut off the lid. I didn't on this one (but maybe should have) so it took some extra care to make sure the lid was the same size and shape as the base. I guess you can consider this "trash art" because everything except the hardware came from my leftovers and recycled wood stash. When I first started woodworking when I made something from pine I'd always say, "For all the effort I put into this, I should have sprung for a better wood." But I think the pine is traditional, makes the whole thing a bit lighter, and will show the "wear and tear" of a functional life well lived. The bottom has box joints that were made from the router jig that I showed a few weeks ago. The top dimensions didn't work out too well with that spacing, so they are hand-cut dovetails.
- 17 replies
-
- 10
-
-
- popwood
- frank klausz
- (and 3 more)
-
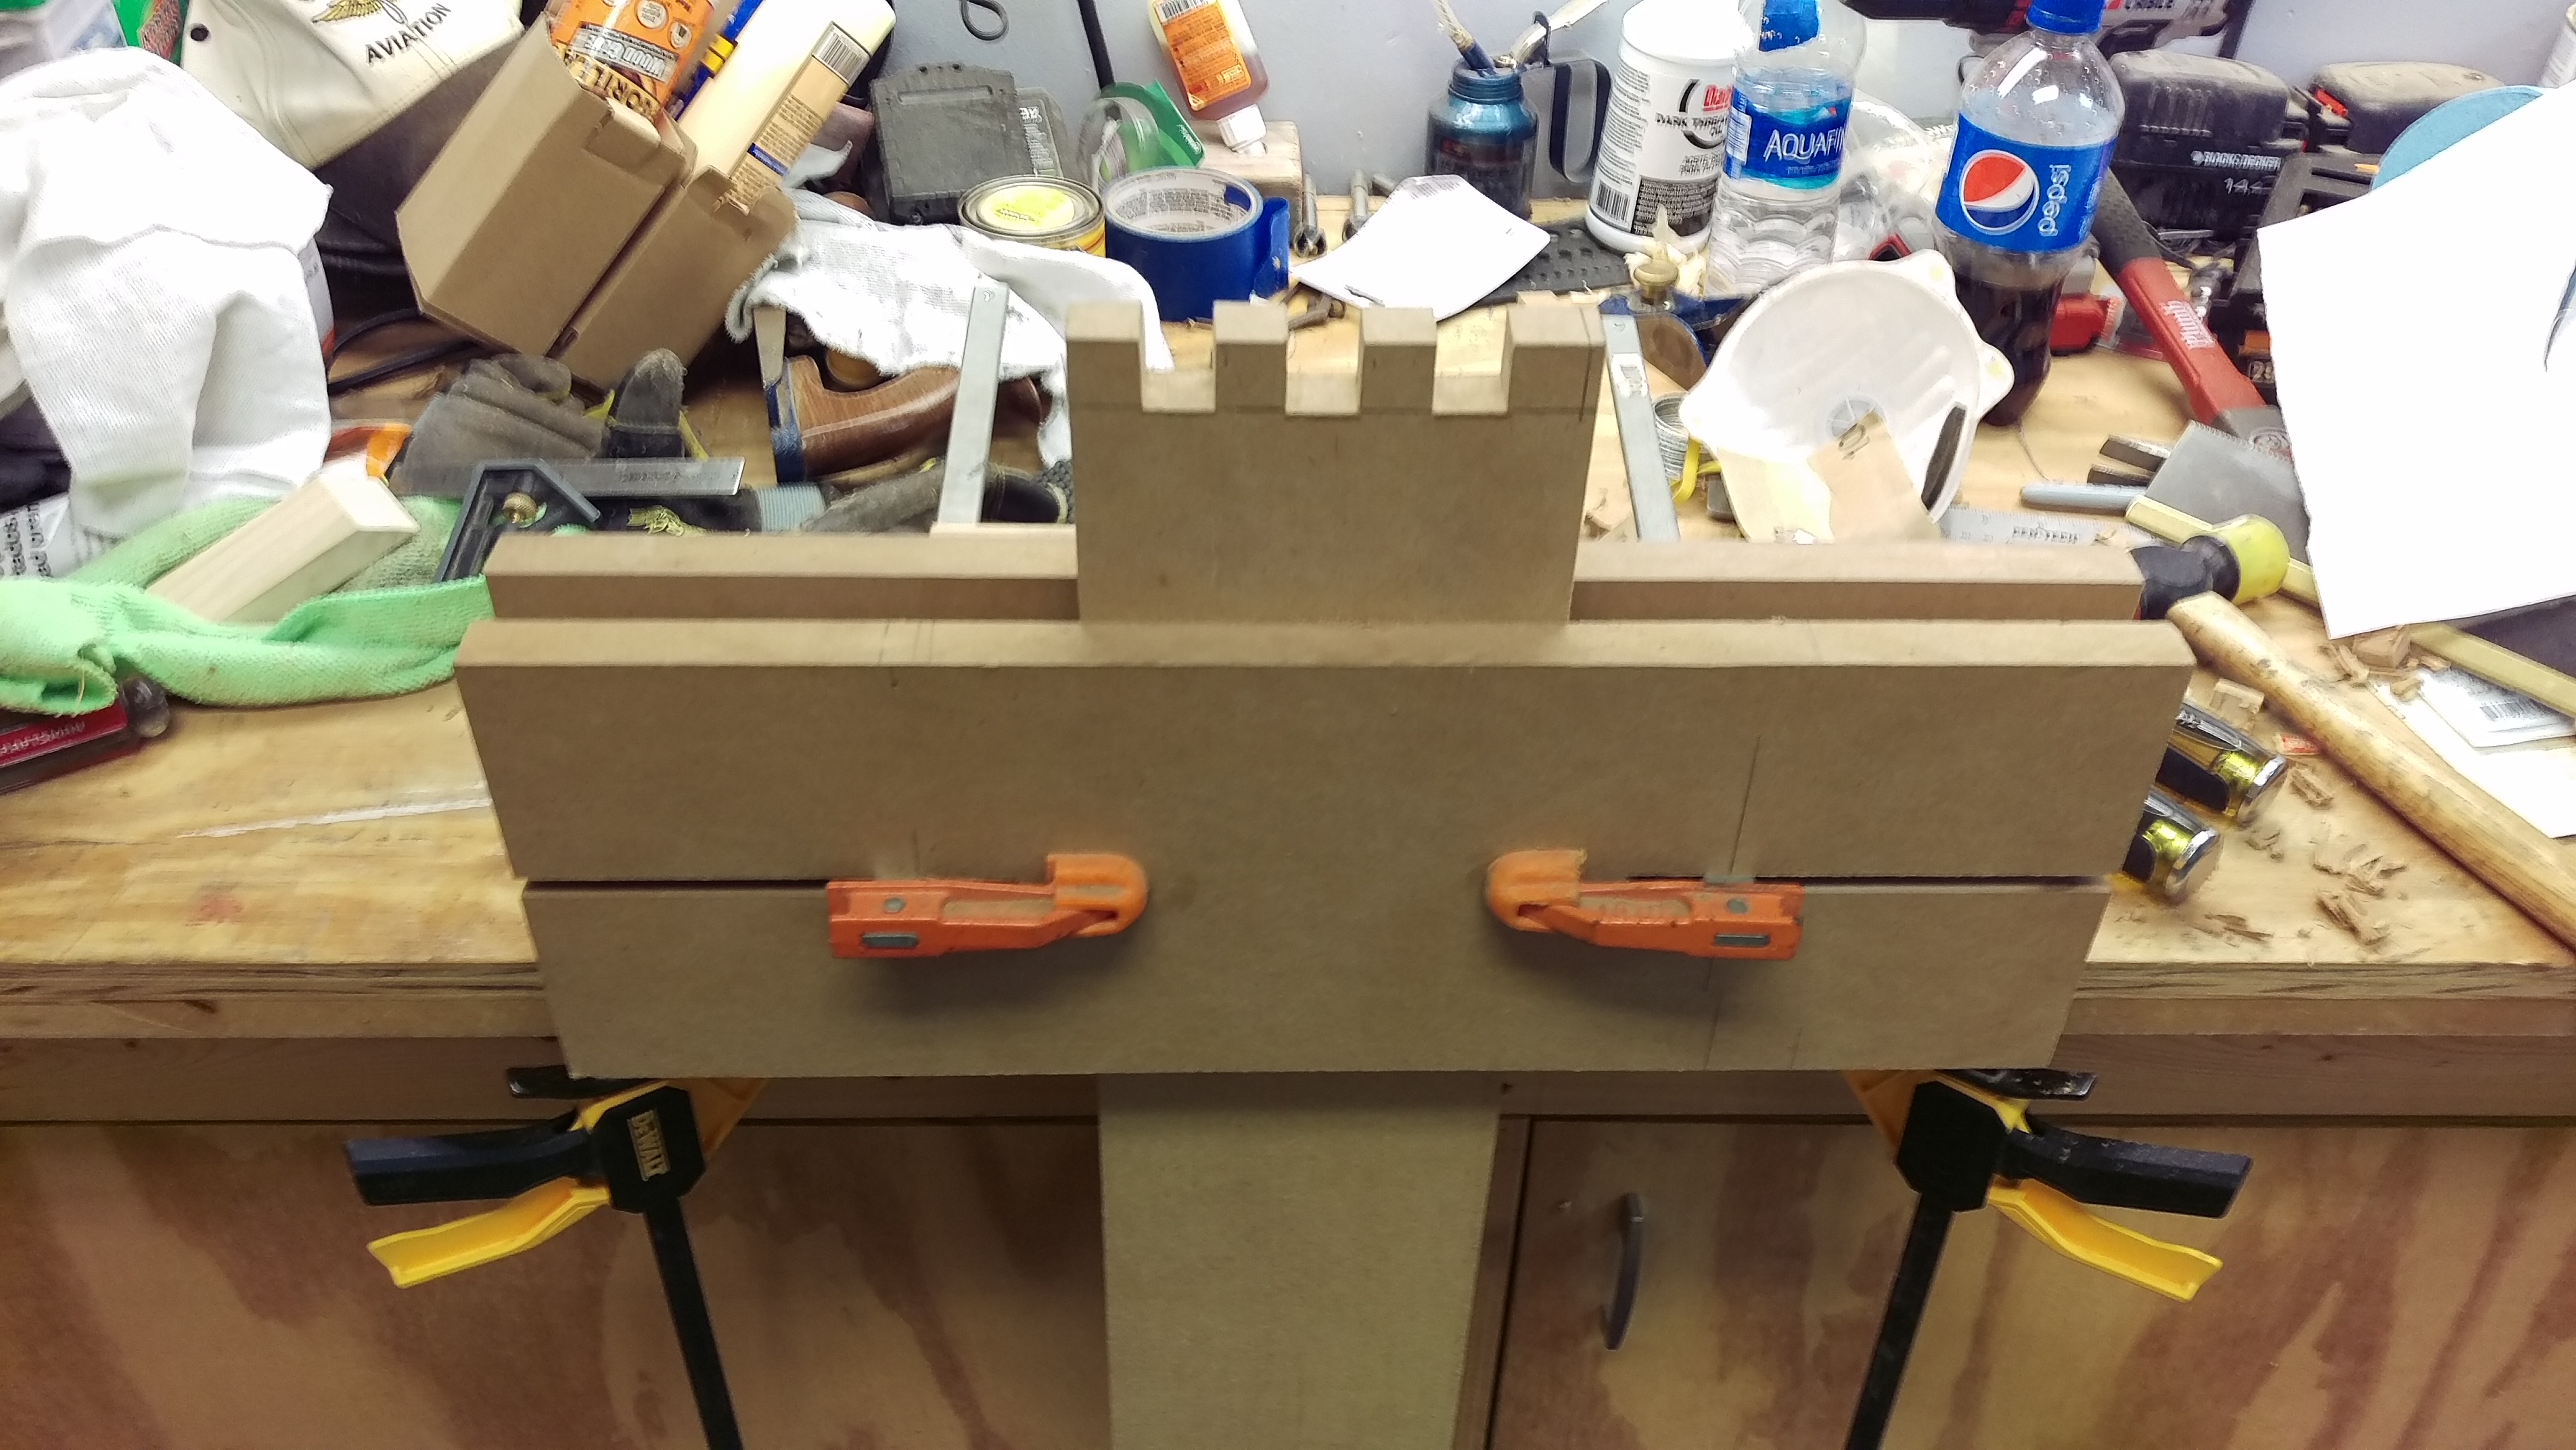
Had a pile of scraps from the last projects. Some of the wider ones needed ripped down a bit for width, as the tablesaw only goes so high... One board had "issues" Bandsaw removed most of the bad stuff... Which left a few good pieces.. I cut the skinny one in half. Set up the zero clearance plywood panel, and then the fence to cut about 1/2" thick slices... Which left a mess of 1/4" thick stuff (0.290" thick)..as opposed to these 0.445" thick parts.. Most of these two stacks were less then flat....leaned a bit from the fence...we have ways.. had two slats, about 2-1/2" wide...somewhere around 12" long....decided to cut them at 11" long, to make the longer sides of a box... And a pair at 6-1/2" long....was trying to get 4 sides all the same width... Had to joint all 4, until they were all alike. There was also a stack of narrow strips...picked out the best of the bunch..5 of them. Jointed the edges, then clamps and glue... And let this sit a day or two....corner joints were next....laid out to cut two ends, by stacking the longer sides together...making sure they matched.. Combo square, and a chisel. 6mm mortise chisel to do the spacings. Start in from the outside edges, work towards the middle....Square marks the line all around. Set to the thickness of the shorter sides. "Drop" the pair down low in the vise, to avoid vibrations from the saw.... Split the lines, or leave them...doesn't matter much..as the matching fingers will be marked from these, once they are chopped out.. Then, turn around, and do the other end the same way...Mark one one as #1, and one end of the shorter ends the same...lay out where to cut, cutting on the waste side of the lines...more line you leave, tighter the fit. One corner at a time...test fitting as I go... Finally, got all 4 corners chopped out.. Which left plowing a groove for the plywood bottom panel to sit in....had to sharpen the #12 cutter, was getting a bit dull, anyway....then set up the 45 And set up a jig, of sorts... Nothing fancy, just enough to hold things steady...to do the longer sides.. Just move two screws a bit....then check for alignment of the grooves... A few pencil lines, to help size the plywood panel....which was a hair too thick, too...we have ways.. Once it was the correct size, a block plane beveled all the edges, both faces.....then sanded the panel, and did a test fit.. No glue, yet. Checking the fit of the plywood, and getting a bunch of clamps set up. hate fumbling around, trying to set up a clamp, with glue running everywhere....so, glue is next.. Then flip this mess over, check the inside of the corners for square...add a couple more clamps....some of which came from the lid blank... Need to clean up the glue-ups...maybe today....once the clamps come off. Need to flatten the lid, too. Stay tuned...there MIGHT be a bit more to this story....than just a plain, old box...
- 44 replies
-
- 14
-
-
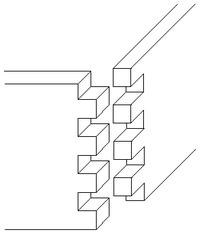
OK, OK, I'll start it. How do you make them? I've made some using an IncraJig and a router table with a straight bit. These worked well. I can probably make them with my SOB dovetail joining jig, but it's so complex, it makes my head hurt every time I use it . There was a video a couple of years ago about how to set up a guide on a table saw and dado blade. I used it once and it worked well and with little fussing. The idea was you set up an auxiliary miter gauge fence with a key that just fits the cut. Then use that key to offset the fence from the machine's rip fence. I tried it recently on that sewing machine box and by the time I got twenty or so cuts, the cumulative error was enough that it didn't fit all that well. My dado set up was not a precise fractional amount, I think. I have some friends that made a jig that you wind a threaded rod with a nx16 thread so that every turn advanced the guide 1/16" I don't make them often enough to justify a couple of days making a jig. And I call finger joints and box joints the same thing. Apparently, Stick does not. ?
- 12 replies
-
- 3
-
-
- finger joints
- box joints
- (and 1 more)
-
I think this was a project that I got done during the blitz last year. Wife's sewing machine (well one of 8) is the one she takes out every week to a "sewing bee." It's a Singer Featherweight, ca. 1940 and is light and compact. Does a great job on basic straight stitches. Anyway, the old case was getting a bit ratty, so I made her a new one. One admonition, "Don't make it too heavy." So I ended using 3/8" q/s white oak. I tried doing box joints on the corners by my dado blade was not a true, even amount. And by the time I'd made 30 cuts, it had trouble aligning. You know, if you're off 0.0001" per cut, after 30 pins and 30 slots, you'd be off 0.006 and that's enough to inhibit a slip fit. So I put angle supports inside and keys on the outside.
- 22 replies
-
- 13
-
-
- sewing machine
- box joints
- (and 1 more)
-
to quell or to add fuel to the fire er discussion what do you guys say... is this a box joint or a finger joint or both??? and this one.. finger joint only???
-
Nothing exciting just sharing what is on my bench and what is going. I am trying to teach myself woodworking and hand craft. The attached photos are of box joints I am hand cutting. The box joint will be used in a drawer I am making for my table saw to catch the saw dust. In addition to this box joints, I had to make a jug to hold the work. Further, I sharpened up my tools. It is amazing how easy things are when tools are sharp. I sharpened my chisels to 2,000 grit wet-dry.
- 5 replies
-
- 5
-
-
- chisel
- box joints
- (and 1 more)