- 11 replies
Featured Content
Top content from across the community, hand-picked by us.

Workbench Magazine January-February 1968 Kamakura Cottage
This is a scanned document of the now defunct Workbench Magazine of this era. Permission was granted by the new Workbench Publication for The Patriot Woodworker community to copy and use the old Workbench Magazine at our pleasure, and for free distribution and re-use.

- 0 replies
.thumb.jpg.573d1497d0675219908c85aabefd797a.jpg)
Featured by John Morris

A fancy box, a labor of love
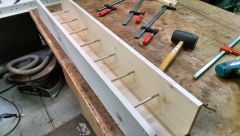
After some fussing yesterday to get it to fit together properly without glue, decided to glue it up today after church, will let it cure all night and do more tomorrow. need to cut the top off, and then add some horizontal corner splines out of wenge and cherry. the vertical splines are of cherry, same wood as the rest of the box. they will get cut off and sanded smooth.
This will be for my wife's, and later mine too, cremation remains. have a plot purchased, and a marker stone ordered.
This will be for my wife's, and later mine too, cremation remains. have a plot purchased, and a marker stone ordered.


- 32 replies
Featured by John Morris

- 0 replies
.jpg.c3dfc4e4595b81b6b62b297a9bc7044b.jpg)
Wedge Tenon Rocker Arm
While shaping the tenon down to fit in the through mortise at the arm of the rocker, I shaped it down a tad to small, but fortunately I was going to fit the joint with a wedge tenon anyway, so that alone took up the gap and and made it right.
- 0 replies

Workbench Magazine March-April 1968 Primitive Carving
This is a scanned document of the now defunct Workbench Magazine of this era. Permission was granted by the new Workbench Publication for The Patriot Woodworker community to copy and use the old Workbench Magazine at our pleasure, and for free distribution and re-use.
- 0 replies
Featured by John Morris

Goodell Pratt decal
I have acquired this old Goodell Pratt #7 breast drill. Obviously it needs some restoration. Problem is ... it still has a remnant of the original decal, and i would like to either retain it, or better ... replace it. I have searched the web, no luck, and i have posted the question on other forums. Does anyone know where i can find a replacement decal?


- 8 replies
Featured by John Morris

Tenon Cutters and Reamers
I am tooling up for Windsor chairs and this craft requires a few tools I don't have. In the image are three tenon cutters, or for you UK folks "rounding planes".
These tools came as a set, a leg tenon cutter, an arm-stump tenon cutter, and a 1/2″ spindle tenon cutter, plus one six-degree reamer and one 5/16″ dowel plate.
These tools are specific to the Windsor tradition but of course can be used for a wide variety of work, I am beyond ecstatic to have these on my work bench, they feel great, works of art within themselves. They'll be a pleasure to use.
Thank you Elia for making these wonderful tools available to us, can't wait to use them!
- 0 replies

Workbench Magazine March-April 1968 Mobile K-D Cabin (Part 1)
This is a scanned document of the now defunct Workbench Magazine of this era. Permission was granted by the new Workbench Publication for The Patriot Woodworker community to copy and use the old Workbench Magazine at our pleasure, and for free distribution and re-use.
- 0 replies
Featured by John Morris

Media stand - Cherry, Curly Koa, Curly Maple
This is a project I began about a year ago and recently completed so I figured a video was in order. Gotta' warn you this is a long video but it includes almost every step of the build process, including mistakes, midstream modifications, design changes, etc. Since the video is so long I have attached a few photos of the completed stand. Enjoy!


- 16 replies
Featured by John Morris

Segment Jig
I built what I thought was the ultimate segment jig only to figure out it was not accurate enough to make perfect joints. So after some deep thought sitting with the hens and sipping on a nice German beer it hit me square in the head what the issue is. The angle can be slightly off if you cut the segments correctly then the complementary angles cancel each other out. I modified my segment jig by removing the first angle guide and making the second on big enough for some Destaco clamps.
First I trim one to the angle
Then I use a scale to set the length to my stop jig
The stop jig overlaps the base so I put a bit of scrap under to lift the scale up
After setting the fence to hold the stop jig in the same place each time I flip the part and set the cut and mark the right edge with an X
Ready to cut a segment
When you assemble the segments the X goes to a blank and the angles are perfect, only a rubber band is holding the segments in place. For glue up I use a hose clamp.
I'll add my segment calculator tomorrow in three flavors, excel, open office and a debian install deb.
JT
- 7 replies

Elbo 2 Hollowing System
Elbo 2 Hollowing System review. I purchased this tool from Tim Yoder via his website. Specifically this is the Advanced model. They are currently in stock.
Tim was great to work with and put my name on the waiting list as they were out of stock when I ordered. He was responsive and answered all of my questions before and after the sale.
The tool is #25 of nickel plated cold rolled steel. I can only describe it as heavy duty and ready for anything. I had some doubts about articulating arm tools centered around torque on the arm. This tool performs admirably with no noticeable deflection. It was very easy to setup and use. I tested the tool on a piece of knotty dry figured pecan. Cuts were easy to achieve with only finger tip control and there was little to no tear out observed.
Boring bar is 3/4" and accepts 3/8" round shank or 1/4" square cutting tools. In the future, a nice addition would be a dual use boring bar so that we could use a straight cutter on one end and an angled cutter on the other. For now there is only the straight option available. The kit included 2 HHS cutters 1/4" and 3/16". I was able to quickly and easily sharpen the cutter after use on the Sorby Pro-Edge using an 80 degree setting on the platform. A carbide tool is available from Hunter tool systems.
One of the reason for choosing this tool over a captured bar is fitment on a short bed lathe. It comes with a universal bed mount and an ingenious angled under bed bar that will fit any lathe. It also comes with a stop collar so that the hight adjustment is repeatable.
The laser arm is also very easy to set up and use. The design is remarkable in two ways. The wire runs inside the arm protecting it from the spinning stuff. Secondly, there is a very easy to adjust laser mount included. In the future, I would like to see a ball bearing detent on the laser mast to help align the arm. The laser seems high quality and has a narrow beam.
Also available on Tim's website are storage hooks. This makes it easy to store the tool away when not in use.
.40
- 3 replies
2018 TPW Gathering
On Saturday, August 25th, Patriot Woodworker Fred Hargis hosted a meet and greet in his new shop in Wapakoneta, Ohio. These are pictures from that day. In attendance were Our host Fred Hargis, Ducksoup (Bob Prochak), Michael Thuman, The Bandit (Steve Newman), GrandpaDave (Dave Zimmerman), kmealy (Keith Mealy), Irish Woodcarver and his wife (Bob and Louann Phelan) and Patriot Woodworker Administrator Ron Dudelston. HandyDan (Dan Hunkele) was there in spirit and donated gifts and TPW Administrator John Moody joined via FaceTime.
We would like to thank our sponsors Woodcraft, Laguna Tools, and Easy Wood Tools for their generous donations of door prizes and take home gifts.

- 2 replies

Reparing a Settee Ball Foot
Awhile back a customer of mine asked me if I could restore, or do a complete makeover of a settee he purchased off of eBay. The settee was from the early 1800's and he wanted the entire piece stripped, gone through, new rails fabricated, and various repairs. The settee had gone through a life of abuse, and it ended up with a thousand holes in it, upholstered with some gosh awful tweed fabric, actually layers of upholstery ended up on it, and long story short, it was a mess, and he wanted a new settee. About the only thing he really liked on it, were the legs, and the beautiful curled maple they were made from.
Later I will show a photo montage of the entire project, but this story is about how I repaired a seemingly destroyed balled foot. My customer wanted me to just cut it off, and make all the legs the same size, I told him I could save it.
The image below is how the foot looked when I received the settee in my shop. As you can see there was hole in the center of the foot, that was to accommodate casters that were on all four legs. The hole for the casters weakened the ball foot and it finally gave way, cracked and just sheared off.
The next image is after I stripped down the entire settee, and started in on the refinishing process. I know I know! That lovely patina, gone! It tore me up to sand it out, and take the project down to bare wood again, but hey, I was getting paid to do a job.
So at first look, it does look dismal, but I knew there was hope for this leg, I could save it! I've seen worse!
So I set about to paring away at the damaged wood with my Marples chisel, I was not worried about shaping the leg repair to be a perfect 90 degrees to accept the repair block, because I knew I had a trick up my sleeve to make the final fit, just perfect. I pared away at the ball foot just so the repair block fit reasonably well. I used Maple, and I tried to get a good matching grain orientation as you'll see in the images below.
The trick here is once you get the fit close, use a piece of sand paper to bring the fit to final. Do not fold the paper in half, this will only distort both sides of the fit as you pull the sandpaper out from between the repair block and the piece to be repaired. Each time you must insert the sandpaper in between the two pieces, then as you apply pressure to the repair block, pull the sand paper out. After time, and with a bit of patience, the sandpaper will have created a custom perfect fit including matching any valleys or highs, or uneven shaping of the repair area. The repair block will conform to the odd shape of the piece to be repaired. Keep inserting the sand paper, then pull out, over and over. The fit will materialize.
And you'll have a perfect fitting repair block.
Finally, time to glue up the repair block.
After the glue set up, I then commenced to paring away at the repair block to rough it in close.
My Marple 1" chisel worked beautifully for this task. I almost have her ready for final shaping.
After I got it close, I shaped the repair block down to match the existing ball with shoulder as well. note the grain orientation.
To bring the repair block to final shape, I used a file and then I blended the repair in with 220 sand paper, and it turned out pretty close to the original shape.
This was a successful repair, it took all of an hour to get it all wrapped up, and we got to save the other three legs, remember the customer originally said to just cut this leg down and the rest as well to match, I would not!
Later I'll show some images of the final restoration, you cannot even see this repair, it looked splendid after all was said and done. Cheers!
- 35 replies
- 0 replies


- 0 replies
Featured by John Morris

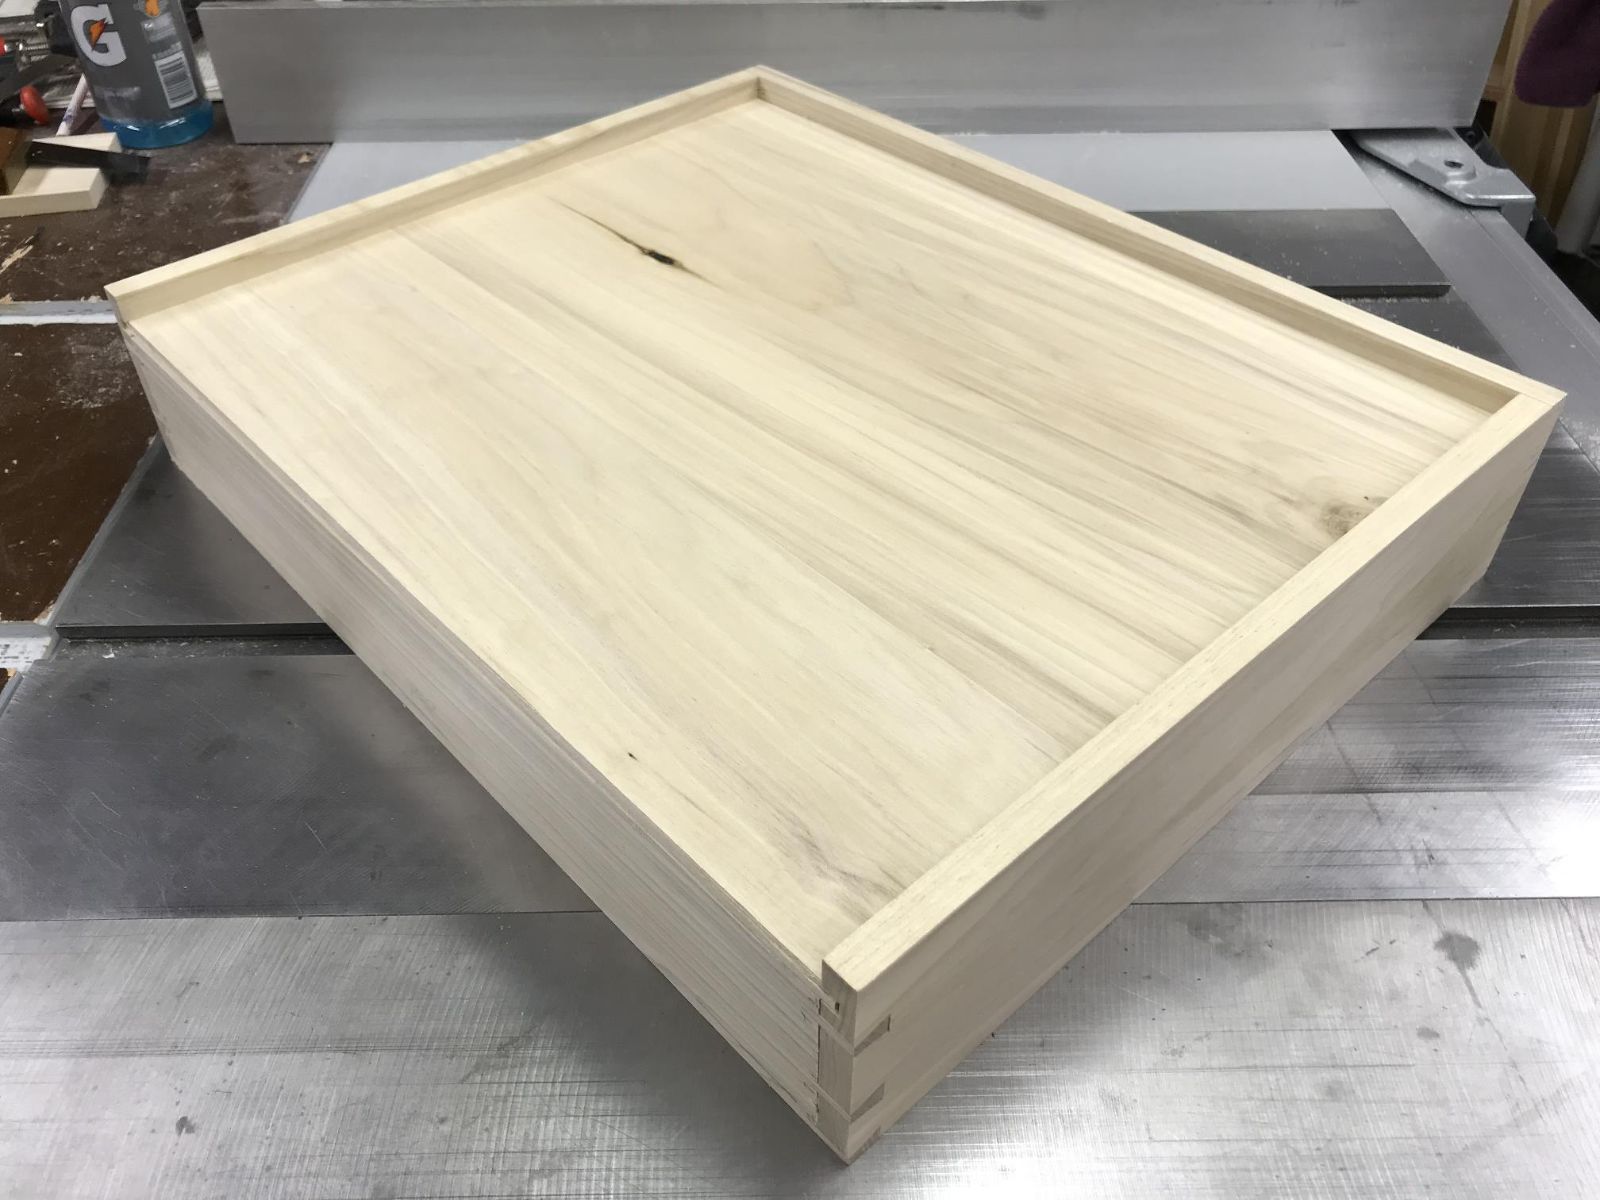
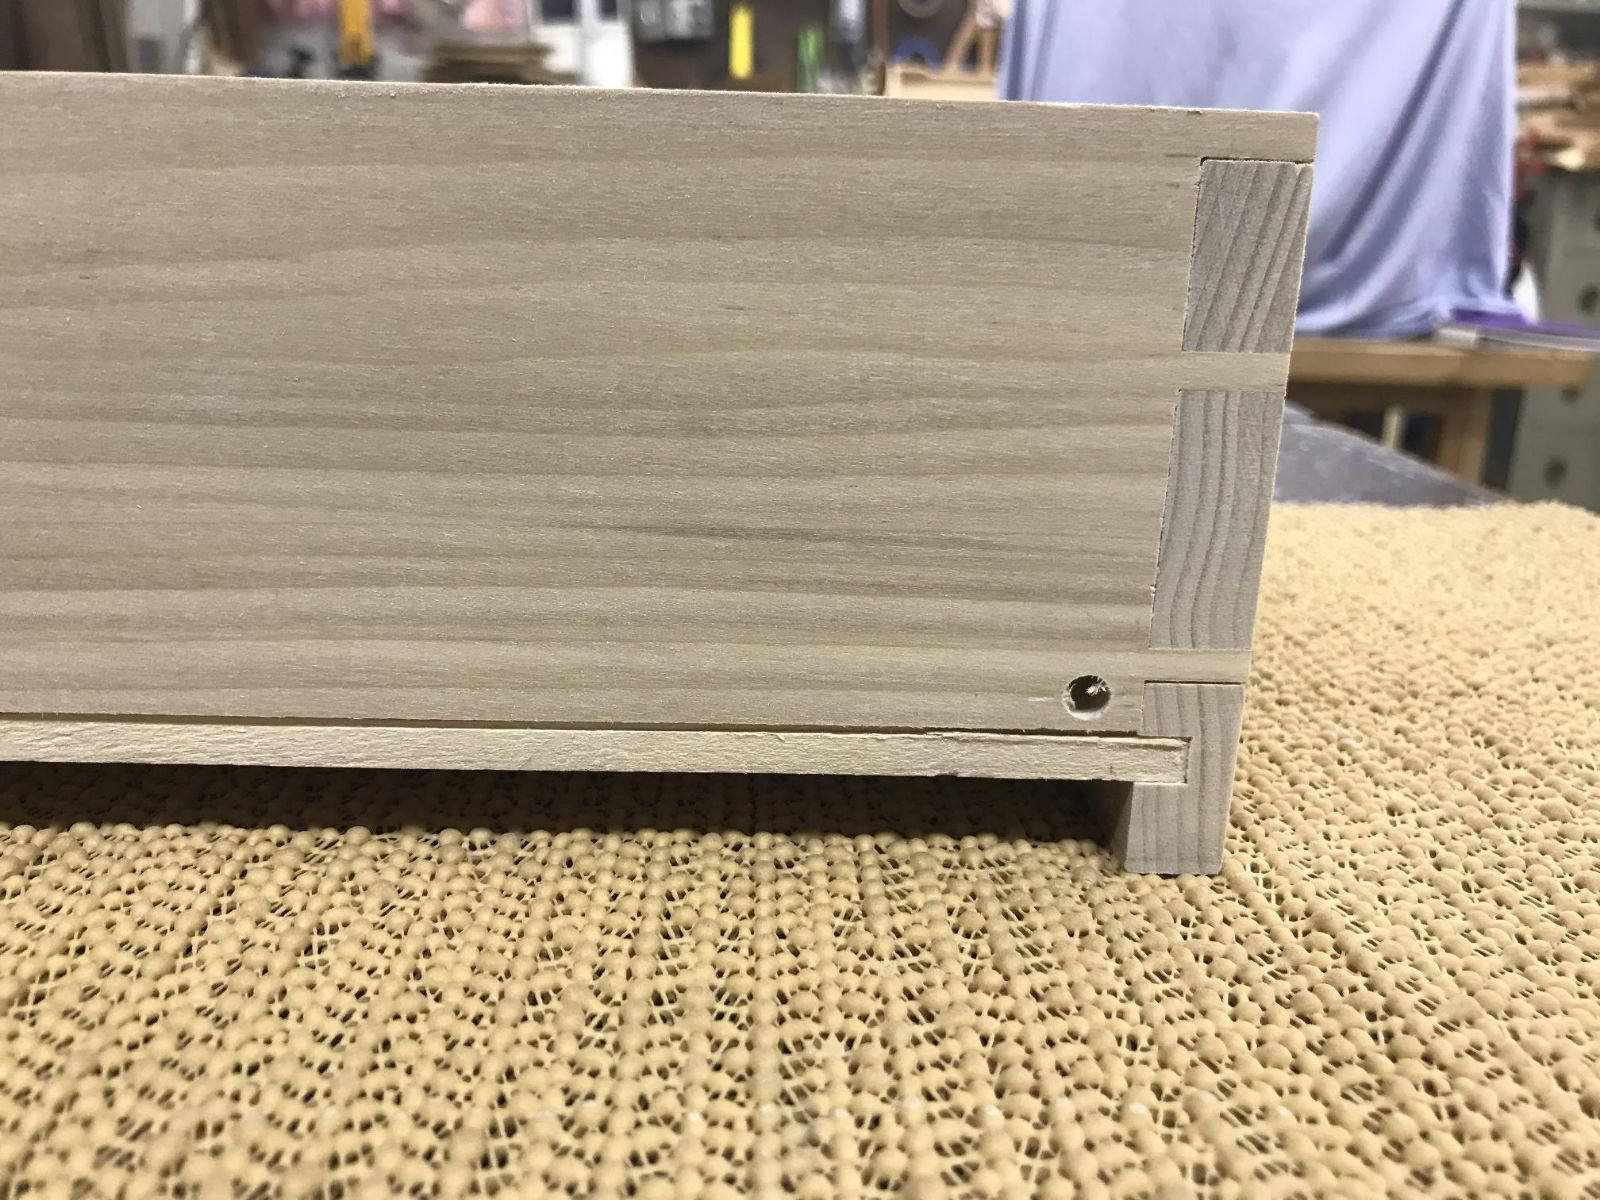
Table saw made dovetail joinery for a drawer
I thought I would try making TS cut dovetails. I used a special grind (10-deg) TS blade, an Incra HD 1000 miter gauge, and a flush trim router bit. I made a sled which attached to my miter gauge. Using a marking gauge, I laid out the tail height on a sacrificial board a smidge higher than the material thickness, tilt my TS blade 10-deg, and raised the blade to the desired height. I ganged my L/R drawer side boards and cut the tails simultaneous.

- 6 replies
Featured by John Morris
The Moulthrop Family Turning Video (PBS Craft In America)
I have watched this episode many times and I still love it. About a minute in is when the spotlight on the Moulthrop family begins, and what a family! I am amazed at the turnings the patriarch of the family created, and the younger is an absolute genus with his turnings. My favorite is the sticks in the bucket with epoxy he does, then turns the blanks to create these incredible multiple species turnings.
Take a look at the video, and have fun.
Craft In American Video (Moulthrop Family of Turners)
Click on the image below to go to their studio website and enjoy.
- 7 replies
(Furnishings)Workbench Magazine January-February Early American Rocking Chair
View File
Workbench Magazine January-February Early American Rocking Chair
This handsome Boston rocker is an ideal project for the lathe enthusiast, requiring many hours to turn the various spindles, legs and stretchers. A hard, dense wood such as birch or maple should be used for the rocker, as the strains induced by the rocking require strong wood and tight construction. Start construction by making the saddle seat, edge-gluing stock 1" thick, also using dowels to reinforce the joints. Locate the dowels near the lower surface ofthe glued-up plank, so they will not be exposed when you cut into the plank to create the seat depression.
Source:Workbench Magazine Jan-Feb 1968
Submitter
John Morris
Submitted
11/12/2022
Category
Furnishings
- 3 replies
(Furnishings)Workbench Magazine January-February Danish Inspired End Table
View File
Workbench Magazine January-February Danish Inspired End Table
Quote
Simplicity of design and ease of building are the charms of this little table. Four legs, four stretchers and a top, and you have a table. Although a bandsaw was used to cut out the original, a jig or even coping saw could be used. The graceful modern design will go well with almost any style furniture, but the table was designed to complement the Danish Chair and Rocker Set from plans in the Nov-Dec., 1965 issue.
Source:Workbench Magazine Jan-Feb 1968
Submitter
John Morris
Submitted
11/12/2022
Category
Furnishings
- 0 replies

The Patriot Woodworkers with Operation Ward 57 Adopt a Wounded Warrior Family for the Holidays - 2022
Introduction
Every year The Patriot Woodworker's adopt a Wounded Warrior or Gold Star family for Christmas. We do this through a great veterans support organization named Operation Ward 57. The Patriot Woodworker's submit an application to Ward 57 to be accepted to receive our family for Christmas, and each year we are chosen to participate. And each year, our sponsors donate wonderful items for us to giveaway for this cause. We use 100 percent of your contributions to purchase gifts for the kids, and a Christmas dinner for the family and to fund related project expenses such as shipping fees for gifts.
Every year The Patriot Woodworker's adopt a Wounded Warrior or Gold Star family for Christmas. We do this through a great veterans support organization named Operation Ward 57. The Patriot Woodworker's submit an application to Ward 57 to be accepted to receive our family for Christmas, and each year we are chosen to participate. And each year, our sponsors donate wonderful items for us to giveaway for this cause. We use 100 percent of your contributions to purchase gifts for the kids, and a Christmas dinner for the family and to fund related project expenses such as shipping fees for gifts.


- 48 replies
Featured by John Morris
.JPG.5298edc9d642af0fa2310f3458d24715.JPG)
Ash Mallet is Done!
The finished mallet at the right, and my two roughs waiting in the wings on the left. I put a very heavy coat of Watco Danish Oil on and wiped off.
- 0 replies
Featured by John Morris

2022 W38 longleaf crafting
Typically I'll collect and mill / plane / scrape pieces until components are collected for several assemblies. Then lay out the table the night before. Tidy piles of parts. Glue. Clamps. Scrapers & chisels. Come first light, with hot fresh coffee, work until I'm out of clamps.After hearing my priorities are skewed, I reflected to resolution. And ordered more clamps.
- 0 replies