Search the Community
Showing results for tags '2-cents'.
Found 9 results
-
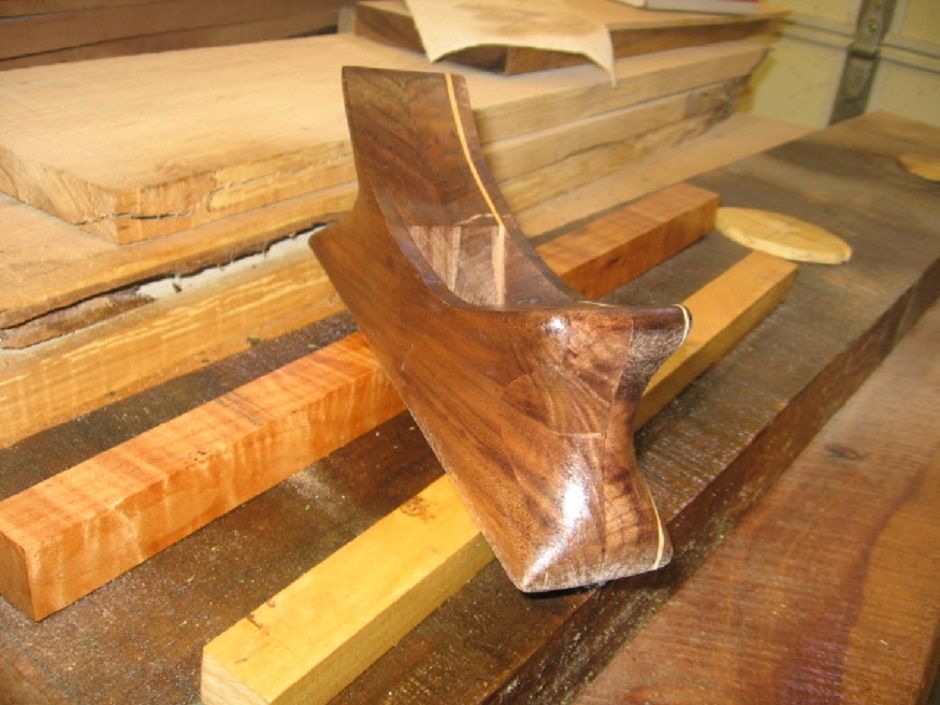
Here is my latest creation in my wooden plane creations. Black Walnut, Holly racing stripe. Shellac Finish Herb

-
I glued up the wooden blocks yesterday for a new plane mock-up. Today I shaped it. It has a coat of shellac on it to see if there are any humps or bumps I need to sand out before I finish it. Here are a couple of boring pictures. Herb
- 17 replies
-
- 8
-

-
- plane
- wooden plane
- (and 1 more)
-
I got to thinking that maybe since I had a couple of plane blades left that I would make a couple more planes. This time I used some Russian Birch Plywood scraps I wanted to use up. Russian birch is not as good of a grade as Baltic birch, but there was a time not so long ago where the Chinese had bought up all the BB and we couldn't get any, so the lumber yards here stocked 4X8 sheets of Russian birch. Also I had a piece of Purple Heart that I have been trying to find a project to make out of it. I found out one thing when I finished the other planes I gave them a coat of shellac and sanded off the grain, then another coat of shellac and then went to the water based Acrylic 50/50 mix. On the purple heart plane I didn't want the yellow in the shellac messing with the purple color, I wanted that purple just like the raw wood. So I decided to seal it with the WB Acrylic. Big mistake , it turned the purple heart a dark greenish black , like swamp mud. so after messing with it,I finally sanded it down to raw wood and put 3 coats of shellac on it. Herb Herb
-
As I posted in another thread I have started making 18-20 wooden block planes that I made 4 several years ago copied from a Wood magazine. Since I have a presentation at our local WW club, I plan on giving a presentation on how to make these. I figure if I give each member that comes to the meeting one of these to hold and examine while I go through the steps of building one, it might be more clear in their mind how to do it themselves. And they might not fall asleep during the presentation. Yesterday I showed the blocks glued up for the bodies, and the one I am using for the pattern. The next step was to roughcut out the 1/4" thick sides and sand edges to finish size. After they were sanded close to size I cut the blocks I had previously glued up 4" from the heel of the plane to the mouth of the blade slot on a 45°angle. The cut-off is then turned over and butted up tight to the heel piece,thus creating a "V" for the plane blade to rest in. and the sides are glued on to hold the assembly together. It takes lots of clamps to dlamp these up , I ran of two planes short and had to wait to finish the final two.
- 56 replies
-
- 14
-
-

-
Have you ever seen this technique for applying paint? https://www.youtube.com/watch?v=enFSoiCo-lA&feature=youtu.be Herb
-
The story behind this little "What is it", is that I had this 1/2 log piece that came with the lumber stash,pic1. I didn't know what kind of wood it was so I cut a about 6" off the end to clean up and see what I had. It turned out to be Maple. I didn't want to just throw away the piece so thought I would make a band saw box out of it. So I cut the bottom off, cut out the center, glued up the sides and reattached the bottom. The cut on the bottom looked ugly so I made a molding and then made some feet for it and called it a desktop pencil holder. The finish is 2 coats of spray shellac, and 6 coats of water based poly thinned 50/50 with water. I did stained the base/feet ,because it looked better next to the bark. Herb
-
Here is a downdraft box I just completed today.
-
Here a month ago I went on a hunt for a good countersink. I I settled on one for an aircraft tools company Brown Tool Co. https://www.browntool.com/Listview/tabid/344/CategoryID/62/Level/a/ProductID/219/Default.aspx I used it today for the first time and it did what I expected of a good countersink. It took a few minutes to set up for depth, but after that it did a nice job. No whirling rim to mark up the work. It is a countersink only, have to dill the holes first. Can be set to counter bore for plugs too. Herb
-
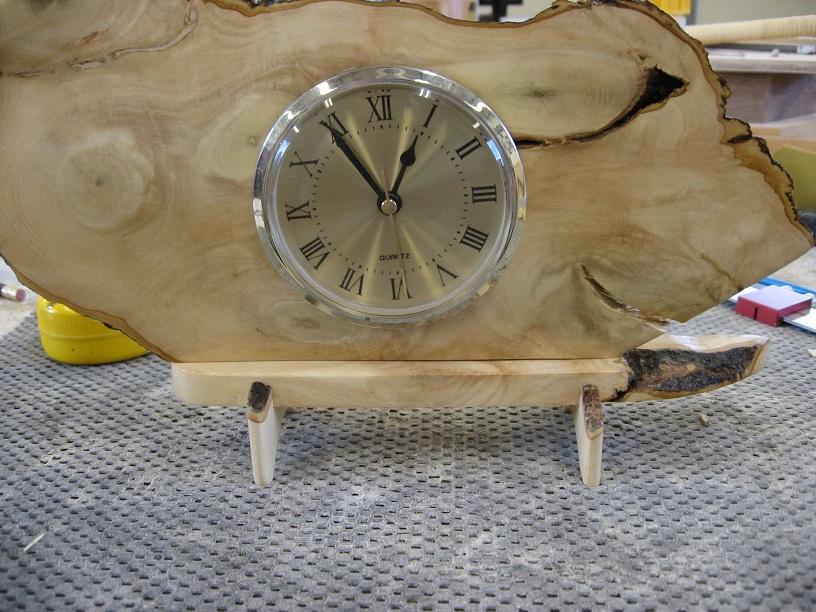
There are 4 different ways to mount the colck top on the base, which do you think is best? Herb
- 17 replies
-
- 2
-
-
- holly wood
- ckock
- (and 1 more)