Search the Community
Showing results for tags 'tutorial'.
Found 20 results
-
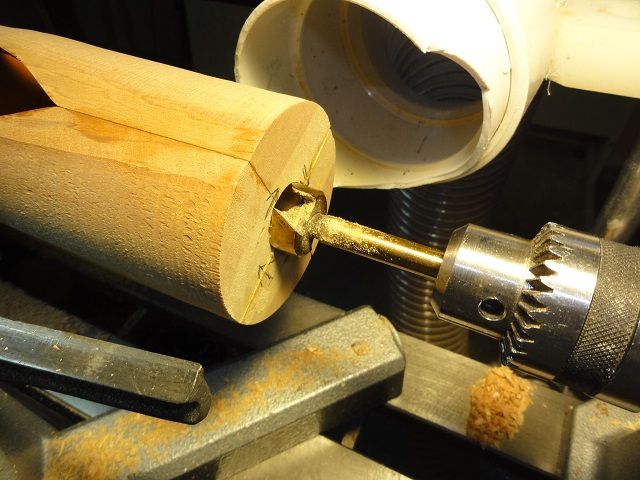
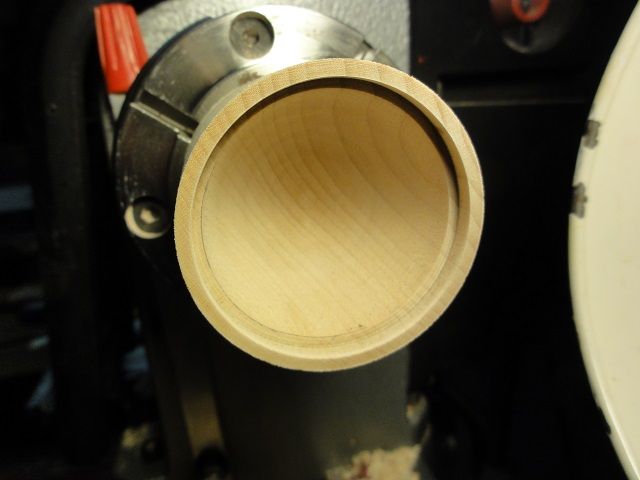
Many seem to have questions on how the rattles are made. I will describe how I do it as best I can. I'm sure there are other ways to accomplish this task and would love to see how you do it. I start out with a 2"x2"x6" turning bland. I make the the entire length round. Then I make a dovetail tenon on each end so as to mount them in the dovetail jaws on the chuck. I also make a parting cut two inches from the end leaving a 2" and a 4" piece. I mount the 2" piece to hollow out the inside cavity. I use 1-5/16" as the inside diameter and allow for a 3/16 recess so I am going to go a total of 1" deep from the end. I have a steel washer that I use as a guide to size the cavity. I size the recess to 1-7/16" and go 3/16" deep and then hollow the inside of the 1-5/16" ball to 13/16" deep from that ledge. 13/16" is half diameter. The recess ledge is the center of the ball both inside and outside. Now it can be rough turned on the outside. Use the parting tool to make a cut at 1-1/8" which is the end and round it over as required. I then part it off and mount the handle end in the chuck. A 3/16" long tenon needs cut on the end to fit in the top piece. Cutting the outside makes it much easier to sneak up on a good fit. The very end of this piece is the center of the ball so hollow it out to 13/16" deep for the other half of the inside cavity. Add the media being used for the noise maker, BBs in this case, and glue it together. There is going to be some squeeze out of the glue so don't move it around until the glue dries to prevent getting glue on the balls and gluing them to the insides. Remember to align the grain too. Mount it back on the lathe when the glue dries. Keeping in mind the center of the ball is 3/16 from the glue line turn the rattle to the final shape and sand and add burn lines as necessary. The glue line should be the first burn line from the left. I add two more to the right because I find three burn lines most pleasing to the eye the center burn line is real close to the actual center. I like to sand to 400 grit. I like to leave the end piece for a handle to use while applying finish. In between coats remounting can be done if desired for removing dust nibs and smoothing. Once the finishing is done, part off the end piece, and rub some finish in the fresh cut. Now it is time to take some pictures and share them here.

-
-
Woodcraft has made available a free tutorial on using Sketchup. Check it out at- https://www.woodcraft.com/blog_entries/the-best-of-sketchup
-

Painting Raised Letters Pictorial
Shane Whitlock posted a topic in Old Machinery Operating and Restoration Tips
"Back From The Archives" I get asked a lot what's the best way to paint raised letters? There are as many different ways to do it as there are old machines .... I have used an artist brush, made a stamp out of cork, used a sponge, paint marker, etc. but this is what I've found gives me the best results. First thing is prep the raised letters for paint by going over it with a sanding block and fine sand paper. Then take a paper towel and tightly roll it up, fold it in half and tape the halves together, then flatten the end at the fold. Now dip the end into some paint and dab it on some paper to get the excess paint off of it. Then start dabbing it on the letters. The more pressure you push down with the more it will paint around the sides of the letters, just don't push to hard or you'll paint parts you don't want too. I push hard enough so it just starts to roll over the top of the letters on to the sides. Painting all the letters took maybe 3 or 4 minutes. A lot quicker than trying to do it with a brush. And clean up couldn't be easier, ... just toss it in the garbage when you're done. Shane- 22 replies
-
- 1
-

-
- restoration
- pictorial
- (and 2 more)
-
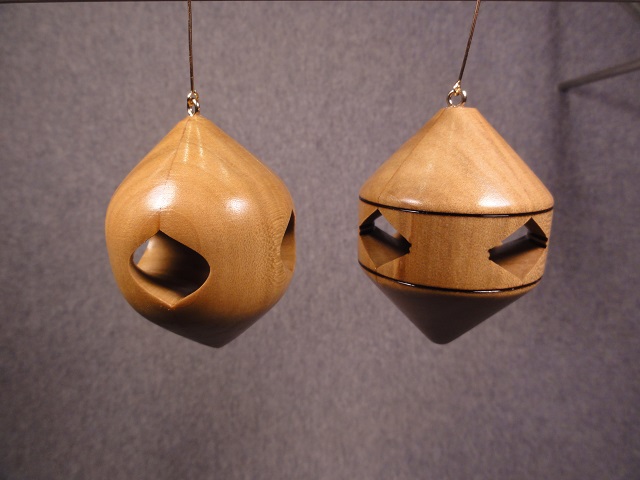
Inside out turning starts with a glue up of four sticks cut perfectly square and glued together to make a square twice the size of the cut pieces. There are limits to how deep a cut can be made and not have the turning ruined because the cut was too deep. One inch square pieces will be glued up to create a two inch blank in this case. When the blank is mounted in the lathe the first order of business is to turn the area where the window is to appear to the max diameter which in this case is two inch diameter or a one inch radius as seen on the right. On the left is what it would look line if it was turned inside out now. The center diamond would be air space and the points of the diamond are where the windows will appear when more turning is done. This shows that a one inch deep cut measured from the corners would be too far. The maximum cut has to be at least one eighth inch short of one inch and that may be pushing it. So if two inch sticks are glued up to make a four inch square the cuts have to be less than two inches deep measured from the corner. Depth of cut mystery solved. Okay, time to get the table saw tuned up to cut perfect square and install a smooth cutting blade. Start by cutting four sticks the same length and perfect square. I used one inch square by six long pieces here. Decide the best looking orientation of the end grain and put a rubber band around them. Mark the four inside corners and number the pieces. Keeping the same orientation turn the inside corners to the outside and glue them together. A quarter inch line of glue on the ends is about all that is necessary as they will need to be split apart later. Let it dry and wrap the ends with tape. Heavy plastic tape can be as an added insurance that the blank will stay together. The tape is also a reminder to not turn that area away. It needs to remain for gluing later. Mount the blank in the lathe and turn it just round in the area the window is to appear. With it turned just round there will be no windows when turned back to finish as shown here. Anything turned away from here on will open the window. This was put back in the lathe and small grooves cut into it to show result. Notice how any cut made is automatically doubled. Next is how to make an ornament with a cross for the windows. Here is the blank mounted in the lathe. Here it is turned just round where the window will be and the cross upright length, one and a half inches, is marked out. Everything turned away now will open the window double the depth of cut. The upright of the cross is going to be a quarter inch wide so a groove one eighth deep needs to be cut the length of the upright. Each side of the horizontal part of the cross is to be a quarter inch long so a groove that deep a quarter inch wide needs to be cut next. To make it round seven sixteenths measured from the corner had to be removed plus two sixteenths for the upright and now four sixteenths for the horizontal arms comes to thirteen sixteenths leaving just three sixteenths of meat left to hold it together. Good to go. Here it is broken apart to check the window. Didn't care for the top and bottom of the upright so it was put back together and the sharp corners were blended in and the finish put on it. Be careful not to get finish on the glue surfaces. When the finish is dry it is time to knock it apart and turn the inside to the outside and glue it back together. Then mount it in the lathe for the finish turning. Turn the whole thing to just round again. If turned deeper where the window is the window will get steadily wider as wood is turned away. There is plenty of meet above and below the window to shape as desired. Just watch where the inside cavity top and bottom are so they are not cut into. Once it has the desired shape, part it off and put on the finish. Dan
-
One of my favorite blogger and craftsmen is The Renaissance Woodworker, and he has some great advice for the hand tool start-up woodworker. If your considering taking a dive into hand tool woodworking, read this wonderful advice, by a trusted source. Hand Tool Woodworking Instruction and Thoughts WWW.RENAISSANCEWOODWORKER.COM The Renaissance Woodworker is woodworking education with a focus on hand tool only construction techniques.
-
These were all done with one inch square six inch long configurations. Anything that fits through the window can be hung inside for added effect. Some beads are hung in this one. Two smaller ornaments made from one glue up.
-
Trained as a Fine Artist at the University of Maryland, twelve of Lora Susan Irish’s pure breed dog oil paintings have been published as limited edition art prints. Her art has been featured on the front covers of “Doberman Quarterly” 1991, “Samoyed Quarterly” – all four issues of 1991, and “Shetland Sheepdog Quarterly” 1991 published by Hoflin Press. Read more... In addition to Mrs. Irish's extensive line of informational products for sale, she also gives back to the crafts community by offering free plans and patterns such as this carving relief tutorial. https://www.lsirish.com/wp-content/uploads/2012/09/Your-First-Carving-by-LS-Irish.pdf
-
- 1
-
-
- craft
- pyrography
- (and 5 more)
-
Sketchup (Trimble) has posted a new learning site composed of individual lessons that progress thru the Sketchup fundamentals. Currently the lessons cover the basic tools and Sketchup operations. There are also lessons on Rendering and using the Trimble Sketchup addition of Layout. https://learn.sketchup.com/
-
Getting started I like to use a piece of straight grained wood wide enough that it can be cut in two square pieces and long enough to cut it in half and for the length of the vase. It takes four same size pieces to glue up a blank. Pick up the pieces and mark the ends. This is how the pieces will be oriented for the final turn. For the first turn twist the pieces so the inside corners face to the outside corners and glue them together. It takes just a small amount of glue on the very ends. Remember these pieces will have to be pried apart after the first turning. The marks should look like this and be glued in this manner. I like to use Vise Grip welding clamps. The pieces need to be as accurate as possible and I get less sliding of the parts with them.I add some quick clamps when the parts are stable. A strong tape can be added for extra hold. I have never experienced any breaks. You will also want to get the vase to use as an insert. I chose this copper vase. The bottom is bigger than the top so I chucked it in the lathe and cut the base off leaving a smaller foot. Now it is time to mount it on the lathe between centers and mark where the vase insert bottom will be. I usually give the top some wiggle room and turn the wood back to fit. I decide where I want the window to be and mark that. It was about five inches from the bottom mark in this case. Measure the vase diameter and cut half that distance deep from the corner. This will create a platform for the vast to sit on and capture it from moving. You want to turn completely round the part in between the marks too. I left a 1/4" shoulder for the vase foot. Right now the windows are still closed. Anything turned of now will open the windows by "twice" the amount turned off. I want an oval shaped window so I marked the center of the oval and used the parting tool to cut the depth I wanted. Now finish turn the half oval and sand it. Now you can add some embellishments such as burn lines and apply the finish. The inside can be coated with finish when the vase is done but it is more difficult. When the finish is dry split the pieces apart. I like to use a thin knife for this operation. It is time to turn the pieces back to their original positions and glue them. Use all the available surface area as they will stay this way now. Here is half of it and you can see the platform for the vase foot. Once the glue is dry mount it on the lathe between centers. Turn the corners off and form a spigot on the bottom for the lathe jaws to grab onto. Remove it from the lathe, install your chuck and mount the piece in the chuck. Drill a suitable hole in the end for the vase and then use your turning tools to fit the vase. A little tip. Sanding sleeves from the oscillating sanders work well for holes your fingers don't fit. Bring your tail stock up with the live center and turn the vase to the shape you want. I added some burn lines and fit a copper foot to it. Put the finish on and you're done. When turning the inside of the vase you can go as deep as you want. Just remember the remaining wood vanes get smaller the deeper you go making it more fragile. Too far is when the blank brakes and that happens when you hit center.
- 13 replies
-
- 11
-
-

-
Pictorial ... Restoring Handwheels
Shane Whitlock posted a topic in Old Machinery Operating and Restoration Tips
"Back From The Archives " I have 3 handwheels that I need to restore for my Enterprise band saw. I figured I would put together a quick pictorial showing the steps I used to make them beautiful again. Original condition: As you can see in the pic above they are in pretty rough shape .. rusted, pitted, and any original old paint that is left is flaking off. First thing I do is use a handheld wire brush and remove as much of the dirt and paint as I can. Next I use a wire wheel mounted on a buffer/grinder and remove the rest of the crud and rust, taking it down to bare metal. After hitting it with the wire wheel it's looking pretty good. If the rust was only on the surface then you can skip this next step, but the rust on these was pretty heavy which caused some minor pitting. I mounted the wheel in my metal lathe and used various grits of emery cloth and sand paper to clean them up. The wheel in the upper right hand corner of the pic above is very pitted and I will need to use a file to get rid of most of the pits. If you don't have a lathe you can build a mandrel and mount it in a drill press or just mount a wooden dowel in a vice, slip the wheel over the dowel and turn it by hand, I've done it that way many times and it works great. Next I use a buffing wheel and load the spiral sewn wheel with tripoli compound and the loose cotton wheel with white diamond compound. Then start polishing. Purdy .... Next give the whole wheel a wipe down with some denatured alcohol or mineral spirits to get rid off any wax residue that may be present so the paint will stick to the bare metal. Use some masking tape to cover the polished areas. And apply the paint. Good as new! One down, two more to go. Looking at the time stamps on the pics it took me an hour and a half from start to finish, not including time spent waiting for the paint to dry. Hope this helps ... Good luck, -
Guys, I'm a visual learner and was wondering, for a real novice user which one of the YouTube creators does the best job of teaching true beginners? Thanks Pat
-
A half-hearted bit of humor has morphed into an idea. What does the membership think about a forum section with membership produced how-to presentations (videos, step by step tutorials, etc.)? You might want to refer to this post for further information.
-
The original video for this post was removed from YouTube. This video is similar- showing keyboard shortcuts to Sketchup tools-
-
-
-
-
Are they segmented? I thought of doing segmented ornaments for a while but really didn't like the idea of cutting the little segments and gluing them together. Seemed like a lot of work. I came up with a way to do inlay which seems easier or maybe it is just because its my way. I started out with making a jig to run the pieces through the saw. There are two side pieces with a two inch spacer block between. I stuck the side pieces together and drilled a .25 inch hole 1.50 inches from the end and 1.25 inches up from the bottom. In the picture the block between the center spacer block and the bolt was to ensure accuracy while gluing and was removed once glue was dry. It is 1.50 inches square. I drew lines down from the hole to help align the jig with the slot in the cross cut sled. The bolt is a carriage bolt with the head ground down to a .50 inch diameter. It is set in a counter sunk hole so the jig sits flush with the sled fence I took a 2.50 inch square piece of plexiglass, found center drilled and threaded it for a .25-20 thread. When threading holes in smaller pieces like this I chuck up the tap and bring the quill down and lock it from going back up. I put a rod through the slot where the wedge can be driven in to remove the chuck and tapered shaft to keep it from spinning. I then use the table crank to raise the piece up to the tap and turn the piece while I am raising it to start the tap. I have a screw center with .25-20 thread so I put it in the lathe and screwed the plexiglass to it. I set the tool rest at center and used the indexing feature to scratch marks into it at 60 degree increments. I cut blocks to use and drilled the centers. I mounted them to the lathe and turned them round. I then screwed them to the plexiglass base and marked the indexes. The stock can be the full two inches of the jig of smaller and add spacer to take up space. I put a mark on the jig to line up each index mark but put it off to the side or the marks get cut off when run through the saw. I did end up cutting the nut side of the jig to 3/8 thick to give it some flex and hold the cylinder tight as it goes through the saw. Here is a completed cylinder. Then cut some inlay to fit the saw slots and glue them in. Mount them and turn them whatever shape you desire. Make some finials for them and there they are. Some of you may have seen this. This is in the tutorial section at William Young's Woodworking Friends site and I had posted it at Wood too. I copied and pasted it here for those who missed it to see.
-
Found this link through my Google+ account. A nice little tutorial for the beginning Sketchup user. This tutorial was written by folks who ultimately use Sketchup for 3-D printing. http://i.materialise.com/blog/entry/tutorial-how-to-create-your-first-3d-model-in-sketchup-a-beginner-friendly-introduction
-


.thumb.jpg.573d1497d0675219908c85aabefd797a.jpg)