Search the Community
Showing results for tags 'miter joint'.
Found 4 results
-
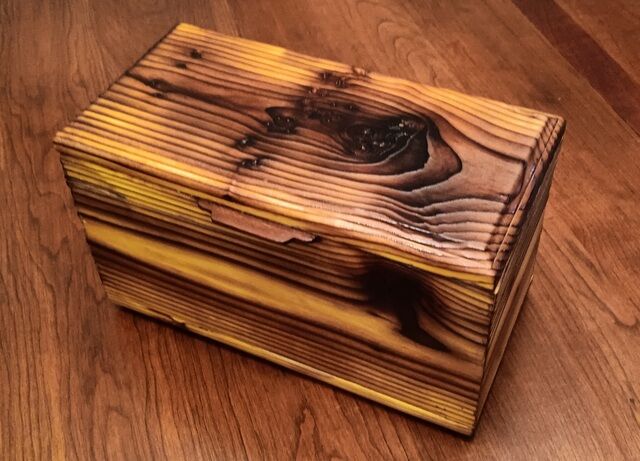
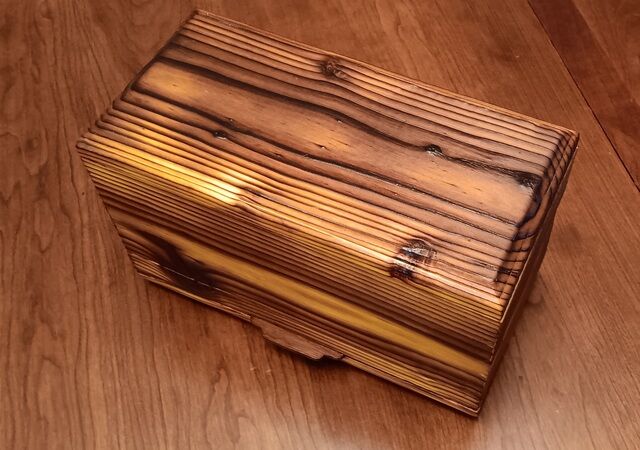
The Japanese have a wood burning process called " Shou Sugi Ban" With this Shou Sugi Ban process, I did a "Deep Burn" on a fully mitered Pine box. Then wire brushed it Zoom in and check out the grain. I then dyed it. Afterwards, I gave it three coats of 2 pound blonde shellac. I made a lift handle.... look closely. Installed brass hinges.... Here's a view of the bottom. Feel free to comment, ask questions and thumbs up if you like it! Thanks for looking! Cheers! MrRick

- 9 replies
-
- 7
-

-

-
- box
- shou sugi ban
- (and 3 more)
-
This one nearly got thrown out as it looks like a boring simple miter joint. Pull it apart and it reveals why it stays together with no glue added. Tenon cut from what is normally cut off to make a miter joint. Mating mortise cut in the face of the opposing side. On my blog: Not just a miter joint 4D
- 1 reply
-
- 3
-
-
-
- cnc joinery
- miter joint
- (and 1 more)
-
With the club's long time charity deciding they don't want wooden toys any more, we needed to find a new place. One current place is the local children's hospital taking 30 small boxes a month for the patients to decorate while there and take home. So I started making some. The first batch (6 of them) was mitered corners with a sliding lid, used keys on the corners. Second batch (5) finger-jointed and solid top rabbeted. Looking for something a little more efficient in production. Third was a prototype with an inset lid held with a brass rod as pivot hinge. Ok, but finicky. Forth was today. Mitered corners and inset plywood top and bottom panel. Biscuits to reinforce the miter joints. I did another groove on the inside near the top. Then once the box was assembled and glue dried, did another pass with the 1/4" bit on the router table. This made a double rabbet to hold the lid in place. Saves having to do an inner layer insert. I'll do a run of these when I get some more lumber and plywood. I talked to a local furniture shop last week and they told me the set out their scraps on Monday afternoon for the trash man. I was there and picked some of their cutoffs from the scrap bin;. Most of it was 1/2" poplar, probably drawer sides. A bit of maple and some cherry. In another adventure, I got a bunch of leftovers from red oak flooring (one time find) . Well, started today to rip off the tongue and groove edges so I could do glue-up. Then I thought, hey, the ends are going to be hidden by miter joints, just use them to align the glue up and rip off only the top and bottom edges. Lesson learned. It appears that the groove side is slightly wider on the top than on the bottom. I'm thinking that's so the top joint is tight and the bottom does not matter so much. I got a lot of "cup" in the top that I needed to get out with cauls and now I looks like there's a gap on the bottom of that joint. Well, nice try. Wait for the glue to dry and rip them apart. On the other ones, I will try just trimming off a bit on the groove side to align it up.
-
Stuck at home and got this video in the e-mail. I looked at my box of a gross (144) sawtooth hangers on my last project and realized I only have about 8 left. I concluded that I've made a lot of picture frames since I use braided wire on bigger ones.
- 3 replies
-
- 6
-

-

-
-
- half lap miter
- miter joint
- (and 2 more)