Search the Community
Showing results for tags 'Gun'.
Found 11 results
-
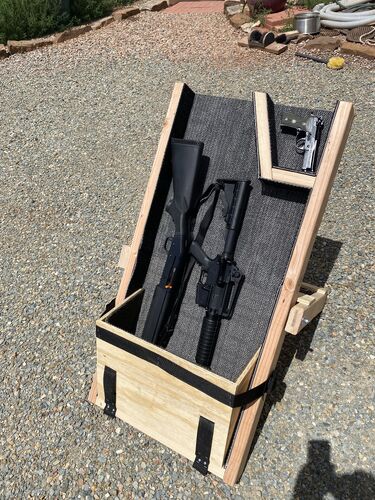
View File 3 Gun Dump Box Construction shows how to build a 3 gun dump box for competition use. Submitter DAB Submitted 10/20/2025 Category Yard and Outdoors
-
Version 1.0.0
9 downloads
This plan shows how to build a 3 gun dump box for competition use. -
Made this today, based on pictures of others i found on the web. there is a commercial one that sells for $509. this was considerably less than that. upper bin is for a pistol, bigger bin is for rifle/shotgun.

-
I've made hundreds of these grips since 2009, and I've come across a lead fragment in walnut three times now. Never found a bullet or pieces of one in any other wood! Luckily, lead doesn't cause any problems for my cutters. I would be really ticked if that were a steel nail!
-
Guy that bought a couple Polish Eagles last year wanted to know i could make a custom plaque for one of his customers. He sent me a pic and picked up the finished product tonite. 24" in diameter round. Must have liked it - I even got a pretty good tip - which is unusual in this business.
-

From the album: Gene's Stuff
Mesquite box to hold my Daughter-in-law's Glock. Solid Mesquite, turquoise and epoxy to fill the voids. Mesquite harvested and milled by yours truly. -
I just ordered this set of screw drivers and picks, I have a couple black powder revolvers and I really need to get into the guts and clean em up really good. Regular screw drivers will mess up the screws and finish, these Grace Drivers are hollow ground, made for guns, once I get em in my hands, and use them I'll follow this up with a review. These picks will come in handy too.
-
Started my bench build yesterday. No plans, just took a few measurements of me and my son for bench height, and winging it. The top will be from pine, and we'll have folding legs. Dry fitting the miters. I also got Mama's car out of the garage today, I feel like I have a shop!
- 20 replies
-
- 11
-

-
My son's old bench. It has seen better days. It took me an hour just to clear the brush around it! ...and the replacement! Seems he's going for the luxury version this time! Used recycled flooring for the bench. I'll be going over later to work on it some more. Updates to follow! John
- 17 replies
-
- 11
-
-
While cleaning weapons the other day, I took a good look at my 1911 and thought to myself, "Those plastic grips just don't do it justice." I then thought, "Hey, I've got this new carving bench that needs to be used." And, so, I started roughing out some grip blanks....... The bench turned out to be exactly what I needed to carve these out. It was the right height, allowed a surface that I wasn't too worried about abusing, and just really gave a rustic feel to the whole process...... I definitely need more practice. I learned a lot about using oak as a carving medium and about customizing grips for a particular person. I need to make another set, but these actually feel pretty good in the hand right now. We'll see what happens in the future....... I still want to know how someone can get this angry over a front sight.......
-
I wanted a nice tripod as a gun rest and for occasional camerawork. I settled on the big heavy studio type they are better for cameras as they dampen vibrations and for a gun rest it'll be great because of the same thing - - mass. I won't be hiking anywhere with this thing. The wood is Maple I harvested on the property. The steel is a plate I got in the fleabay, some extra heavy steel gas pipe and various A-36 grade crud steel from Hillman I got at the BORG. The knobs are blanks from Carr Lane that I drilled and tapped. Ii is only mostly done. The angle head and gun rest are not even designed yet. I have some fill work and paint to apply, Plus I need to create the locking clamp for the head and gun rest that will slide up and down in the steel pipe/tube. I'll use another Carr Lane knob for that. The sanding and applied coatings are yet to be done to the wood too. Also there is the feet to finish. I'm going to turn steel spikes for one end and put rubbers on the other. The inside leg parts will pull out and reverse to invoke the spikes or rubbers. So far I'm really happy with how it's turned out. The leg angle adjusters work flawlessly and are very robust. The action of the leg extensions is smooth as silk. And it is solid as the Rock of Gibraltar First I made these three little knuckles. They are part of how the leg angles are set and locked. The first pieces of 3/8" steel drilled with 1/2" and tapped for 5/16-18 one side and clearance through the other. I made them to be clamps by clamping them together for drilling, Then sanding 0.010" or so off the faces with the hole half then re clamping them on the 1/2" shafting and welding one end. This way when I engage the tapped hole on the end opposite the welds they would squeeze around one of the shafts locking the action. You'll see~ ~ ~ ~ ~ Then I welded up six of these below clamps for the sliding legs In the pic above you can see the one with the knob has a little flat piece of steel inside the box. That is to spread the pressure of the clamp screw across the wood to prevent damage. In the pictures of the tripod you only see three of these but there are six that will be on it in the final assembly. Then I turned three of these 2' maple shafts Of course this is not the final shape. I had to rip them and pop them in my planer to make them skinny. like so: The above is two halves re-glued together. I left a little lip at the end to fasten a block of wood. Here is the planer rig = pretty basic. It was necessary that they be very accurate in dimension and each be exactly the same as the other half. I would have to rip the glue up twice more so I glued them offset like so: And then mount little blocks to them to keep them stable and flat on my table saw To finally get this shape (see the piece in the center) Here are some of the tripod's leg angle locks From below looking up The leg height adjusts so smoothly


.thumb.jpg.573d1497d0675219908c85aabefd797a.jpg)