Search the Community
Showing results for tags 'shou sugi ban'.
Found 3 results
-
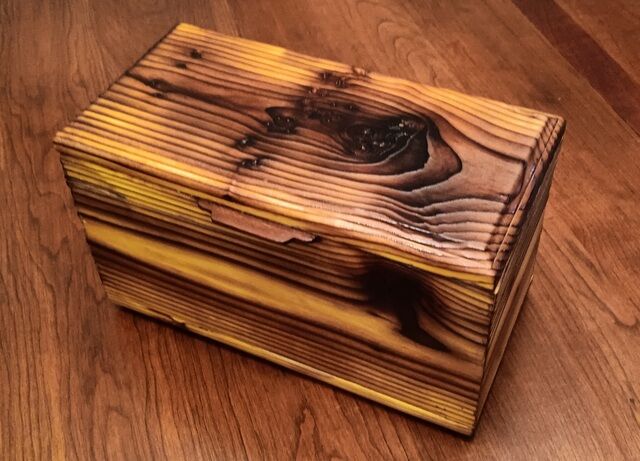
I've been dabbling with Greene and Greene techniques and features for boxes about a month now. I really enjoy it. I have also made a number of boxes using the Shou Sugi Ban techniques. So I decided to experiment making a box incorporating both these techniques. I started my making a box out of Pine and Cedar with box finger joints first as shown. This is a dry fit. No glue yet. I then started "pillowing" the finger ends Next I loosely tacked on a plug to see how it would look. I decide to take the risk and move forward. So I bought square hole punches from Lee Valley. Once I got the punches, I started making square holes as shown on all four corners of the box. It was alot of work. I Shou Sugi Ban burned the Top (lid) Here's a view showing the brass hinges installed. Note how the box is contoured to lift the box off the surface. This is called a "cloud lift" There are several variations of this G&G technique. Here's a corner shot Here's the box open with my gent saw placed in it. Hope you liked it. Thanks for looking! Cheers!! MrRick

- 4 replies
-
- 3
-

-

-
- greene and greene
- shou sugi ban
- (and 4 more)
-
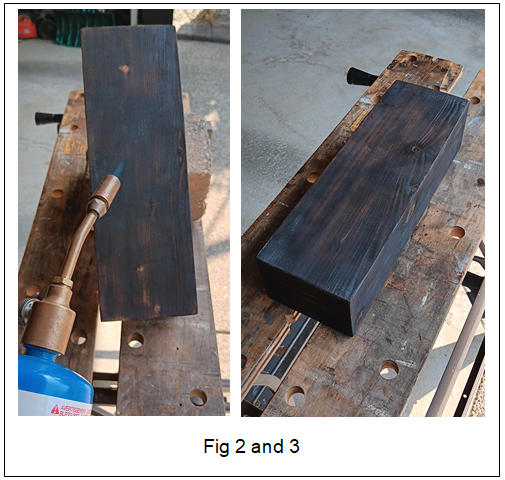
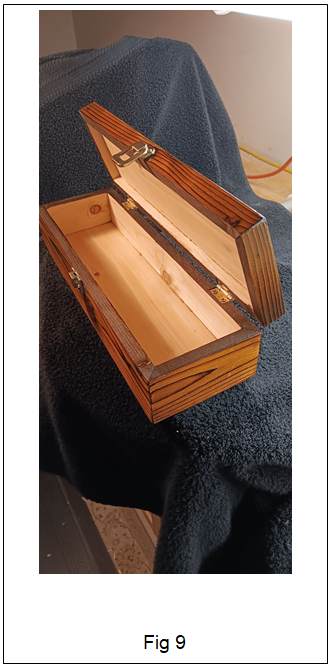
INTRODUCTION It's been a long time since I made a fully, all sides, mitered box. As miters go, It is the ugliest box I've ever made. I mean "butt ugly"! Okay...okay...maybe not that bad but challenging! I think many of us may take mitering for granted and sort of dismiss making a whole box this way. To tell you the truth, I don't know why I did and then to add insult to injury I decided to finish the surface with the Yakisugi technique or "Shou Sugi Ban" as we call it in North America). MAKING THE MITERED BOX I started by cutting all sides on my tablesaw. Yes!... my table saw! As hand tool crazy as I am, I couldn't imagine doing all these miters and bevels by hand (hereafter just called "miters"). My blood pressure is high enough. And then I still could not get the miters as perfect as I wanted all around. Even using my tablesaw! LOL. Then it dawned on me... I'm going to torch the thing so perfect miters may not matter! It is highly likely there will be some separation from burning and minor gaps on the corners. But it will add to the rustic look I was after with this technique. We'll see. Next... I glued it all up. I'm usually very strategic and meticulous gluing up. However by the time I completed mitering, I didn’t mind being messy and just slathered it on. Here it is ..... "Plain Jane" in Fig 1. BURNING THE BOX So why am I doing this? I dunno. I like challenges or maybe I'm just "bonkers"! Next, I started the "Shou Sugi Ban" process and torched all six sides, edges, and corners. I wasn't after a deep "alligator skin" burn but rather an even medium surface burn. Some alligator skin char was acceptable. The look I was after was the "Kimo - Tora" as some call it. This is a good site to see the different ones. See Fig. 2 and 3. WASHING THE BOX With the grain, I then brushed away as much of the dry blackened ash surface as I could on all six sides. Next I washed all sides with the hose and brush cleaning away the dirty surface. See Fig 4 and 5. APPLYING THE STAIN After it completely dried out, I decided I wanted to give it a yellow dye stain followed by shellac. I went everywhere looking for a small size can like 236ml. Do you think I could find it? And on top of this the ones I did find were like $15 -18. But no yellow or orange. Man 'o man!... things have really gotten expensive and limited. The heck with it!! Anyways I made my own using Tumeric. One coat on all sides was all I needed. However Tumeric is a fugitive stain. Though you wouldn't agree if you got some on your clothes or the rug not to mention your hands. LOL. See Fig 6 and 7 FINISHING WITH SHELLAC To prevent future fading it was sealed with four coats of blonde shellac. First coat was a one pound cut. Second, third, and fourth coats were a two pound cut. Then brass hinges and clasp was added. Here's the results: See Fig 7, 8, and 9 Hope you all enjoyed this!! Feel free to comment, ask questions and thumbs up if you like it! CHEERS! MrRick
- 4 replies
-
- 3
-
-
- miter
- shou sugi ban
- (and 2 more)
-
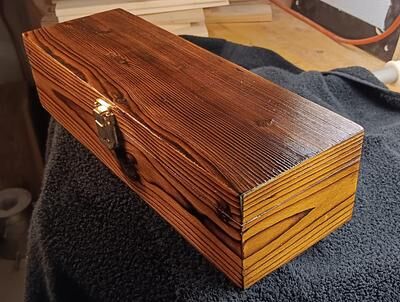
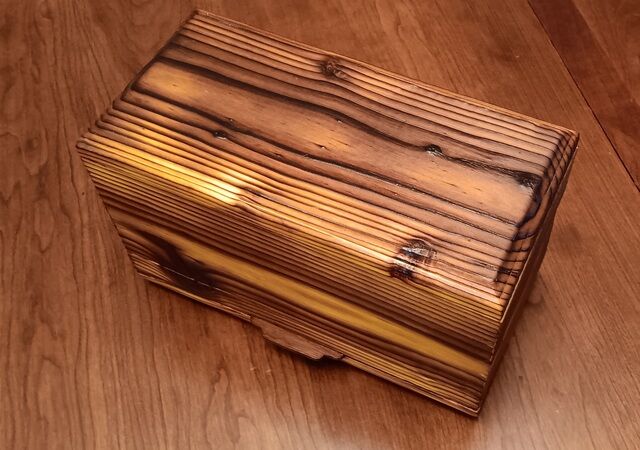
The Japanese have a wood burning process called " Shou Sugi Ban" With this Shou Sugi Ban process, I did a "Deep Burn" on a fully mitered Pine box. Then wire brushed it Zoom in and check out the grain. I then dyed it. Afterwards, I gave it three coats of 2 pound blonde shellac. I made a lift handle.... look closely. Installed brass hinges.... Here's a view of the bottom. Feel free to comment, ask questions and thumbs up if you like it! Thanks for looking! Cheers! MrRick
- 9 replies
-
- 7
-

-
-
- box
- shou sugi ban
- (and 3 more)