Search the Community
Showing results for tags 'Routing'.
Found 4 results
-
Sorry that I've been inactive for so long; had a lot on the plate in recent months. But now it's (long past!) time to repaint and rehabilitate the exterior of my 1930s-vintage home. I'm wanting to keep the same basic paint scheme of white with blue trim, but one thing I want to add is functional shutters (this is hurricane country, after all) at every window. And I'm wanting to use my ShopSmith for most of the work. (Actually, I NEED to use it as I don't have/can't afford a router table or similar accessories.) The biggest challenge I'm looking at is making the stiles; I have the (standard, over table) router package for the ShopSmith but I'm wanting to create some kind of jig which will simplify routing uniform slots at a consistent length and angle in two pieces of wood of varying lengths. I have several different sizes of window and also several of the windows have the old-style aluminum awnings over them. I do like these awnings and want to keep them, but I'm going to have to build shutters which "fold" in the middle to be stored opened and then unfold to protect the window when in use. Looks like it should just be a problem of building a pair of mid-rails and hinging them horizontally. I also have questions about wood selection; I'm intending to simply paint these so would softwood (pine) be a good long-term choice? Any alternatives I should consider? (I shouldn't have to say this these days, but the budget's tight!)
-
I wasn’t sure to put this here or in the CNC category. The wife got some new steak knives and requested a tray for them. I designed it with Fusion 360 and then used the Shaper Origin to router it. Wicked knives. I think they are the sharpest knives I have ever seen on delivery. They are scalpel sharp. Quick little project but fun. Paul

-
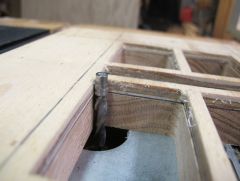
For such a simple table, this thing has run me through the funnies big time. Everything started out pretty good. The walnut trim, for the top, was made by multiple passes over several different router bits to get the desired profile. It'll take a little sanding to smooth things out but I am happy with the results. Next I turned to the legs. I milled down some 1 3/4" maple into 1 3/8" square blanks. Then laid out the locations of all of the mortises for the aprons and stretchers. Cut an extra piece for testing, too. I was really please as to how straight the legs were off the saw. Usually there's some twisting/warping but these stayed straight. Using the hollow chisel mortiser to create the openings Prepped the legs layout Punched out all of the holes- For me, it is so easy to get confused as to the orientation of parts. I need to label everything to make sure I don't mix them up. I thought I was on a roll at this point but fate had something else in store. From here everything went to "you-know-where" in a very big hand basket. Next part- the failures.
-