Military Challenge Coin Display Build

By Courtland
· 93,805 views
 Thank you for joining us. Below is the Military Challenge Coin Display as described by The Patriot Woodworker network. This is a design that we drew up with the help of designs seen all over the web, it is easy to build, most folks have the tools that are necessary to build it, and the finishing process is quite simple. If you don't have the tools that I am using, your sure to find a way around that, as this is as I said, very simple to build.
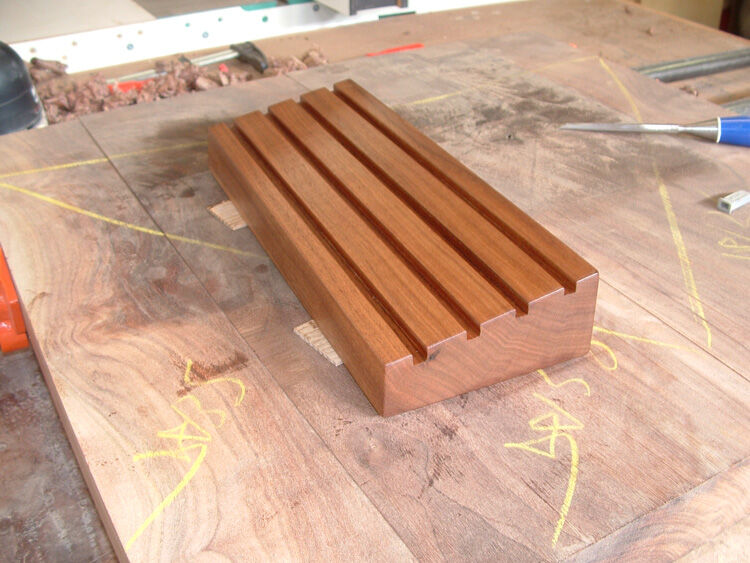
This basic display is 12" long, 4 1/2" deep, 1 1/8" tall at the front, and 1 7/8" tall at the rear. The grooves are 1/4" wide and 5/16"" deep. The beauty of this design is you could take an 8' long board and mill the board out and groove it in it's entirety, and then section it up to make many coin displays at one time.
This display unit will hold up to 20 challenge coins plus or minus as the coins can vary in size. The front face of the display is 1 1/8" tall to accommodate a name plaque if the warrior wishes to install his or her own name plate. I have found that our soldiers actually take their name tag off their Class A's uniform and apply it to the front of these displays.
Now here we go
This display cost me nothing to build, I had the wood on hand, and the finish on hand, it took me an hour to build this first prototype.
I first started out with a 2" thick (8/4) by 4 3/4" by 12" long walnut blank.

I then drew a guide line at the end of the blank, note I started at 1 1/8" up from one side to the corner of the back. After I drew the line, I laid it on the jointer and set a straight reference item such as my engineers square (it can be anything straight) to determine the angle I needed to set my jointer fence. I eyeballed this, it doesn't have to be perfect. The 1 1/8" side is your front, the front is where the name tag is secured. As you are looking at the blank, it is laying upside down on the jointer. The front is to the right against the jointer fence.

I set my jointer to cut 1/8" increments, you can set it to whatever you want, it's purely a personal choice. After a few passes my blank is taking shape.

The following picture is after my final pass, it really only took about 15 to 18 quick passes, about 3 or 4 minutes on the jointer to get it to this point. The final cut is a bit off the line, but I am calling it good. You see, this is not rocket science folks! It's just fun!

Before I lay out my centers for the grooves, I set my table saw to 5 degrees and shaved off the front of the display, I am sorry I failed to get a picture of this, but just set your display upright and the back of your display against the fence, set the fence so your taking just enough off the front to make the front a 5 degree slant back as your looking at the front. Keep in mind, I am using a right tilt TS.
Now with the front of the display cut at 5 degrees, I laid the first groove out at 5/8" from the front, then 1" on center after that, you'll end up with 4 grooves for the coins. Depending on what your blank ends up being, you might have to fudge the numbers a hair until you get an equal layout between the grooves.
After I marked the centers, I laid out the sides of the grooves at 1/8" on both sides to make a 1/4" groove.

Now set your TS blade at 90 degrees to cut the grooves, this allows the coins to rest in the crook or angle at the bottom of the grooves. Your natural tendency is to cut the grooves canted back, but the better option is to just lay the display face down and cut the cut grooves at a 90.

To come up with a nice even set of grooves I set my calipers to 0.250 or 1/4". If you don't have calipers, plane a piece of wood to a 1/4" for a feeler gauge, we want these grooves to be 1/4" as close as possible.

Then I set my blade height at 1/4". (ATTENTION, make the grooves 5/16" deep)

Now you will have your blade set at 90 degrees, you now have your depth properly set, you are now ready to cut the coin grooves. Set your display face down, bottom side up, and with the front against the fence, set the fence to your layout line, and start your cut. I make about 3 passes per each groove, after the first two passes, I check the groove with my calipers to see where I am at.(I failed to take a shot of this process so I laid the finished display in place for a visual reference, sorry!) NOTE: the display is upside down, face down, front against the fence, rear of the display to the left of the blade.

After the grooves are cut, you will notice the blade left a nice kerf mark at the bottom of the grooves. I took a very sharp Marples 1/4" chisel and cleaned up the bottoms of the grooves. I used the chisel in a scraping fashion. Be careful not to drag the chisel on the top edges of the grooves, it's easy to do, please don't ask me how I know. You might have to skew your chisel a hair to avoid dragging it against those edges.

After you've cleaned up the bottoms of your grooves, you can now sand the grooves, I used a folded up piece of 120 paper, I wasn't making much progress getting the bottoms smooth with this method, so I ended up folding the paper around a piece of wood that could fit in the grooves, then the bottoms were getting the attention they needed with this method. I finished the grooves to a final sanding of 220. No one will be able to touch the inside of the grooves, so just a good sanding to clean up the chisel marks is all that is needed here.
I sanded the entire piece with 120, 220, 400, 800, then a final burnishing with Abralon 1000. The Abralon actually burnishes the wood to a nice dull sheen. During the sanding process I paid special attention to the end grains, I love end grain when it is finished nicely, it adds a ton of character in my opinion.

Below you'll see an Abralon pad on my ROS

After we have sanded the display, I wrote a heartfelt message on the bottom of the display, and signed it on behalf of my family. After all your work getting this far, this in my opinion is the most important part of the entire project. This is what adds personality to your display, this is what makes your display unique, and none other in the world will be like it.
On my display I wrote with a black Sharpie,
"Dear Service Member: Thank you for all you've done, Thank You!! Drive on and Stand Tall, We Love You!!
From:The Morris Family" In the lower right corner, I wrote the species of the wood used.
Also, feel free to write your company name on the bottom, or brand it, I will be affixing a small decal on the bottom with our network name on it.

Now we are ready to finish the display.
I finished the display with BLO. Brush on the BLO. Let the BLO soak in for about 15 minutes on the entire piece then wipe clean. I will repeat this process two more times to get the BLO to soak in. I like the simplicity of oil. And for the coin displays, they are strictly being used on top of furnishings, not in moisture areas where a protective finish would be needed. I love the deep rich tones that BLO and Danish Oils bring out in furnishings. Once it's all dry and ready to go, I will affix four round felt pads at each corner on the bottom of the display.

So there you have it folks.
Keep in mind, this is only a guide to making a wonderful Challenge Coin Display for our troops. This is not the end all be all. I would like to really encourage folks to be creative, your more then welcome to come up with your own designs, and your more then welcome to use any type of wood.
If you have any questions regarding this project, feel free to leave a comment here in this blog
And, please take pictures of your displays and post them on our Woodworking Forum !
-
 3
3
Recommended Comments
Join the conversation
You are posting as a guest. If you have an account, sign in now to post with your account.
Note: Your post will require moderator approval before it will be visible.