Search the Community
Showing results for tags 'moulding plane'.
Found 3 results
-
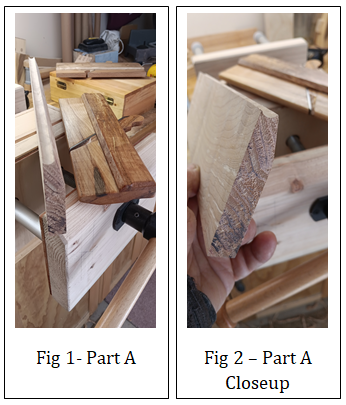
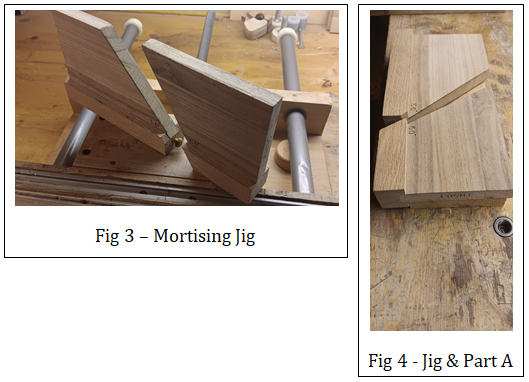
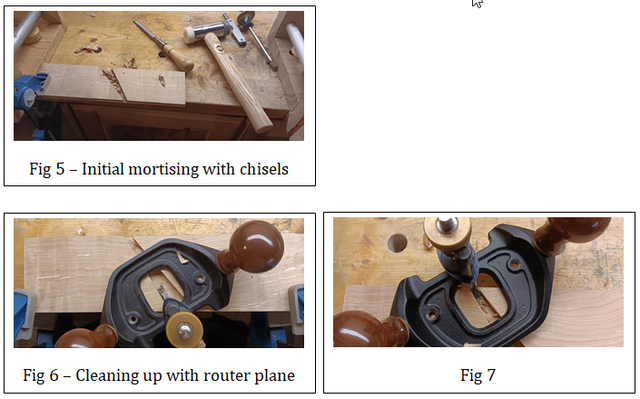
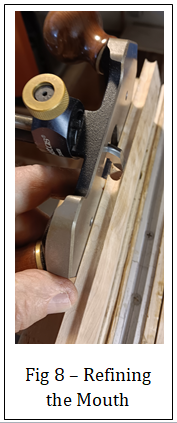
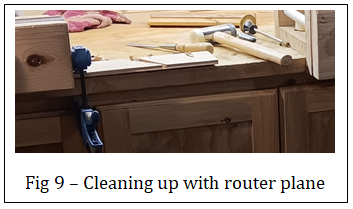
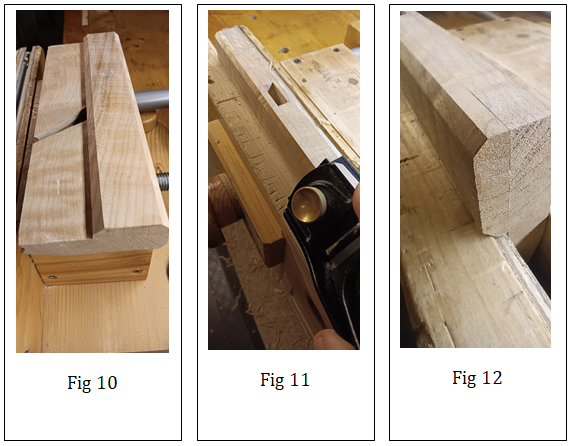
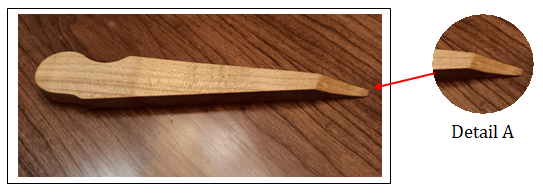
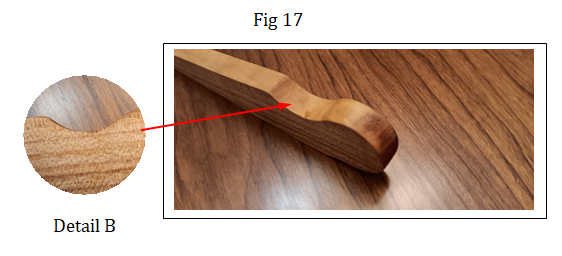
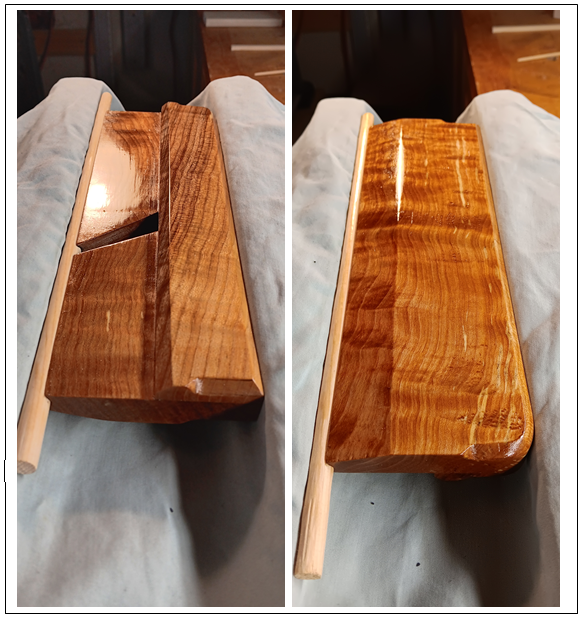
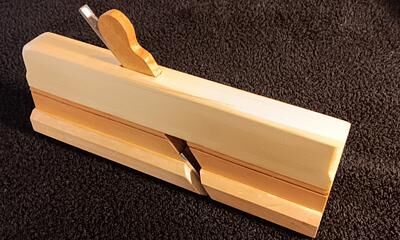
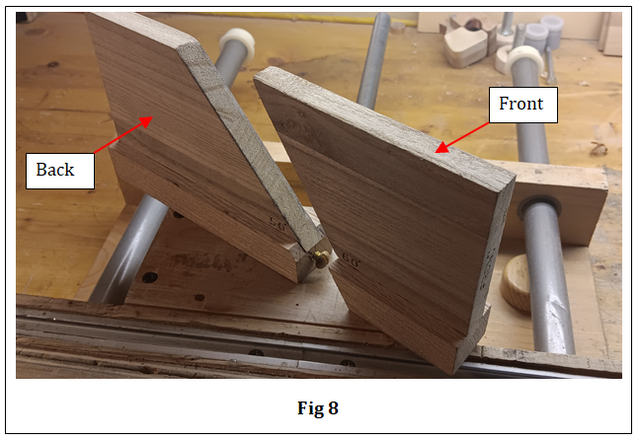
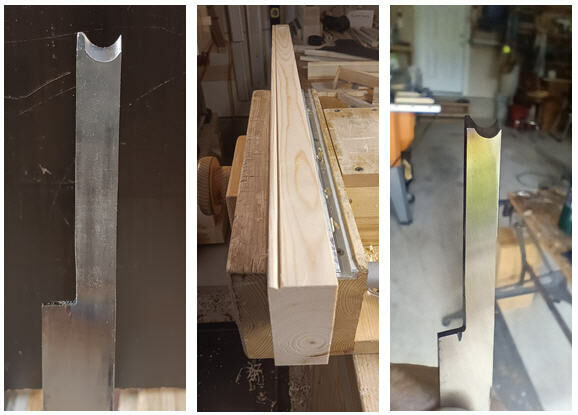
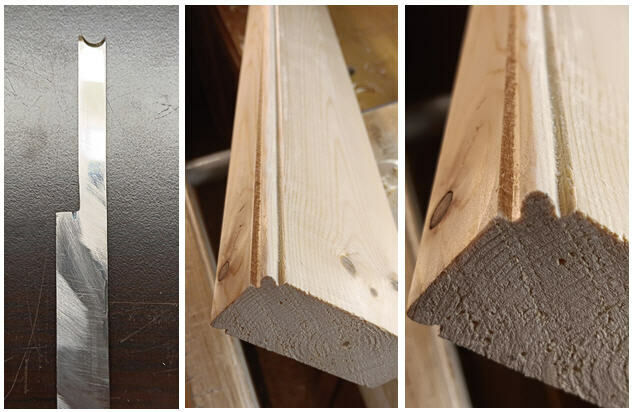
Introduction I enjoy doing most of my wood working projects with hand tools. I feel that I've become adept roughing stock with handsaws and squaring all four sides by hand planing. I've also become much better at joinery over the years with my favorite being handcut dovetails. One area that has intrigued me is creating mouldings with hollow and round moulding planes. Pursuing this has taken me down the road of making moulding planes. It has been a delightful pursuit. In addition, I make the blades or cutters and go through the whole heat treatment process. The Beginning I started by cutting two finished blanks out of Spalted Maple. These two blanks make the complete body of the plane. The first one (Part A) was milled to 5/8" thick x 3-1/8" high x 10" long and is the main body and left side in one piece. The second (Part B) was milled to 3/8" thick x 1-9/16" high x 10" long and is the right side that is laminated to the first piece. This plane will be a No. 2 ( 1/4") Round Moulding Plane. In Fig.1, it's mating plane, a 1/4" Hollow Moulding Plane sits on the right. It was used to make the 1/4" round groove as shown for the new plane on the left. When done this will make a matching set of 1/4” Round and Hollow Moulding Planes. See the closeup of the new plane's bottom in Fig 2. Mortising the Escapement Area Now it's time to mortise the escapement area for the blade's bed, cheek, throat, mouth, etc. I made this jig, see Fig 3 below, that I use for locating the bed angle at 50° and the wedge face at 60° on Part A. The jig has an adjustment screw that allows me to fine tune the mouth opening for Blade and Wedge. I can explain further how I use this jig if anyone is interested. Once I have the jigs placed where I want them (see Fig 4), I clamp them down on Part A to the bench and scribe the mortise cavity to be cut. Initially I cut the mortise cavity boundaries using my chisels (see Fig 5) Then I use my Lee Valley Veritas Large Router plane to excavate the cavity as shown in Fig 6 and 7. Here in Fig 8, I’m refining the mouth with the router plane. Fig 9 shows how I’ve clamped it to the bench while mortising. Laminating and Shaping Next in Fig 10, I laminated the Right Side (Part B) to Main Body (Part A). I then started chamfer detailing . In Fig 11 - 13, I am chamfering along the top edges and bottom edge of the Right Side (Part B). In Fig 14 & 15, I have done Stopped Chamfers for the front and back corners. The Wedge Next I shape the wedge Per Fig 16. As mentioned earlier the bed angle is at 50° and the wedge face at 60° on Part A. The wedge will be a 10° angle and is approx 6” long. Making the angle slightly larger initially then fine tuning to fit the mortised area is advisable. Detail A shows the curvature required for the shaving to climb up and out as you are planing. Fig 16 Per Fig 17, this is the notch, Detail B, for assisting in wedge removal. Blade This is the complete 1/4” round blade per Fig 18. I didn’t go into detail here with the whole process of shaping, heat treating, honing, etc. Again if anyone is interested and has questions please let me know. Fig 18 Finishing To start I coated all the plane body (except the bed) and the wedge with two coats of 50/50 cut Tung oil. Per fig 19. I let this cure for one week. Fig 19 Then I brush coated with two coats of Shellac and allowed to dry overnight. The actual sole is left only with the tung oil coating. After this, I French polished with shellac to make the grain “pop” per Fig 20. Fig 20 Finally per fig 21, I coated and buffed eveything with wood butter except the bed and bottom of the wedge. Here’s the completed 1/4” Round Moulding Plane per Fig 21 and Fig 22. Fig 21 Fig 22 Thanks for Looking! Cheers! MrRick

- 7 replies
-
- 4
-

-

-
- plane
- moulding plane
- (and 3 more)
-
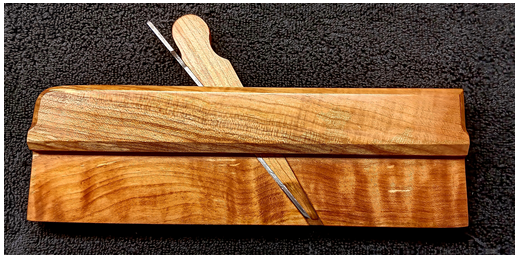
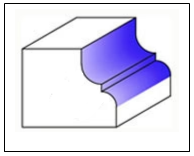
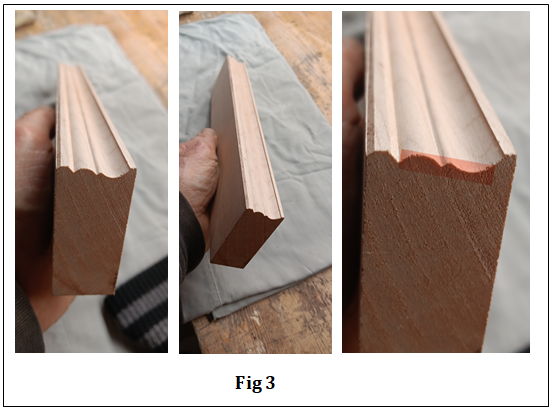
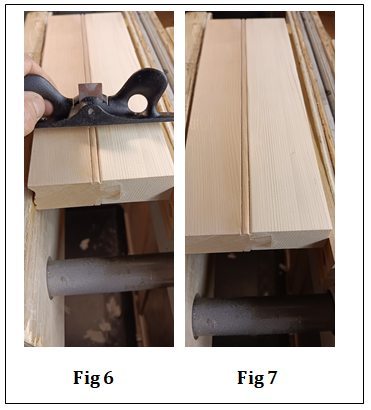
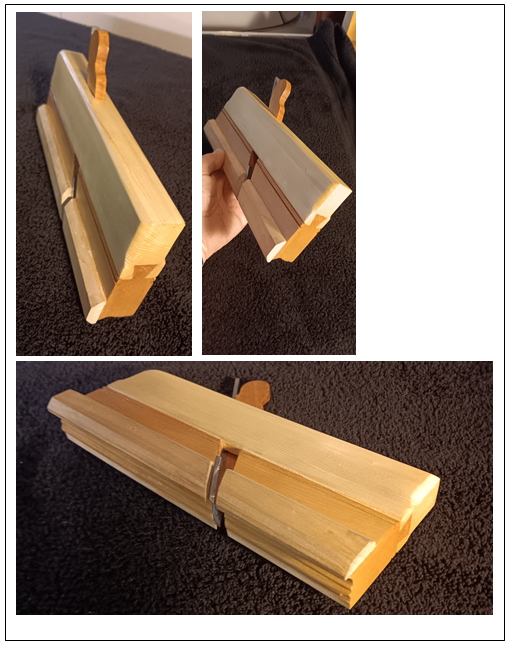
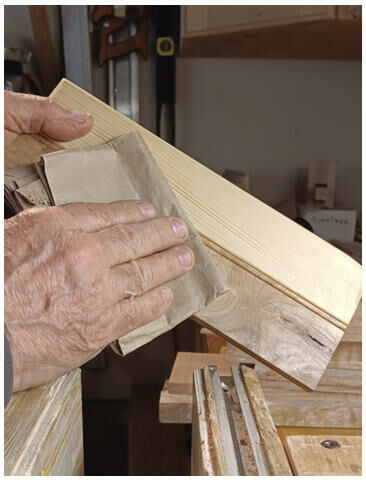
Introduction I’ve made a number of moulding planes now but have always had it in mind that one day I’d make an “ Classic Ogee” moulding plane. I knew it could be a challenge because it’s a step up from making Rounds and Hollows. This seemed true to me because an ogee is the combination of a Round (see “a”) and Hollow (see “b”) on the same blade (see “c”) and sometimes with a quirk in between. Think of a quirk as a little stepped recess. Cutting the “Round” portion for the blade (see “a”) is finicky but not too difficult because you are using a round file for shaping. However, cutting the “Hollow” portion (see “b”) can be difficult because a number of small files are required to shape the curve and you are placing a quirk in between. The Beginning There’s a lot to do when making a moulding plane. I start off by choosing what wood I will use and milling the stock. I start off by making my moulding plane a little on the large side at 3-1/8” tall by 10-1/8” long and finish to 3” tall by 10” long. Thickness will vary depending on the blade but usually I shoot for 1”. I will be making this plane out of two kinds of wood. The top half will be Pine and the bottom half will be Maple. Here I made the Maple bottom half about 1-5/8” x 10-1/8”. The pine top half will start off with the same dimensions. After card scraping the stock, see Fig 1, all around and acheiving a perfectly square profile, I will mate the upper and lower halves (Pine on top and Maple on Bottom) using a sliding dovetail to join the two together. See Fig 2. shown upside down here. Then I proceed to doing the profiling on the bottom (shown completed here) Next, I flush the ends square. I don’t take too much off because I want enough to finish off to final dimensions at the end. Then I do a final check before continuing. Shaping the Profile on the Bottom As mentioned, I wanted to do a “Classic Ogee” profile on my plane’s sole. There’s a number of different kinds but this one is the one that I wanted to try. See Fig 3. No small task. I have to say that this was a real challenge! The edge highlighted “orange” is the actual shape that I now needed to make the blade shape. It just gets tougher but I’m up to the challenge! Here, I do some light sanding to prep the sides for some beading that I will do with a scratchstock. See Fig 4. Scratchstocking Beading I scratchstock some beading where the two different woods of Pine and Maple join at the dovetail. This is done on both sides. The reason is two fold. First it will help to hide any gapping that may occur with wood contraction and expansion. Second it will aesthetically hide the parting line between the two. I start by using my homemade scratchstock because it has a larger fence and allows me to reach the area to bead. See Fig 5. Once I made the initial beading using my homemade scratchstock, there is enough scratched depth to allow me to switch to my Veritas scratchstock and finalize the beading freehand. See Fig 6. Why? Because I found for me that using two hands on a scratchstock allows far more control to accomplish the final perfect beading. Look at Fig. 7. Mortising for the Blade I now begin to do the mortising for the Escapement, Mouth, Bed, Cheek, and details. First I set up my Moulding Plane Mortising and Angle Jig that will give me a 50° Bed and a 60° Wedge face. This jig has an adjustment screw that allows me to fine tune the mouth opening for the blade and the wedge. When set up, the front half provides the angle for the wedge face and the second half provides the bed angle. See Fig 8. In Fig 9, I flush the 60° front half to the front nose of the plane’s body and clamp down. Note that the plane’s body sits on an “alignment edge” on both jig halves. I use the blade (see Fig 10) to get an idea how much gap to allow for a wedge’s tip to almost reach the blade’s tip for maximum clamp down force on the blade when installed. I usually like this gap for the wedge’s tip to be 3/32” – 1/8”. See Fig 11. Then I cut a 10° wedge. Final shaping for this wedge will come later. Along with the blade, I butt these two against the 60° front half. Then sandwich the second half against it. I then micro adjust the screw until it just touches the jig’s front half as shown. Then I make sure both jig halves are clamped well to the plane body. I then pencil in the lines on the plane’s body for the two angles. After mortising the Escapement, Mouth, Bed, Cheek this is what it looks like. See Fig 12. I also made a cardboard template for the blade that I make next. Making the Blade I ordered a couple of plane blades from Amazon. I was hoping they would be at least HSS steel. I know they will be from China. I did a spark test and pretty sure they are at least 1084 or 1095 steel. Here I cut out the blank from my cardboard template. See Fig 13. Here per Fig 14, I have annealed the steel to remove the hardness and start shaping the blade. In the two Fig 15, I then place the blade into the plane body and trace the sole onto the blade with a hooked awl. I then proceed to shape the blade. After getting the desired results, I then re-hardened the blade. I clean it up and temper it. Finally, I hone it. Then I do a test to see how it planes. Modification So after doing this, I felt the fence was a little short and decided to add another fence. It proved to be easier to use. Thanks for looking! Cheers! MrRick
-
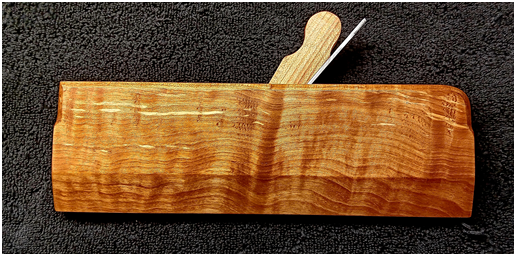
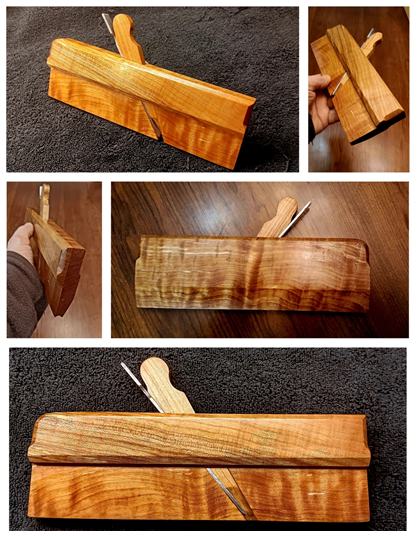
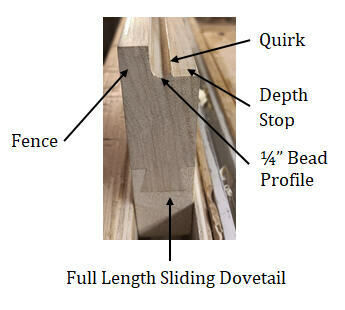
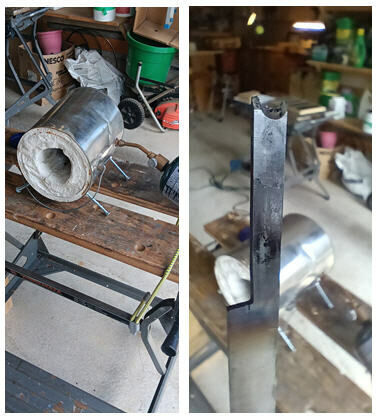
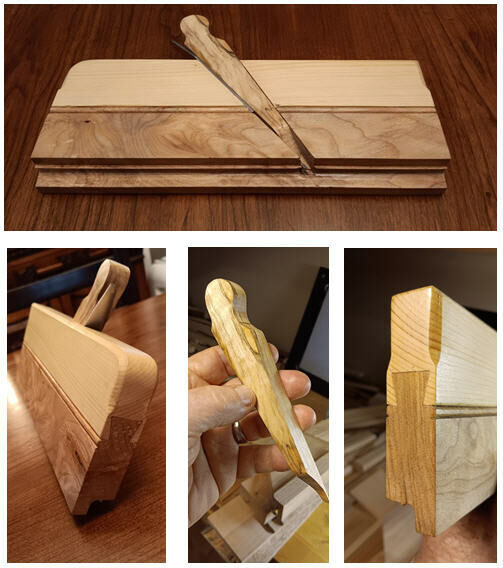
Introduction - Why Use Moulding Planes? Moulding planes are extremely effective tools- quick to setup and easy to use. They can take the place of most router bits and leave a much cleaner surface. Plane irons shear wood fibers, leaving a perfectly smooth surface ready for finishing. A router bit, no matter how sharp, leaves a scalloped surface behind. Now, if you are running 1,000 linear feet of crown molding, a router/shaper is the way to go. If you want to quickly add a bead detail to a door or table apron, tweak a rabbet, or cut a few dados, you can grab a moulder and have it done in seconds. It's also much easier to quickly wreck a piece using a power tool than with a moulding plane. Not to mention the dust, noise, and danger inherent in power tools. Moulding plane blades were normally bedded at 45 degrees to the sole of the plane, though British planes commonly used 50 degrees (York pitch) or higher. As the bedding angle increased, the action of the plane iron becomes more of a scraping action, and less of a shearing action. This is the same effect as increasing the effective cutting angle of a bench plane. The benefit to a higher pitch is that the plane will perform better on hardwoods with difficult grain. The cost is the plane may be harder to push and has a reduced usable edge life. On the other hand keeping the blade sharp goes a long way to making it very effective. The Concept I started by selecting a piece of Spalted Maple and Pine. The idea here was to mate the two together vertically where the top half will be the Pine and the bottom half will be the Spalted Maple. Pine has a nice soft comfortable feel in the hand. So I wanted to chance using it for where the hand rests on the top half of the plane. I needed the structural part on the bottom where the bead profile, quirk, fence, and depth stop will see the wear. So instead of getting into boxing solely for structural benefit of the bead profile itself, I decided to make the whole bottom half Spalted Maple. This side bead moulding plane cuts a bead on the edge of a board. Because of the integral fence and depth stop it is simple to use- hold it upright against the edge of a board and plane until it stops cutting. Very simple. These type of planes are always boxed- at a minimum the "quirk" of the bead is boxed. Better planes are completely boxed. As mentioned, my whole bottom half is boxed. These are very useful planes to have on-hand. A bead detail is useful anywhere you want to add interest to an edge- along a table skirt for example. It also serves to soften a sharp edge, protecting people and the edge from splintering. A bead is also a good idea anywhere you want to distract the eye from a joint where two things meet- along a the vertical lines of a door, or along the edge of a ship-lap back of a case piece. The bead hides subtle variations in the edges from the viewer. Building the Body and Wedge The overall plane dimensions are 1” x 3.5” x 10”. I hand planed the two halves and squared them up all around. Then I joined and glued the two halves with a full length sliding dovetail (as shown). Next, I shaped the bottom full length with the ¼” bead profile, quirk, fence, and depth stop. I then cut out the mouth, cheek, bed, and breast. The Bed Angle is 50° and the Breast Angle is 60°. The primary bevel angle on the blade is 35°. Next, I shaped a 10° Wedge. The final shaping comes after making the blade. Detailing There was some very minor chip out along the mating surface edges of the upper and lower halves, between the Pine and Spalted Maple. So I decided to use my scratchstock and strategically place a bead on both sides at this parting line. I started to use my Lee Valley Veritas cast iron scratchstock but its fence depth was not great enough. So I used my home made scratchstock with the veritas ¼” bead cutter. Surprisingly the scratch stocking was very successful. Spalted wood especially Maple is not easy to do but can be if you monitor your pressure and speed. Making the Blade It’s now far enough in the build that the blade needs to be made. I assembled the rough cut out blade stock into the plane so that it was just poking out of the mouth and scribed the bead and quirk outline on it. Next, I setup my homemade forge. I showed this in a previous post. I then annealed the blade to remove the hardening. Next, I cleaned up the blade and gave it the first grinding, shaping and honing. Then I re-hardened the blade. Before going too far, I wanted to make a test cut to make sure I had made a functional plane. I didn’t want to push cutting too much because the blade at this stage is brittle. The test cut was very pleasing. Then I fired up the forge again and tempered the blade. A straw color means it’s perfectly tempered. It softens the steel a bit and readies it for final honing. Lastly, I did the final honing to the blade. I used my DMT Diasharp diamond stones 600, 1200, 8000 and final polishing with a Shapton Ceramic waterstone 16,000. It came out very very sharp! Then a quick final test cut pass confirms the blade is ready for use! Preparing for Final Finish After the first coat is dry, I go over with a brown paper bag. This is an old woodworker’s technique that many seldom hear about. It de-nibs, lightly sands and buffs the wood. IMO it’s better than steel wool, costs nothing really, and cleaner for the surface. The Final Finish I applied the final finish. I gave it 3 coats of General Finishes Oil based Gel Top Coat, Satin. Each coat dried for 12 hours. Between each coat I Brown paper bagged it. Then I gave one generous coat of wood butter and polished. Hope you enjoyed this! Cheers!! Thanks for looking! MrRick
- 9 replies
-
- 9
-
-
-

-
- plane
- moulding plane
- (and 1 more)