Skip to content
View in the app

A better way to browse. Learn more.

The Patriot Woodworker

A full-screen app on your home screen with push notifications, badges and more.

To install this app on iOS and iPadOS
  1. Tap the Share icon in Safari
  2. Scroll the menu and tap Add to Home Screen.
  3. Tap Add in the top-right corner.
To install this app on Android
  1. Tap the 3-dot menu (⋮) in the top-right corner of the browser.
  2. Tap Add to Home screen or Install app.
  3. Confirm by tapping Install.

Cutting Bands Of Hardwood On A Table Saw
Featured Replies

Hi Guys,

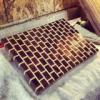
I'm a novice wood worker and I'm looking for some advice. I make end-grain cutting boards and in the cutting board I have about ten 1/8th inch thick x 1" wide by 14" long pieces of hardwood that go in-between other layers. I find it very difficult to get a consistent thickness and safe-cut on the table-saw. Often times Im binding up or burning the wood and other times when I'm being more "safe" I'm not getting a consistent thickness. Is there any way I can do this properly!?  I have attached a picture of one of my walnut/maple cutting boards and you can see the band of maple that I'm referring to in it.

Any advice would help; and please "spell it out for me" cause I aien't that smart haha....

Thanks


post-1938-0-57355500-1410994059_thumb.jp

There's only 2 ways that I know of to do this with my limited knowledge in the subject, and that is to either get a power planer for a bunch of $$$, or maybe attache a power sander to a table laying it on it's side and then run your strips between  the sander and say a 2x4 that you also attach to the table, if that makes sense. There's a guy on Youtube by the name of Carl Jacobson, that had a similar setup which he was running strips through to plane them.

I had the exact same problem with the inserts in my rolling pins, also 1/8" thick. I tried my planer, with a table insert. It is a 3/4" thick piece of MDF covered with a 1/8" piece of Plexiglas. That , in essence , raised the planer bed so I could plane thicknesses 1/8" and thinner. It works sometimes if the wood grain is very straight and uniform. If it isn't it shatters the piece and makes a mess.

Let me find some pictures of other methods and I'll upload them here. Be back in a couple minute.

OK, I found some example of one method that is not very expensive and may work for you

These are some variations on Thin Strip Ripping Jigs-

gallery_3380_41_22462.jpg

Made from hard wood


gallery_3380_41_1244.jpg

Similar with bearing


gallery_3380_41_834176.jpg


gallery_3380_41_407278.jpg


My interpretation of the previous two.


All of these work on the same principle. Set the edge of the jig offset from the blade by the thickness of the strips. Set the rip fence so the piece to be cut is between the jig and the rip fence. After a cut, move the rip fence to again trap the piece and make the next cut.


There is another method and it seems to work the best for my situation. I built a drum sander. I don't know exactly what it cost because I had a lot of stuff lying around (motor, PVC pipe, wood). You can see it at http://www.thepatriotwoodworker.com/index.php/the-story-stick/woodworking-stories/shop-made-machinery.

Ryan there are several ways to achieve your desired results. Of course the jigs Lew has shown will work and work safely. If you are going to be making many end grain board you really need a drum sander. I do a lot of end grain boards and the drum sander was the best investment I made to sand them flat and consistent. 

As fat as sanding down to 1/8" you can do that on the drum sander also. I cut strips to use on Chess board and after resawing them on the band saw, I run them through the drum sander to get them smooth and consistent in thickness.


You can build a sled to run through your jointer for the small pieces and plane down to 1/4". As Lew stated, grain on maple can cause some problems there.


If you are getting a lot of binding and burning cutting those pieces at 1/4" you might need to check you blade alignment and your fence alignment and make sure you have a really sharp good blade when cutting the thin strips. I have cut them on the table saw for my chess boards also. to cut a 1/8" strip set your fence at 1/4" and it will give you the 1/8" strip. Make a push stick and set the blade height just high enough that 1/2 a tooth is clearing the top. If all is lined up you should get a good cut. If you are looking for 1/8" final, you might want to add a bit to it and then sand smooth.


Great question!

Ryan

I use a thin strip jig I made with a bearing for the wood to roll past. See the photos Lew posted for an example. I also make sure that my table saw is in alignment. I also watch the speed I feed the piece through. Cherry and Maple can burn pretty easy, so when I make these I clean my blade really good. I also found that I get better results using a 40 tooth blade. Lightly sand the pieces cut using a sanding block as to not distort them. Someday I would love to add a drum sander to my shop, but till then this is the method I use.


Wayne

Years ago I made a jig to cut strips using my feather board. It already had about everything I needed except rollers. I used

a couple of old bearings and it worked well. Shop Notes magazine thought it was good enough to publish

post-3488-0-60389900-1411076226_thumb.jp

post-3488-0-31754300-1411076268_thumb.jp

My preferred method of thin strips is the bandsaw and the jointer & planer.  I consume less material this way and get a  cleaner more consistent  product.  No saw blade marks no burn and the thickness  never varies.


Joint the edges of a board or more than one board .

 Saw two strips from the board  on the Bandsaw

Joint the edges again

Saw two more

Yadda yadda


When there are sufficient strips  put a plywood board in the planer to alter the minimum height to which  planer can cut and affix a block to trap the board stationary.


Run your strips through the planer jointed side down.

VIOLA~!!   they are uniform and perfect.


Some planers are unfriendly to thin strip planing but I seem to have no issues.


If you are dedicated to the table saw make a board shaped like so:

thinripfence-002_zpsb06db04c.jpg


The bright green bit at the lower left corner is the bit that pushes the work.

You set the fence up to accommodate the pusher board and  repeatably cut whatever thickness you want.


 It works sometimes if the wood grain is very straight and uniform. If it isn't it shatters the piece and makes a mess.


I had the same issue till I got a byrd Shellix.

  • Author

Guys,


Thanks for all the great tips. I think the best method would be the feather board; and I LOVE the roller added to it; I'll make one up when I get home! I have a Delta 31-260x drum sander coming on Wednesday. I had "made-do" with a planer, but after a very "exciting" accident on one of my previous cutting boards I have decided it's just too dangerous to use on end-grain boards; so I I think it'll be money well spent; plus I can make wider cutting boards now.


Thanks again!

Ryan

You will love being able to do it on the drum sander. It made a lot of difference when I got mine. I never ran the end grain through the planer but I sanded them all with a hand belt sander. Talk about wearing out your arms.


Depending on how they look coming out of the clamps I start with 36 grit, then work up to 60, 80, 120. If they are too bad out of the clamps I will just start with the 60 grit and work through the other grits.

Great information here, guys.  Will put these jigs on my list of "must have".  Thanks

Join the conversation

You can post now and register later. If you have an account, sign in now to post with your account.
Note: Your post will require moderator approval before it will be visible.

Guest
Reply to this topic...

Recently Browsing 0

  • No registered users viewing this page.

Account

Navigation

Search

Search

Configure browser push notifications

Chrome (Android)
  1. Tap the lock icon next to the address bar.
  2. Tap Permissions → Notifications.
  3. Adjust your preference.
Chrome (Desktop)
  1. Click the padlock icon in the address bar.
  2. Select Site settings.
  3. Find Notifications and adjust your preference.