Search the Community
Showing results for tags 'tip'.
-
Well, Al Jolson was certainly right about April showers! A little over 3" since Sunday evening and a little more yet to come Our Patriot Turners- Member @calabrese55 posted a great tip for protecting turnings when chucked to a set of Cole jaws. In his post, he shows us how he made these foam protectors. Thanks, Mike, for this great idea! @Fred W. Hargis Jr posted a question about the Easy Wood Tools square cutters. Our members offered lots of great information. Please check it out and share your experiences. ( @Jordan Martindale ) Member @User74 gave us a couple of interesting surveys this past week. Don is interested in our shops and our preferences for turning species. It is really nice to get to know our members on a more personal level. First off, Don inquired about the lathes we are using: LOTS of responses and we learned that @HandyDan wins first prize!! Secondly, he asked what our favorite wood to turn. Again, no one was shy about sharing their picks: We really appreciate having our members getting actively involved in these conversations. Lots of projects finished and OFF the lathe this week! @kreisdorph and @RustyFN gave us a peek at what they were up to The new posts start here- What’s Coming Up- Click on the images for links to registration and more information: For The Newbies- Sam Angelo continues to offer videos for the beginner interested in learning woodturning. This one is about considering grain direction when turning- Well, you found a nice size log along the road and you are thinking about turning it into a bowl(s). A couple of videos to get you started. First from Richard Raffan showing how to break down the log- And from Craft Supplies USA demonstrating the roughing out process- Expand Your Horizons- It is a new month and the 4 Ways collaboration group has posted a new project. Each of the turners creates a version of a mystical goblet. Another turning from the antiquities. From Craft Supplies USA, an artifacts pot. Check out the microwave tip at the end! A neat birdhouse from Carl Jacobson. Maybe @Steve Krumanaker could shape it a little more like a bee hive to add to his product line! New Turning Items- For our Canadian friends, Lee Valley is now carrying some additional Laguna equipment. Check their site at- https://www.leevalley.com/en-ca/tools/laguna-tools?utm_campaign=485417_Apr3-ProdFeature-Wood-LagunaLaunch-CA&utm_medium=email&utm_source=Lee Valley&dm_i=6EER,AEJT,12YD53,1HQJS,1 Everything Else- This was originally posted in the Woodturner's Forum. In case you missed it- From Ron Brown's newsletter- Just A Few Things I’d like to talk to you about incrementalism for your turning journey. Let’s assume that you already have the basics; a lathe, chucks, spur centers, faceplate, etc. And that you have at least a basic set of turning tools including a few carbide-tipped tools. Also, that you have at least a basic sharpening station for your High-Speed Steel tools. You’ve made the major capital investment needed. Now let’s suppose you want to turn pens and pencils. You only need a few more things like a pen mandrel to hold the blanks, a drill bit to make the hole for the brass tubing, and bushings to help make the proper sizing easily. You might add a pen press and a drilling fixture if you really decide to make lots of pens, but that’s about it. What about threaded lidded boxes? There are two routes, hand chased threads, and a threading jig. A great set of thread chasers from Robert Sorby including a depth gauge is only $149.94 on Amazon. With that set you’ve expanded your repertoire to small turned lidded boxes, burial urns, hollow forms with threaded lids, etc. You can add different thread pitches for around $100 with the addition of new thread chasers. Threading jigs begin at around $250 and go up to over $500, but there is practically no learning curve and you seldom fail. Let’s say you become fascinated with turning salt and pepper mills. You need a couple of forstner bits and a drill chuck for the tailstock. A drill bit extension for the taller mills is handy along with a couple of mandrels to hold the blank between centers as you shape the body. Pepper Mill kits are inexpensive and now you have added salt and pepper mills to your arsenal for about $100. And my latest favorite, Bowls From A Board. For under $150 you can add a basic system to your collection and open a whole new world of fascinating possibilities limited only by your imagination. Think segmented turning with 90% less work. It turns out there are hundreds of YouTube videos on making “bowls from a board” so you are guaranteed a quick start. Turning wood can be daunting because there is so much to learn. Many folks claim this line, “by the yard it’s hard, by the inch it’s a cinch.” I recommend you add one skillset at a time and get the few things needed for that. Pretty soon, you will have to decide which of your passions you want to enjoy next! Safe turning

- 5 replies
-
- 7
-

-

-
- bird house
- carl jacobson
- (and 30 more)
-
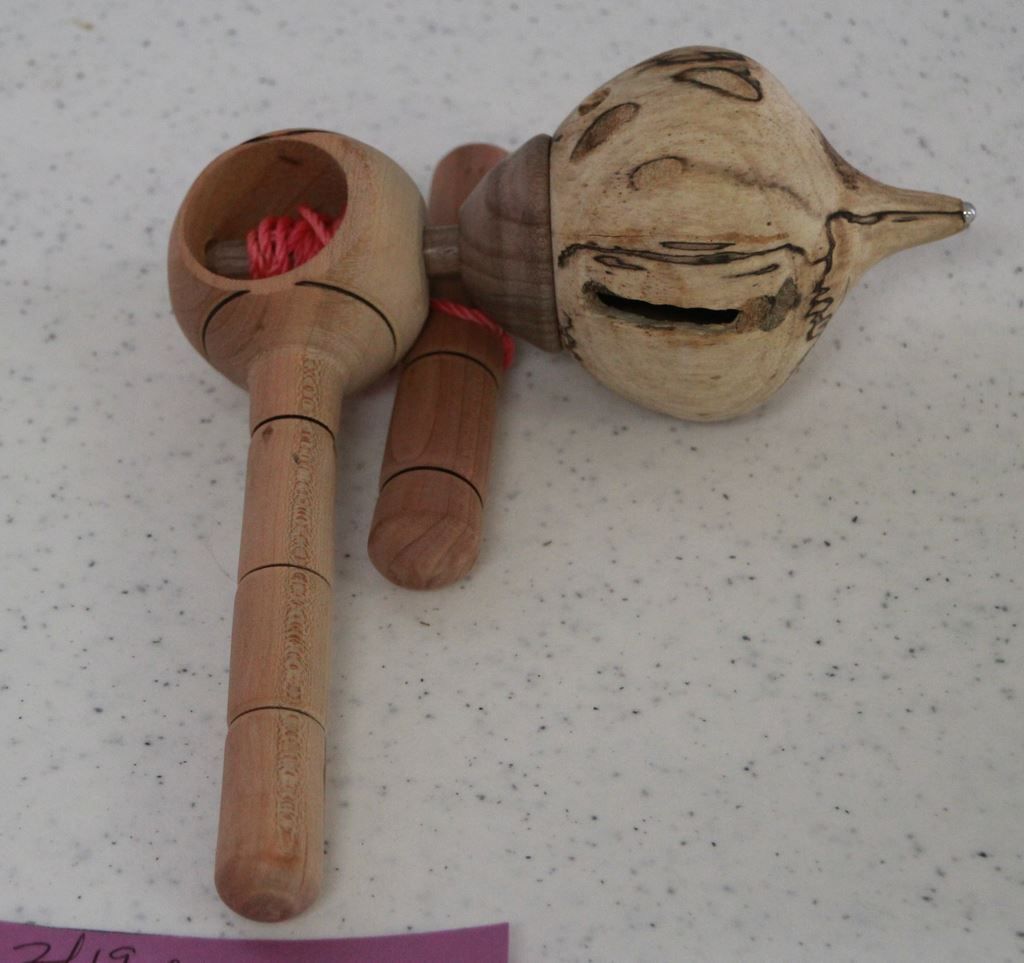
Here is how I save sanding dust to mix with epoxy when I need to fill cracks in my late work. I keep just enough to help me if I am turning something and need to fix/fill a crack on something and I just mix it with some epoxy glue, and it works well for me. Does anyone else have ways of doing it (maybe better than mine)? I bought 25 of these little containers on the internet for like $5 or so.
- 12 replies
-
- 7
-
-
-
- tip
- organization
- (and 2 more)
-
Cool tips! I like the Wedge Anchors Dowel
-
Memorial Day weekend coming up. Please take time to remember all those who gave the ultimate sacrifice for our freedoms. Our Patriot Turners- @Gerald was kind enough to tell us about their recent turning club meeting. Their guest was Jeff Hornung. He does absolutely incredible spiral embellishments. You can read more about the meeting and our members input at- @Ron Altier showed us some of his recent ornaments. Ron received lots of comments on these. In his post he explained a little about the wood he used in making these- What’s Coming Up- Click on the images for links to more information and registration. From the AAW- Lyle Jamieson- For The Newbies- Over the past several weeks, Alan Stratton has been working on turned goblets. He continues to refine the process as shown in this video- A short tip from Lyle Jamieson on the use of the "Pull Cut" with a bowl gouge- Expand Your Horizons- Mike Peace demonstrates turning a Holly box with lid. He adds some beautiful pyrographic embellishments- Many woodturners get requests to turn cremation urns. Mike Peace demonstrates the process as well as providing information about size and lids- New Turning Items- @Gerald provide this link for a turning light. He said the light is available from Jeff Hornung's store- Here's the link again- https://www.thewalnutlog.com/woodworking-store/#!/GloForce-Eye-Light-With-Magnetic-Base/p/162397077/category=41610157 Last week, we posted a video from Carl Jacobson using the new Easy Wood Tools face plate rings. In this video, Carl demonstrates their use in more detail as well as their new chuck drive centers- These are both excellent products and of the quality we have come to expect from Easy Wood Tools. From Craft Supplies USA, some new ring cores- https://www.woodturnerscatalog.com/p/58/7506/artisan-Hammered-Tungsten-Comfort-Fit-Inlay-Ring-Core?utm_source=csusa&utm_medium=email&utm_content=tungsten&utm_campaign=22-05-rings Everything Else- Rick Turns list of YouTube woodturning videos from last week- Lathe face plates and face plate rings need to be centered as close as possible to the center of the piece we are going to turn. I guess some turners are able to do it "by eye", but my eye isn't calibrated very accurately. I've seen (and made) a couple of devices to aid in the centering but they all relied on getting a sharp point to set into a depression. When I got my EWT face plate rings, I decided to make a different centering device. Turned a wooden prototype to be used as a casting model. Then made a silicon mold from the model. Then used clear Alumilite resin for the centering device. The blank cut and the center marked with sharpie- A face plate ring and the centering device- The centering device dropped into the faceplate ring- The larger black dot is the Sharpie mark on the wood and the smaller black dot is the center of the device. My faceplate ring is too far to the left of center Now it's centered and I can mark the holes to mount the ring. There is an small rare earth magnet cast in the resin to hold the device in the faceplate. Which also works great to hold it on the lathe when not in use- ...and for those who argue that carbide tools only scrape and not cut- Air dried white oak more than50 years old! Safe turning
- 3 replies
-
- 2
-
-
-
- carl jacobson
- chuck centers
- (and 20 more)
-
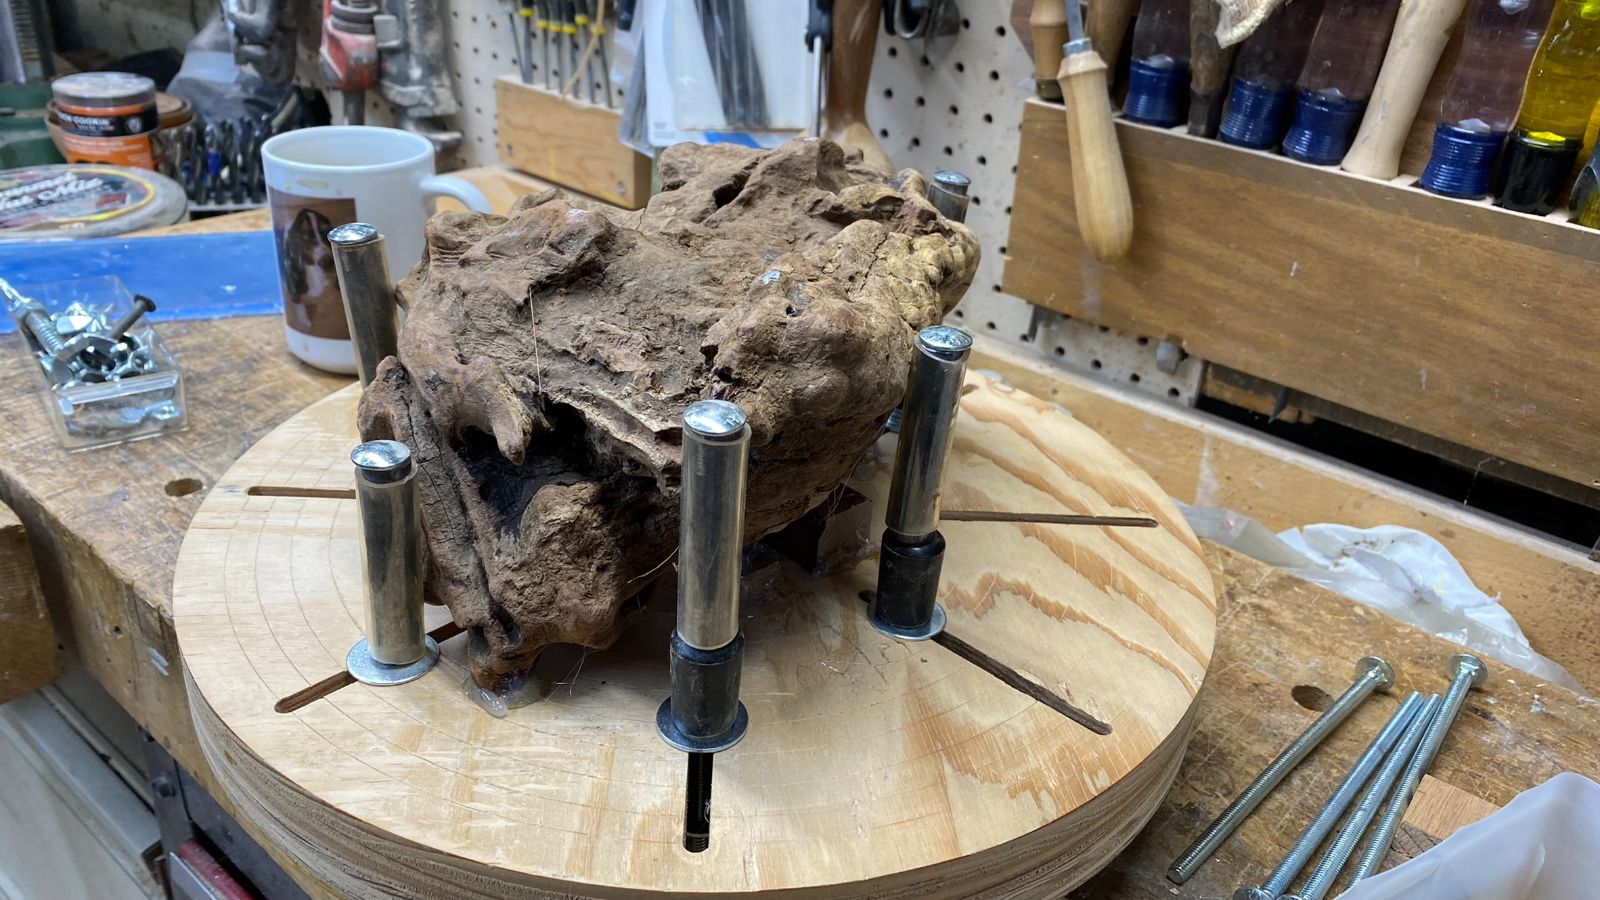
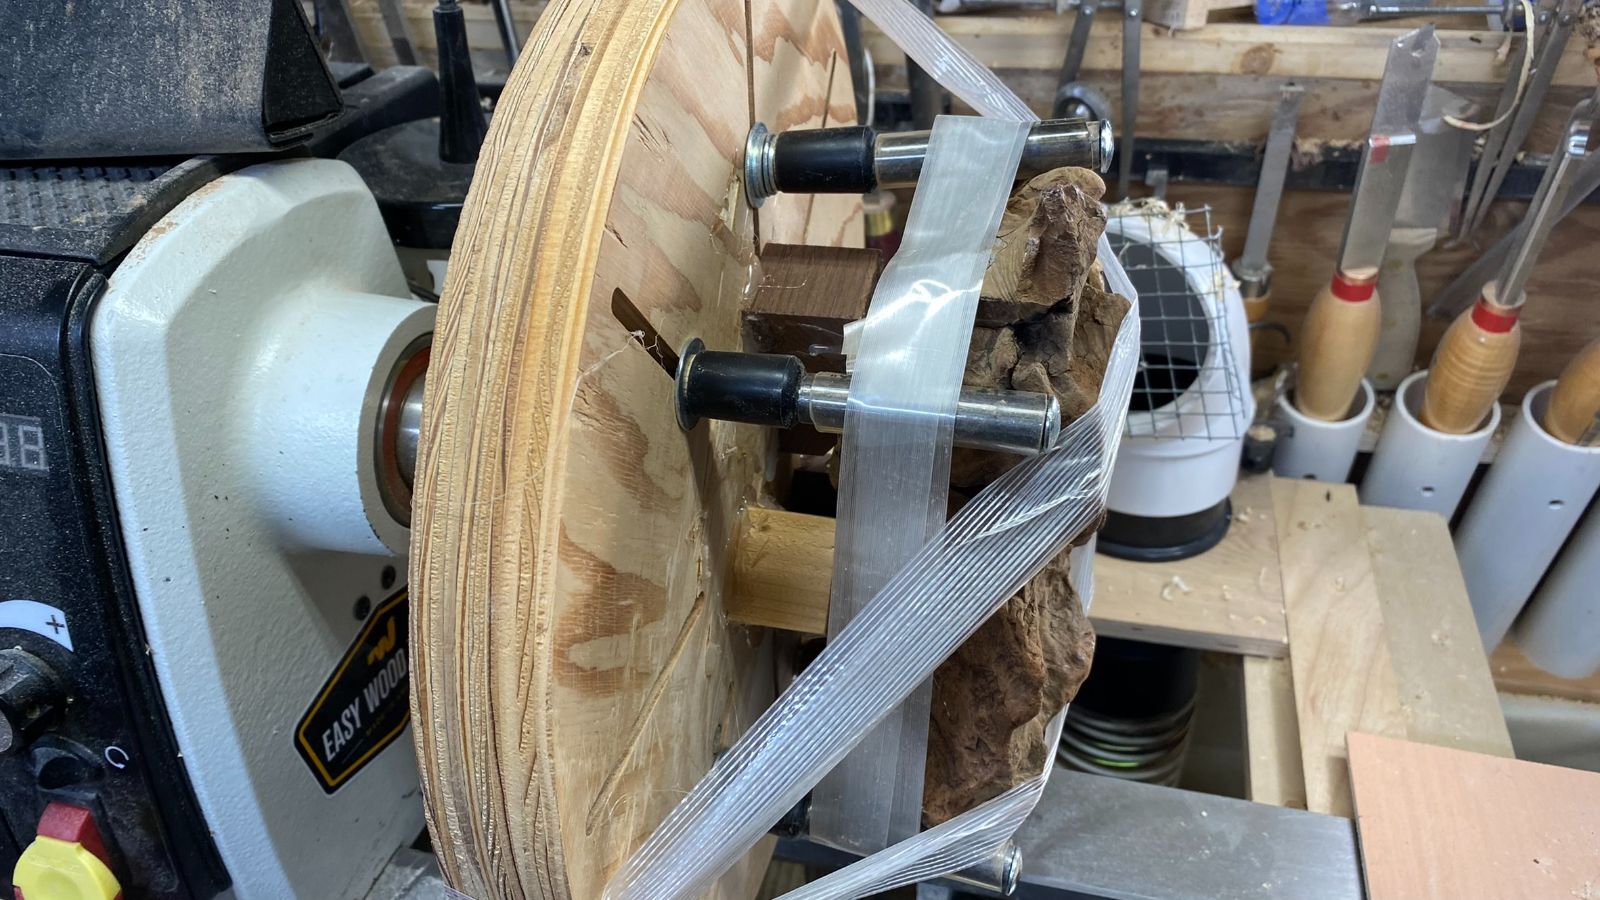
Lovely spring day here in south central PA. My grandmother would have called this "the robin snow" Our Patriot Turners- Not too much happening from our turners this week. @Gerald did post about some of his sales on a different forum in answer to questions about craft shows- What’s Coming Up- From "Meet The Woodturner"- A two day event featuring quite a list of presenters and a wide variety of topics. Click on the above image for the link to the home page and associated information. From Ruth Niles- Click on the above image for the link to registration. For The Newbies- Turning can be like dancing- there are lots of subtle moves that makes it an enjoyable pastime. This video from Kent Weakley demonstrates body movements that can really improve your turning abilities. Cap'n Eddie has a nice little video with a shop tip on protecting your lathe ways. Simple device and easily made- Our shops are almost always in a state of flux. New equipment, saying goodbye to old stuff and changes in interest can all lead to rearrangements. Some of you may be lucky enough to have local friends to compare notes and idea. Others need to rly of folks like Mike Peace to help with ideas on shop reorganization. Expand Your Horizons- Lyle shows shaping and hollowing small objects with Hollowing System and laser measuring. Richard Raffan posted a couple of really nice turned box videos. Both are cross grained turnings. The second video shows making a suction fit lid. New Turning Items- The folks at Woodturners Wonders have a new lamp available. Check it out at- https://woodturnerswonders.com/products/nebula-led-lamp Everything Else- Rick Turns list of YouTube woodturning videos from last week- You may remember from last week, I was trying to figure out what to do with that piece of Manzanita. Gerald suggested carving it instead of turning. I seriously considered that, however, that would have required the purchase of new realm of tools/equipment. As I have already spent my allowance on a new laser engraver, turning it seemed to be the least expensive option. The piece had 3 nubs on the most flat side (circled) which seemed to say "these will be my feet". That meant some sort of mounting had to be made, on this side, for chucking the piece. The stumper was that the opposite side was anything but flat! Using scraps under what would become the top, and hot melt glue, the piece was fastened to my very old shop made chuck; making sure the 3 nub feet were at a level plane. Various length posts added to hold the piece while spinning. And some additional safety taping. Turned a recess. I wanted to leave as much of the natural shape as possible. If I had cut a dovetail mortice for the main mounting, the chuck would not fit with all of the natural shapes. Made a glue block and a paper joint. Utter failure! Considered just a plain glue joint but recently saw a lot of information on hot glue for mounting. I'm Sold! That stuff really holds!! Re-chucked in the lathe. Fairly well balanced and had no trouble with vibration up to and above 1000 rpms. Ready for sanding on the front. First coat of wipe on gloss poly. After the second coat, I'll see what it looks like. Then remove the glue block, reverse chuck it and finish up the area where the glue block is located. Safe turning
-
I am working on a new segmented bowl. I was sanding the rings tonight a learned a very valuable lesson. Whatever you do, do not burp while wearing your respirator.
-
can we expand on motors some... MAINTENANCE OF AC MOTORS The inspection and maintenance of ac motors is very simple. The bearings may or may not need frequent lubrication. If they are the sealed type, lubricated at the factory, they require no further attention. Be sure the coils are kept dry and free from oil or other abuse. The temperature of a motor is usually its only limiting operating factor. A good rule of thumb is that a temperature too hot for the hand is too high for safety. Next to the temperature, the sound of a motor or generator is the best trouble indicator. When operating properly, it should hum evenly. If it is overloaded it will "grunt." A three phase motor with one lead disconnected will refuse to turn and will "growl." A knocking sound generally indicates a loose armature coil, a shaft out of alignment, or armature dragging because of worn bearings. The inspection and maintenance of all ac motors should be performed in accordance with the applicable manufacturer's instructions. Troubleshooting The following troubleshooting procedures are not applicable to a particular ac motor, but are included as examples of the general troubleshooting procedures provided by various manufacturers of ac motors. ----------------------------------------------------------------- TROUBLE: Motor speed slow. POSSIBLE CAUSE: No lubrication. Applied voltage low. Motor wiring defective. CORRECTION: Lubricate as necessary. Check motor source voltage. Perform voltage continuity test of motor wiring. ----------------------------------------------------------------- TROUBLE: Motor speed fast. POSSIBLE CAUSE: Excessive supply voltage. Motor field windings shorted. CORRECTION: Check and adjust level of motor supply voltage. Repair shorted windings or replace or overhaul motor. ----------------------------------------------------------------- ----------------------------------------------------------------- TROUBLE: Motor will not operate. No voltage applied to motor. POSSIBLE CAUSE: Loose or broken wiring inside motor. CORRECTION: Perform continuity test of motor circuit. POSSIBLE CAUSE: Defective motor switch. CORRECTION: Check switch and switch wiring using a continuity tester. POSSIBLE CAUSE: Armature or field winding open circuited. CORRECTION: Repair open winding or replace motor. POSSIBLE CAUSE: Brushes worn excessively. CORRECTION: Replace brushes. POSSIBLE CAUSE: Brush springs broken or too weak. CORRECTION: Replace brush springs. POSSIBLE CAUSE: Brushes sticking in brush holders. CORRECTION: Replace or clean and adjust brushes. ----------------------------------------------------------------- TROUBLE: Motor vibrates. POSSIBLE CAUSE: Loose or broken motor mountings. CORRECTION: Repair or replace motor mountings. POSSIBLE CAUSE: Motor shaft bent. CORRECTION: Replace shaft or overhaul or replace motor. POSSIBLE CAUSE: Motor bearings worn excessively. CORRECTION: Replace bearings or overhaul motor. ----------------------------------------------------------------- TROUBLE: Motor arcing excessively at brushes. POSSIBLE CAUSE: Brushes worn excessively. CORRECTION: Replace brushes. POSSIBLE CAUSE: Brush springs weak. CORRECTION: Replace brush springs. POSSIBLE CAUSE: Brushes sticking in holders. CORRECTION: Replace or clean brushes. POSSIBLE CAUSE: Brushes incorrectly located. CORRECTION: Position brushes properly. POSSIBLE CAUSE: Commutator dirty or excessively worn or pitted. CORRECTION: Clean or repair commutator as necessary. POSSIBLE CAUSE: Open circuited armature coil. CORRECTION: Repair open circuit or overhaul or replace motor. ----------------------------------------------------------------- TROUBLE: Motor runs but overheats. POSSIBLE CAUSE: Motor bearings improperly lubricated. CORRECTION: Lubricate bearings. POSSIBLE CAUSE: Excessive applied voltage. CORRECTION: Check voltage and adjust to proper level. POSSIBLE CAUSE: Field windings short circuited. CORRECTION: Repair short circuit or overhaul or replace. POSSIBLE CAUSE: Excessive brush arcing. CORRECTION: Replace and adjust brushes. ----------------------------------------------------------------- TROUBLE: Motor will not operate but draws high current. POSSIBLE CAUSE: Shorted circuit to motor. CORRECTION: Locate and repair short circuit. POSSIBLE CAUSE: Open field winding in shunt motor. CORRECTION: Repair or overhaul or replace motor. POSSIBLE CAUSE: Motor internal circuit shorted. CORRECTION: Repair short circuit or overhaul or replace motor. POSSIBLE CAUSE: Mechanical stoppage. CORRECTION: Check for seized motor bearings or binding of mechanism driven by motor. Repair or replace seized components. POSSIBLE CAUSE: Excessive load on motor. CORRECTION: Reduce load or install motor capable of carrying greater load.
-
I wanted a bench mounted tape dispenser for packing tape. While working on some compound ornament I needed to be able to hold the piece with one hand and tear off short strips of tape with the other. At work we have a bench tape dispenser, but it moves around a lot when in use. U-line has a bench mount dispenser with a c-clamp, it's about $25 with shipping, and I'd have to wait to get it. So, I got a tape gun (Walmart) for $11 (the handle was bolted onto the frame) I removed the handle and clamped it to the workbench next to the saw. Works like a charm.
-
For those that need a little help. IF you are willing to drive to Piqua, OH. At the corner of South St. & McKinley St. ( stoplight, look to the south east) you will find Chuck's Sharpening Service. Almost any edge that needs sharpened....chainsaws, chisels, knives, plane irons, and handsaws. Very reasonable. Note Rt36 coming in from the west, just as you head downhill, there is a T intersection, this is Mckinley St. head south until you hit South St. 2nd building. Also..he has even less room in his shop, than I do...
-
I clicked on a video showing a guy nailing brads in a lap corner joint. He said that since he was nailing so close to the end of the board, turn the brad upside down and blunt the point with a hammer. Your board will not split. Never heard of this before. Anyone know if it works as he said?
-
This might be better in the "Tip" section, but.. How to check a square for...square? Get a nice straight edge piece of wood scrap. Set the square against that edge...and mark a line across the face of the board.. Yes, there are two lines there ( already done the test..) Next, flip the square over... Mark a second line beside the first one. You are looking to see IF the two lines are parallel to each other. If they are not? Square needs adjusted until it will pass this test. Usually a hammer strike on the blade..up or down..recheck, and adjust til it does pass. At least this old Stanley 8" passed the test...close enough for the girls I go with So..give it a try....doesn't take very long, either.
-
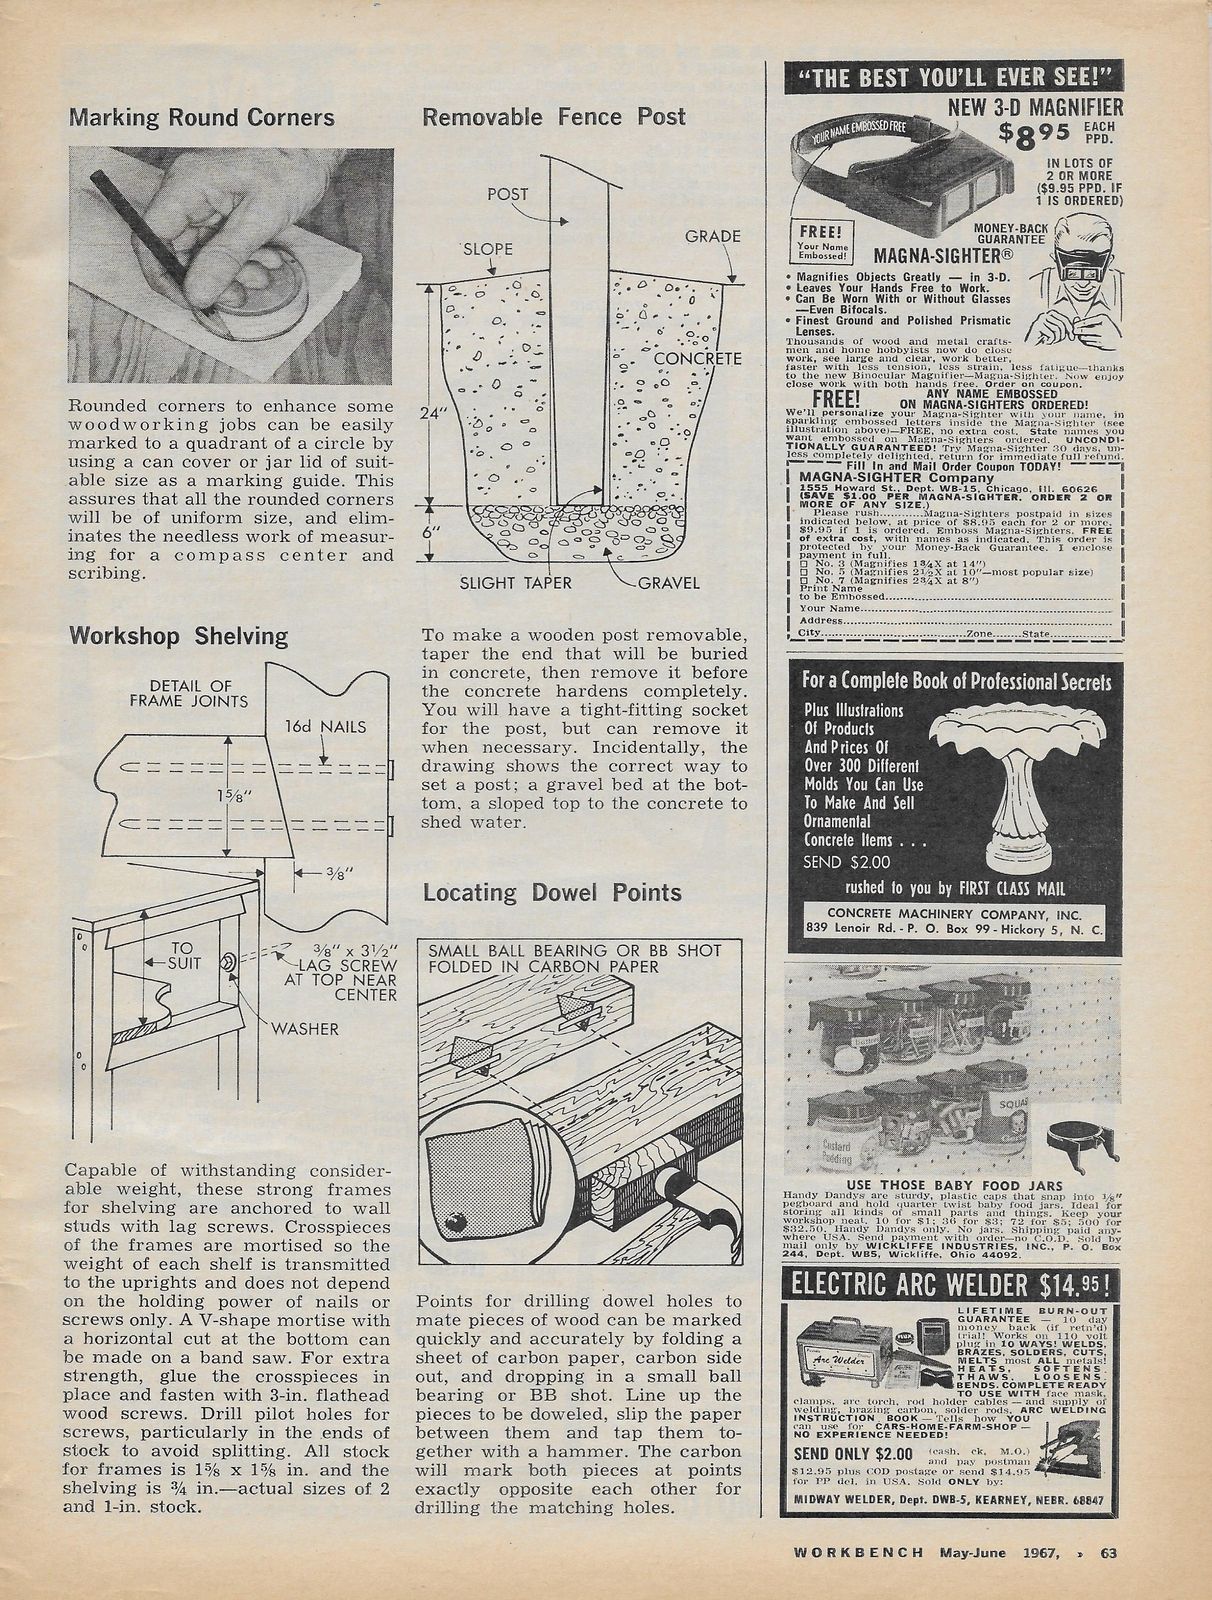
I have continued to scan my collection of Workbench Magazine plans for our guests and members to download from our Files Department, and I thought I'd share the Shop Tips section of the magazine as well. As is the case with my file downloads for plans from Workbench Magazine, the same applies here, I have received permission from the current Workbench Magazine to publish the old articles and plans on the open source web. Please see the collection of plans as well at https://thepatriotwoodworker.com/files/ Enjoy! These tips still apply to our work today, very cool!
-
When using small hinges to install delicate frame doors or any thing smaller then a standard cabinet door that requires a mortised hinge, I like to crimp my little hinges to close the gap between the door and the mating surface of what ever your installing the door on. Once you close the gap in the hinge, then mortise it in, you have a nice tight fitting door with virtually zero gap. The first pic is a standard small hinge, in this case I have a 2" brass hinge I bought from the home center for a display case I am building. You will see how "Gappy" the hinge is right out of the bag new. Put the little hinge in a vise, Then tighten the vise as tight as you can, be careful not to insert the hinge too far into the vise jaws or you'll just be crimping the hinge against the pin. The pic below shows my hinge after I tightened down on it. There you have it, a very simple little hinge trick for closing those gaps in your doors, works great for jewelry boxes, small cabinets, or for any project that requires small hinges. And, don't worry about marring the surface of the hinge with the vise jaws, because the jaws are against the bottom surface of the hinges, and I have yet to see any scratches on the brite side of the brass, but you can always slip a piece of wax paper in between the hinge to prevent marring if your worried about it. Thanks for reading!
- 21 replies
-
- 11
-
-
Quite a wide variety of things this week. Our Patriot Turners- @Ron Altier posted a question concerning his lathe's faceplate. He was having difficulty removing the faceplate after use. Our turners offered several suggestions and modifications. Head on over to Ron's post and see if you can add anything to what was discussed. @Gerald added a really great tip to the Woodturner's Forum tip section. He gave us a link to an article using the bandsaw for cutting bowl bland. Lots of good information- @John Morris Asked for information on the "Ring Master" tool for making bowls. Several of our members gave him their opinions. Please check in on this post and help John out with his inquiry- You know, our turners are the absolute best bunch of folks! @HandyDan posted his thanks to @John Morris for gifting him a buffing system. Dan is our pen making expert and this system really helped him improve the finish of his bullet pens. What’s Coming Up- More information and registration for this September event can be obtained at- https://gawoodturner.org/symposium/ For The Newbies- We want to thank @Gene Howe for passing along this reminder. Safety is really important, not just for beginners, either. Expand Your Horizons- I run hot and cold on what type of finish to put on a turning. Sometimes the function of the turning dictates the type of finish. Other times it is up to individual tastes. I really like the "feel" of the wood when you touch the turning while others prefer a more "finished" feel. If you like the high gloss finish, here's a video from M. Saban-Smith on the steps he uses to get a glass-like finish- New Turning Items- We found a couple of new items. From Woodturners Wonders, a small bit holder for use when sharpening. More on this holder is at- https://woodturnerswonders.com/collections/unique-tools/products/small-tool-bit-holder Second, it a new item from Ruth Niles. Ruth calls this one a "Tab Popper". This should be a hit with the ladies to protect their nails. Ruth has more information and images on her site- https://nilesbottlestoppers.com/product/niles-tab-popper/ Everything Else- The latest edition of Woodturning OnLine is available at- https://www.woodturningonline.com/index.php?edition=062019 . I know many of you do club demonstrations. There is a nice article about remote demonstrations in this issue. You can check it out at- https://www.morewoodturningmagazine.com/articles.php?articlesid=127&access=bb51e4e9a315 Rick Turns has the May edition of the YouTube woodturning videos. Please add a comment to Rick's posting. A lot of work goes into cataloging this data- I made a trip up to the Woodcraft store and now have been playing with my new Easy Wood Tools mini hollowing set ( @Jim from Easy Wood Tools ). I had a really dry, hard chunk of cherry. Used the straight hollower to make a bracelet. Shavings came off like it was green wood! Finished with mineral oil and beeswax. I had some maple, from a tree we had removed, setting behind the garden shed. When I cut into it, I discovered it had spalted. Couldn't let that go to waste although it is quite punky in places. Mounted a small chunk and went to work. I drilled a 1/2" hole down thru the center and then shaped the outside. I flooded the surface with CA to help stabilize the punky wood. Using the 0°, 45° and 90° tools to hollow out the center I made a wall thickness tool from an idea I stole from a Mike Peace video. He recommended spring steel wire but all I had was coat hanger wire. As you can see, I need more practice and a better thickness gauge. The bright light near the top is where I sanded thru the surface of the turning. It was extremely soft there. The lights near the bottom show thru REALLY thin walls! Side view from one angle, looks pretty symmetrical. Looking closely, you can see where I sanded thru at the neck. Turned 90° and now the asymmetrical neck can be seen on the right. The soft part sanded down quicker than the harder grain next to it. I just couldn't bring myself to pitching it. Made a jam chuck to finish the bottom- As fragile as the piece was, I needed to get it out of the chuck without banging on the sides. Air pressure to the rescue! When I make a wooden chuck (or glue block), I drill a small centering hole completely thru the wood. Turned out to be a good habit. And there you have it. Gonna play around, using the mini hollowing tools to create a small finial. Not sure about the finish, yet. Safe turning
-
I have continued to scan my collection of Workbench Magazine plans for our guests and members to download from our Files Department, and I though I'd share the Shop Tips section of the magazine as well. As is the case with my file downloads for plans from Workbench, the same applies here, I have received permission from the current Workbench Magazine to publish the old articles and plans on the open source web. Please see the collection of plans as well at https://thepatriotwoodworker.com/files/ Enjoy! These tips still apply to our work today, very cool!
-
To start the "Tips and Tricks" off on a good note, I thought of what basics we should all be aware of and some tips to make the best cuttings we can. Remember, guys and gals, there is NO right or wrong answer to any of our topics. What best works for you is the way it should be. That being said, I think we can always learn a little from our fellow scrollers. Please chime in with your suggestions of your ways of doing things. It will always be appreciated by all. BLADE ALIGNMENT We all realize that the blade should be perpendicular to the table unless we are doing angle cuts. Great blade alignment is "required" in stack cutting (which we discuss later). What we don't normally check is front to back alignment, "fore/aft" movement of the blade, and "wobble". Â Let's take them one at a time and see what we can come up with. LEFT/RIGHT ALIGNMENT I have seen several ways, over the years. Â Most of them work pretty well. I use a machinest's right angle to set my blades. Â However, for some reason, this doesn't always work on my machine. Cut into a block of wood, back it out of the kerf, move the cut to the back of the blade and see it lines up. Using a scrap piece of 3/4" stock, cut a piece out, then move the cut side to the opposite side of the blade and see if it is aligned. Cut a small circle out of 3/4" stock and see if the bottom and the top of the hole are the same size. FORE AND AFT ALIGNMENT I generally use the machinest square for this one. BLADE WOBBLE This is when the blade moves either left or right from the top to the bottom of the cut. Problem could be either rails bent, misalignment of machine, or as simple as alignment in the blade holders. Need much more help on this one. YOUR IDEAS ? ? ? ? ? ?? The Eclipse scroll saw is the only saw that I know of that has solved the above problems. This saw design has gone back to some "ole timey" machines. Belt driven, with a "perfectly aligned" plunger system.
-
Install a large window blind above/behind you. When you are setting up to turn, pull the blind down behind you and it will confine the cuttings to one area for easy clean up. When done turning, let it self wind back overhead out of the way.
-
Reading the push pencil/sticks/ice picks, knew I needed to throw this in. Old hand saw handle or cut exact copy to start. Cut 1/2'' ply bout 10'' high to attach that handle, 12" 18'' long shaped like that old hand saw. attach the 12'' or 18'' into the handle. Under the handle on the ply bottom. Cut the ply leaving a heel under the handle bout 1/4 ?high? to engage/catch the piece being pushed. Out at end of the 12'' 18'' ply,or more, glue some 80 grit to hold on to piece being pushed. Handle attached to 10'' high part is for safety. Now your hand is well above the blade & you have control.
- 1 reply
-
- 4
-
-
- push stick
- table saw
- (and 1 more)
-
center finding: ("Thales Theorem") take your ruler and place zero inches on one edge.... move the ruler diagonally across the piece till you read a number at the other edge easily divisible by two... divide... that number is is the center... find it on the ruler and make your mark... to find that IRL measure of center... measure from the edge to the mark w/ the ruler perpendicular to the edge... no measure... say the stock is 3/4" thick/wide... put a 3/4" fostner bit in the DP.. slide the fence up to the bit and lock it down... presto... center of stock all done... finding spacing... Do your diagonal measure only instead of dividing by 2 divide by the number of pieces you want... example.. you want 5 pieces from stock 12±'' wide... diagonal measure 15'' and divide by 5.. quotient is 3... every 3'' make your mark.. (3, 6, 9, 12).. center finding ruler... lay the ruler on the piece and shift left or right till the measures are the same to both edges... mark the zero...
-
Relative to our new subcategories for "Tips", Please remember to add tags to your posts!
-
These are my push sticks (no I have not been pushing @Stick486 around). The First is a 2x4 with notch cut out and corners rounded over and is used on the router table. The second is a simple piece of ply with notch for pushing and I use it on the bandsaw. The third is my standard cut from ply and allows gluing a replacement push block to the rear. The monster allows me to keep my hand as far as possible from the blade as possible, but it is cumbersome to use.
-
Folks, I am so glad to see our new Tips Subcategories being used! Several things I would like to see, is. Please stay on topic related to the original tip submitted. Please do not submit another tip within the same tip topic that was created by another member. Please do not get into the back n forth, regarding how you would've performed the same operation, in other words please stay away from, "what you should of done", "what I would have done", "here is my method" etc etc. It defeats the purpose of individual tips created by each unique woodworker. If you have a different way, or improved way to perform a tip that was already entered by another woodworker, please submit your own version in a separate tip topic. Title your tips accordingly, the title should reflect what the tip is. In addition to the tags you will be using for your tip, please always include a tag "tip". I will surf back through the tips already created, and remove any content that does not follow the above guidelines, and I'll create an area to display these guidelines in each tip area. The Tips are brand new forums, this our chances to keep them clean and orderly, so that users in the future may search our growing database of tips, and find the content they need with ease. As a side note, "tags" will be mandatory soon. Thank you!
-
Years ago I came up with this idea for cutting strips by using my wooden feather board. I submitted it to a wood magazine. I won $25 and signed away all rights. As you can see, I just installed roller bearings. It worked very good. 3 months later, in a wood working sale flyer, there it was and labeled as "Dual use feather board, exciting new tool" That was my last submission of any kind.
-
My first router table was an over-engineered bench top affair. (Ever hear the saying that an elephant is a mouse built to government specifications? Well, I'm that guy.) I didn't have a sophisticated system to store my bits, so I used empty prescription bottles. No way the plastic would damage the edge of the bit, the bit was protected from damage by contacting anything else in the box or drawer into which the bit was very carefully placed, , and the bottles were free. A piece of masking tape took care of labeling. Downside was that most of the bottles not transparent, so a lot of picking up and reading the label was involved. Worked good until I built my current router table, and started using blocks to hold each bit.
-
I recently made a thread cabinet for a sewing friend of mine. The spools were to be placed over dowels to keep the thread spools in order. I needed 168 four inch dowels. Decided I need 20 four foot dowels to come up with the number needed. Couldn't see myself making 168 cuts so I came up with a plan to wrap them all together with some plastic stretch wrap and give that a whirl. Marked off the a dowel every four inches and wrapped the dowels together in between the marks stretching the plastic nice and tight and put them through the table saw. Worked nicely. Got them all cut quickly and smoothly.


.thumb.jpg.573d1497d0675219908c85aabefd797a.jpg)


.JPG.e5137c960ecb065d59fd57f9dde9cf9e.JPG)
.JPG.651a2f48487a37d401b4d8d74e7f7616.JPG)


