Search the Community
Showing results for tags 'rolling pin'.
-
I hope everyone can enjoy a peaceful Easter accordance with your customs. Our Patriot Turners- @Smallpatch was hitting the yard sale circuit when he spied an old lathe. Not one to pass up a bargain, he took it home a refurbished it. Check out his post for more images and the back story- New member @User74 posted a question about carbide tools. We had a very informative discussion about the quality of tools and cutters. Check out the post and see if you can add to it- @Steve Krumanaker created a beautiful Beads of Courage box. Steve used a special technique to create the staves for his turning project. Head on over to his post for more images and our members' comments Another great week for our What's ON/OFF your lathe discussions. From ON the lathe, @Gerald and @User74 gave us a look at their current turnings New information starts here- And, from OFF the lathe- @RustyFN and @User74 completed some really nice turnings- New posts for this week starts here- What’s Coming Up- Click on the images for links to more information and registration- Last week, we posted a link to the Mid-Atlantic Woodturning Symposium. One of the presenters is Alan Lancer. Here's a short video of what you can expect to see from him- For The Newbies- A tip, from Lyle Jamieson, for holding small turnings without a chuck- Easy Wood Tools shared a new video on how their products are made. Easy Wood Tools are made, in America, entirely in house- even their carbide cutters! @Jordan Martindale Expand Your Horizons- Tim Yoder shows us how he makes his French rolling pin. Tim is always fun to watch! Richard Raffan is bucking the trend of large turnings. In these two videos, he creates lovely small turnings. His commentary, while turning, gives an insight into his turning techniques- The Woodworker's Journal has published the Woodturning Monthly newsletter. Nice article on how to add butterfly patches to a turning. The newsletter can be found at- https://www.woodworkersjournal.com/woodturning-monthly/?utm_medium=email New Turning Items- Got a heads-up from @Grandpadave52 about a great price on a Longworth chuck sale. Everything Else- Safe turning

- 5 replies
-
- 4
-

-

-
- peachtree
- longworth chuck
- (and 29 more)
-
I found it easier to glue if I oriented the blank with the diagonal cut facing up. I use an old restaurant cutting board as a gluing work surface and pieces of the cutting board as culls and pads. In this picture, you can see the three strips to be glued into place. They measure 2” x 10 3/4” x 1/8”. Test fit the pieces first to make sure they will seat into the slot. (I now have a thick piece of Corian countertop for the gluing surface) On my first attempt, I didn’t use enough clamps- using more clamps and culls assured that all of the joints were tight. I probably overdid it with the amount of glue. A liberal coat over all mating surfaces. Clamped up After the glue has dried and the clamps removed, the blank is ready for trimming. I used to use a special table saw jig for this but found it was easier and quicker to trim off the excess insert length on the bandsaw just free handing it. Trim both ends and the side. At this point it is a good idea to “sweeten up” the layout lines, if the trimming operation removed them. Now it is just a matter of re-mounting the blank on the diagonal cutting jig and repeating the operations for making the second diagonal slot. The diagonal slots, glue ups and trimming operations are the same for each of the remaining three sides. On the lathe, ready to be turned. The final dimensions on this rolling pin were: 20” long; diameter at the center: 1 9/16”; diameter at the ends : 1 1/4”. I have tried two types of tapers. One started at the center and continued to the ends. The other starts at the ends of the ellipses and continues to the ends. Personal preferences will determine the tapers. After the blank is turned round, the layout lines for the taper can be drawn on the blank. To aid in getting it symmetrical, I started with an arc template. My turning skills leave a lot to be desired and there was too much variation from one pin to the next in diameter and symmetry. I considered purchasing a lathe duplicator but finances dictated this calls for another jig! Most of the hardware is standard off the shelf stuff- ¼” x 20 threaded stock, wing nuts, T-nuts, deck screws. The only thing “special” was the ¼” tool steel- which I purchased from a local machinist for 25 cents and then ground a rounded tip. This shape worked better than a point because it left the wood with a smoother surface. The base of the jig mounts onto the lathe bed. The back edge of the jig has the “reverse” arc of the rolling pin. The cutting portion of the jig sits on the MDF bottom and the bolt follows the arc to create the shape. The long bolt can be adjusted to position the cutter depth.
- 13 comments
-
- 3
-
-
- french
- celtic knot
- (and 2 more)
-
Last October we had the great fortune to meet a professional pastry chef. I took the opportunity to ask her about our rolling pins which resulted in her requesting a custom pin 24" long and 2" diameter. She loved the colors our peppermills have and asked about them for her pin. Unfortunately, those bright colors are water soluble and would not work well in a wet dough situation. I took the time to gather some Yellow heart, Purple heart, Bubinga, Padauk and added walnut and maple to help those other colors stand out and laminated them into a panel (pick attached). Tomorrow, I'll cut it on a slight bias that will include each wood type to get my pin blanks. After I have a few turned I'll add pics of them to this post.
- 5 replies
-
- 6
-
-
- rolling pin
- french
- (and 1 more)
-
Seems I remember someone posting on here how to do it?? Its been on my back burner for years, I'm wanting to do it, Finally! What glue to use? Was thinking maple and black walnut for color contrast, I think the walnut is a no go for food contact? Advice? Links?
- 2 replies
-
- 2
-
-
- celtic knot
- rolling pin
- (and 2 more)
-
It's been computer madness here so far this week! I think I need a vacation!!! Our Patriot Turners- @AndrewB used a glued up poplar blank for a pepper grinder. Looks really nice. He shows us some progression shots in this post- Andrew has found a new source for turning blanks. He gives us the low down in this post- @RustyFN gave us an update on the platter he started last week- Check Rusty's post for additional pictures and the start to finish thread- Rusty has also been busy with his segmented work. Here's another one of his beauties- This one garnered lots of positive v=comments! @Ron Altier received a request from his daughter. As always, Ron's projects are fantastic and use a variety of wood species. Lots of great comments about this on- @FlGatorwood received some sad news from a classmate. He decided to brighten her day with a "care package". Steve originally posted this in General Woodworking forum but I thought our turners would appreciate seeing what he made.- @Gunny puts a lot of us to shame with his organizational skills. He posted a utilitarian project he made on the lathe. Those projects that help us get things done are great to see (and steal)! Check out Curtis' post to see what this is used for. @Gerald finished up the coffee bar for his Mrs. He called it a coffee bar but I think it's more of a Coffee Shrine! Judging from the smile, I think she is happy. The entire project can be seen here- What’s Coming Up- https://www.woodturner.org/Woodturner/WIT/WIT-Presents-Registration.aspx Mike Waldt is changing the format of his live presentations. A short video explaining what will be happening- For The Newbies- If you have decided to get into resin casting, Alumilite has free online video course to help you get started- https://www.alumilite.com/learn/casting/101?fbclid=IwAR3ngaxsteCcXRNZaKdNWel1wI6hFyvrFWOt2fld02AHzFiGfggv6zKM1_g Expand Your Horizons- Buying turning blanks can be expensive. Cutting your own blanks is fairly easy but is you can't turn them immediately they will deteriorate quickly. This PDF document, from the AAW, explains how to prepare and store the freshly cut blanks- Save turning blanks.pdf New Turning Items- Not really a new item, but Mike Peace covers the subject of Collet Chucks- If you are considering adding carbide tools to your arsenal, our sponsor Woodcraft, has Easy Wood Tools products on sale for the month of April- And they also have turning kits and supplies on sale- Ruth Niles' newsletter came this week. Lots of images of the items made by other makers. Some really great ideas. A cute idea from Rebecca DeGroot- You can sign up for Ruth's newsletters https://nilesbottlestoppers.com/ Everything Else- Rick Turns list of YouTube woodturning videos from last week- Safe turning and stay well
-
Well, this is my first rolling pin of any kind. When I do something for the first time, I jump in and try the most difficult thing. This was “supposed to be a Celtic knot rolling pin. It looks more like a drunken knot...ha ha....I thought turning the taper would be difficult, but it wasn’t to bad. I know there must be a way of doing it....anyhow here is a photo of it. It’s Curley maple with walnut inlays...
- 21 replies
-
- 6
-
-
- rolling pin
- celtic knot
- (and 2 more)
-
It's been a busy week here. Not much turning but still in the shop. Our Patriot Turners- @Ron Altier has really been industrious this week and wins the prize for the most posts! Ron is still experimenting with the UV activated finish he first mentioned a couple of weeks ago. He used it on this fabulous ornament- He describes more about what he is learning about the characteristics of this finish in his post- Ron also posted a question to our members about the Hut Crystal Coat finish. Check out his post and see if you can give him input on your experiences with it- @Masonsailor showed us his progress on his "tulip" turnings- If you haven't been following his progress, you can check out his thread here- @Pauley turned his Celtic knot rolling pin and it is a beauty! He received lots of great comments. Head over to his post and see what our turners had to say- Back in the summer, @John Morris asked our members about the Ring Master turning tool. There has been some additional information shared on that thread. Here's the thread in its entirety- What’s Coming Up- @Jim from Easy Wood Tools alerted us to this weekend's show. Click on the image for the link to more information and registration. For The Newbies- I accidentally stumbled onto a series of videos from Stuart Batty. These videos cover a wide range of turning topics and techniques. Here's the link to the video set- https://vimeo.com/woodturning A random selection of the videos available- Expand Your Horizons- Easy Wood Tools has a Youtube video demonstrating the use of their negative rake scrapers on acrylics. You can see why their negative rake scrapers have gained the respect of turners! Tim Yoder posted the making of a beautiful Crater Burl Bowl. As always, Tim's videos are enjoyable and informative. New Turning Items- Jerry Marcantel (Nubsnstubs) added a video showing/describing his tailstock steady. I think we mentioned this in this past but this video shows it in action along with some of the other wood lathe holding items. Everything Else- Mike Peace added a video on turning a natural edge bowl from a green log. Love those long shavings!! I mentioned there was very little lathe work for me. It seems this project has been 1 step forward 3 steps back. I finally got the inside of that spalted maple bowl turned out and sanded. Flipped it around the turn off the recess and finish out the bottom. The strapping tape is just for safety. Didn't want to put too much pressure on the punky soft wood. Just got the bottom shaped when I heard a "pop". Two cracks (insert a very long string of Navy language here)! Went ahead and finished sanding the bottom. Then tried to fix the cracks I'll need to do some touch-up sanding around the glue joints and put some sort of finish on it. Safe turning
-
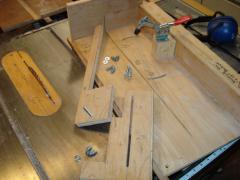
This is a re-post on the Celtic Knot Rolling Pin. I am a fan of “Cook Book” style instructions so if I miss any details, please let me know and I will try to flesh them out. In addition, many of these photos/procedures have been refined over time and I will try to point them out by adding extra photos rather than rewriting the entire blog. I thought it best to start with the jigs I used to prepare the turning blanks. Please note that I always over engineer everything and hardly ever see the obvious or the easy way to do something so if you see an easier way- go for it! The first jig is one I made a while back, when I first started thinking about this project. I try to make jigs that have several uses. This one was also used to make the Cheese Knife Handles. Special Diagonal Cutting Jig Sled has 2 movable fences to change the angle of the cut and position of the blank. Toggle clamp holds blank during cutting operation Top view- Bottom View- The long extension is a stop to prevent the jig from being pushed too far. That’s because I wasn’t paying attention to what I was doing and pushed the jig too far thru the saw. Disassembled Fences- Top of the angle fence Bottom of the angle fence- Bottom of the length stop- Top of the length stop, in place- Partially Assembled Fences- The spacers on the bolts elevate the wing nuts above the rolling pin blank to make adjustments easier. The bright pink tape improves visibility as the blank is aligned to the layout marks on the tape. Notice the single narrow saw kerf. The pin blank is cut with three passes thru the saw; using spacers to offset the pin blank on each pass. Several woodworkers suggested that using a dado blade would allow the cut to be made in one pass. My dado set isn't large enough in diameter to get the height needed to cut the slot. Also, the pattern of the Celtic Knot can be varied by making just two single passes. The spacers create a 3/8" slot at the fish of the third pass.
- 1 comment
-
- 2
-
-
- rolling pin
- jigs
- (and 2 more)
-
The second part will concentrate on the layout of the rolling pin blank in preparation for cutting the slots. Create a blank that is 22” long and 2” square. Locate the center of the length (11”) and carry a line around the blank. The ellipses are 11” long and made of three pieces of 1/8” thick material Layout a mark 5 ½” on either side of the centerline and accurately carry the lines around the blank. To assist in laying out the diagonals, use a 3/8” thick spacer gauge, drawing lines on the blank, along BOTH sides of the spacer gauge. It is not necessary to layout both diagonals on each side. However, a check of the second diagonal will indicate if the layout is accurate and crossing in the center of the blank. NOTE: the cut for the diagonal strips falls within the 11” layout lines Rotate the blank 90 degrees and layout the location on the next diagonal cut. Continue rotating and drawing the diagonals until all four sides have been completed. Each diagonal consisted of two drawn lines. One line intersected with the layout line that defined the end of the ellipse. The second diagonal line ends “short” of the ellipse layout line. The location of the end, of this diagonal line, must be carried around the blank. These lines define the location of the saw cuts for the strips that create the ellipse. I have also begun to mark each end of the blank at the exact center of each end. This along with a centering line on the jig have helped reduce positioning errors as the saw kerf widens over time. Accuracy is important when laying out these lines in order to get the ellipses to maintain continuity. This drawing is not to scale. The measurements are what I used to make this rolling pin. The length and diameters were averaged from various baking supply websites for their rolling pins.
- 3 comments
-
- 1
-
-
- celtic knot
- layout
- (and 2 more)
-
Once the blank has the layout lines drawn, it is time to cut the slots for the ellipses. The first step is to set the blade height. When the cut is made, there should be about 3/32" to 1/8” of material left holding the two sides together. This is necessary during the glue up by keeping the pieces aligned. Set the blank on the jig and adjust the angle and the end stop so that the front SHORTER layout line is positioned to the LEFT side of the blade cut. Orientation is when you are standing at the back of the saw looking forward. (These pictures are from the SIDES of the saw). On the latest jig, I drew positioning lines to locate the ends and center of the knot layout as well as the longitudinal center. These really help in positioning the blank. Make sure the length stop is adjusted against the end of the blank Aligning the layout lines to the jig Continue to adjust the angle and the end stop so that the rear LONGER layout line is positioned to the LEFT side of the blade cut. Securely tighten all adjustments. Once these angles/lengths are set, they will not change for all of the remaining cuts. Clamp the blank firmly in the jig. Double check the layout lines. In order to keep the correct orientation of the blank, I labeled the end of the blank nearest me. This end must always be placed against the rear stop for all diagonal cuts. With everything secure, make the first cut. Unclamp the blank. To make the second cut, I made a space strip to reposition the blank without having to change any of the jig setting. My first guess was that this spacer would be 3/8” thick- the same as the width of the finished cut. BUT that was too thick. I guess there is a way to calculate the thickness but trial and error won out. It came out closer to 1/4” (.265”). Later, someone told me that the reason was that I had failed to consider the width of the saw blade and on which side of the layout line the blade was cutting. The second cut is made with the blank position so that the front LONGER layout line is on the RIGHT side of the saw cut. The rear SHORTER layout line is on the RIGHT side of the saw cut. The walnut spacer strip can be seen between the blank and the fence of the jig. The thickness of the spacer strip could be different for each person. So check the setup carefully. Also, Make sure the blank butts up against the end stop before each cut. After the second cut has been made, there may be a thin piece of material left in the slot. I made another spacer- about 1/8”- replaced the first spacer and made a third “clean out” pass. The finished cut should be 3/8” wide and almost through the blank. Completed slot- Checking the slot for the inserts
- 1 comment
-
- 1
-
-
- rolling pin
- french
- (and 1 more)
-
In Part #1, I mentioned that the pattern of the Celtic knot can be varied by how much wood is removed during the creation of the slots. Typically, I plow out a 3/8" wide slot and fill it with three inserts. That technique results in a pattern of knots that overlap- If the slot is cut, leaving a center slice of wood intact, and then placing an insert on each side; the pattern displays diamonds at the cross-over- Another subtle change in the pattern can be achieved by the sequence of the cuts related to the sides. I number each side of the blank during the layout procedure. Then when cutting the slots, I cut sides with the sequence 1, 3, 2, 4. Cutting the sides in a 1, 2, 3, 4 makes a slightly different pattern. So, that's how it's done! Once sanded, and the ends trimmed, a liberal application of mineral oil and they are ready to use.
- 2 comments
-
- 2
-
-
-
- pattern
- celtic knot
- (and 1 more)
-
Happy Birthday America!!! Thunderstorms slowly moving thru our area right now. The annual fireworks display may be postponed. @Gerald posted a nice looking platter he is currently making- He has had several questions and comment about the process and the wood grain. @HandyDan added a nice image of one of his turnings to help explain what is meant by "feathering"- @Smallpatch finished up the teapots he has been creating- Final comments are in his post- @Steve Krumanaker is perfecting his ability to add decorations to his turnings. He is learning "Chip Carving". Looks to me as if he has got the process pretty well mastered- His post shows his progress- I thought of Steve when I happened across a site that creates custom rolling pins. Steve has a neat shop built laser engraver. The folks at http://www.thisiscolossal.com/2015/06/new-laser-engraved-rolling-pins-by-valek-imprint-elaborate-designs-on-baked-goods/ make some neat designs on rolling pins- These could make some really fancy cookies! Mike Peace has a 2 part video for making brush lids for finishing jars. Part 2 is linked from his YouTube page- This reminded me of @Steve Krumanaker's honey jars. The Woodturning OnLine newsletter came this week. Their featured project is one by Carl Jacobson. His video shows a Yin Yang turned platter. The "New and Hot" sections, of the newsletter, has some interesting items as well. The entire newsletter is at- http://www.woodturningonline.com/index.php Woodworker's Journal posted a YouTube video by Ernie Conover on turning small hollow vessels. Nice explanations and demonstration- I had the chance to play a little, this week. Started a little turning blank for the August demo. I forget where I read about this trick, maybe Mike Peace or Rick Turns, about using TiteBond glue as a sealer. I sealed up the turning blanks after I cut them from the logs and none have cracked. I sealed this rough blank turning the same way hoping it will be fine until I need it. Safe turning
-
Been a busy week in the shop but not too much wood turning. A friend asked if I would show/sell some stuff at his church's event. Seems they are looking for some vendors to attract folks to the event. I have never done anything like this but if it helps his church, I'm game. My biggest problem- as with most hobby woodworkers- is fairly pricing my stuff. Anyway, I've made some small (5 x 7) laminated cheese board. Have some bottle stoppers and of course the old standby- rolling pins. I needed to make some more rolling pin wall holders so that's where I'm at now. Lots of neat stuff for Turners arrived this week- so @Cliff- listen up!!! First, I've read from several sources, that Woodturning Design magazine will cease to exist. The parent company, All American Crafts, declared bankruptcy a week or so ago. I checked their site and it is still up, but if you were thinking of subscribing, maybe you should hold off a bit. Next, David Reed Smith posted a really neat project on turning earrings. As with all his post, he goes into great detail on making jigs and the turning process. Here's the link to the complete article- http://www.davidreedsmith.com/Articles/Earrings/Earrings.html If you have some younger children around, or you're just a big kid yourself, Tim Yoder shows us how to turn a "String Top Toy"- Easy Wood Tools has added another super tool to their turning arsenal. The Easy Parting Tool. This is sure to be a welcome addition to any turners collection of go to tools. Although I haven't personally had an opportunity to try this particular tool, I have used and own some of their other turning tools and they are second to none! Check it out here-Â http://www.easywoodtools.com/easy-parting-tool-products-page/ If you plan on turning acrylics (or dense wood), here's another option, instead of the micro mesh pads. A three part polishing system that seems to be receiving pretty good reviews. Dr. Kirk's Micro Magic Polishing Wax 3 Piece Set. Safe Turning!
-
The final part of the Celtic knot French rolling pin covers turning the pin to shape. Most of my pins are turned with the traditional shape which is a gentle arc originating at the pin center and continuing out to each end. Originally, I turned this shape with a gouge; creating the shape by eye. This was totally unsatisfactory. Next, I created an arc template to gauge the shape of the pin. While this worked OK, it was easy to “take off a little more, oops, take off a little on the other end, oops†pretty soon the pin diameter was too small. I finally settled on a dedicated jig/cutter that would allow me to turn the diameters and shape all in one step. These are the steps I am currently using. Bring the blank round using standard turning techniques. The blank, although round needs to have the entire "knot†exposed. The complete knot exposed. This diameter is slightly larger than the finished pin diameter. This is the most exciting part of the entire process- seeing the oval appear from the flat inserts. Layout the critical points on the pin- center and each end (10†either side of center) Turn away waste at the ends of the pin and set the exact center diameter. At this point I will switch over to the dedicated jig/cutter. The jig locks onto the lathe ways. It is adjustable left to right so that the center of the jig will align with the center of the pin. The back plane of the jig is formed with the profile of the finished pin. I have recently rebuilt this jig to eliminate the slots- which were there because this base was made from another jig. The cutter sets on the jig surface. The cutting bit is set vertically to be at the center line of the centers. The long bolt adjusts the distance from the cutter to the work. The vertical bolt holds the tool cutter stock. My cutter is a .25 x.25 cutter stock ground to a half circle. The operation is simply moving the cutter assembly into the pin until the bolt touches the back plane; then moving the cutter left or right removing a little material at a time. The only “trick†is making sure the cutter is perpendicular to the surface of the pin. Once the pin is completely shaped, I round the ends slightly. Sanding is done using a random orbital sander on the spinning lathe. To finish sanding the ends, the waste is removed. The drive spur replaced with a sanding pad and then work up thru the grits. Finish in just plain old mineral oil from the grocery store laxative aisle. That’s it! Here is a link to all of the photos used and a bunch of extras. Some of these pictures show different angles and/or additional information. http://thepatriotwoodworker.com/forums/gallery/album/103-celtic-knot-rolling-pin/ Thanks for reading along! If you have questions, comments or criticisms please let me know!
-
This part will cover the glue up and trimming of the inserts for the rolling pin. I found it easier to glue if I oriented the blank with the diagonal cut facing up. In this picture, you can see the three strips to be glued into place. They measure 2†x 10 3/4†x 1/8â€. Test fit the pieces first to make sure they will seat into the slot. I originally used an old restaurant cutting board as a gluing work surface and pieces of the cutting board as culls and pads. More recently, I substituted a Corian counter top cutout for the work surface. It is more sturdy. On my first attempt, I didn’t use enough clamps- using more clamps and culls assured that all of the joints were tight. I probably overdid it with the amount of glue. A liberal coat over all mating surfaces. Clamped up After the glue has dried and the clamps removed, the blank is ready for trimming. I made a special jig that holds the piece above the saw table. Trimming assures the piece will sit flat for the next diagonal cutting operation. Blank is raised above the saw table. Trim the blank, rotate and re-clamp Trim, rotate an trim again. At this point it is a good idea to “sweeten up†the layout lines, if the trimming operation removed them. ALSO: IF YOU USE THIS TRIMMING METHOD PLEASE REMEMBER TO LOWER THE SAW BLADE BEFORE CUTTING THE NEXT INSERT SLOT (don't ask how I know this). EDIT: I found it easier and quicker to do this trimming operation on the band saw. It is just as accurate and doesn't require a change in the table saw blade height. Now it is just a matter of re-mounting the blank on the diagonal cutting jig and repeating the operations for making the second diagonal slot. The diagonal slots, glue ups and trimming operations are the same for each of the remaining three sides. A slightly different pattern can be made by changing the sequence of cutting the slots. I cut the slot on side 1 first, then rotate the blank to cut side 3, then side 2 and finally side 4. After the four sides are cut, glued and trimmed. On the lathe, ready to be turned. The final dimensions on this rolling pin were: 20†long; diameter at the center: 1 9/16â€; diameter at the ends : 1 1/4â€. I have tried two types of tapers. One started at the center and continued to the ends. The other starts at the ends of the ellipses and continues to the ends. Personal preferences will determine the tapers. In Part 5- turning with a special taper jig.
-

From the album: Celtic Knot Rolling Pin
Line drawing of dimensions-
- 1
-
-
- celtic
- rolling pin
- (and 1 more)
-
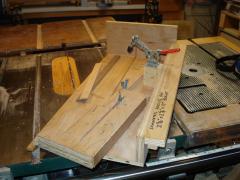
I am a fan of “Cook Book†style instructions so if I miss any details, please let me know and I will try to flesh them out. I thought it best to start with the jigs I used to prepare the turning blanks. Please note that I always over engineer everything and hardly ever see the obvious or the easy way to do something so if you see an easier way- go for it! The first jig is one I made a while back, when I first started thinking about this project. I try to make jigs that have several uses. This one was also used to make the Cheese Knife Handles project. It could be used for any diagonal blank cut. Special Diagonal Cutting Jig Note: The two wing nuts on the left of center are raised with wooden standoffs. This was a change made after some of the images were taken. The raised wing nuts allow for easier adjustments of the angled fence Sled has 2 movable fences to change the angle of the cut and position of the blank Originally jig slid over the rip fence. Later modified to ride in miter slot for accurate repetitive cuts. Disassembled Fences Toggle clamp holds blank during cutting operation Trim Jig During the blank assembly, it is necessary to trim waste material before proceeding to the next step. This simple jig holds the blank for those cuts. Although I used this method for trimming, I soon learned that it was faster to use the band saw. The trimming process will be addressed in another part. In Part 2, we will cover the process of laying out the rolling pin blank.
-
From the album: Celtic Knot Rolling Pin
Disassembled jig -

From the album: Celtic Knot Rolling Pin
Disassembled jig -
From the album: Celtic Knot Rolling Pin
Disassembled jig -

From the album: Celtic Knot Rolling Pin
Disassembled jig -
I hope I am not jumping the gun on this, and stealing the wind from the sails of Lew, but I am so excited, Lew is re-posting his complete Rolling Pin Tutorial! You may have noticed Lew's images are taking command of the Photo Gallery line at the top of our site, that is because he is going to make available the images in the gallery, and in the topics that layout the construction of these rolling pins. So sit tight folks, it's coming it's coming! And thank you so much Lew for undertaking this huge effort!
- 5 replies
-
- 1
-
-
- rolling pin
- tutorials
- (and 2 more)
-

From the album: Celtic Knot Rolling Pin
Widened Cut Rear -

From the album: Celtic Knot Rolling Pin
Widened Cut Front -

From the album: Celtic Knot Rolling Pin
Trim Jig2


.jpeg.d7bb1e70099f04dc48f60299e1a79368.jpeg)


.thumb.jpg.573d1497d0675219908c85aabefd797a.jpg)