Search the Community
Showing results for tags 'rehab'.
-
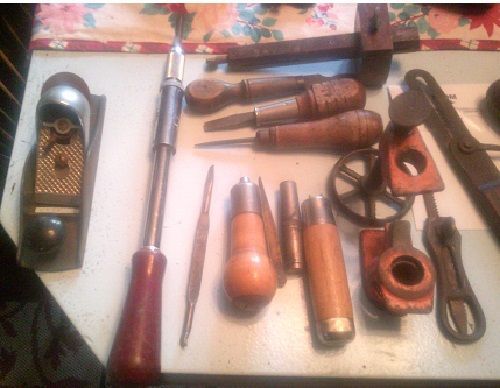
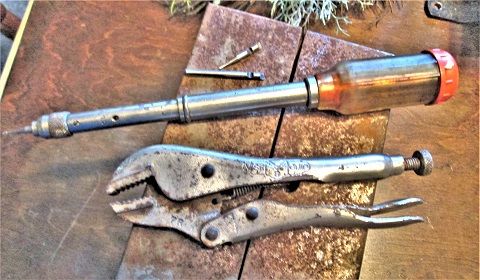
Thursday...a large, HEAVY box appeared on my front porch....opened it up, and spread the contents out, a bit..took up half the table's top...but.. The Ring? Goes on a finger, then you pull a strip of leather through..cutting a strip that you can adjust the width of... Guide Bushings, Craftsman router... A little bit of everything... That saw blade gave me a poke, during the un-wrapping.. C clamps, anyone? and a few squares..so...today's task was to clean and sharpen..and repaint as needed.... What had looked like a pair of tweezers was a solid brass pair of dividers 4" Tear the bevel gauge all the way down..shine up the brass fittings, shine the steel parts up...straighten the blade..give the sanded wood a wipe down with oil. Squares? Bottom one was from Henry Disston & Sons No.1, 6" try square..not too sure about the other 2..top one was a rusty mess...that is not the smallest block plane in the till..but very close to it. These look any better? No. 67 is now SHARP, Block plane is too..Turnscrew looks better,All metal square is a Stanley SW 6" Miter square..and as for that rusty double Spokeshave? Wire wheel clean, gloss black paint, both irons sharpened and set..Under the handle, and under the two cap irons is the No. 60...Early model Stanley? Saw has E.C. Atkins stamped on the blade. Depth adjuster on that block plane is NOT gray plastic...but a type of cast metal. The orange clamp is from PONY...and needs a bit of 1/2" pipe. The Craftsman Handle? Is to hold files and such. That metal cylinder, is hollow, and has couple of bits inside...that fit into a slot...in one case, it becomes a t handled Gimlet Drill...Those are not tweezers, that is the Brass 4" dividers...Not sure about the fat body handle..yet Unscrew the butt end, until a file will fit inside, then tighten things up. Holds the file securely.. First half is done...start on the other half, tomorrow? Stay tuned

- 13 replies
-
- 12
-

-
- hand tools
- rehab
- (and 1 more)
-
Trying to write up a story about an old tool I bought at a Garage Sale a while back..and how I tried to get it in working order.. Top end..and The adjustable Table ( raise it up and down ) Chuck still had a small broken drill bit... Asking price WAS $25....made him an offer he couldn't refuse of $10....and he helped load it up into the Chevy This is a Champion Blower Forge Co. No. 90 Post Drill...Hand cranked, was made before 1920..when they started to concentrate more on Fans...and changed their Brand Name. They also made forges for Blacksmiths, that they could turn a crank to add air to the forge's fire....instead of working with a hand operated Bellows... The board this is attached to..came with the drill...even has the model number stenciled on it... No. 90....Hole is where they would lag bolt this to a post in the shop. Entire drill, counting the board...weighs in right at 100 pounds....and they made a larger version that had 2 speeds and a larger table...and weighed 10 pounds more. So...stay tuned..will show how this got cleaned up for use...including adding a post in the Dungeon Woodshop for this beast to call home...
- 14 replies
-
- 7
-
-

-
- champion brand
- old drill press
- (and 1 more)
-
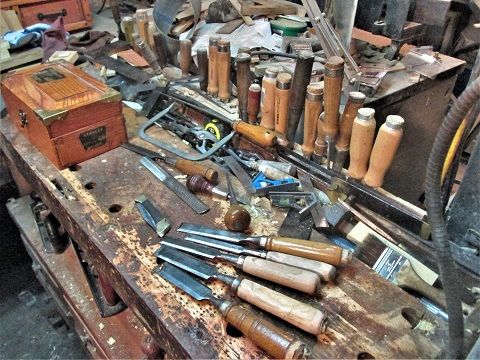
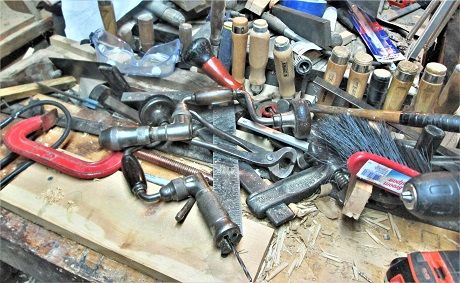
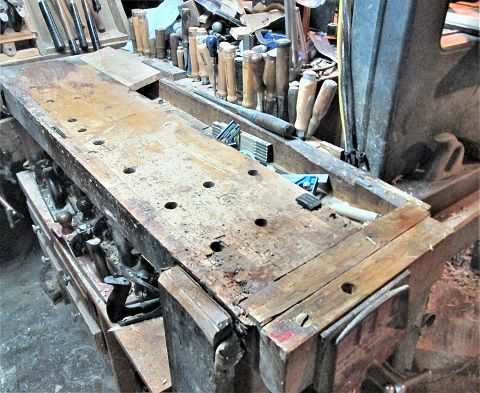
After the last few projects, decided things were getting out of hand... Having to dig out a box for the right tool.. Bench was always covered in tools...because.. Not really any place to store them...without doing a lot of digging around.. Wasn't enough hooks for the bevel gauges...screwdriver rack was a mess.. Most of these chisels were never needed, rack could be removed, Old Jack needs a better home than on a ledge.. This corner needed to be cleaned out..and start over... Well, that IS a start...where'd all them squares go? Maybe build a rack for these? It is a start... 9 squares should handle about any job...rest went to a drawer, as I never really used those. Sorted through that red rack.. Emptied it out...things were laid out on the bench...things with ugly plastic handles headed to the mechanic's drawer..which left.. Red rack was cut down. The old chisel rack in the left hand door was re-located to the back of the bench's chisel rack.. And the cut-down red rack installed in it's place....then filled up.. And that will do it, for part 1 Stay tuned...
-
During the recent re-arranging of the FULL plane til....one or two planes stayed outside .....needing a bit of work... This just need cleaned up, and the settings up to date...still a little deep...Millers Falls No.9, pre-war Type 2 Next? Well... May have been sitting around a bit too long? Ya think? cleaned up nicely enough (cheap brush with a few drops of 3in1 oil) Need to adjust the frog a bit..otherwise.. The iron is cambered, as this IS a jack plane...Sargent No.3416...old enough that a patent date is on the lateral lever...from 1901 Next...that Stanley No. 8c, type 19 does have a few "issues" to fix.. That bolt has a burr to be ground off..and.. There is a burr at that point...just enough that I have to remove the bad bolt BEFORE I can remove the lever cap...grinder for the bolt, needle files for the lever cap Next? NOT a "good" look...all pitted, needed to grind back behind that black line.. Almost there. Then over to the H-F Disc/beltsander...mainly the disc part...had a full glass of water handy, too..took a while of grind, dunk, grind, dunk..to get a new bevel and a flat back.. Then a couple oil stones..this is the coarse Crystolon...then on to the 600 medium India stone....the the wet or dry papers..1500 grit followed by the 2000 grit.. From the 600 grit to the.. 2000 grit...at each step, flatten the back more.. Then finally, a good stropping.. Old leather belt, with some green stick (didn't feel like going to the Unicorn, this time..) Got things back together..a test drive or two to get things set up.. Was a busy day, today...plane in the middle? Millers Falls No. 9, type 4.... One before WW2, the other, about 1947ish... A Jack, a Jointer, and 2 smoothers...might be a good starter set?
- 4 replies
-
- 11
-
-
- sharpening
- clean up
- (and 1 more)
-
Rust Hunt on a Saturday....rain threatening ....Antique Mall 3 blocks from the house, and the Boss has sent me out to run a few errands...including buying a new roll of Blue "City" trash bags.....and..of course I hit that Mall...first. Backyard is shaping up... Metal framework is gone, most of the trash and old tarps or bagged up. That be the Neighborhood Yard Nazi's Garage, back there....her attempt to mow the yard got..rained out....too bad. I have to learn to NOT go up to the second floor of the Mall....but...I did spend about...$19 and change...on just 4 items....from a stall that has planes for OVER $65.. 3 out of 4...Square seems to be a Stanley? Compass turned out to be a Sept 24, 1889 Patent, from Starrett...Not sure about the calipers, yet.. As for the 4th? Rusty & Krusty, Stanley No. 116 Mitre Box.. THIS just MIGHT take a while There is supposed to be a scale on top, showing the degrees the box is set to... And a notched "pointer" in the inner ring...right.. Square did not require any work. Calipers are soaking in 3in1 oil...2 hands to make the arms even budge...no way to loosen nor lock it in place..The compass? and.. New Pencil. May see about a new pointer....funny looking bolt is not OEM...May try to make a new one? I did take the Mitre Box apart, last night....work in progress....all bolts and screws have been removed, and cleaned up. Just happen to have a backsaw to use with this Mitre Box.. As for those rusty things? Parts is parts...I did find a logo, though.. And, as for the bolts... A work in progress.... May start in again, this afternoon?
- 5 replies
-
- 9
-
-
- rusty & krusty
- rehab
- (and 2 more)
-
In my shop, there are just 2 spokeshaves. The one in front is by Seymour Smith & Sons....the other...haven't a clue ( hanger hole was done by me) No-Name was having issues, was chattering more than it was cutting....took it apart.. The cutter needed it's back flattened, and the bevel honed. The cap was ROUGH...needed the bevel polished up, the underside flattened to match the iron/cutter....but....the "bed" for the iron to sit on....60 grit sandpaper would be almost smooth....we have ways .. Still a bit more to smooth out. Needle file, run all the way to the back, as the iron sit back there, too iron and cap done, bed cleaned and flat... Take it for a test drive on some White Oak...mmma Nosing profile? So, I can use one of these two.. Until it feels a bit dull, and simply switch over to the other one....always nice to have a back-up..
-
Years ago, I picked this at a yard sale....really, it was just laying in the grass...$10... Craftsman 13" Tilt Table. Today I gave that table a darn good cleaning....rust bunnies were trying to take over... not to mention the spiders.....actually the saw itself runs! Nice and quietly, too!Tilt seems to work.. And even locks in place. Even found a bag of blades for this saw... Yes, it takes pinned blades....May just keep it that way..... Reason this saw came out of hiding? Thinking IF i start making a bunch of these... I might just cut those finger joints with this saw.... Still have a bit of 3/4" plywood....may add a cleat, and bolt this to the plywood.....then I can clamp things up in the bench vise....maybe sitting towards the vise, where I can sit down and saw a while....That Cedar box isn't all that big..pencil for scale... We'll see how things go....just an old saw...
- 9 replies
-
- 8
-
-
- craftsman
- pin blades
- (and 1 more)
-
Ok, latest Project is about ...done. Time to clean up the bench, put away the toys,,,and maybe rehab a few items.. I can finally set this back on the bench....bench is a bit ...full... Over flow from the Tool Well? "Name that Tool"? How do you hang this thing up.... Every shop could use a 4-in-hand rasp/file....but it needs a place to sit, until called for.. Chisel shaped objects, at least the 3 in front...the other was rehabbed long ago...clean, sharpen, and re-do them handles.. May "refine" the other two....Scratch Awls were also cleaned, sharpened up, and a coat of finish brushed on... The rasp was cleaned of rust and crud, pocket knife was too..and sharpened... Anyone want to stop by and help out? Stay tuned..( may build a second row to the back of the bench storage rack....may need 2..?)
-
3 planes...first 2 were easy... Handsome, ain't they...spent about $10 for these three "gems"...In the front is a Sargent V.B.M. #5408/408c (Stanley #3 sized) mainly a lot of wire wheel work, a few spots needed a spritz of PBblaster to loosen bolts up....sole was "groovy" Yeah....refinished the wooden parts...old finish was flaking off.... NOT Rosewood, Sargent used East African Mahogany. Base has a coat of penetrating oil...later was wiped down and a fresh coat of black was sprayed on.. Made about 1917. Metal parts were shined up, chipbreaker mated to the back of the iron. Iron's back was flatten, a single 25 degree bevel was sharpened and stropped.. Test drive showed a few nicks still remained in the edge...will remove those in the next sharpening...meanwhile The second plane is a Stanley No. 4, Type 20 (1962-67) with the dark, Royal Navy blue colour scheme... This spot was packed solid in nasty wood fibres, spider nests....and just plain dirt...wire wheels and wire brush to clean out... Lever was frozen in place, both of them ( Goop-off soak, then oiled) Grinder has a 6" brass wire wheel installed... Been sitting a while. Edge was chewed up a bit...new grinder to regrind the 25 degree bevel needed....then 2 oil stones, 2 grits of sandpaper (1,000 and 2,000 grit) then stropped on the buffer wheel on the old grinder.. Bolt for this wheel was wire wheeled clean, along with the rusty stuff. Brass shined up, dab of oil on the threads... Same with the rest of the metal parts....plated stuff was buffed out. Threads cleared and oiled up...test track set up..again.. BTW...The flaky black paint of the handles? Gone, replace by a coat of Gunstock stain, and then a few coats of BLO... Test tracks, one of Pine.. Took a few tries to get the setting just right... And, since I also do a lot of work with Ash.. 1 x 2 is now smooooth and flat.. Looks more like a plane, now. I left the yellow logo alone, the cleaned up Royal Navy Blue was given a wipe down with a thin coat of 3in1 oil.. Which brings us to the third plane... With "Issues" Lots of issues... Made by Millers Falls, sold at your local Sears store as a Craftsman....turned out, this plane had been broken in two...then brazed back together... Wasn't too bad on the right side ( biggie blob inside, though) but the left side? Not his best work.....checked that sole for flat....was more like a banana, or, high in the middle, low on the ends ( OHIO?) well, we have a beltsander, with 60-80grit belt onboard....took a long time (for me) checking with a straight edge every 5 minutes ( and let the cast iron cool down a bit...) Finally..other than a hollow up front, and a little spot on the "fantail" I think I can live with that...flat the rest of the sole. All this done with the frog and handles still in place...the frog? Needed a soak, and a hammerdrill, to loosen two bolts. Frog was too far forward, made it hard to fully engage the slots in the bolts. Once they were loose enough, the frog was slid to the rear..then removed. End of troubles? Nope....took the wheel off, or tried to....got almost to the end of the threads...bolt had come loose, too.....Backed the bolt out of the wheel, clean the rusty blob out of the threads. At least it made it easier to clean up the rest of the frog.. OEM chipbreaker was too rusted on the end..tossed it, found a 2" wide spare....mated it to the cleaned and straighten iron. Iron was bent, curved, pitted...Ball pean hammer time! grind the pitted edge away, started a new bevel. derusted the now straight iron. Back is NOW flat... Cleaned the hardware..brass had been plated..had. New spritz of blue into the logo...then wiped away the excess.... I was going to sharpen the iron...noticed the cup of water was empty...and, I was covered in cast iron grinding dust...even me beard was black...decided that was enough, closed the shop. The Sargent plane took a couple hours, took longer to sharpen. The Stanley? 90 minutes, total....The Craftsman? still working on it....will be a while.. Stay tuned
-
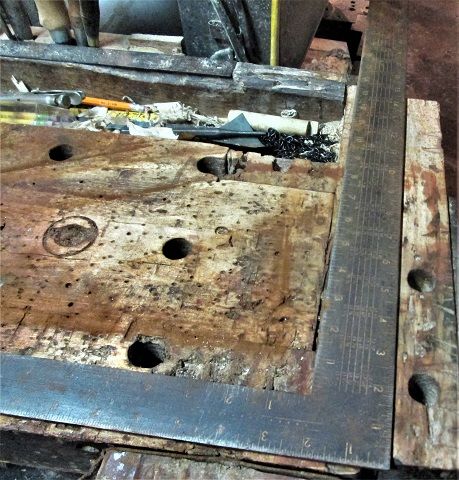
A while back, like last spring or so...I picked a framing square for about a $1....little on the rusty side.. Flip it over... Nothing was bent...might be worth the effort to clean up? Took some 60 grit paper, and gave a spot a rub down by hand.. Might be ok....80 grit in the palm sander.. Getting rid of the worst of the rusty stuff...except down in the lettering...switch to 220 grit, one "pad" per leg, on each face.... We getting there...wipe each area once it is sanded...then a bead of 3in1 oil, and wipe that around with a rag.... Looking better? About 99.9% of the markings are readable....square should be about ready to go back to work? At one time, one could lay out every cut and build a house, using just a square like this....might be a lost art, now-a-days.....
-
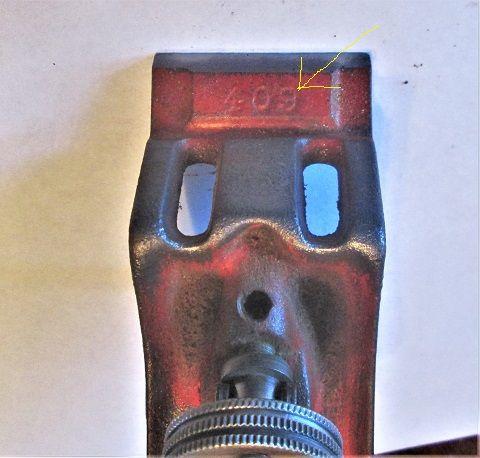
A while back..picked a $15 Jack plane at an estate sale....been trying to clean this thing up.. Made by Sargent & Co. and sold at Sears as a Craftsman brand tool... Even was marked as Craftsman on the iron... The "BL" was a Sears code for Sargent..... First things I do is tear the plane down to just..parts...and clean each up...metal parts see the wire wheel on my grinder... Frog...bolt and the rest needed a bit of cleaning... That "409" is because Sargent 409 and 414 planes used the same frog. Steel adjuster wheel took a bit of cleaning. Same with where the frog sat...after a bunch of crud was removed... Bolts....used a pair of visegrips to hold these, while the wire wheel went to work....at one time (WW2 ?) the nuts had been blued. A large,brass wire wheel was chucked into a drill, and all rust removed here...then a paint brush with 3in1 oil was used all over, to keep the rust away... Sides were cleaned up with the wire wheel on the grinder..then oiled. the sole? A few scratches...checked it for flat.....sit it on a know flat surface, index finger on each hand...one on each end, try to press down and see IF it rocks...this one never moved...flat enough for me The handles were stripped of the old finish, and ugly paint...smelly BLO was brushed on, and rubbed down...then a coat of varnish. Which left these three.. Had a burr on the bolt's slot to remove, and rust in the knurling....Wire wheel to clean the rust off. I adapted a sander to be the sharpening center... Table was adjusted to a 90 degree to the disc. And a large cup of water was nearby... This is Snaggletooth....what I started out with... Cleaned up, back is now flat...worked on the chipbreaker, too. Then, oil stones.. Long one is a COARSE, small one is 600 grit...rag to keep things clean, and the 3in1 oil as needed.... Then 2 grits of wet or dry paper...a 1000 grit, and then this 2000 grit....we getting there.. Then the strop. Had to work on the chipbreaker a bit..until it sat flat ( no gaps) on the back of the iron. Rest of the plane was still upstairs...happened to have another Sargent Jack plane IN the shop...used it as a test bed, of sorts... Almost done... Took a few trips...took the iron and such upstairs, and re-assembled the jack plane... Look any better? Trying to decide what colour was used on the lever cap.. To make the "CRAFTSMAN" logo stand out better.....blue? Red? Gold? Have seen all 3... Not too bad, for a $15 plane?
- 2 replies
-
- 4
-
-
- jack plane
- rehab
- (and 1 more)
-
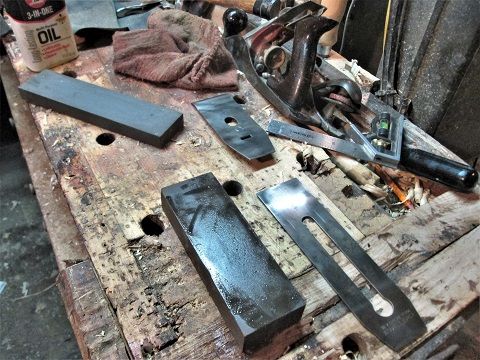
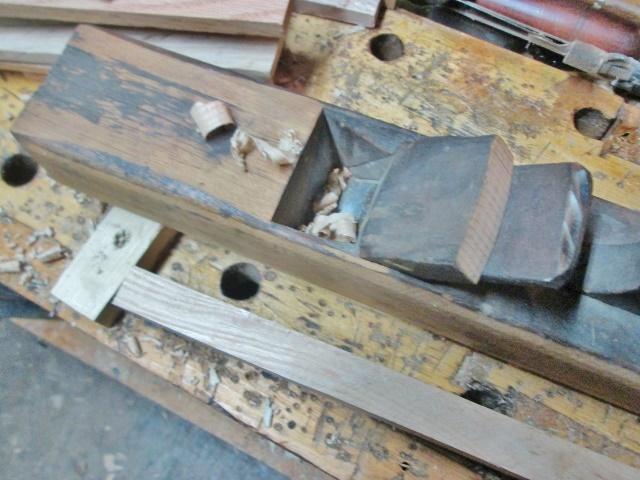
One of the "treasures" brought home from Wapak.. I've already rehabbed the Defiance plane, and cleaned the drills up...which left that wood bodied Jack plane... Needed a blade/iron/cutter.....Well, I did have a chunk of decent iron handy.. This is the half that is "leftover"...went back as far as this was flat....used the grinder to cut a deep groove.. Because this chunk of steel was laughing at my hacksaws...got as deep as I could, then snapped the "good" part off. Beginning to think someone had re-worked an old lawnmower blade. More grinding.....beltsander......more grinding...wound up with an almost flat "back" and a cambered bevel... 2" wide iron....could have been a tad wider. Will work on the sharpening later... Had to trim the wedge a bit....will refine the cut later. It was sticking up further than the iron was. Finish the sharpening, may see about tightening the handle a bit...finish the wedge a bit..will do for now. May try to find out how thick the iron is..... Stay tuned....
- 8 replies
-
- 7
-
-
- iron
- jack plane
- (and 1 more)
-
Earlier this year, picked a $1 handsaw at a garage sale.... Not much to look at? Disston USA, 11ppi, hmmm Scraped away some of the rust....D-8? Checked Disstonian Institute....saw was from 1939-1947 era....so Searched for a Sharpening Service....as them tiny teeth are too small for me to see each tooth, let alone file them.. A place in Piqua, OH., called Chucks Sharpening Service....took this saw over to him....about 10 days later ( chainsaw season around here...) This came back home with me. $10 to set and sharpen....cuts like a new saw should...wood is Ash, saw cuts fast and true. So, I shined up the hardware...plating was worn off... But brass will do...plate was shined up.. And, I can read the entire etch. Stripped the flaky finish off the handle, gave it a good sanding, then a bunch of wiped on Amber shellac.. Top horn was a bit worn...I even was able to "clock" the screws.. Compare to original.. So...for about $11 total.... We have a Finish Carpenter's "Finish Saw". 26" long, 11 ppi, D-8 Might find a bit of use for it? ( I also dropped off an Atkins No. 65 Perfection saw, will see how it comes back..a little easier for him to see the teeth..8ppi...and, he does use a Foley filer..) Stay tuned...
-
One of these #3 planes got torn down, cleaned up, and put back together, today. warning: Tain't purtty at the start.... Warned ya, didn't I ? PBBlaster soaked for a while, then started a tear down. Took a bit of prying to get two items loose Hammer to adjust the lateral lever out of the way, to get the tote off ( didn't wait long enough on the soak, snapped the bolt off for the tote...easy-out..) More "fun"...getting all of these apart....BIG screwdriver, hammer, and a pair of visegrips.... IF you are afraid to get your hand very, very DIRTY...turn back now....I left well enough alone, with the front bolt....will let it soak a while.. Usual wire wheels, belt sanders, and even a ROS....and a couple of shop rags....Visegrips to hold small parts while I clean things up.... getting there.. Almost done... Sole looks better than it did...Iron may or may not get reused...kind of thin..Turtle wax Polishing Compound to shine things up.. Handles got all the crud cleaned off...time to put things back together, for now...( until I bring the Easy Out kit to the shop..) What I started with... And what it looks like....after 2 hours of soak and work... May work on either the Craftsman No. 3, or the Stanley No. 6, Type 7/8 next....or wait until tomorrow...
-
Somewhere this spring, I picked a old axe....cost me a whopping $1....despite the price tag of $2......finally was able to find a handle for it... As I think it needed a new handle.... More cracks than a city sidewalk? After about an hour in the rehab shop....remove old handle, clean off the rusty-crud, remove burrs and such Fit the new handle, add the wedge...tighten things down...trim the excess wood.. And, toss the old handle out, onto the fire pit. Seems I now have a 3-1/2 pound Collins splitting axe....just needs a GOOD sharpening, when I get a bit of time. Not too bad of a deal?
-
Well, Stopped at ONE garage sale.....Spent a bit over $15...Picked a pair of straight jaw Visegrips, and a "modern" Yankee drill... That had 3 drill points. That was the $0.50 of the $15.50.....and I almost drove off without these two..why? A COMPLETE Stanley Mitre Box with it's OEM saw...had to take the saw out, to make things easier to cart around... So....in order to do a rehab on this new "toy", one item needs addressed... need to put away all of this mess....including those freshly cleaned up bits.. other end of the bench was worse..( board was to test how sharp the saw is....VERY sharp...) Took maybe 10 minutes to go from this mess...to... I think I can live with this... That Disston saw... And, when I cleaned the spine up, there was another Disston & Sons stamp. Took the Brass out, and shined them up. Saw is 26" long, not counting the handle..and WAS 4" under the spine ( now about 3-1/2"..) which makes the Mitre Box it goes to a #246, or a #346 model. IF you look at the bottom of the guide rods, instead of a square block, there is a split cylinder. Both stock rests and both stock holders are there...was missing depth stop back here ( had one in me spares box) Afraid to look under the top deck, and see what sort of shape the main deck is in...No name plate showing Model number.. But there are 4 patent dates, all from 1904...There was one item to replace.. An old break..and I had a replacement in the spares box...Decided to soak the moving parts in PBblaster, since none were moving....got rid of the plywood deck... Well, well, lookee what I found. Those stock rests ( for doing crown molding) These are OEM, OLD ones..they have a small button to keep them from being pulled out too far ( and lost) But, if you take the rest and that thumbscrew and holder around front... That same thumbscrew threads into the metal disc in the deck...and you have a length stop for repeat cuts...Shook up the can of PB..and gave things a soaking... Swing arm did not want to...swing...let this soak for about an hour, gave it another try...was able to move it nicely enough...details? One, in addition to the numbers on top of the quadrant, that show the number of cuts for a given box ( 4 = 4 sides = 4 cuts= 45 degrees) there is a scale along the front edge.. These are degrees. There are detent holes under all of this, to lock the saw in place for the cuts... Still evicting spiders...That HUGE slotted "bolt"? is not a bolt..notice that little hole in the slot? There is a tapered pin in there, when you install the guide rods into the arm, you tight a bolt at the end of this pin. It spreads the slot, and holds the guide rod assembly in place. You can also see the detents the swing arm locks into..other end of the swing arm turns on a "King bolt"... Which I may need to remove, to clean and repaint everything that needs painted.. Intent is to make this Mitre Box & Saw look like the day Mr. L Millice bought it...Saw has been cleaned up....box has been taken down to the bench....need a bowl to toss cleaned up parts in, and a new 6" brass wire wheel for my grinder....and a 3/8" thick plank of Poplar, 6" x 24" Project wood. old wheel sheds worse than a sheep dog in August... Stay tuned...
-
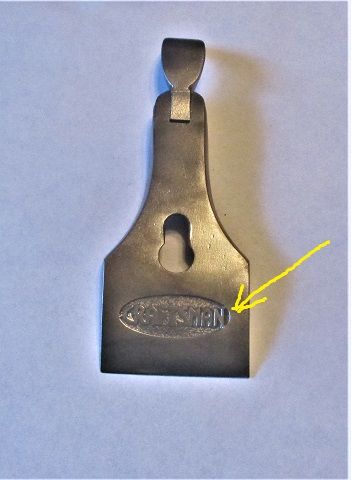
Not enough lumber to start another project....might as well keep going with the rehab stuff.... 5 planes...some parts were cleaned up, and given a new coat of paint. Threaded items were cleaned off, and oiled up. Decided to work on the red plane Sole is now as flat as I am going to get it. Like the hanger hole This was the easy one...we also have the "Bad".. And the "Ugly"...to go along with the "Good" Yeah....Ok, iron was flattened on the back, honed to 25 degrees and 2,000 grit....then stropped. putthe plane back together Sold by Geo. Worthington Co. of Cleveland, OH. Apparently, this is a made by Stanley #220....Iron is stamped as a Worthington W2200. Pine test track, had to rotate because of grain direction.. Rub a bit of wax of the sole, set the depth and lateral...seems to work. which leaves.. These 3 for tomorrow. Label claims to be a Defiance, by Stanley. Then there is that other plane.. Ummm, yeah. 9-1/2 knock-off. This might take a while.. Stay tuned...
-
- 6
-
-
- block plane
- rehab
- (and 1 more)
-
Because, I had spent $7 the day before the Mitre Box find.....soooo Price tag said $8...bought it for $6...needs a little TLC? There were a few "Gems" in this mess... 2 countersinks, 2 screwdriver tips, and German "center" bit... A #20 bit, and twist drill bit...and a Irwin No. 21 expansive bit..without a cutter I think I could use the one in the #22...but not the #1... Inventory? I cleaned a few, to ID them, but.. The 3 off to the right? P.S.&W. Co. Smallest of the 3 is a #8...8/16" That one in the center, with a slightly different flute pattern....Bates A very Motley Crew? Spade bit, with hex shank, no spurs...Concrete bit...piece of the carbide insert in gone ( junk) Somehow, I doubt IF the twist drill is a #12.....as 12/16" is 3/4"...as for the cut up bit? Methinks this were for a 3 jawed Breast drill, or hand cranked drill press... Those other gems? had a few like them, so cleaned them all up.. Smallest bit is a #4, the Gimlet is 3/8", the center bit is 5/8" I now have 4 countersink bits, and 3 screwdriver tips,,,should be enough, for now.. Box needed cleaned out, in more ways than one.. 1/2 rust..1/2 gunk....soaked it in Oxyclean overnight, this morning a HOT water rinse and let it sit out in the sunshine to finish drying out Outside was dried off....and given a "Basic Black" finish... Letting that 85 degree sun bake the Rustoleum....Might have a couple handles, will see about a latch... Wire wheel to clean the bits....rather a bit messy...have to also watch so they don't catch in the wheel... stay tuned BTW: the $1 extra? Atkins/Sheffield panel saw... Cut out the glare... Will tackle this restore, after the bits are done....
-
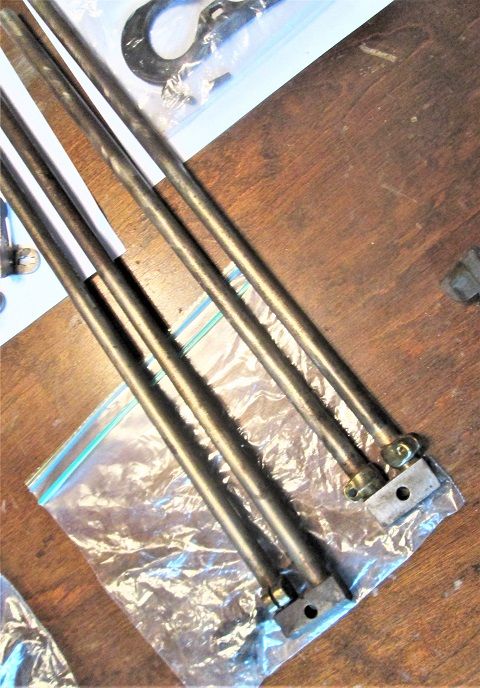
A friend dropped off a "project" for me to rehab.... The rest of the parts were in a bunch of baggies.. and these.. and.. Lots of tiny parts....and not all the parts were there.. Lever to unlock the swing arm... Guide rods attach here...block for the front set is MIA. saw guides. assembled on set.. These slide on the rods, and guide the saw. Newer models had roller bearings... One bag had just 4 bolts.... To install the feet with. There is also a dozen small wood screws, to attach a wooden "deck" to the metal frame. Been about 3 years since I last rehabbed a Stanley No. 358 Mitre Box... Trying to remember which part goes where....and, this was a newer model, than the one I am now working on.... Need to buy a 1/2" thick Poplar plank....something about iron vs Oak (or Ash).....there is even a few wood screws, to attach the box to a bench. Might take a while to get the latest version rehabbed, and making sawdust. Stay tuned..
-
I have a Porter Cable cordless drill with a 3/8 keyless chuck and it is about 5 years old. I really like it. However the keyless chuck has started coming loose and dropping what ever I have chucked in it. Is there anyway to rehab it to its normal gripping power or is a new chuck the only answer?
-
these stairs were covered w/ red shag carpet, loose (no shims and 8d finish nails) and the riser heights were random... the treads were re-positioned, risers adjusted to fit and center stringers added... Both sets of stairs are kicked/racked ¾" the opposite way of each other... The 1st risers of each set were 7/8" low and the top 2 risers are 7/8" tall.... the fix was to change the elevation of the stairs... pulled everything out and reinstalled them to required height... I'm sure the original installer didn't allow for the finish floor elevation... This project received a new front door and a tiled landing.... pressure sealed (same process as PT'ing wood) the threads and handrail w/ Rexthane, plus 2 coats and started the installs... all of the newels, baullisters and railing were shop produced... this work got me a lot more around the neighborhood...
- 7 replies
-
- 8
-
-
- yesteryear series
- rehab
- (and 1 more)
-
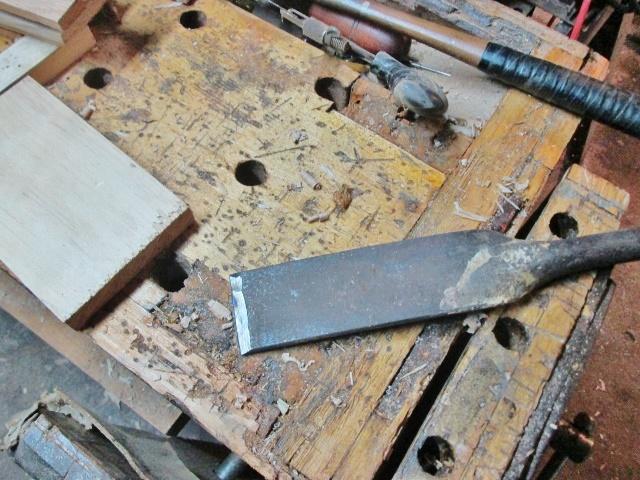
Ok, awhile back I picked a plastic tub of tools and such....in one of the many "layers" of toys in that tub, was a chisel shaped object. All metal, mushroomed tip, must have been hurting, tip is all red... Well, finally some free time in the shop, got rid of that mushroom.. Could even read all the writing on it..."Made by Crescent Tool Co." "Jamestown, N.Y." No. 175 1 1/4 Made in USA Hmmm, that might take awhile....bevel had a 40+degree angle to it, and was skewed.... Took a large cup of water to the shop, and set it right beside the grinder. VE Haft Werk to do..... Looking better, now. No attempt at a bevel..just straight in. And dunk it often. Once this was straight, I could work on a new bevel...at 35degrees.. And made sure the back was flat.. Will do....then the stones and papers.. A very coarse stone, until a wire edge showed up.. Bench dog to keep things from sliding away. Medium stone..600 grit..then the fine stuff Set each paper, 1000 grit, 1500 grit, and 2000 grit right on the stone. Sprtiz of WD40 on the stone, and the paper...then the leather belt strop, loaded up with the green compound... First test drive.. Yep, it will curl some shavings...but, this is not what this chisel was designed for...next test drive.. Say this is a floor, or ceiling joist, and you needed to run a water line, or electric lines through it...rather than drill a hole that may or may not fit..just chop your way through.....including through lath with brown coat, joists with nails..this chisel will cut through....and that be the hammer most often used... These were sold with a shiny blade, a blue/black handle, and a red top.. Just like new. Might have to find a use for this one, around the house...
-
On the way to Huber heights, OH thursday..stopped at the store in Brandt, OH...spend a whopping $5 on a pair of chisel shaped objects... Skinny one is 3/4", wider one is 1''....nothing special? No handles, one has a mushroom growing on it....bend at the socket was made that way...even saw a trace of a name stamp on the bent socket... MIGHT need a bit of sharpening? Well, got busy with these two, while the stain was drying....Beltsander to remove the mushroom, and a chunk out of my knuckle...DNA on the new sander Dug out the wooden plug inside the remade socket..dug through the spare chisel drawer, and found a couple loaner handles.. Flattened the backs, got a start on the sharpening.. With the 3/4" firmer all shined up, found a name stamp on it, too. 1" wide is a UNION Hardware Company of Torrington, CONN. USA The 3/4" one? T.H. Witherby....also of Torrington, CONN, USA. It will go with the 1/2" one I have. And the 3/8" Mortise chisel... Not too bad..for $5?
-
Well, first we dropped off Craig at his job, then stopped to check on Mom......not a good time....Call button wasn't working....she needs help to get out of bed....so, somehow she now has a Urinary tract infection, too...along with too many painkillers. Got the nurses motivated, then my sister arrived, and really motivated them.... They were working on mom when we left....with my sister playing strawboss.... On the way back home from there, stopped at a store, for a little rust hunting....$9 +sales tax.. A little 8" sweep brace, with a "Bonus" of sorts.. A VERY minty Craftsman 13/16" bit. Got home, did a wire wheel change, and the cleaned things up.. Almost like new? Wonder IF Craftsman would replace it? As for that brace? The only markings I found, were on the chuck.. A Goodell Pratt, from Greenfield, MASS., USA....PAT. Dec 27, 1892. That "loop" is a gear shift. Flip it to one side, or the other, chuck now will ratchet, center it up, and no ratcheting will happen. I think I know where Millers Falls got the idea about the top attachment.. As Goodell Pratt used the same thing. Was kind of a so-so day....and 1-2" of fresh snow..grrrrr.
-
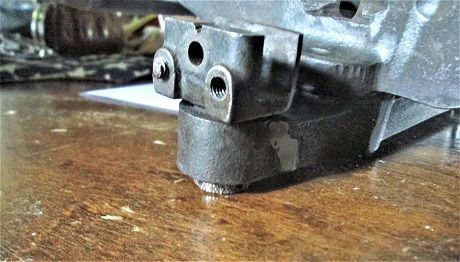
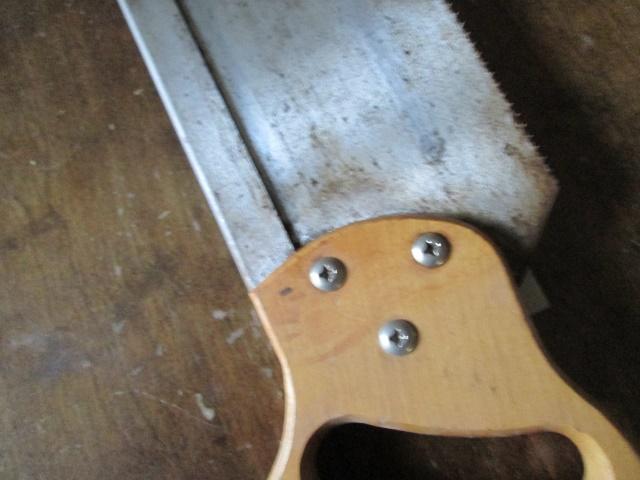
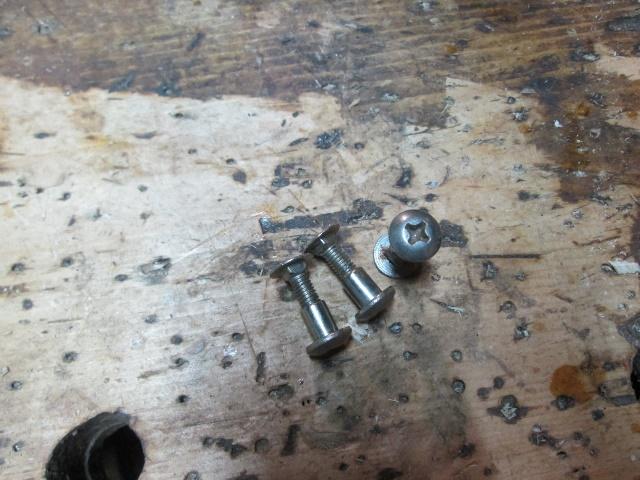
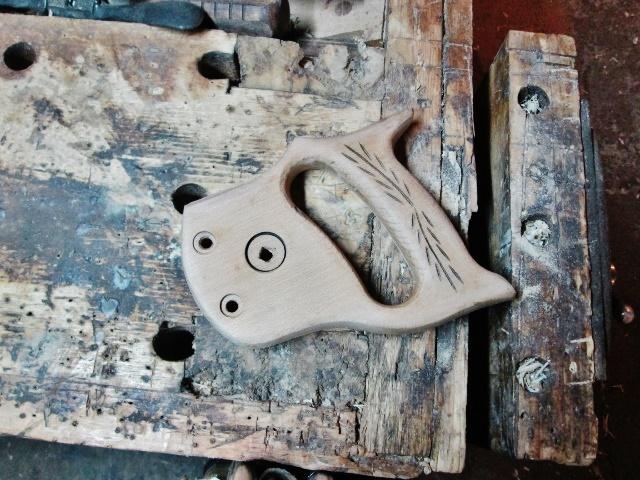
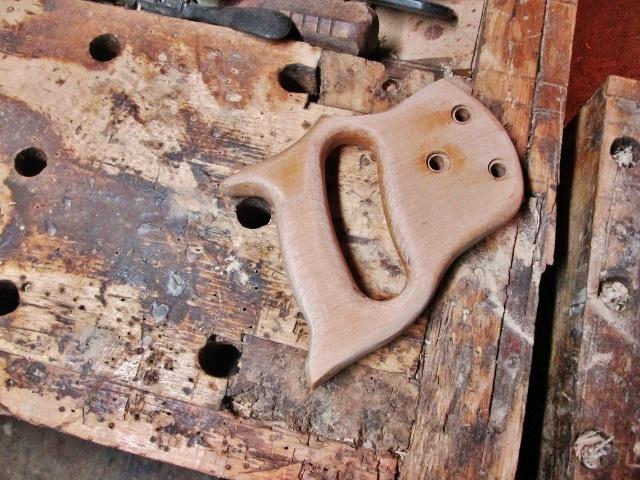
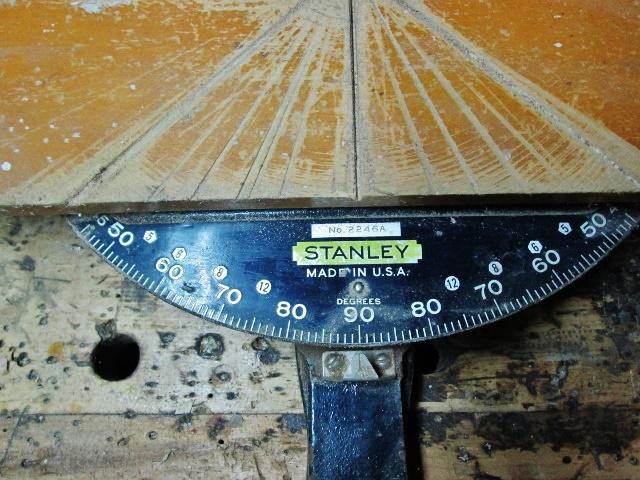
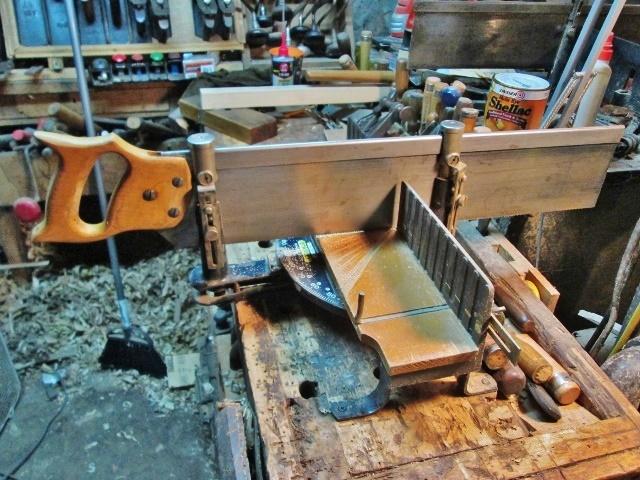
Well, today was speding hauling the Boss around, while she did some shopping....decided to stop at a store in Anna, OH.....and spend a little "Me" time....and as few dollars as I could.... hey, for $5 and tax...it did have potential.....except for these things.. Which have no place on a saw. Decided to rehab this saw up, as a spare for the smaller mitre box... First off, these had to go....found a few better bolts in the spares box.. Forstner bits to recess these new bolts. At least the phillips headed bolts were gone.. Getting somewhere....took the bolts back out, needed to do something about that blockheaded handle..... Router with a roundover bit, sanders, spokeshave, rasp, and a piece of glass..... Getting there.... Wire wheel to get rid of the old finish. Sander to polish the saw's plate.....put things back together.. And set up a mitre box while the first coat of amber shellac dried.....then a test cut.. Mitre box? Just an old Stanley No. 2246A. Another look at the saw? Had to raise the depth stops a hair, this is a full 4" under the spine, 24" long, with about 22" tooth line. Seems to be even better than the other 4 x 24 backsaw I have. I do have the 4 x 26 backsaw the mitre box was made for....needs sharpened, and a split in the handle needs fixed. I think I can "make do" with this new $5.38 saw.....? Note: Couple of months ago, I had stopped at this store....found two moldy ( yellow fuzzies) Tongue and Groove planes....could have got both for...$5 each...saw the same planes all cleaned up, and hanging in the "showroom"....$42 each....YIKES!! Oh well, I do have that Stanley #45....