Search the Community
Showing results for tags 'curly maple'.
-

From the album: Glenn Davis
Cherry display cabinet with curly maple raised panel back and bulletin board, mortise and tenon doors, pegged construction -
.JPG.3216c61d4ed005567a59dd2361e31d5f.JPG)
From the album: 18th Century Connecticut Blanket Chest
I cut these dovetails with my PC 7519 Router and an old Model 1601 Keller Jig that dad bought in the 80's to make beehives with. He gave me the jig and I've had it ever since.- 2 comments
-
- 1
-

-
- 18th century
- maple
- (and 3 more)
-
I posted photos of this build in July last year but for the full build video I'll just post it here rather than revive an older thread. It's a beautiful piece with the Curly Maple and Purpleheart; the video is 23 minutes long and has chapters if you want to go to certain sections. Enjoy!
-
I love perusing second hand furniture, I love the quality and the patina it has on select pieces I'll see, and I came across this Ethan Allen Made in the USA Solid Maple China Cabinet. As far as production furniture goes, this is a really nice example I believe. I love the color, the style, it has clean lines, I love the imitated old glass, and if you look close enough there is even some curl in places. The price, 850.00 on Craigslist, this is the furniture that I wish younger folks would look out for, or even older folks who are more prone to going to the more conventional furniture sales stores. Because for this price, the quality you'll find at the conventional stores is not even a quarter of the quality this piece is. I don't want to start a topic bashing the IKEA's of the world, or the Levitz and Ashley's, because they have a place, I remember when I was younger, and my wife and I were just starting out on a single man income and barely above min wage, the IKEA's helped us out a lot, not that we had an IKEA at that time, but you know what I mean. Back to my rambling, this is just a wonderful example of what folks could find if they get a little creative with their home decor, and try not to perfectly match everything in the house, I love a home where nothing really matches, eclecticism is wonderful in a home, where nothing matches, but they all appear to be in harmony. This Ethan Allen China set, would go lovely with a Danish Modern dining set, or a Mission style dining set, or?

- 13 replies
-
- 5
-
-

-
- curly maple
- ethan allen
- (and 5 more)
-
.thumb.jpg.573d1497d0675219908c85aabefd797a.jpg) View File Woodcraft Magazine Issue 81 (Classic Shaker Counter) A wonderful plan by our sponsors "Woodcraft Magazine". Woodcraft has given us permission to share any items from their online catalog, thank you Woodcraft! Submitter John Morris Submitted 08/14/2022 Category Furnishings
View File Woodcraft Magazine Issue 81 (Classic Shaker Counter) A wonderful plan by our sponsors "Woodcraft Magazine". Woodcraft has given us permission to share any items from their online catalog, thank you Woodcraft! Submitter John Morris Submitted 08/14/2022 Category Furnishings- 1 reply
-
- 3
-
-

-
- mortise
- tiger maple
- (and 9 more)
-

Version 1.0.0
18 downloads
A wonderful plan by our sponsors "Woodcraft Magazine". Woodcraft has given us permission to share any items from their online catalog, thank you Woodcraft!-
- 2
-
-
- tiger maple
- curly maple
- (and 9 more)
-
 Ol knuckle head sanding on a New Lebanon Shaker Rocking Chair. I built this chair from Curly Maple, it turned out very nice.
- 5 comments
-
- 3
-
-
- curly maple
- maple
- (and 5 more)
-

From the album: Old English Plate Shelf
Finished and ready for delivery. My go to finishing schedule for most of my flat work is water based dyes for color, followed by a coat of boiled linseed oil, then oil based varnish. I still love the warmth and glow of oil based varnishes, it has a warmth that I love.© Courtland Woodworks
- 7 comments
-
- 1
-
-
- curly maple
- dye
- (and 6 more)
-
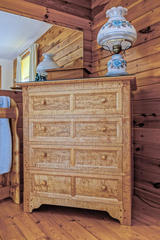
Starting a new project for a serious audiophile with some serious equipment. His McIntosh amp alone weighs 125 lbs.! The dimensions alone make this rack impressive; everything is 8/4 and the shelves are 23" deep, 52" wide, and the unit is 31" high. Each shelf will weigh about 70 lbs. The top shelf is Curly Maple and the middle and bottom shelves are Northern Hard Rock Maple. These will be banded with Curly Maple so from the front you'll see Curly Maple shelves. But since the middle and bottom shelves will be covered with gear there was no need for these to be the much more expensive Curly Maple. The legs are about 2" x 3" and are Purpleheart. I'll finish the piece in Nitrocellulose lacquer. While there's no rush on completing this piece I do want to stay on it as much as possible but as other orders come in I'll put this aside. For instance, we got two separate orders for 18" Longworth chucks today so I'll move all of this out and cut the chucks tomorrow, then move all of this back in to begin planing and jointing shelves. When the shelves are glued I'll take them to my friend's cabinet shop and run them through their wide belt sander. Our SuperMax 19-38 will work but it will be so much easier to do it on their wide belt sander. As you can see, just the lumber alone overwhelms our little shop and when it comes to assembling this I'll have to do it in the house because I don't have room in the shop to put it together. Preliminary design - One shelf, basically, prior to jointing - All the lumber for the project - Curly Maple close up shots - More photos and updates as I work through this project. Enjoy! David
- 39 replies
-
- 7
-
-
- audio rack
- curly maple
- (and 1 more)
-
.JPG.fb9ed6e12ca313b82562160683f83344.JPG)
From the album: 18th Century Connecticut Blanket Chest
This is the same chest featured here in this album, but a better picture I believe, with a few craft items I made, the two vases and the wood platter dish, with my wife's pottery she made sitting atop. -

From the album: 18th Century Connecticut Blanket Chest
- 2 comments
-
- 1
-
-
- connecticutt
- maple
- (and 2 more)
-

From the album: Shaker Furniture
The seat is checkerboard weaved, with 5/8" fabric tape available at: Shaker Style Furniture WWW.SHAKERWORKSHOPS.COM Shaker furniture is the one truly original American style of furniture. Its clear crisp lines and singular lightness unite and... -

From the album: 18th Century Connecticut Blanket Chest
-
 figured maple
- 6 comments
-
- 4
-
-
- maple
- curly maple
- (and 4 more)
-
Just completed,...horn is by Bill Smith and myself. Tiger maple base plug.
- 15 replies
-
- 7
-
-
- curly maple
- maple
- (and 6 more)
-

From the album: Glenn Davis
Mortise and Tenon Construction -

From the album: John Morris's Hand Tools
I got in the shop a little and decided to make my own layout tools, starting with the ever so useful 6" square. Since it's the most used size in my work, it's a good jumping off point. Then I'll create a smaller 3" followed up by a few larger squares. I love how this one feels, and you know what? No more accidental scratching or marring of wood surfaces like you may get with steel squares.- 5 comments
-
- 4
-
-
- try-square
- square
- (and 3 more)
-
.JPG.f2df02fabd4939c45bcd3b67229a914f.JPG)
From the album: 18th Century Connecticut Blanket Chest
Installing the mortised lock was interesting, having to do it after the entire chest was finished was a tad stressful to say the least. But it does lock, and looks wonderful.-
- 3
-
-
- chest
- curly maple
- (and 2 more)
-

From the album: John Morris's Hand Tools
I built this square from left over Walnut from some project eons ago, and the Curly Maple is scrap from a Shaker Rocker I am currently building. The two pins are of Walnut as well. They are through-pins.- 3 comments
-
- 4
-
-

-
- curly maple
- maple
- (and 3 more)
-

From the album: Shaker Furniture
This is the first time I have played with actually photographing my work in a more professional way, with the help of my kids, I think we did pretty good. This chair was another fun build, I just love these chairs. -

From the album: Shaker Furniture
Rear of Shaker chair. -

From the album: Shaker Furniture
If anyone has an critiques regarding the photography of this chair, please share, I want to learn how to photograph work like this. Thanks! -
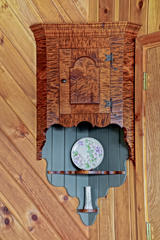
From the album: Glenn Davis
Curly Maple Corner Cabinet with Pendant Shelves, hand made rat tail hinges, tombstone reverse raised panel- 4 comments
-
- 3
-
-
- curly maple
- tombstone
- (and 1 more)
-
Related Topics Shaker Transitional Rocker Part 1 (Curly Maple) Shaker Transitional Rocker Part 2 (Curly Maple) Shaker Transitional Rocker Part 3 (Curly Maple) The Finish Well folks, as were the others this subject was getting a little long in the tooth so I split this topic off from the 3rd entry. We'll show the finish and the seat weave in this topic. Today I was able to get out in the shop and get some finish on our rocker. I don't have really any images of the finish prep, there wasn't much to it, unless you like viewing a man holding sand paper. But mainly what occurred today was much hand sanding. I was able to leave the back slats and rockers alone, since I scraped them before installation, the figure really popped after the scraping and I was satisfied with that. And, the spindles came off the lathe sanded to 600 and then burnished with wood shavings, so the level of prep on those items were satisfactory enough to just go over once again with some 600 grit. Really I could have left all the spindle work as was, accept there was some grain raising around the joints as I cleaned up the glue with water during assembly. Also, over the course of time that I started this project, two years ago, the spindles all had a darker patina from just sitting around, than the flat work pieces of this chair. So in order to even out the patina I knocked it down by hand with 600 grit. A thing about hand sanding, this is just my opinion, when you are doing solid work like this, furnishings with parts that are many shapes, sizes, and point in various directions, I feel you must hand sand. You could hit the work with a detail sander, sure, but you are missing one very important item, the details. When you work a piece like this with power sanding, you are visually (or at least for me) kind of viewing the overall project as a whole surface, whereas if you hand sand, as you are sanding in any specific area, your eyes are drawn to that narrowed view, and you are focused, and you are going to catch many more unsightly surface features than if you powered through it all with an electric sander. Also by hand sanding, for me anyway, it's very peaceful. I had my chair out in my back patio area, it's late Spring, the trees are rustling in the wind, and the birds were chirping, and all you could hear from me was the shhhshhhhshhhhshhhh of my sand paper with the natural sounds in the background, it was really nice. I have learned to slow down my work considerably, and just to enjoy each process of the work, and not to rush anything through. This type of work lends well to that philosophy, because I really can't rush this anyway, because of the various components of a chair, my body mechanics must slow down, along with my mind, and consequently, my thoughts, and a peace builds up and the project is just fun, and relaxing. Sure you could do everything I have done on this chair with power, but why? Just so you can say you got it done faster? And with a bunch of noise? And therefore missing much of the happiness that surrounds these projects. So, I set my chair on the bench and shaped some tin foil into a bowl and poured about half a cup of Boiled Linseed Oil in the tin. I like using my home made tins, I can just use up the oil, and throw it away, there is no need to clean the bowl or container. With a white cotton rag nearby to apply the oil with we are ready. My dog Woody is nearby as usual now, as you may know by now by my other topics, he is deaf now, and he loves the shop! I love this part of the chair-making process, especially when using curly figured wood, all the efforts that were made to ensure the joints are tight and clean, the hand planing and scraping, the carefully placed wedged tenons, and chair leg pins, the pillow rail, the curly figured arm rests, it all comes alive in a crescendo of color and natural figure when the first swoop of the towel soaked in oil hits the chair, it's like Christmas all over again. I love this part. With my Appalachia music on in the background, and my dogs nearby, and my warm bench I am working off of, the chair comes alive. Something we have not discussed in prior chair topics, is the use of Ash for the top rungs that the seat is weaved around. You'll notice the Ash rungs, Ash is used because of its incredible strength, the Ash will hold a lot of weight without breaking or cracking. After I wipe on the first and only coat of oil, I'll revisit the chair several times today to wipe down the leaching areas as the oil resurfaces and beads. Typically I find about three to four times I have to revisit the chair, and wipe off the access leaching. This was a perfect day to start finishing my chair. I learned a trick a few years ago that I use often still, I can't remember where I saw it, or where I heard it from. With my chair projects, and virtually any project that you may want a darker patina built into the project before the finish goes on, you can set the project (chair) out in the sun, and let the sun do it's job for half a day or all day if you can work it out that way. I set my chair out in the sunlight for a tan, that's right, I let nature have her way with the chair in the sunlight, the sun will darken the chair a couple shades, and even bring out the curly figure a little more. Back in the day, I used to do this trick with with the project in its bare wood phase, pre-finish. But then one day I got the idea to use this technique after the first coat of oil is applied, I figured if it works on humans at the beach who want to oil up and get that sun tan, that it will probably work on my chairs, and other projects. So since then, I oil up my project, set it out in the sun for a few hours, and wipe it down as the oil will leach even more significantly when heated. A darker patina is created, and it's beautiful. Image below is the chair set in the sun immediately after the oil has been applied. A couple hours later, I don't know if you can see but the curl is actually darkening a shade. This is 5 hours later, in real life I can visually see the difference, the picture does it no justice, but perhaps you can see a change in color? So folks, the chair now has it's first and only coat of oil, and the wood has darkened a bit and the curly figure is popping, and I have wiped the chair down a few more times, and now it is back in my shop, awaiting for me to have a little more time for the final finish. I will apply one coat of General Finishes Gel Topcoat, then I'll wax the chair. Then, the seat will be placed. Thank you again for following along!
- 42 replies
-
- 7
-
-
- curly maple
- maple
- (and 2 more)
-
Shaker Rocker in Cherry Related Topics Shaker Transitional Rocker Part 1 (Curly Maple) Shaker Transitional Rocker Part 2 (Curly Maple) Current Project So folks, I decided to break this topic up in parts as the last one was getting a little long in the tooth. So you can see the links above to the first two parts of my chair build. April of 2017 is when I started this maple chair, and as you know by now I decided to pick it back up and get back out in the shop and try to focus for once on woodworking as I did in Part 2. Thanks for following me! The back support rack is assembled as can be seen in Part 2. And now it's time to bore the mortises for the side rungs of the chair. The side rungs connect the back legs to the front leg assembly rack. I use a story stick for the entire chair layout, 99 percent of this chair is cut, turned, laid out, and assembled with story sticks. In the image below I am marking out the side rungs. Once the side rungs are laid out, I am using a slant support to bore the mortises at the proper angle, so the side rungs will splay out, thus creating a trapezoidal seat. So the front of the seat will be wider than the rear. You can see my first Shaker Rocker at this Link to get an idea of what I am talking about. Also, @Gene Howe, I know what you must be thinking, why use the slant table on a drill press that is fully capable of slanting its own table? I know I know Gene. For this Rocker I don't want to deviate from my norm, but next chair I make Gene, I promise I'll utilize the tilt table of my Shopsmith. Just a side view of my slant jig, also, the Shopsmith has a wonderful table that moves on two axis, first off the tilt, and the slide, in and out for fine adjustments in accuracy, this way I could clamp the jig to the table, and with the hand wheel I can slide it in and out till the bit sits directly over the line I need to bore, I really like my SS. Another view of what I am referring too for the sliding table, it's pretty awesome. First set of mortises are bored, I am using a Freud Diablo 5/8" Forstner with center spur or pin I guess you could say, it's a very clean cut. Some of the rungs are too tight to fit in the 5/8" mortises so I like to secure them in my vise and take some rolled 80 grit and work the tenon down till it fits snuggly in the mortise. After I made sure all the rungs will fit nicely, I did a dry run to see how they all line up, and they lined up beautifully. Now it's time to bore the mortises in the front assembly, you'll see these mortises are angled inward, to catch the side rungs that are angled outward from the rear legs. I used a story stick to lay these mortises out as well. Again, the Diablo by Freud really does a nice clean cut in this seemingly brittle Maple. In my desire to turn more and more towards hand tools, this may be an operation best suited for the drill press, as the angles in these frames are very important. I will practice with a brace and bit, there are tricks that Windsor makers use to bore accurate angles by hand, but for this chair I'll continue on the beaten path I know, just to get this one wrapped up successfully, this chair will be sold, so I can't afford big errors at this point. Now that the front and rear legs are bored out, I performed another dry run before glue up. You may notice at the left, it appears the side rungs were bored at an incorrect angle, they were not, well they were, but the error was on purpose. The books I am studying for building these chairs are written by Kerry Pierce. Mr. Pierce built-in a deliberate error in this these chairs, once those rungs are inserted into the mortises, the stress of those tenons are actually locking the chair together, if there is ever glue failure, the chair will hold together mechanically. There is a wonderful story in Mr. Pierce's books, he talks about repairing an original Shaker chair, the joints were loose, the glue was void, but one thing he noticed was the chair was virtually impossible to beat apart, and he surmised it must of been because the Shaker's introduced this deliberate error in the rung angles, in order to serve as a backup in case of glue failure. Now you can really see the trapezoidal shape of the seat. I only took the below picture to show the folks what my shop looks like now. Where the Shopsmith is sitting is where my wife's car parks. When I am done for the day I'll roll the Smith to the left side of the shop against my saw bench. So what you see here is what I am down too now, I have my Smith, my lathe as you can see on the back wall, my work bench at the rear left, and a miter saw cutoff bench at the left of which you cannot see the saw, but you can see the bench area. I have downsized considerably, for folks who may not no or have ever seen my shop before, there was a huge Grizz 12" table saw with an aircraft carrier bench right where the Shopsmith is sitting now. I had a 15" Delta Drill Press at the back wall where my cabinet makers bench is now, along with a 15" Grizz band saw, a Performax sander, and and a router cabinet, and at the right side of the shop out of picture, I had a 6" Grizz jointer, a planer, and a dust collection system. I sold them all, and to be honest, I do not miss them. But that's me, it was just time, I actually feel liberated being a relative minimalist. What started my downsizing was my desire to turn my shop into a more quiet experience and to start focusing on building with hand tools and in order to force myself to use more hand tools I knew I had to rid myself of luxuries. What quickened the downsize was my wife and I purchased her brand new car last Spring, it's the very first brand new car we have ever had, and it's a nice one, a 2018 Honda Pilot Touring, that is her daily driver, and I decided I wanted to give her, and her car a proper space to park, instead of in our driveway. Also the security of her being able to just pull in and close the garage door behind her, is really comforting for me. By the way, the garage door in this image actually leads out to our backyard, it's a pull through door. The two car door is behind the photographer. It's funny how life works out, we adapt, and often times, it works out really well. I'll end this tonight with my preparation for glue up. Once again, everything I need is on my bench, and within hands reach, all the rungs have been fitted, and the next post in this topic we'll see a chair assembled. Thank you all once again for following along! I'll install the rest of the images for this day in the shop tomorrow night.
- 67 replies
-
- 8
-
-
- shaker
- curly maple
- (and 2 more)


.jpg.e153af0773a0c9501bfe58baf6a28b47.jpg)
.jpg.330fdfa3c78dd10e6fec0023c6b6b5ae.jpg)
.jpg.42e9866544b2364f3ce19718c2982db3.jpg)
.jpg.4f1dd73fae96ccd276df4fc2005f0915.jpg)
.jpg.66c9cd696d7ba63b9c0b2d5769e60a45.jpg)

.jpg.87e574c6a57db4e73873525c37b9834d.jpg)
.jpg.1b3cf9913b2476ef90272aa3a6e3174a.jpg)
.jpg.d11ada16032ad49a0e45d9b82eec5db7.jpg)
.jpg.568a66c517fdee84133bdd27840350c8.jpg)
.jpg.ce23860c0986c766452a4b0605d5a184.jpg)
.jpg.9fbeecd9c572304dce184e8b7b738d53.jpg)
.jpg.39ab4ce1f5272a12e24853a48258186f.jpg)
.jpg.be7aa32a7b53c644f7967fb380432f74.jpg)
.jpg.deca21cc96b6537ea6e609db5163c295.jpg)
.jpg.ce149f0b59a9c5c392056125a3ff1eaa.jpg)
.jpg.20f5614b5e6c82dfb6316037ff0512b4.jpg)
.jpg.a1e5158f0e73435a5f03ca5f9c06f8b7.jpg)