Search the Community
Showing results for tags 'advice'.
-
Well, this is a big deal. I've gone many years with my midi-Jet, limited in bowl size to 12 inches. I have announced that a new lathe will be my retirement gift to myself. I want a big hurkin lathe to make big hurkin bowls and platters, and a few vessels. I have little interest in spindle turning beyond finials for vessels. What I don't want and hardly have the space and money for is the long bed that comes with larger diameter lathes. Looking at Laguna, Powermatic, Grizzly, Rikon, I just see really long beds. I seem to remember seeing a lathe to accommodate large diameter with a short bed but cannot find it now. I imagine I am not the first with these two parameters - large diameter -18-20 inches, short bed. An alternative is turning outboard of the bed and that might be a consideration. I would appreciate your wisdom and practical advice on lathes that do that, simply. I watched the Laguna video today for the 1836 to see that it would require a heavy and expensive extension and some other stuff to increase the diameter of the bowl. I see how that works yet it would then take half a wall of my 400 sf shop. So, once again, I turn to this group for excellent advice and experience. Thanks, as always
-
Well, last Wednesday in September. Hasn't been a great week, maybe a new month will chase away Mr. Murphy. Our Patriot Turners- @Gerald had some misfortune while turning a hollow form- He was looking for some suggestions on how to have the repair enhance the turning. Check out his post and see if you can offer any ideas- @bradleyheathhays is looking for suggestions on which type of bowl scraper to buy. Several of our turners added their thoughts; what are yours @Masonsailor turned some items for his reloading area. He shows us more of what he did in this post- A week or so ago @Gerald posted about a jam chuck. We are still getting input and inquiries about the chuck. If you made that chuck, please add your input to the conversation- I made a post asking for recommendations on air filtration masks. I really appreciate the input. I haven't decided on the route I want to take. I subscribe to the Alton Brown philosophy that every item should be a multitasker but they should also do those things well. If you have any ideas to add to the already suggested items, I would appreciate it- What’s Coming Up- Click on the images for links to registration and more information- For The Newbies- Mike Waldt works on that ash bowls. This is a live demonstration with questions and lots of good tips- Expand Your Horizons- If you are considering learning to cut threads, Mike Peace demonstrates a few tricks for setting up a thread cutting jig- New Turning Items- The Woodturning Tool Store has the NEW Elio-DR Safe Drive- See more at- https://woodturningtoolstore.com/product/elio-dr-safe-drive-2/?receiptful=614cfd7b710e56003dbee782&utm_source=CM Commerce&utm_medium=email&utm_campaign=newsletter-121&utm_term=newsletter&utm_content=other&receiptfultype=newsletter Everything Else- Rick Turns list of YouTube woodturning videos from last week- Been fighting computer problems for the past several days so shop time has been non-existent. Before everything went south, I did manage to get the last batch of rolling pins shaped but not sanded- probably a good thing as I am still hawking up lugies and haven't gotten better dust protection. After the rolling pins are pretty much round and dimensioned, the tapering jig is used to shape them. I used to do this free hand but getting consistent results proved difficult. The base of the jig holds the taper guide at the bottom/back. The cutting is done with a handheld, sliding fixture that houses the HHS cutter and an adjustable follower (bolt). The cutter is removable for sharpening. I'm using a 5/16" square tool stock now. It seems to make a better cut that the 1/4" square cutter I use originally. Cutter and follower bolt- Cutter closeup- After the overall shaping is finished, The tapering jig is removed. Each end of the pin gets the shoulders rounded. I use either a small spindle gouge or the Easy Wood Tools rougher with an R2 cutter. The pins are now ready for sanding. Safe turning and stay well

-
Hey folks, we have a new member and he is looking for advice on a starter lathe. Check his post at-
-
- 4
-

-
- advice
- starter lathe
- (and 1 more)
-
Hard to believe but only two more days left in April! Really looking forward to summer weather. Our Patriot Turners- @Gerald gave us a peek at his shop made parting tool. Unlike a lot of parting tools, this one cuts cleanly. Gerald explains how he created this tool, in his post- @RustyFN posted his almost completed combination bowl. This one is a beauty and combines multiple disciplines. Rusty got lots of positive comments on his work. You can read them in this update to his original thread- Rusty also provide a bit of sage advice. It is self explanatory- @AndrewB is finishing up a pepper mill in which he combined 2 species. They really look nice together- Andrew explains more about this turning in this posting- Andrew also mentioned his wishes to improve his dust collection. Maybe you have some ideas that he could incorporate. What’s Coming Up- Click on the above image for the link to registration For The Newbies- Sanding is one way to remove tool marks. However, a better way is to avoid them as much as possible. Here's a video explaining the possible causes of the marks and what you can so to help reduce them during the turning process- This is another video in the beginners series, from Mike Waldt. This one on scrapers, negative rake grinds and parting tools. It's rather long as it is from his live presentation.- Although aimed at the Record Power Midi Lathe, most of the maintenance tips in this video can be applied to just about any lathe- Craft Supplies USA has been publishing a beginners series of woodturning videos by Dale Nish. This one is turning a bowl from a dried blank- Expand Your Horizons- Lyle Jamieson shows us the thought process for designing and turning a natural edge hollow vessel. The other week we posted some information on purchasing already made wooden threads for lidded projects. With a little practice and a couple of tools, you can create them yourself, as Mike Peace explains- Within Mike's video, he references this from Allan Batty New Turning Items- Couldn't find anything interesting this week, so hang on to that stimulus check! Everything Else- Tim Yoder is having fun with this project to be gifted to a friend Rick Turns' list of woodturning YouTube videos from last week- I finished up the little natural edge bowl I had been messing with. I like the shape but I think I can do better by using less of the logs diameter and making the piece a little longer. I think that will give the piece a flatter more pleasing look. Anyway, used wipe on gloss poly for this one. I'm getting better at making the walls thinner, too. Safe turning and stay well
-
What a week! Hope this Wednesday finds you all safe and healthy. June 1st started our annual site fundraiser/raffle. Our generous sponsors have kicked in some fantastic prizes. Please check the announceent- Our Patriot Turners- @Ron Altier used some spalted Maple to make another fantastic ornament! Ron continues to use this UV finish and it really looks like it does a fantastic job. Check Ron's post for his description of a "happy little accident" @Ron Altier also started a great discussion based on something that @Lissa Hall posted. Lissa showed us her first bowl, Ron wondered what our first turnings were. This sparked a bunch of comments from our turners. Why not join in and post a picture or tell us what your first turning was- @Ron Altier is this week's winner with the most posts! He asked us if/how we lubricated our scroll checks. He received several responses. How do you keep your scroll chuck running smooth? One of our new turners, @AndrewB considered a new lathe. He asked use for input. Although Andrew has purchased a lathe, you might be able provide advice on using the one he bought- @AndrewB Also purchased some carbide turning tools. Check out the ones he bought and the pictures of the project he turned- What’s Coming Up- Looks like all of the live, in-person symposiums are cancelled through the summer. However, Cindy Drozda is doing live remote learning demonstrations. Her next one is Saturday June 6. Here's her video with more details- For The Newbies- Turners make things round from stuff that is square. Often there is a need to cut the the round turning to remove the part we want. If the diameter is small, a hand saw works well. But on larger pieces, the bandsaw is often the tool we use. Cutting round pieces, perpendicular to the length can be dangerous if not held securely. Mike Peace has a short video showing how to make a jig to safely make this cut- @AndrewB mentioned he is interested in turning bowls. I found this video, from BB turning, that covers the basics of rough turning a bowl. Although he uses traditional turning tools, the process is basically the same for carbide tools. Expand Your Horizons- I don't think I would ever have the patience to do this but Carl Jacobson makes it look easy. The basket weave illusion has been around for a bit- Carl shows us how he does it. I was particularly taken with the jig/platform he uses to draw his straight lines. Tim Yoder is always fun to watch. He shows us that not every turning needs to be proportioned by the golden ratio, have a flawlessly sanded surface, inlaid with colored acrylics or finished with 2000 layers of CA. At about 2 minutes and 40 seconds into the video, Tim uses a really neat way to secure lose pieces of the blank he will turn. I think this might come in handy for securing bowls to Big Easy Jaws and Longworth chucks. New Turning Items- If you are a pen turner, you know the importance of trimming the blank to the exact length of the tube insert. Some turners sand the blank while others use a barrel trimmer. Some of the barrel trimmers don't do an outstanding job and need to be sharpened. This set uses carbide inserts so it will cut cleanly for a long time. Although a little more expensive, it comes with virutally every size pilot reamer. Each piece is available for individual purchase. Click on the image for the link to the website and more information. Everything Else- Rick Turns' weekly video listing is available- I had every intention of sanding my elm bowl this week. But you know about "the best laid plans of mice and men..."- Sunday evening Mimi asked me to go to the basement and start the laundry. Getting things ready, I noticed some water on the floor. Not Good! In the back of my mind, I have been half expecting the 15 year old water heater (the one with the 6 year warranty) to be about at its end of life. Sure enough it had sprung a leak. So, Monday it was a trip to Lowe's. Got the new one plumbed in by the end of the day- fortunately we have the electric type. Got the mess cleaned up yesterday. The problem was how to get the old one up the basement steps. Gravity was a great help taking the new one down; not so much bringing the old one up. Luckily a friend was available and the carcass is now in the bed of the pickup. So the bowl sets for a bit longer- Safe turning and stay well
-
Pulled motor on Powermatic 65 table saw, made repairs to elevation gears, reinstalled motor, and it will not run. It just buzzes and tries to turn. I checked switch for loose wires, plugged into wall socket that is running fine on belt sander. My volt/amp meter conked out, so I bought another one that has a clamp-on the cord type tester, but haven't checked it out. According to youtube, I can check capacitor with this tester. Will check it and also to see if a connection on the motor might have pulled out. Any other suggestions? Thanks!
-
Looking for a good small detailed sander to use on turning projects. I just watched the video Ron Altier post about the whatchamacallit thing. I saw the guy using a small Makita sander that I think would be nice. Does anyone have this or is there something better out there. Not sure what to look for. Is there attachments that would be useful?? Thanks for the suggestions John T.
-
One of my favorite blogger and craftsmen is The Renaissance Woodworker, and he has some great advice for the hand tool start-up woodworker. If your considering taking a dive into hand tool woodworking, read this wonderful advice, by a trusted source. Hand Tool Woodworking Instruction and Thoughts WWW.RENAISSANCEWOODWORKER.COM The Renaissance Woodworker is woodworking education with a focus on hand tool only construction techniques.
-
I bought the Dewalt 733 planer seems like in 2000 and at the time I thought how I should take care of it... And my answer to a post the other day was completely wrong for I have never applied any kind of slickum to the base or table where the wood lays while the rollers are pulling the wood through the blades, never. The reasoning back then and still now.... A person should plane both sides of a board and try to take off the same amount of wood from each side. So the board gets flipped back and forth swapping sides until the ruffness and thickness is achieved.... Each time a person flips the board over to plane the other side if he has applied wax to the table the rollers will be getting some of that wax each time the board is flipped.....and soon , in my thinking the rollers will collect enough wax to make them too slick to pull the wood........ All these years all I do is keep the table clean with soap and water.....and make sure the soap is removed completely for that will help rust form.....The Johnsons Paste Wax I do use on the threaded rods and that is the only place. Good or bad idea thats for you to decide but so far I have never had any trouble with the 733. I am on my sixth set of blades and I do have a machine especially to sharpen the planer blades but I decided long ago a new set of blades are easier for me than to set the machine up each time and hope for the best... And for those who are new to using a planer and wonder why a person should take off the same amount of wood from each side you can do an experiment... Take a good flat board , kiln dried, and take off say an 1/8" off of one side only, not all at once but a very small amount each pass, and lay it back somewhere for a few days and see what happens. Most all the time that board will warp something terrible... And most of the time it is not fixable.
- 9 replies
-
- 2
-
-
- dewalt 733
- planer
- (and 1 more)
-
Ok so I need some advice about depth of a workbench / outfeed table I am about to build. So far height will be 36 & 1/2” by 44” wide. I have a fairly large table saw so I don’t need a ridiculous amount of out feed I don’t think. I have a Delta 36-725 for the record in half to 3/4 of a garage and with everything else in there not a ton of pathway. This is more like an assembly / outfeed bench. I just wanted to get some suggestions on how much depth I should build without wanting to rebuild it bigger a year later or get mad it’s too cumbersome. Max I can squeeze is around 30” maybe 36” if I move a few things around. I plan it being a multifunctional shop but mostly furniture and shop projects for its use. I’m going for minimal yet functional. Thanks y’all!
-
So, I just broke another blade. What's the best one for the money for 14" Rockwell saw? Not interested in bi-metal ones. Anybody used a HF one? If so, would you do it again? Thanks!
-
Hi, my mother-in-law has a storage shed on her property. It’s about 27 years old, neighbors tree fell on shed, roof no longer rain tight. Shed was an cheapie, did a great job lasting this long. Doors are sagging/rotting, roof has moss growing on it, particle board has become fall-aparticle-board. So I’m trying to find out whether it’s more cost advisable to buy a new, already made one(probably not), buy a precut kit, and assemble (maybe, but quality could still be an issue), or just get a set of plans build it myself, well with some help of course (I’m thinking this is the most inexpensive, and fun, but also most work). To price out the build it myself, I need plans. Due to my MIL’s yard/driveway layout, we’re looking for a shed that is 8 feet X 12 feet. We need the door to be one the 8 foot end, and maybe a window or two for light. I found a set of plans that do this, but the rafters, joists, etc seem to be 24 inches on center, I think for strength and snow loads up here in NE I’m wanting 16 inches on center. So any recommendations for where I can get good plans would be greatly appreciated. Thank you for any help or suggestions, Artie PS I have checked the laws/rules/regulations and no permit is required for sheds 120 sq feet or less.
-
Ladies and Gents, I intend to spend time in the shop this summer. Time to tool up. I have a standard marking gauge, the kind with the spike on it. I don't like it much, it follows the grain. I see a lot of youtubers using a metal marking gauge with a rotary cutter on it. Who uses one of these, do you like it, and what brand do you recommend? Same question for saws. If I were buying a tenon saw or panel saw, what brands should I consider?
-
Hi, I am hoping that some of our very knowledgeable members here will share their bountiful wisdom with me. (Did I lay it on too thick?) A good friend of mine has a small cabinet in his bathroom that matches their medicine cabinet. It appears that the wrong hinges were used on this cabinet. For the cabinet door to lay flat against the face of the cabinet, the hinges would need to be spaced out from the face by 1/8-3/16 of an inch. My friend tried to force it shut, and well........ the door didn’t take kindly to that. So the advice part.... I believe this is what is called a raised panel door. I have a cheap raised door panel router bit set coming from MLCS. I’m planning on making the door frame out of Poplar, and was thinking that a 3/4 piece of Baltic Birch could be the raised panel. The total dimensions of the door is 13x16x3/4. Will wood movement between the Poplar, and the BB (on account of them being different woods) doom my work? I have never glued up boards to make a panel yet, and it seems cutting a piece of BB square would be fairly easy (you know, for someone like me ). Is using a router bit ( I know to make small cuts, and sneak up onto my final dimensions) on BB worse for the bit, with the glue of BB versus glued up Poplar? This is a cheap cabinet, and I know it would be much cheaper to buy a new one, but I want to make this, and get me some new learning in. As always any thoughts, advice, opinions, are welcome. Thank you. Artie
- 116 replies
-
- 1
-
-
- advice
- baltic birch
- (and 1 more)
-
I'm not a turner but, I subscribe to Ron Brown's newsletter. He often publishes content applicable to general woodworking. This one is such a case. Hope you all find it as interesting as I did. If not, well it's only a few minutes lost. Choices I heard an artist on the radio voice his disgust over his recent interaction with the owner of an art gallery. It seems that the gallery owner had put stipulations on the kind of work he would accept – imagine the audacity! The artist was insulted that he wouldn’t be able to do whatever he wanted and go wherever his artistic leading took him. He felt that the gallery owner should just accept anything the artist did and give him space in the gallery just because he worked hard and was very passionate about his art. Here is a hard truth: You can’t make people like your artwork just because you like to make it. Regardless of the amount of time and effort you put into something, people don’t have to like it and some won’t. The obvious solution here is that he open his own gallery and fill it with whatever he chooses assuming he can afford it. Or, meet the demands of the gallery owner. Years ago, I made wooden furniture and sold it to a specialty retail store which sold it to the public. I learned quickly to make items which sold well and were relatively easy to make at an affordable cost. I learned to make things that the customers of this particular store wanted to buy regardless of whether I liked them or not. I tried introducing pieces I thought were beautiful and the owner allowed me to stock a limited number of my own creations. Most of them bombed horribly. If you have followed me for some time, you have undoubtedly seen products listed on my website for a while, and then mysteriously vanish. I was certain that they would be run away best sellers and some are. Many more are not. Still, I keep trying. So here is the decision: If you are turning because it makes you happy and provides an outlet for your creativity, do anything you want to and can afford. If, however, you expect to earn money from at least some of your turning, make what people what to buy, not what you want to sell them. I realize that most of you don’t sell things you turn and that turning is simply a creative outlet for you. But for those of you who would like to earn some extra cash, a lot or a little, make what people want to buy. Make it the size they can use, in the colors or wood species they like and at a price they are willing to pay and that you are willing to accept. I met a fellow at a wood show one time that made mostly simple wooden pens. He had three large cases of pens, about 50 pens in each case. The first case was full of pens in maple, oak and walnut. Case #1 was offered at “All pens for $10ea – your choice”. Case #2 contained some more figured wood and was offered at “All pens for $15ea – your choice”. And case #3 contained more exotic woods and was offered at “All pens at $25ea – your choice”. I remarked that his prices seemed too low for the amount of work he put into these beautiful, but simple pens. Then he told me that he went to a flea market each weekend and sold out every week. He was OK with the prices where they were since pen turning was a hobby and he had a regular full time job to pay the bills. Now there was a fellow who knew his customers, what they wanted, and what he was willing to sell his work for. I wouldn’t change a thing. If you are your own customer pleasing just yourself, do exactly what you want. If the public is your customer, do what they want and are willing to pay for because wherever you go there you are.
- 9 replies
-
- 9
-
-

-
- woodwrking
- hobby
- (and 2 more)
-
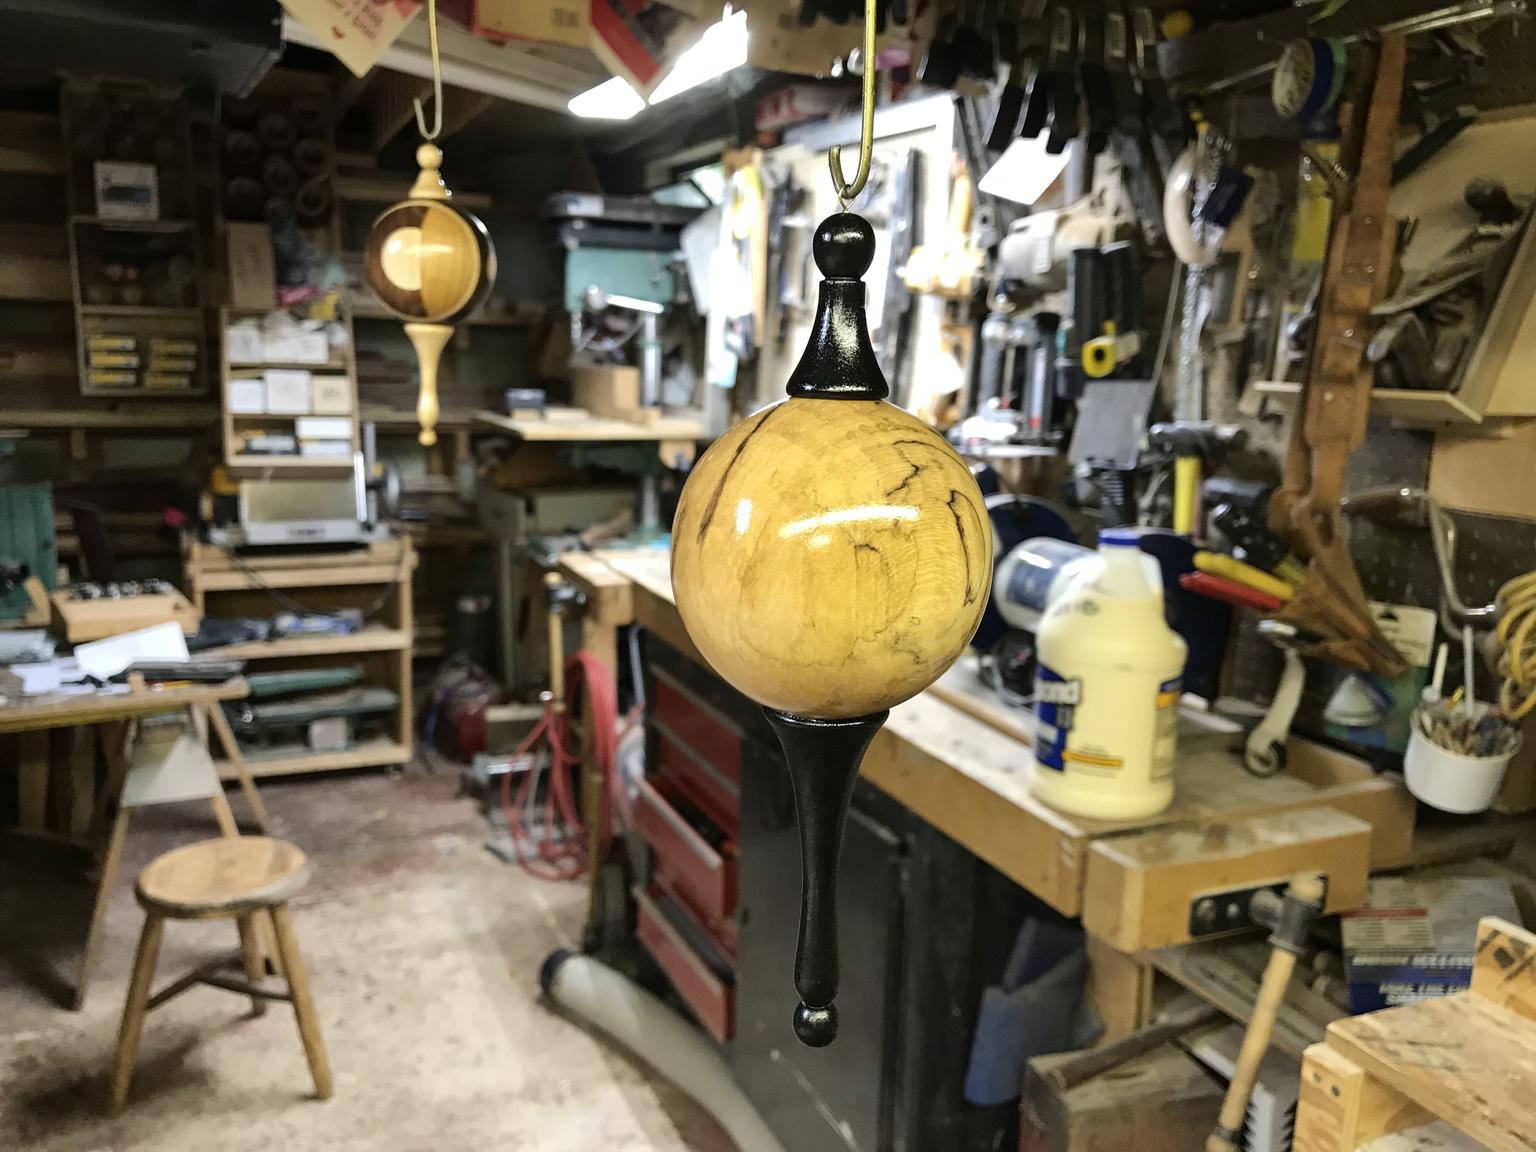
October already but the weather is more like early September. At least it isn't raining! Please checkout @John Morris's announcement concerning the Easy Wood Tools ornaments. Let's all pitch in and help load up the Easy Wood Tools lobby Christmas tree! You don't have to be the most experienced turner to create some neat items for their tree. Here's a couple of really easy spindle type items- Remember, you don't have to paint/decorate the turnings. @Jim from Easy Wood Tools told me they have volunteers who can do that. Our Patriot Turners- @Jim from Easy Wood Tools has been honing his hollowing skills. Check out this beauty- his first attempt! Jim posted his description here and received lots of positive feedback- @Ron Altier has created another gorgeous ornament. Ron always finds creative ways to embellish his turnings. He received lots of comments and Ron exposes his source for some of his materials- @RustyFN posted a fantastic seam ripper he made as a gift. Lots of interest in his technique and he answered questions about how he produced such an awesome finish- We had a couple of questions this week. @hawkeye10 asked about purchasing turning chisels. The group is pretty much split between the standard tools (gouges, etc.) and the newer carbide tools. Please head on over to Hawkeye's post and give him your insights and experiences. Hawkeye also posted images of his newly cleaned/restored lathe. It sure is a beauty- @Ron Altier asked about the cushioned micromesh sanding abrasives. Ron was curious about sanding speeds and what materials could be sanded with this product. Check his post and the responses. If you have any tips or hints that will help him, please give him the information- @Gerald posted two excellent videos on lathe maintenance. I know I need to do preventative maintenance more often. From The Internet- Our friends from Easy Wood Tools shared a video from Tracey Malady. In this one, she turns a bowl with an internal rim. You get to see the EWT hollowing tools in action! On my old lathe, I had a honing wheel mounted to the "left" side of the headstock. It was really handy for honing tools during turning. Mike Peace demonstrates how to make one of these for sanding or honing- Tim Yoder put up a video about turning a pumpkin. I'm sharing it here not so much for the project but for Tim's concern for safety when turning large pieces. Everything Else- I did get to spend a little time at the lathe. I'm working on the last two ornaments to send to Jim Luley for the EWT Christmas tree. The first one is made from a piece of spalted maple. The "finials' are also maple but ebonized with india ink. The second one is from a blank I glued up a while back that was intended for salt/pepper grinders but that never happened. It's a combination of walnut, maple and cherry. I used a jig designed by Mr. David Reed Smith to create the balls. Everything was completely turned with Easy Wood Tools. Safe Turning
- 5 replies
-
- 3
-
-
- wednesday
- woodturners
- (and 7 more)
-
Guys, I need a doweling jig. Seems to be many to choose from. Any recommendations? Rick Sexton
-
Hi, I am in need of advice from those more knowledgeable than me (so everybody). I’ve been looking on the various used items websites and have found two scroll saws I think I’m interested in. One is a 2004 Hegner Unimax, listed as brand new. This soon not seem to be sold any longer. They are asking $250 for it. Will it serve the needs of a newbie, and yet maybe last into journeyman status, or if I take to scrolling will it not be adequate in the future? Two is an RBI Industries scroll saw, used, and model number not listed. It also looks like the upper bar that holds the safety/clamp (I’m sure my naming of the parts is incorrect). That is next to the upper bar that holds the blade is missing. I have not received any contact back from the lister. This one is being sold for $75 which would give me some leeway parts wise. I got a lucky break over the weekend and got a $300 windfall, so either of these does not come out of the family budget (at least that’s what I’m telling myself LOL). Option 3 is wait till refund from taxes enters bank account, and dip into that for $250 and buy a new DeWalt 788 from Grizzly. I think that’s around $530 total, with shipping, stand and light. Any and all opinions wanted, and welcome. Thanks Artie
-
I have limited experience with Acrylics and I need some advice on gluing. In the past I have used CA to glue acrylics to wood, however I have always used a center post to assure that it would stay together. Can I successfully glue a flat acrylic material to a flat wood piece and then turn it without worrying about it coming apart. It will be a small piece, such as a Christmas ornament. Thanks
-
I may need to replace my inexpensive B&D jigsaw soon, it really heats up after about 15 minutes of use (130 degrees). I am looking for personal experience here I can google reviews or look on Amazon, but I want real reviews not cheerleaders. So, a couple of questions: 1. T or U? 2. Brand and model please. Thanks in advance. My usage is occasional, but when I do use it, it will be for hours at a time. The current project is cutting out large (38") snowflakes for the bosses wife (local winter fund raiser) 2 full sheets of 5/8 plywood. 4 sizes of snowflakes, at least 4 of each size.
-
 I bought it new in 1997 and used it off and on for the first 17 years but in the last 3 I have used it a lot, sometimes daily. It has always run fine but today I turned it on and it ran for 1/2 a second then quit. Here's what I know: 1) It is getting power, I even switched to different circuit altogether 2) I pulled the switch out to verify that it is good 3) The brushes, though original, are still 1/2" long and show no signs of chipping or abnormal wear 4) The wires on the brushes are intact and the springs have plenty of tension 5) The motor is easy to spins (took the side covers off to verify) 6) The 18 amp built-in breaker on the top of the motor is in the position it should be in 7) In shining a light onto the commutator I see no chips or bridged arcs between segments I don't really want to spend the money on a new planer and would rather get this one running again. I can order new brushes just to rule that out but again, the current ones look fine to me. Ideas? David
 -
 Hi, I have an Unisaw and I bought it second hand about 10 years ago. Up until a few days ago it was opperation fine. But after ripping a few boards, when turing the saw on, the blade rotated slowly and then the 20 Amp breaker tripped. I attempted this a few more times and the same thing happened. I have a planer on the same circut and it worked fine. I took out the capacitor and the other fuse and had them tested at a motor shop and they told me that they were fine. I will attempt to switch the breaker on that line with another, but with this information, what else should I look a that would cause it to draw more amps than normaol on start up? The brushes? Also when I took the capacitor out, it was chuck full of saw dust and I had to take a tool to get the sawdust cleard out to see the connectors on the capacitor. Do you think this may have been an issue, sawdust on the points? Best regards, Ron
 -
I need to lengthen a water supply line to a sink. The ½” copper supply line routs up through the bottom of the cabinet. Questions: 1) To lengthen the supply line I wanted to add a coupling, an extension, and a shut-off valve. What is the minimum distance I should try to maintain between the sweated on coupling and the sweated on shut-off valve? When I sweat on the shut-off valve I do not want to create a leak at the previous sweated on coupling . 2) What is the minimum distance I should have between the cabinet floor and the shut-off valve? I do not have anything which is fire retardant to help protect the cabinet from the torches heat/flame. The coupling and supply extension will be installed after the old cabinet is removed and before the new cabinet is installed. The shut-off valve will be installed after the new cabinet is installed. I want to be able to sweat the fittings, but I only have a few successes under my belt. I am willing to learn and do. Looking for your advice. Thanks Danl
-
Want to install glass into an old grandfather clock door but found the door frame was warped,how do I straighten the frame? Thanks
-
What is the trick to getting the roping into the slots when replacing screen on doors? Thanks!


.thumb.jpg.573d1497d0675219908c85aabefd797a.jpg)