Search the Community
Showing results for tags 'turned'.
-
This is one of my better turnings. I had a piece of firewood from an old apple tree and saw some spalting in it. I combined some exotic wood rings in it and it came out beautiful. I am not good enough to hollow out something like this and if I was, the spalted apple would not holdup, it was pithy.

-
I saw some wings at Hobby Lobby, I think were meant to be part of a necklace and of course it got my mind going. Here is the result
-
My wife asked me to stop at Micheals to pick up something for her. It is less than a half mile away, no problem. When I saw they had all Halloween stuff out with a mix of some Christmas, I saw something that gave me a great idea. They have several sizes of clear plastic globes. Don't know what their intended use is, but here is how I used it.
-
This one is about 2" long. I tried some glitter paint on top of the finish. Some places look good, while some didn't do as well. Haven't used glitter much, I'll have to practice and I do like it, but maybe not with certain colors or shapes
-
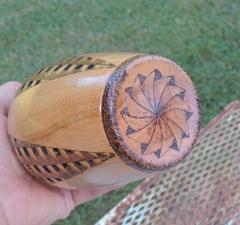
Are they segmented? I thought of doing segmented ornaments for a while but really didn't like the idea of cutting the little segments and gluing them together. Seemed like a lot of work. I came up with a way to do inlay which seems easier or maybe it is just because its my way. I started out with making a jig to run the pieces through the saw. There are two side pieces with a two inch spacer block between. I stuck the side pieces together and drilled a .25 inch hole 1.50 inches from the end and 1.25 inches up from the bottom. In the picture the block between the center spacer block and the bolt was to ensure accuracy while gluing and was removed once glue was dry. It is 1.50 inches square. I drew lines down from the hole to help align the jig with the slot in the cross cut sled. The bolt is a carriage bolt with the head ground down to a .50 inch diameter. It is set in a counter sunk hole so the jig sits flush with the sled fence I took a 2.50 inch square piece of plexiglass, found center drilled and threaded it for a .25-20 thread. When threading holes in smaller pieces like this I chuck up the tap and bring the quill down and lock it from going back up. I put a rod through the slot where the wedge can be driven in to remove the chuck and tapered shaft to keep it from spinning. I then use the table crank to raise the piece up to the tap and turn the piece while I am raising it to start the tap. I have a screw center with .25-20 thread so I put it in the lathe and screwed the plexiglass to it. I set the tool rest at center and used the indexing feature to scratch marks into it at 60 degree increments. I cut blocks to use and drilled the centers. I mounted them to the lathe and turned them round. I then screwed them to the plexiglass base and marked the indexes. The stock can be the full two inches of the jig of smaller and add spacer to take up space. I put a mark on the jig to line up each index mark but put it off to the side or the marks get cut off when run through the saw. I did end up cutting the nut side of the jig to 3/8 thick to give it some flex and hold the cylinder tight as it goes through the saw. Here is a completed cylinder. Then cut some inlay to fit the saw slots and glue them in. Mount them and turn them whatever shape you desire. Make some finials for them and there they are. Some of you may have seen this. This is in the tutorial section at William Young's Woodworking Friends site and I had posted it at Wood too. I copied and pasted it here for those who missed it to see.
-
This is the one I made experimenting with plastic cutting board pieces. It is very soft & tricky to work with. This ornament is for the Grinch's tree.
-
I got a great idea about turning some of the plastic from a cutting board. I'd layer it with a soft wood and see what it looked like. What a mess. The plastic was VERY soft and the waste came off in long strings. Long strings that bunched up on the work and got in places you don't want it to get. I had to stop/start many times. I had a mess to clean up and did it by hand, that stuff would plug a vac. I have decided that I won't turn any more of it. The end result looks like an ad for ATT
-
From the album: Steve Krumanaker
The bottom with "phicops in a circle" and stippling for shadow -

From the album: Steve Krumanaker
walnut bowl-
- 2
-

-

-
- wood turned bowl
- turned
- (and 3 more)
-

From the album: Steve Krumanaker
Small maple bowl -
Last week I wrote that I had cut and drilled a piece into a precise form only to drop it one the cement floor. I'm sure there are still some pieces there. I looked at the two larger pieces and tried to come up with a way I could still use it. It wasn't happening, until I saw Steve's bird house ornaments. It seemed that each step resulted in a failure of some king. I kept at it, not wanting to admit defeat. So here is the bird house ornament that resulted from so many failures. It has a lot of problems, but I don't dare to so any more with it. It is like a jinx
-
I lost a lot of my hearing during my stint in the Navy, working around jet aircraft. Now I wear hearing aids. The batteries tend to die when you need them most. I turned this little holder for my key chain. Made from Walnut and Maple.
-
A couple of candle holders made on the lathe. Left one is walnut the right one is maple.
-
As we get older some of us have a pill that has to be taken during the day. How do you take it with you? Made a batch of totes with some Cherry for my brothers and sisters and the inlaws as well. I ran across a deal on some half inch conduit connectors at the Habitat Restore. I cut them in half and put them on the metal lathe and made thread insert sets as you see in the picture. They are epoxied in place. Here are some of them.
-
My son's Cross Country team asked if I would take an attempt at making a new spirit stick for the team. What I have learned about spirit sticks at cross country meets is that the teams carry these to receive their awards post-run. I do not know much else about the history of this and believe it just something that the teams do for fun. I agreed to give it a shot as the old one was in a bad state of repair. I have a Powermatic PM90 with VFD but have not had many excuses to run it. I am really a "nooby" in the turning world. I also took a first attempt at inlay on this project. While I do not consider this my best work, I am pleased with how it turned out and what I learned as well. This will be attached to pool cue that is candy striped in two tone blue school colors. I did not have it ready at the time I took the pictures. For many of the folks here, I know that this is pretty rudimentary turning so I apologize for the fledgling work. Hopefully it meets the team expectations!. Go Storm!
-
gave this one away.
-
a couple of years ago, I wanted to try off set turning, I think that is what it is called. You turn it on one set of centers and then move it to another. Then one idea led to another. I drilled holes, routed edges and had a neat looking piece. Then it started looking like a modern art guy. So I fashioned a head and base. I really like how it came out. My wife loves it. If I had to name it, it would be "TOUCHDOWN"
-
I am making another ornament. Gerald asked if I used paint on one I had made. I told him that I never use paint. Then I thought, why not? I could look good if used properly. So I used some paint to make stripes. I got the finish on and promptly dropped it on the floor. AHHHHHHHHHH! that is why you don't see a picture. I'm going to look at it tomorrow and see what I can do. I darn sure don't want to redo it.
-

From the album: Hollow Forms
Almost threw this piece of wood away and had to work around some flaws -
I made as couple more ornaments out of soft wood. The circles are pine and the rest is maple. I used those woods to experiment with and I wouldn't lose the exotic wood, if my experiment didn't work. When I got them as smooth as I wanted, I applied stain. They came out much better than I expected. After the wood I got at Rocklers dries, I will repeat, but with a different size circle.
-
I think I have a handle on Ebony and how best to proceed, so I learned from my first turning and applied what I knew. All went well with the Ebony and then I selected a much better piece of Yellow Hart than the piece I used with my first turning. As I was finishing up and pleased with my work, there was a noise outside that startled me and I made a move that BROKE the yellow heart in two pieces!!! I walked away for about an hour, had a coffee and came back. Not wanting to make a new piece or destroying what I had.............I got an idea and I worked at it until I have what you see. Finding centers and drilling holes in those tiny pieces was one big challenge.
-
I didn't want to take away from Ron's ornament thread so I started this one. I make and give away about 60 ornaments each year. This years ornaments have a plastic insert which is what Ron was showing some of. My inserts are pieces cut from the tall shiny tubes that were once part of some trophies I took apart. A few years ago I made finials for some glass bulbs that are sold everywhere for Christmas trees. The tops are large because they had to go over the tube that are on top of those bulbs. John said he wanted to see pictures when I said I have used something other than wood in ornaments. So here they are.
-
Today I turned some black Ebony for the first time. A very dense, heavy and hard wood. First thing I notice is that the chips don't go a flying, like normal. A black discharge of tiny particles, more like dust. I used my carbide tools mostly, but did also use my HSS small gouge and parting tool. I did notice that these tools got dull quicker than normal. Does this wood take glue well? Should it be prepped first with an alcohol cleaning?
-
I used some spalted Apple, yellow hart and Paduk to make this one. I am not good enough to hollow it out, but neither was the spalted Apple. I was worried that it would not hold up when I was turning it. My wife said this was a keeper. My daughter took one look and said, "Dad, I love this one" my wife nodded and I gave it to her.
-
I got an idea about a bell Christmas tree ornament. I used Yellow hart and Padouk. I had it all planned out in my head and started I had the top of the bell in the chuck, hallowed it out and started adding layers. I hallowed as I went. It went well, for a while. Then I started to turn the top of the bell and found a hidden flaw, a bad one. After all that work. It is right above the yellow stripe. I did finish it, by adding a bell. sure not proud of it. I didn't work very hard to make it shine either.


