Search the Community
Showing results for tags 'how-to'.
Found 4 results
-
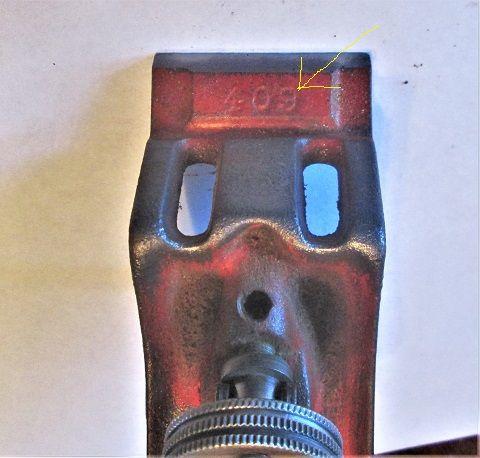
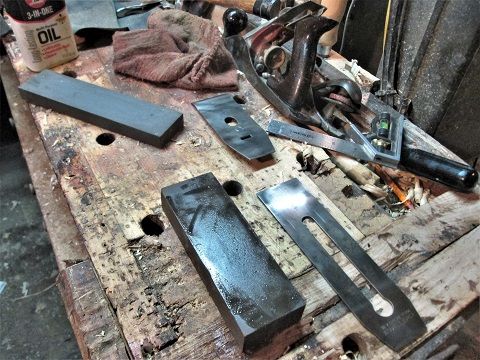
A while back..picked a $15 Jack plane at an estate sale....been trying to clean this thing up.. Made by Sargent & Co. and sold at Sears as a Craftsman brand tool... Even was marked as Craftsman on the iron... The "BL" was a Sears code for Sargent..... First things I do is tear the plane down to just..parts...and clean each up...metal parts see the wire wheel on my grinder... Frog...bolt and the rest needed a bit of cleaning... That "409" is because Sargent 409 and 414 planes used the same frog. Steel adjuster wheel took a bit of cleaning. Same with where the frog sat...after a bunch of crud was removed... Bolts....used a pair of visegrips to hold these, while the wire wheel went to work....at one time (WW2 ?) the nuts had been blued. A large,brass wire wheel was chucked into a drill, and all rust removed here...then a paint brush with 3in1 oil was used all over, to keep the rust away... Sides were cleaned up with the wire wheel on the grinder..then oiled. the sole? A few scratches...checked it for flat.....sit it on a know flat surface, index finger on each hand...one on each end, try to press down and see IF it rocks...this one never moved...flat enough for me The handles were stripped of the old finish, and ugly paint...smelly BLO was brushed on, and rubbed down...then a coat of varnish. Which left these three.. Had a burr on the bolt's slot to remove, and rust in the knurling....Wire wheel to clean the rust off. I adapted a sander to be the sharpening center... Table was adjusted to a 90 degree to the disc. And a large cup of water was nearby... This is Snaggletooth....what I started out with... Cleaned up, back is now flat...worked on the chipbreaker, too. Then, oil stones.. Long one is a COARSE, small one is 600 grit...rag to keep things clean, and the 3in1 oil as needed.... Then 2 grits of wet or dry paper...a 1000 grit, and then this 2000 grit....we getting there.. Then the strop. Had to work on the chipbreaker a bit..until it sat flat ( no gaps) on the back of the iron. Rest of the plane was still upstairs...happened to have another Sargent Jack plane IN the shop...used it as a test bed, of sorts... Almost done... Took a few trips...took the iron and such upstairs, and re-assembled the jack plane... Look any better? Trying to decide what colour was used on the lever cap.. To make the "CRAFTSMAN" logo stand out better.....blue? Red? Gold? Have seen all 3... Not too bad, for a $15 plane?

- 2 replies
-
- 4
-

-
- jack plane
- rehab
- (and 1 more)
-
Guys, since I have to take it a little easy for the short-term future and I seem to learn better from visual input can you sugest some of your favorite YouTube WW. I have subscribed to most of the more well known ones but am looking for any rare or new ones I might not have heard of.
-
A half-hearted bit of humor has morphed into an idea. What does the membership think about a forum section with membership produced how-to presentations (videos, step by step tutorials, etc.)? You might want to refer to this post for further information.
-
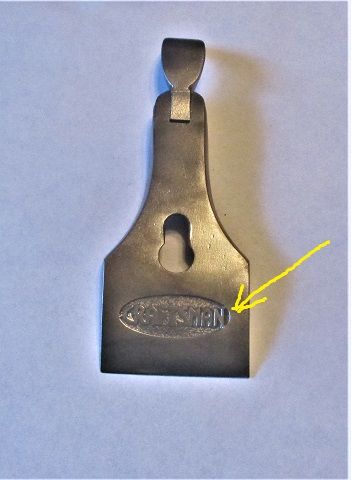
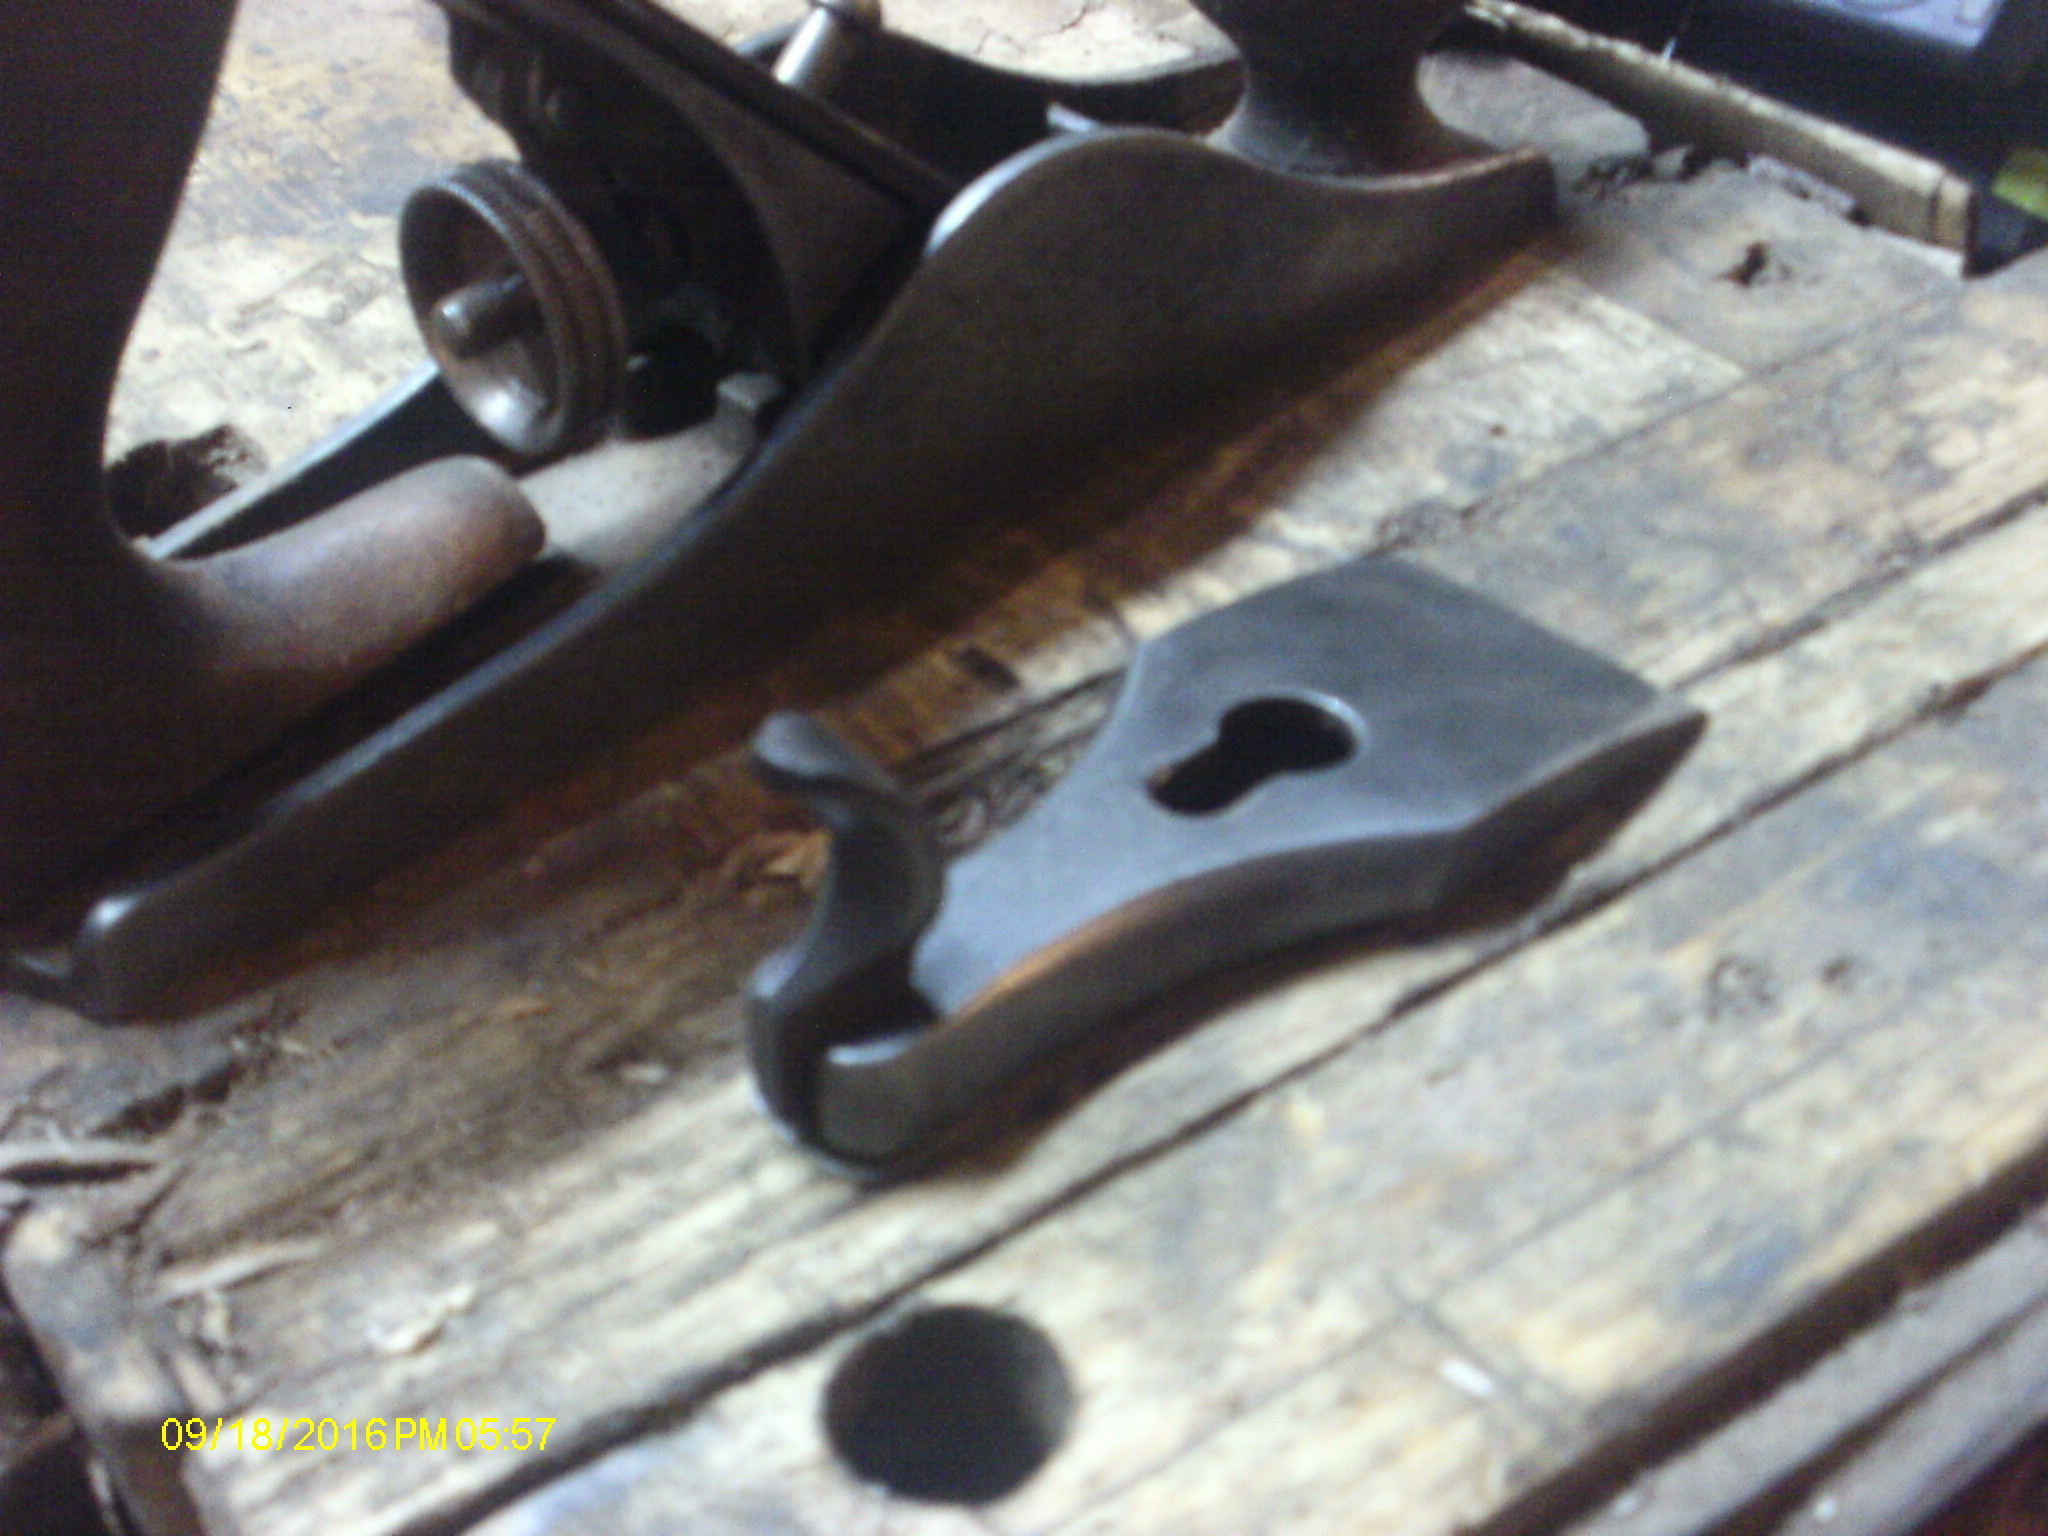
While most here have heard of, and MAYBE used a thing called a hand plane......there are some that haven't ...sooooo This chunk of iron is called a hand plane. This one is for smoothing a wood surface, not to smooth a hand. Set up right, and this can replace sandpaper. No loud noises, no dust. Some will come ready to go (akmost) right out of the box. Others? This plane in the picture came out of a damp, unused basement, covered in mold and rust. Others that have come through my little shop? Ok, once a plane IS all cleaned up, and the cutter has been sharpened back up.....how does one actually put this beastie back together? First off... The long piece of flat steel here is called the iron ( cutter on smaller planes) Note there is a bevel on the end. The bolt head sticking up? Is used to attach the chipbreaker, to the NON beveled side of the iron. I have had way too many come into the shop with this backwards. What shows up in the first photo is the underside of this assembly. The oval slot allows a bolt to pass through. The smaller rectangle allows a tab to come through. This assembly goes in the the tool like this.. There is a tab through the assembly. The oval part allows the assembly to move past the bolt. On this plane(YMMV) the chipbreaker goes up, the bevel edge goes down. Other planes have no chipbreaker, because they work with the bevel up. There is a wheel to adjust the depth of cut... Older planes, this is a right handed threaded wheel, newer ones use a left handed thread. The reason for the LH threads? When you spin the wheel to the right, and the wheel backs off the bolt, you are actually deepening the depth of cut. The wheel move a "Y" shaped yoke, the tab at the top of the yoke moves the iron in or out of the cut. The wedge shaped piece of iron it is attach to? It is called the frog, not sure why.. Also attached to the frog is a lever. You slide it left or right with your thumb, this causes the iron to tilt sideways, making one side or the other stick out more. Also helps IF you didn't have the bevel on the iron perfectly square to the length of the iron. Ok, we need something to hold the iron in place.. This is called a lever cap. The "lever" is the part sticking up. Some planes will use a bolt of some sort instead, and they would be called a cap iron. This old Sargent made Fulton plane uses a lever cap. There is also a keyhole shaped slot cut into the cap. This is where the bolt that comes out through the iron goes. Note: I have seen enough lever caps put on a plane upside down...THIS is how they should be installed.. The underside of these lever caps have a few ribs for strength. Note the lever cap's lever has been lowered onto the chipbreaker. Now the tricky part...That bolt sticking up. Sometimes they are set too tight, and you need a pry bar to flip the lever up....seen a few with broken areas where the lever hinges to the cap...Use a screwdriver, NOT to pry with, but to looosen the bolt until the lever will just move. You want to be able to just stick a finger under the lever to flip it up. Same with flipping the lever down, just the pressure of a thumb. IF the bolt is so tight, you can't move the depth adjuster at all, screwdriver to loosen the bolt a 1/4 turn at a time until you can movr the wheel. You want this tight enough to keep things from moving around, yet loose enough to make any adjustments needed. Ok, all put together? Hold the plane upside down, and look along it's bottom ( called the sole, like a shoe's) and you will see a slot, called the mouth. Hold the plane so light will shine along the sole, you then adjust the depth until you just barely see the bevel start to appear through the mouth. Check to make sure it is evenly across to openly. If not,use the Lateral lever to fix. While you are holding the plane like this, grab an old, plain candle, and rub a few lines onto the sole. Makes pushing the plane a lot easier.. Set the plane on some scrap wood, time for a test drive. If it didn't cut, adjust the wheel until it barely does. Try again. Some planes are MADE for see-through shavings, some are meant to "hog off" rough wood. This Fulton is supposed to take the thin shavings....called a Smooth plane. Others have a rounded profile to the beveled edge, ....jack, scrub, fore planes. I have a similar sized smooth plane.. Both of these two planes were sold by Sears, the Fulton was from between the world wars, the Craftsman was from the 1950s. both are what Stanley termed a #3 size of plane. That is the basics. LOTS of old planes have come through my little Rehab Center of a shop....Chipbreakers upside down, irons upside down with the chipbreaker ON the bevel.....Lever cap put on either with their undersides showing, or with the lever down by the mouth opening... Lateral levers bent down so much, the abuser ( NOT a User) had broken off a bit of the rear handle for clearence. All the above symptoms...then the person complains that it doesn't work. Too tight a lever cap bolt can lead to the iron and chipbreaker taking on a curve,,,,,That Fulton had a curve to it's iron. Hammered back to almost flat in my shop. You will see chipbreakers not only shaped in a curve, but the middle where the bolts are is lower or higher than the sides. Lay a chipbreaker flat on the bench, and then see which way it "rocks". A lot of the problems with making sure a chipbreaker will sit flat on the "back" of the iron, is from the chipbreaker getting deformed from misuse. Sometimes, a hammer to flatten the main section.. sometimes a hammer and a punch. If it rock side to side, find the high point, turn the chipbreaker over and place the punch on that spot, A few hammer blows, check to see if the rocking is gone. The edge where the chipbreaker meets the back of the iron....I tend to try for a "Knife-edge". I check for gaps, grind or sand until the gaps are gone. I also polish the Curved part where it meets the iron. Burrs and and "steps" in the curve will trap shavings. Ok, that is enough for today. I left out sharpening the iron...mainly becayse everyone has their own way of doing that. Some try to get a perfectly flat sole on the plane....good luck with that one, as even Stanley never did. And, after 100+ years of use ( and abuse) sole will wear a bit....and yet still work. Flat sole is needed only in three places..front edge ( toe) backend(heel) and both the front and back of the mouth opening. These three need to be coplanar. As long as the rest of the sole sits up out of the way of these three points, you are good to go. Maybe later this week, I can do a bit on ....Sharpening ( with a Bostonian accent) BTW: even the new in the box planes will need a little time on a hone...