Search the Community
Showing results for tags 'epoxy'.
Found 25 results
-
Maybe I'm just a grumpy old guy, but Things I don't really like or want to do * Live edge furniture * Epoxied "river" tables * Flame treated wood, particularly softwoods * Polyurethane on everything * Cedar picket planter boxes Suggested tools for starting out * Miter saw - a table saw will do everything it can * Track saw - does one thing well, but can't do 95% of what a table saw can do, maybe if all you did was plywood * Air nailer, brad gun - you can really get by without this, unless you've watched too much Norm Abram * MFT table - meh While I'm at it, a Domino would be nice, but I can't justify $20 per joint for all the use I'd get out of it. Polyurethane Gorilla Glue -- short shelf life, messy, foams out, ruins clothes, stains flesh, does not gap fill, not easily re-done if it fails
-
Hello. I have a small woodturning business and i am in hawaii so it is hard to get epoxy resin shipped here. I have been using stone coat supercast deep pour epoxy. It costs around 200 for a 1.5 gal kit. It has recently become unavailable on amazon and i cant get anyplace that will ship it. Is there any other epoxies people would reccomend besides stone coat. I make alot of colored pencil bowls and alot of other stuff with koa and resin. Stuff like that. The stone coat epoxy is awesome! Anyone had any luck with any of the other epoxies? I was pretty sure stone coat was among the best.
-
Used some nice Maple to make this napkin holder along with pouring some epoxy in a 6" round mold, turned it down and cut it in half to make this project. I was having a hard time deciding if I should have closed the ends where the napkins go but decided not to so they can be folded in half to have a lower profile.

-
Summer's about over and the days are getting shorter. Less yard work means more lathe time! Our Patriot Turners- @nevinc has really put his lathe to work this week. He showed us a bunch of bowls, with different design! He describes what he has done in this post- Nevin also worked on a box elder bowl with a unique shape- He provides us with more information in his post- @forty_caliber also has been busy with more of his pecan stash! he posted a couple of bowls for us to drool over- There's more images and descriptions at- Forty then had a chance to finish up the bowl on which he used epoxy and diopside inlay- More images and specifics can be found in this post- @Gerald added a video of a neat little toy on which he has been experimenting. He calls them "Tippy Tops". Check this post to see what they do! Another addition to our continuing thread- "Off The Lathe And Just Finished" What’s Coming Up- Click on the images for more information and registration- For The Newbies- A few video short from Tim Yoder and Ron Brown Both Tim and Ron have been producing these short videos to help the newer turner understand some of the nuances of turning. You can check out their series at https://www.youtube.com/@woodturningwithtimyoder/featured and https://www.youtube.com/channel/UCMD5dw_8FCyaHPjztP5sklw I think everyone knows how I hate to sand, mainly because I never get the results I see from other turners. Cindy Drozda recently did a live Tool Talk showing her sanding techniques. I learned a lot. Expand Your Horizons- @Gerald's post on Tippy Tops coincided with this video from Alan Stratton. Alan revisited these in hopes of having better success. Check out Alan's process from turning spheres freehand. Kent Weakley turns a wooden bowl but not without some difficulty. He explains what happened and how to correct it. Mike Peace shared a video of an IRD he recently conducted. The video is rather long but the demonstration of the threading jig/device is interesting. Not all tree logs are suitable for turning bowls or larger pieces. Richard Raffan explains the phenomena of "wind shake" or "cup shakes". New Turning Items- Not new but some better prices- https://lylejamieson.com/ Free shipping continued until September 25. https://woodturnerswonders.com/ Everything Else- Woodworker's Journal published their Woodturning Monthly newsletter. https://www.woodworkersjournal.com/woodturning-monthly/?utm_medium=email Safe turning
- 3 replies
-
- 6
-

-

-
- lyle jamieson
- sale
- (and 27 more)
-
Vectric will do monthly projects. This month was a bbq sign. Seeing bbqing is my other hobby I thought why now. First time doing epoxy inlay. Tried to blend colors together for the fire,spatula and tongs fail. Oh well. No one will see but those who come to the house.
- 12 replies
-
- 10
-
-

-
Back to milky skies from the Canadian wild fires. Our Patriot Turners- @Ron Altier has perfected his technique for getting a glass like finish on his Christmas ornaments. Now inquiring minds want to know his secret!! Head on over to Ron's post and add your comments- @RustyFN finished up his lidded gift box. His mixed media turning is truly beautiful. Notice how closely the grain matches at the lid/box interface. Check out Rusty's post at- Our "What's On Your Lathe" still has weekly additions! I really want to thank @RustyFN to starting this thread. It's so great to see what everyone is doing and the progress on the projects. This week picks up here- What’s Coming Up- Click on the images for links to more information and registration. For The Newbies- Haven't turned a bowl yet? Here's a nice little beginner's bowl from Mike Peace- Some important safety information for beginners and experienced turners alike. Kent Weakley discusses the importance of keeping that respirator clean and functioning properly. Expand Your Horizons- You've turned a natural edge bowl, now how about a natural "sided" box?!?! Alan Stratton shows us how it's done! See how Richard Raffan re-turns a small warped bowl. Notice how he chucks the bowl to true up the outside. You might remember that Easy Wood Tools ( @Jordan Martindale ) recently added beading cutters to their product line. In this video, Carl Jacobson demonstrates their capabilities as he turns some really neat refrigerator magnets. @Steve Krumanaker might just ad these to his product line! New Turning Items- Last week we posted a video from Mike Peace where he demonstrated how to make wooden faceplates/glue blocks. Part of his video mentioned the Beall taps. This week he updated the Beall information to let us know that John Beall sold his company to Lee Valley and that Lee Valley will be the sole distributors of Beall products. Mike there is a quick note in this video- Everything Else- Interesting thoughts from a recent Ron Brown's newsletter- How To Become An Overnight Success As a new turner, you are anxious to become as good as some of the names you hear regularly; Nick Cook, Richard Raffan, David Ellsworth, Kirk Deheer, Mike Mahoney, Cindy Drozda, and many more. So, you develop a plan: 1. You buy a top-of-the-line lathe, a Powermatic 4224, a Robust American Beauty, A OneWay 2436, a Laguna 2436, or something in that same category costing between $5,000 and $12,000. 2. Next, you spend whatever it takes to get the very best lathe chisels, Robert Sorby, Carter and Sons, Crown, Ashley Iles, Doug Thompson, etc., and you need at least one of everything they sell in multiple sizes because great tools make great turners, or so you’ve been told. 3. Then you must set up your sharpening station with a slow-speed grinder, sharpening jig, and not one, but two CBN wheels. 4. You’ve watched untold hours of YouTube videos, including some of mine, so you have tons of head knowledge under your belt. You have many ideas on how this turning thing works; now is your time to shine! Wait! You are still not a turner. You are a student and you will be for the next several years. Granted, you are a student with lots of nice expensive gadgets, but you are missing the one thing you can’t buy: Time in the seat, or hours in front of the lathe. You are a novice until you have put in the time, made the mistakes, tried something 10 different ways, made 100 pieces of the same thing, and made 10 different kinds of turned items. The wonderful thing about turning is that even our first pieces while we are learning can turn out pretty good and it is just a given that our wives (and most of our kids) will love whatever we make. But you are still a beginner. That isn’t a bad thing, it is just a thing. Over the years I’ve met thousands of folks that had been turning for 20 years. The problem was that they had one year of experience 20 times over! Since you can’t get around the time needed to become an overnight expert, a master, or someone to pay attention to, just put in the time as a student to acquire those skills, make those mistakes, and perfect those methods and techniques. It is all part of the journey that will one day result in your overnight success. Safe turning
- 4 replies
-
- 5
-
-
- beall products
- honey
- (and 28 more)
-
Unbelievable, planted tomatoes last week supposed to be in the low 30's tonight! I hate this global warming! Our Patriot Turners- @Ron Altier brought us up-to-date on his epoxy finish for ornaments. Looks like he has pretty much perfected the process. Ron provides lots of tips on how he gets this mirror like finish- Several members posted in our "What's On Your Lathe" this past week. You can catchup with the new posts here- @forty_caliber added a couple and @teesquare added this beauty (and a couple of other pieces as well)- Do yourself a favor and check out all the new turning in the past week! What’s Coming Up- Click on the images for links to more information and registration For The Newbies- Thinking about turning that first bowl or maybe just need some more pointers? Kent Weakley's video could be what you are looking for. I thought this one was particularly helpful with the dialog and tips throughout the presentation. Richard Raffan puts his spin in the natural edge bowl project- Something to think about from Ron Brown's newsletter- This Is Just The Beginning It is easy to forget how much you have learned along the way. New turners also have to learn the same things we did. Or, if you are a new turner, there is much to learn. You can learn to sail in an hour – It takes a lifetime to become a sailor It is the same with learning about a wood lathe. Just like any other craft, getting the machine is only the beginning. Let’s start with the Four Pillars of Woodturning: #1-The Wood Lathe Itself There is a multitude of quality wood lathes available to fit most budgets. The most common starter lathe nowadays is a 12 to 12.5-inch swing lathe with a 1 hp variable speed motor. Many folks will keep this lathe when they upsize to a larger lathe with swings of 16 to 25” and motors up to 3 hp. #2-The turning chisels Beginning turners will see much faster results if they begin with carbide-tipped tools. A sharpening station is not required for carbide tools. High-Speed Steel tools require frequent re-sharpening and require a suitable sharpening station (more in #4) The turner must learn a whole new skill set for sharpening in addition to learning woodturning. #3-The means of holding your work Most lathes come with a spur drive center for the headstock and a live center for the tailstock. Great for beginning spindle projects like baseball bats, lamps, etc. Most lathes also come with a faceplate mainly used for turning bowls. I consider a 4-jaw scroll chuck a basic necessity. I recommend extra jaws also Pin jaws for very small spindle projects #3 or 100 mm jaws for larger spindle work and for many larger bowls. #4-A sharpening station Slow-speed grinders (1750 rpm or similar) with 8” grinding wheels made to work with High-Speed Steel are recommended A sharpening jig specially designed for sharpening lathe tools is virtually a necessity when using HSS lathe tools. Note: Using only carbide-tipped wood lathe tools eliminates the need for any kind of sharpening station and eliminates 25% of the learning curve and initial expense. Folks trying their hand at any new craft are much more likely to stick with it if they can experience early success. Easy projects to learn on are pens, small bowls, spinning tops, and small lidded boxes. Someone can successfully make all of them with simple carbide tools. Some folks only turn bowls while others only turn pens. As long at they turn something, I’m happy for them. Most folks who begin using carbide tools eventually add HSS tools and a sharpening station down the road. I recommend that route to see if they are going to enjoy turning wood and if they are going to stick with it long term. It seems like you never have every widget you want, but over time you can accumulate most of them. Remember that you can turn small items on a big lathe, but it is much harder to turn something big on a small lathe. So get ready to see that huge smile on that kid’s face from ages 8 to 88 when you show them how to make their first slimline pen or maple bowl. There is nothing like it! Expand Your Horizons- In last week's post, one of the "What's Coming Up" events were classes on turning kitchen utensils. The classes were at Highland Woodworking in Atlanta, GA. Not everyone can travel that far to learn to turn a spoon, so I found a bunch of videos, if you'd like to give it a try. If kitchen ware isn't your thing, Mike Peace demonstrates how to add an insert to a turned box New Turning Items- Sorry, couldn't find anything this week Everything Else- Started working on one of the elm rough blanks. I have enough meat on the bottom to remove some of the thickness around the mortice. It will make the thing set a little lower on a surface and lighten up the piece a bit. Safe turning
- 4 replies
-
- 4
-
-
- ernie conover
- ron brown
- (and 21 more)
-
I'm still playing with the 2 part, 30 minute epoxy. I have refined my set up and application process. I am still learning. Here are some rules I use a low RPM manual setup to regulate RPM 1. MOST IMPORTANT! Clean your lathe and surrounding area of all dust. Just one little mistake will show up and stay. 2 Apply slowly with a small brush while turning at slow RPM 3. Go over any areas that look like they need it. Remember that curing time can creep up on you. 4. Once you are satisfied, allow the piece to continue turning for 45 minutes (curing time is 30 minutes on the epoxy I used) 5. Shut down and allow it stand in the lathe for 24 hours for a full cure. It does look like glass. NOT everyone likes Christmas ornaments that look like that. I do.
-
Not sure how many caught this post from @John Morris about one of our Patriot turning members. Please keep Brian and his family in your prayers, Our Patriot Turners- @Gerald showed us some of his recent turnings. A couple of absolutely beautiful turned boxes And a gorgeous platter he salvaged- @Ron Altier is always trying to improve on his turning. In his post, Ron explains about a new finish he is experimenting with- Check his post to see what he discovered and how he is applying it- @forty_caliber posted a lovely platter he turned. Looks like his kiln is working really great- Head over to his post and check out what our turners thought about this piece- I am so happy to see our turners continue to add comments to our "What's On Your Lathe" thread. Thanks @RustyFN for creating it. This posts picks up where we left off last week- Kudos to @Gene Howe for posting this from Ron Brown's newsletter. I know, from teaching, how these words ring true- In last week's "Wednesday's..." we posted a toothpick holder project. @HandyDan was kind enough to share his version of these. What’s Coming Up- Click on the images for links to registration and more information- For The Newbies- Richard Raffan demonstrates his sharpening techniques- Expand Your Horizons- From Craft Supply USA a nice project that might make a nice gift or sell well at craft shows- You know about Jam Chucks but how about a Drive Block? Sam Angelo demonstrates- New Turning Items- Starbond adhesives has added some new inlay products. Click on the image for the link to these items- Everything Else- Mimi said I had to get rid of some of my priceless tree parts from behind the garden shed. Granted, some had rotted beyond being salvageable and some will go out with the trash on Friday. There was a slab of Chinese Elm that was salvaged from a tree in the back yard.. My original intention was to use it for a chair seat but the best laid plans... so the elm will become shallow bowls/platters. Another piece was a mystery. Pretty light and the bark was already gone. I think it might be cotton wood as I remember someone giving me a couple of pieces a long time ago. What's left will probably go to the trash over the next couple of weeks. Mystery wood- Safe turning
- 5 replies
-
- 1
-
-
- sam angelo
- drive block
- (and 19 more)
-

From the album: Bowls and Platters
Cherry plate with inset flame colored copper segments and epoxy seal on copper© Gerald Lawrence
-
The black walnut came from city hall here . They took down 3 and woodturners got 2. This is the crotch and there is still the other half to do. I was pleased with the flame showing on both inside and outside. This cherry bowl was a practice piece for the demo I did in March. It had a knot which was rotten but did not show till well into turning. Fortunately it was not a thru knot. I used epoxy colored with two micro powders which I think were blue and silver. Had noticed rim treatments . The center is cross hatched with Sorby Spiral Master and colored with Baroque Gilders Paste. Used woodburning pen to stipple the inside and outside of the rim design. For some reason this one looks better in person.
- 16 replies
-
- 4
-
-
- black walnut
- turning
- (and 3 more)
-
Hello, I am to the stage of finishing the kitchen cabinets I have been making for my sister ski condo. In the first time in my woodworking life, I have purposefully attempted to contain as many knots in the wood to make it rustic. The wood I have used to make them is rustic hickory. I need to fill most of the knots before I can finish with a clear coat. I have seen some YouTube videos of filling gaps with black tinted epoxy. This is what I know; you put tape on the back of the board to keep the epoxy in the gap and mix up black epoxy and pore it in the knots or gaps. Has anyone out there done this? I need some pointers where to get the epoxy and the black colorant. Best regards, Ron
-
Saw this elsewhere but thought it worth sharing. Too much You-tube video drama IMO, but the guy is talented and the "build" creation was interesting.
-
Building a river table for a gun shop/range’s customer lounge. In my frame I laid wax paper down over my mdf base in an attempt to save the surface of the mdf. That part worked out, but it appears that then resin heated up enough to melt the wax in the paper and then fuse together laminating together to make a super flexible and hard to break sheet. Next time I’ll just tape my mdf and move on.
-
Greetings all. Quick question here ( I hope). I am building a butcher block rolling island for my daughter (which many of you helped me with in the design stage). During the thickness planing stage on the butcher block top, I got a couple small tear out spots which are too deep to sand out. I was thinking that I could fill the depressions with some epoxy. I have never had to use epoxy and am looking for any suggestions any of you may have as to any preferences you may have. Don't need more than a tablespoon so no large quantity needed. And will epoxy take mineral oil "finish" ok? Thoughts? And as always, thank you in advance for any assistance. Gary
-
So, I finally have a jig saw, an angle grinder, some mica powder (for epoxy resin), I found a local wood shop for things I need done that I can't do myself (planing an uneven slab, etc)... I feel like a kid turned loose in a candy store LOL I ordered the wood carving bits for the angle grinder (not the $145 Arbortech that I had been looking at), more jig blades... I feel like I'm about to get myself into LOTS of trouble LOL I'm probably going to go get the 2x4's that I need to make that wavy flag, get the shop to plane them to the same width (on the 4" side), and to level one side (2" side) to have a squared bottom edge to start with. OMG I am so excited and ready to start tearing into some wood LOL Granted, getting them sold will be another issue until the fest season begins around here again. So... What are your woodworking plans for the new year? (I can't promise I won't borrow your inspirations lol)
-
Howdy yall,been awhile since I have been alot has happened,Lost my Father this June,but had a great Military service for him,,I have been doin some work in the shop,added a new edition to it but still need more room lol,have been making a few things,will post them,am trying the Pallet road right now,hoping yall will like them
- 11 replies
-
- 13
-
-

From the album: my furniture
eucalyptus block end table -
I've been making pens lately, and up to now, no real problems. The last three blanks I tried to square up the blank ends with the brass tubes, the tubes come back out of the blanks. I'm using a barrel trimming kit from PSI. The first blank this happened to me on, I glued the tube in with medium CA super glue. The next two, I used 5 minute epoxy. Both times, I let the items set for several hours before trying to square things up. I have a couple of theories. 1. I am trying to use stabilized maple burl blanks from PSI. Is it possible that the hardened maple blanks are drilling too smooth to grab the glue or epoxy? The pens I have made up to now have been with regular hardwood blanks, not stabilized or anything like that, and I haven't had these problems. 2. As per instructions, I am roughing up the outside of the brass tubes with some sandpaper. Maybe I am too aggressive with the sandpaper and taking too much off the tubes. Any thoughts?
-
I got some ideas about using 5 minute epoxy and glitter. I made some mistakes, but learned a lot in the process. You can see the upper ring. It looked really good until I tried something else to smooth it. I think I am going to try again, I have a couple more things I want to try
-
This video isn't the most scientific and mixing proper amounts properly factors in, there is one clear winner
- 5 replies
-
- 4
-
-
- epoxy
- guidelines
- (and 1 more)
-
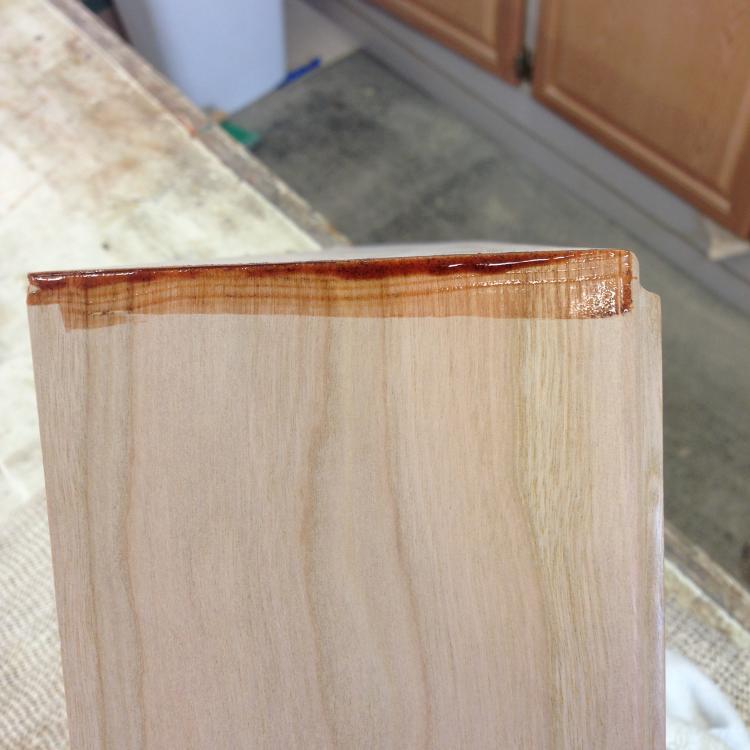
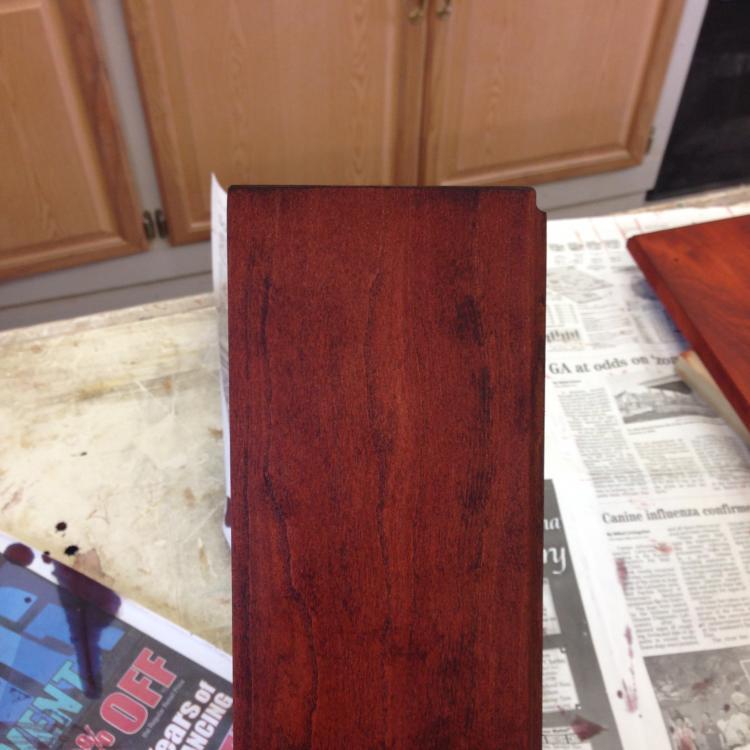
As many of you may know, I have pretty much sworn off stain and like to use dye instead. The down side of dye is that wood fillers don't take dyes well so you really have to make sure you have tight joints. Late last week I was building a couple of flag cases (one cherry and one poplar) and I had a 45 degree miter that wasn't as tight as I liked so I've fretted and stewed all weekend about how to filler the slight crack. After some experimentation, I finally mixed a little dry aniline dye granules with some 2 part epoxy. The epoxy took the dye well. I sanded the case to 240 grit and misted it with water to raise the grain and then hit it with 400. Then I mixed the epoxy and filled the crack. After a couple of hours, I resanded it with 400, re-wet the case and put 2 coats of W.D. Lockwood dye on it. I liked the way it filled and it is invisible. I'm now a believer. Before After
-

Oyster Box Lid
Gene Howe posted a gallery image in Small Crafts, Boxes, Picture Frames, and Lighting

From the album: Gene's Stuff
Solid mesquite lid. Voids filled with Turquoise and epoxy. -

From the album: Gene's Stuff
Sagebrush rounds, or oysters were glued to 1/2" plywood and leveled with a router jig. Voids between the rounds were filled with turquoise and epoxy. -

From the album: Gene's Stuff
Sagebrush rounds, or oysters were glued to 1/2" plywood and leveled with a router jig. Voids between the rounds were filled with turquoise and epoxy.


.png.092ae258479b9dd659cf89970a073ef2.png)
.png.8c2eddd8e897b9492e445e6620a889b2.png)


Thinkingoutsidethebowl-Contemporarywoodturningsandotherformsofart.png.6e78f97f62469731cbc9464ba246f952.png)


.jpg.47578d29ed2c06f227a45f314ad90af9.jpg)