Search the Community
Showing results for tags 'curly maple'.
-
Shaker Cherry Rocker Related Topics Shaker Transitional Rocker Part 1 (Curly Maple) Shaker Transitional Rocker Part 3 (Curly Maple) Current Project I hope to revive this project this weekend. All the components have been cut, steamed, bent, shaped, and now I need to chop the mortises in the rear legs for the back slats. The last time I touched this, was the last time I've done any real meaningful work in my shop, about two years ago. So far the stars are lining up for Dad and the shop the next couple days. Wish me luck! And plenty of this.

- 55 replies
-
- 11
-

-
Shaker Transitional Rocker Part 2 (Curly Maple) Shaker Transitional Rocker Part 3 (Curly Maple) Well here we are. Getting ready to cut into a nice 8/4 board of heavy Curly Maple to begin another rocker journey. Tonight I'm laying out parts and cutting. With any luck I'll have some slats in the steamer tonight. This photo does no justice to the figure in this board. I'll keep this topic going with this chair build. Thanks for following along! Legs are cut and squared.
- 63 replies
-
- 12
-
-
I made this firetruck for my grandson 12 years ago. I went to the internet to get ideas. I used exotic woods where I could. The ladder (curly maple) extends and swivels. The hose comes off the reel and cranks back up. I painted in all the gauges. I didn't have a lathe at that time and made the wheels and rims with the drill press. The lug bolts are tacks I found. He still loves it and is displayed in his room
-

From the album: Glenn Davis
Sliding Dovetail Shelves, Dovetailed case, Sliding Dovetail Keyed Mldgs, Mortise and Tenon Doors, and Repro Antique German Glass Maple bookmatched frame and panel back -

From the album: Glenn Davis
Cherry and Curly Maple Wood, Interior shelves, Rotating Base, Laser Etched Maple Panels with Hunting Scenes, Deer Antler and Carbon Arrowshaft book retainers, raised panel construction, mortise and tenon.- 1 comment
-
- 4
-
-

-
- storage
- magazine rack
- (and 2 more)
-

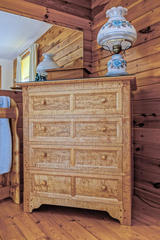
From the album: 18th Century Connecticut Blanket Chest
-

From the album: 18th Century Connecticut Blanket Chest
-
.JPG.a9ccc96700773c0929eee7d4692dfaf3.JPG)
From the album: 18th Century Connecticut Blanket Chest
I absolutely loved making these chests, I made a few of them then stopped, I was combing through my archives and found images of this chest, we still have this chest in our home today.-
- 1
-
-
- curly maple
- chest
- (and 3 more)
-
In honor of Memorial Day, Curly Maple Hardwoods has a fantastic sale at 20% off. See them at http://www.curlymaple.com/ I purchased my Curly Maple for my rocker I am currently working on from this outfit, and the service is excellent, shipped right to your door.
-
We lost our 12 year old Maltese a little while back.... and was quite disappointed in the little box the crematorium returned his cremains...... I had a nice piece of Walnut with a slice of a branch in it that, when bookmatched created the "V" for "Vinnie" on the lid.... Curly Maple, Walnut & Ebony..... Laser etching of a photo of Vinnie...
- 6 replies
-
- 8
-
-
- cremains box
- walnut
- (and 3 more)
-
.thumb.jpg.573d1497d0675219908c85aabefd797a.jpg) I got a little shop time yesterday! So I thought I'd make a little something for our daughter's violin teacher, she has taken it upon herself to give our daughter lessons pro bono, but we could not have that so I told every now and then I'd get something out of the shop for her. We are starting small at first so I can get an idea of her tastes, once I know what she likes in her home (mountain cabin with cedar walls) then we'll get more extravagant. I decided on a simple little shaker style wall shelf with sliding dovetails. Of course every project starts out with a plank of wood! Then with a couple simple layout tools we can commence to just having some fun and layout some lines. It takes me a few tries before I get something that looks pleasing. It is purely a personal thing, and even after I do the layout and it all looks good on wood, I really don't know what I will think about it until I get it cut out and set it up to see how the proportions look. The idea here is to just have fun with it. After about a dozen tries I finally came out with some lines I enjoy. This photo is the bottom of the wall shelf. You can click on this one to view it larger to see the line. This next photo is the top of the shelf, I loved how this one turned out, I tried some tighter radius's and a thinner top portion, but then I went bold and just used my string bow for the radius. Click on photo for larger image. I cut the first half out on the band saw, I only like cutting up to the line about a 1/6th proud, I am horrible at following a line on the line, if I try to cut to the line I typically cut over it and blow the layout, I am one of those unfortunates that do not have a good eye and steady feed to be able to cut right to the line so I leave the line in place, and spindle sand or plane to the line. Below you'll see the first half is finished, and it is laid up over the second half to mark out. I am pleased with the appearance of the layout after it has been cut out. I have a Porter Cable 4210 Dovetail Jig that is really handy for these smaller jobs. I like to use the sliding dovetail feature instead of dadoing the shelves in. I like the way the sliding dovetail lends that extra level of assurance that the shelves will not separate from the sides of case work like this. Think about it, an interlocking shelf that with all your might you could not pull apart even before it is glued up, then you add glue, and it would take a herculean effort to pull the sides away from the shelf, I like to make projects to last lifetimes, to hand down to generations. I know this is just a simple shelf, but 150 years from now, it will still be in one piece bar any disaster such as fire or landfill. You could drop this from 10 feet up and it will not separate. I like to think that anything I do will age and gain a rich patina, and the marks of wear from a century of knick knacks along with salt and pepper shakers that will have inhabited the shelf. I like to do my runs in sets, to assure that the two Dovetail slots will line up perfectly. So I clamp my halves together and then I insert the halves in the jig. These halves will stay clamped together for the duration of the slotting operations. You want to be sure you position the clamp in a manner that you do not have to pull it off to make room for the next operation. If you do have to pull it off, you'll need to use a second clamp to secure the boards before you pull off the first clamp. Click on image to enlarge. Just another shot of the two boards in position, the dovetail slot is the longer narrow area in the middle of the template. Now the Porter Cable 4210 Dovetail Jighas a handy little feature just like the bigger jigs do, a router bit depth stop. The depth stop is marked out accordingly, 1/4" for routing dovetail slots in 1/2" lumber, 3/8" for routing slots in 3/4" lumber, and 1/2" for routing slots in 1" lumber. I forgot to say, the PC 4210 comes with bushings and a dovetail bit that are suited for this jig. In this case I set my router bit depth to 3/8", I planed my lumber for the sides to 5/8" to give the shelf some depth and difference in the parts, and I wanted the slot to be routed as deep as possible without compromising the integrity of the sides. Click image to enlarge. With the halves in place and the boards set to the line in the jig ,and the bit depth set, the operation was completed, I am sorry I did not get any pictures of the actual operation, but it would have been difficult to hold the camera in one hand and the router in the other! TIP:When you route the slot, come in from both sides as to prevent tear out. Start from one side, cut the slot length about 90 percent, back your router back down the slot to exit, then come in from the opposite side, this will prevent unsightly blow out of the edges. One slot cut one to go. As you can see the two halves are still clamped up! You want to keep them clamped up until your finished with the slot cutting operations. Now the two halves are rotated 180 degrees (on this piece because of the location of the slots, yours will differ) with some operations you can keep feeding the work in one direction until you run out of room or support, but with this small shelf, it had to be rotated. The opposite end is now in the jig, and just for assurance, even though I drew my lines out accurately, I check the board for squareness in relation to the jig. And the second slot is cut just as the first one was. TIP: Do any sanding of the surface of the slotted boards before you slot them! If you sand them after you slot them, you'll ruin the reference to the dovetailed boards, and you'll create an unsightly gap between the ends of the shelves and the surface of the slotted board. Now with my slots cut and clamp removed I set the two halves out of the way and I get set for the routing operation of the shelf ends for the dovetail style profile. I start off with a piece of scrap the exact same thickness as the shelves. TIP: If your going to thickness plane the shelves, make sure you plane a piece of scrap at the same time to use for a test run in this procedure. In my case, I did not plane the shelves, so I was able to use a cutoff from the band saw operation. This portion of the entire operation is the only time you'll need to make some minor adjustments. The routing of the slots is straight forward, it is what it is, set the depth of the bit, line em up and cut. Routing the ends of the shelves is where all adjustments are made. Set the scrap piece in the jig up to the template, keeping your router bit at the same depth throughout the entire procedure, make your first test cut. Remove your test piece and see how it fits! As you can see my first test run turned out a sloppy fitting joint. Click image to enlarge. To adjust this slop out, you'll need to adjust the black knob, then the brass knob, it only takes a slight twist clockwise of both knobs on each side of the jig to take up the slop, what this does is cut less of the material away by putting more of the lumber under the aluminum jig. You'll have to flip your test piece over or cut off the one end to make a new cut. Since I have slop, there is no re-using the same cut end. If it were too tight, I could turn the knobs counter clockwise, bring the board out from under the template thus cutting more away. Sorry for the poor picture quality on this one, but you can see the adjusting knobs. Ahhhh, perfect fit now!!! You don't want the fit to be snug, you want to be able to slide the piece with some resistance, but not a whole lot, you'll need some room for the glue, and if your doing a multiple shelf glue up you'll be thankful you gave yourself some room, if you don't leave the room, your glue can freeze up the joint before you get it all in place. Now we are ready for the actual shelf to be cut, the shelf is in place. And the first cut is performed. Click on image to enlarge. Once you get it all set up, the rest goes quickly, I routed the ends of my two shelves in 3 minutes. So, with the shelves now routed, the sides are slotted, we are getting ready for glue up. The rest is academic, we all know how to spread glue and insert board "A" into board "B". The only thing I would recommend here is to do a dry fit first, sometimes the boards might fit a little too snug, in which case all I do is wrap some 220 sandpaper around a paint stirrer sized stick and sand the insides of the slots to allow a little more room for the board to slide in. Use plenty of glue, to allow for lubrication while sliding the joints in place. The natural instinct is to use too little,we think that just because it is an interlocking joint that a lil dab will so ya. That may be so, but that lil dab will do ya philosophy will get you in trouble as you slide the joints in place and it freezes up on you half way through. Once the boards are in place, clamp it all up! This project up to this point took me about 2 hrs to complete, it is a simple project, fun to wind down with and you are able to freestyle it. No plans, just your eye. If I would change anything about this one, I would rip the board down to 4" instead of 6" for proportional sake only. Nevertheless I think she'll be happy with the small shelf for the wall of her mountain cabin. The dimensions are 28" tall by 18" wide and 6" deep. Though the routing setup and operation seemed like it took awhile in the tutorial, it actually only took about a half hr for setup, test cut, and final cutting. Once you get to know the jig just like with any jig, it all goes fast. Today I will sand it out to 180, apply some TransFast Early American Maple Dye and we'll talk about the rest of the finishing process in the next post! Thanks all for reading!
I got a little shop time yesterday! So I thought I'd make a little something for our daughter's violin teacher, she has taken it upon herself to give our daughter lessons pro bono, but we could not have that so I told every now and then I'd get something out of the shop for her. We are starting small at first so I can get an idea of her tastes, once I know what she likes in her home (mountain cabin with cedar walls) then we'll get more extravagant. I decided on a simple little shaker style wall shelf with sliding dovetails. Of course every project starts out with a plank of wood! Then with a couple simple layout tools we can commence to just having some fun and layout some lines. It takes me a few tries before I get something that looks pleasing. It is purely a personal thing, and even after I do the layout and it all looks good on wood, I really don't know what I will think about it until I get it cut out and set it up to see how the proportions look. The idea here is to just have fun with it. After about a dozen tries I finally came out with some lines I enjoy. This photo is the bottom of the wall shelf. You can click on this one to view it larger to see the line. This next photo is the top of the shelf, I loved how this one turned out, I tried some tighter radius's and a thinner top portion, but then I went bold and just used my string bow for the radius. Click on photo for larger image. I cut the first half out on the band saw, I only like cutting up to the line about a 1/6th proud, I am horrible at following a line on the line, if I try to cut to the line I typically cut over it and blow the layout, I am one of those unfortunates that do not have a good eye and steady feed to be able to cut right to the line so I leave the line in place, and spindle sand or plane to the line. Below you'll see the first half is finished, and it is laid up over the second half to mark out. I am pleased with the appearance of the layout after it has been cut out. I have a Porter Cable 4210 Dovetail Jig that is really handy for these smaller jobs. I like to use the sliding dovetail feature instead of dadoing the shelves in. I like the way the sliding dovetail lends that extra level of assurance that the shelves will not separate from the sides of case work like this. Think about it, an interlocking shelf that with all your might you could not pull apart even before it is glued up, then you add glue, and it would take a herculean effort to pull the sides away from the shelf, I like to make projects to last lifetimes, to hand down to generations. I know this is just a simple shelf, but 150 years from now, it will still be in one piece bar any disaster such as fire or landfill. You could drop this from 10 feet up and it will not separate. I like to think that anything I do will age and gain a rich patina, and the marks of wear from a century of knick knacks along with salt and pepper shakers that will have inhabited the shelf. I like to do my runs in sets, to assure that the two Dovetail slots will line up perfectly. So I clamp my halves together and then I insert the halves in the jig. These halves will stay clamped together for the duration of the slotting operations. You want to be sure you position the clamp in a manner that you do not have to pull it off to make room for the next operation. If you do have to pull it off, you'll need to use a second clamp to secure the boards before you pull off the first clamp. Click on image to enlarge. Just another shot of the two boards in position, the dovetail slot is the longer narrow area in the middle of the template. Now the Porter Cable 4210 Dovetail Jighas a handy little feature just like the bigger jigs do, a router bit depth stop. The depth stop is marked out accordingly, 1/4" for routing dovetail slots in 1/2" lumber, 3/8" for routing slots in 3/4" lumber, and 1/2" for routing slots in 1" lumber. I forgot to say, the PC 4210 comes with bushings and a dovetail bit that are suited for this jig. In this case I set my router bit depth to 3/8", I planed my lumber for the sides to 5/8" to give the shelf some depth and difference in the parts, and I wanted the slot to be routed as deep as possible without compromising the integrity of the sides. Click image to enlarge. With the halves in place and the boards set to the line in the jig ,and the bit depth set, the operation was completed, I am sorry I did not get any pictures of the actual operation, but it would have been difficult to hold the camera in one hand and the router in the other! TIP:When you route the slot, come in from both sides as to prevent tear out. Start from one side, cut the slot length about 90 percent, back your router back down the slot to exit, then come in from the opposite side, this will prevent unsightly blow out of the edges. One slot cut one to go. As you can see the two halves are still clamped up! You want to keep them clamped up until your finished with the slot cutting operations. Now the two halves are rotated 180 degrees (on this piece because of the location of the slots, yours will differ) with some operations you can keep feeding the work in one direction until you run out of room or support, but with this small shelf, it had to be rotated. The opposite end is now in the jig, and just for assurance, even though I drew my lines out accurately, I check the board for squareness in relation to the jig. And the second slot is cut just as the first one was. TIP: Do any sanding of the surface of the slotted boards before you slot them! If you sand them after you slot them, you'll ruin the reference to the dovetailed boards, and you'll create an unsightly gap between the ends of the shelves and the surface of the slotted board. Now with my slots cut and clamp removed I set the two halves out of the way and I get set for the routing operation of the shelf ends for the dovetail style profile. I start off with a piece of scrap the exact same thickness as the shelves. TIP: If your going to thickness plane the shelves, make sure you plane a piece of scrap at the same time to use for a test run in this procedure. In my case, I did not plane the shelves, so I was able to use a cutoff from the band saw operation. This portion of the entire operation is the only time you'll need to make some minor adjustments. The routing of the slots is straight forward, it is what it is, set the depth of the bit, line em up and cut. Routing the ends of the shelves is where all adjustments are made. Set the scrap piece in the jig up to the template, keeping your router bit at the same depth throughout the entire procedure, make your first test cut. Remove your test piece and see how it fits! As you can see my first test run turned out a sloppy fitting joint. Click image to enlarge. To adjust this slop out, you'll need to adjust the black knob, then the brass knob, it only takes a slight twist clockwise of both knobs on each side of the jig to take up the slop, what this does is cut less of the material away by putting more of the lumber under the aluminum jig. You'll have to flip your test piece over or cut off the one end to make a new cut. Since I have slop, there is no re-using the same cut end. If it were too tight, I could turn the knobs counter clockwise, bring the board out from under the template thus cutting more away. Sorry for the poor picture quality on this one, but you can see the adjusting knobs. Ahhhh, perfect fit now!!! You don't want the fit to be snug, you want to be able to slide the piece with some resistance, but not a whole lot, you'll need some room for the glue, and if your doing a multiple shelf glue up you'll be thankful you gave yourself some room, if you don't leave the room, your glue can freeze up the joint before you get it all in place. Now we are ready for the actual shelf to be cut, the shelf is in place. And the first cut is performed. Click on image to enlarge. Once you get it all set up, the rest goes quickly, I routed the ends of my two shelves in 3 minutes. So, with the shelves now routed, the sides are slotted, we are getting ready for glue up. The rest is academic, we all know how to spread glue and insert board "A" into board "B". The only thing I would recommend here is to do a dry fit first, sometimes the boards might fit a little too snug, in which case all I do is wrap some 220 sandpaper around a paint stirrer sized stick and sand the insides of the slots to allow a little more room for the board to slide in. Use plenty of glue, to allow for lubrication while sliding the joints in place. The natural instinct is to use too little,we think that just because it is an interlocking joint that a lil dab will so ya. That may be so, but that lil dab will do ya philosophy will get you in trouble as you slide the joints in place and it freezes up on you half way through. Once the boards are in place, clamp it all up! This project up to this point took me about 2 hrs to complete, it is a simple project, fun to wind down with and you are able to freestyle it. No plans, just your eye. If I would change anything about this one, I would rip the board down to 4" instead of 6" for proportional sake only. Nevertheless I think she'll be happy with the small shelf for the wall of her mountain cabin. The dimensions are 28" tall by 18" wide and 6" deep. Though the routing setup and operation seemed like it took awhile in the tutorial, it actually only took about a half hr for setup, test cut, and final cutting. Once you get to know the jig just like with any jig, it all goes fast. Today I will sand it out to 180, apply some TransFast Early American Maple Dye and we'll talk about the rest of the finishing process in the next post! Thanks all for reading!- 12 replies
-
- 2
-
-

-
- porter cable
- porter cable 4210 dovetail
- (and 8 more)
-
Awhile back a customer of mine asked me if I could restore, or do a complete makeover of a settee he purchased off of eBay. The settee was from the early 1800's and he wanted the entire piece stripped, gone through, new rails fabricated, and various repairs. The settee had gone through a life of abuse, and it ended up with a thousand holes in it, upholstered with some gosh awful tweed fabric, actually layers of upholstery ended up on it, and long story short, it was a mess, and he wanted a new settee. About the only thing he really liked on it, were the legs, and the beautiful curled maple they were made from. Later I will show a photo montage of the entire project, but this story is about how I repaired a seemingly destroyed balled foot. My customer wanted me to just cut it off, and make all the legs the same size, I told him I could save it. The image below is how the foot looked when I received the settee in my shop. As you can see there was hole in the center of the foot, that was to accommodate casters that were on all four legs. The hole for the casters weakened the ball foot and it finally gave way, cracked and just sheared off. The next image is after I stripped down the entire settee, and started in on the refinishing process. I know I know! That lovely patina, gone! It tore me up to sand it out, and take the project down to bare wood again, but hey, I was getting paid to do a job. So at first look, it does look dismal, but I knew there was hope for this leg, I could save it! I've seen worse! So I set about to paring away at the damaged wood with my Marples chisel, I was not worried about shaping the leg repair to be a perfect 90 degrees to accept the repair block, because I knew I had a trick up my sleeve to make the final fit, just perfect. I pared away at the ball foot just so the repair block fit reasonably well. I used Maple, and I tried to get a good matching grain orientation as you'll see in the images below. The trick here is once you get the fit close, use a piece of sand paper to bring the fit to final. Do not fold the paper in half, this will only distort both sides of the fit as you pull the sandpaper out from between the repair block and the piece to be repaired. Each time you must insert the sandpaper in between the two pieces, then as you apply pressure to the repair block, pull the sand paper out. After time, and with a bit of patience, the sandpaper will have created a custom perfect fit including matching any valleys or highs, or uneven shaping of the repair area. The repair block will conform to the odd shape of the piece to be repaired. Keep inserting the sand paper, then pull out, over and over. The fit will materialize. And you'll have a perfect fitting repair block. Finally, time to glue up the repair block. After the glue set up, I then commenced to paring away at the repair block to rough it in close. My Marple 1" chisel worked beautifully for this task. I almost have her ready for final shaping. After I got it close, I shaped the repair block down to match the existing ball with shoulder as well. note the grain orientation. To bring the repair block to final shape, I used a file and then I blended the repair in with 220 sand paper, and it turned out pretty close to the original shape. This was a successful repair, it took all of an hour to get it all wrapped up, and we got to save the other three legs, remember the customer originally said to just cut this leg down and the rest as well to match, I would not! Later I'll show some images of the final restoration, you cannot even see this repair, it looked splendid after all was said and done. Cheers!
- 35 replies
-
- 4
-
-
- settee
- curly maple
- (and 4 more)
-
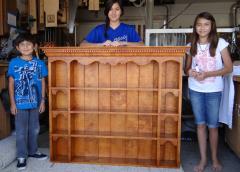
From the album: Old English Plate Shelf
Young Patriot Woodworkers, they are not ready to see this one leave our shop. As with any project that takes time, it becomes part of the family, and the kids always hate to see it leave the shop.© Courtland Woodworks
- 4 comments
-
- 1
-
-
- varnish
- boiled linseed oil
- (and 7 more)
-

From the album: Lap Desk
Can also be a Kitchen Office. Hand cut dovetails in the front corners, simple rebate glue joint in back. Lid has a few large knots, decided to "feature" them. Back edge has a live edge, and Walnut plugs cover the five scews that hold the non-folding part of the lid still. Four coats of oil finish...so far. -
Hello All, I am planning a build of a narrow table for our foyer. I have some 5/4 waterfall bubinga that I planned to use for the top and a small amount of gaboon ebony for accents. However for the apron and legs I'm stuck. I thought about using walnut, but figured the ebony would get lost. I then looked at a curly maple but the contrast seemed extreme. What wood would be a good compliment to a bubinga top, that would showcase the bubinga and ebony but also compliment the peice as a whole? Kevin
-

From the album: Old English Plate Shelf
This image was supplied by our customer, he wanted us to capture the feel of this 18th Century English China Shelf. He saw the shelf at auction, the auction was taking place in Europe, but he thoughtfully realized that the cost of the shelf, including shipping to the states, was getting a tad high, so he sought us out as we had done work for him in the past, and thought of us as his builder. And we are glad he did, we had a blast making it. I used the image to scale the shelf, considering his desire to make it 48" wide by 40" tall, I was able to scale it out on grid paper and duplicate much of the details and the proportions.© Courtland Woodworks
-

From the album: Old English Plate Shelf
The cabinet in place at its final resting place, with pewter molds in place. You'll see the tails are cut into the side of the cabinet and exposed, I set the tails on the side of the cabinet to lend it downward strength, the mechanics of the joinery will not allow any weight to push down and separate the corners.© Courtland Woodworks
-

From the album: Old English Plate Shelf
In place at a home where the resident loves colonial works, and this piece fit right in.© Courtland Woodworks
-

From the album: Old English Plate Shelf
The customers pewter molds on full display. The pewter molds are one area of his vast collections of antique in his home. These molds were used to make breads, bread puddings, and puddings, in the shape of the molds.© Courtland Woodworks
-

From the album: Old English Plate Shelf
The crown is built up, by using traditional methods of building crown, just as it was done the old days, they did not have power nor molding knives, so just as they did, we did, by shaping each facet of the crown as an independent piece, then applying them on top of each other.© Courtland Woodworks
-

From the album: Old English Plate Shelf
The curls are wonderful in this lumber, thank you Bob Kloes.© Courtland Woodworks
-

From the album: Old English Plate Shelf
In all my work, I always make the unseen areas just as finished as the seen areas, I think it makes it more custom and refined when you can look all over the work, and see a finished side instead of unfinished.© Courtland Woodworks
-
- 1
-
-
- curly maple
- dovetail
- (and 3 more)
-

From the album: Old English Plate Shelf
After the shelf was assembled I shot the customer some progress images, I put a nice Lie Nielsen No.4 Bronze on the second shelf along with a couple of his pewter molds in the cabinet. The joinery used for this project was sliding dovetails for all shelf's to side wall joints, and dovetailed carcass corners.© Courtland Woodworks
-
- 2
-
-
- curly maple
- dovetail
- (and 3 more)