Leaderboard

Popular Content
Showing content with the highest reputation since 09/07/2014 in all areas
-
We are having our annual contest at our club. It is due for the February meeting. The person that won last year gets to pick, he picked a lamp. I thought I would try a basket illusion. This is the base. I am going to do a flower pattern. I added a basket weave around the bottom to make it look more finished. The base is around 10”.
 19 points
 -

A Before and After
aaronc and 18 others reacted to steven newman for a topic
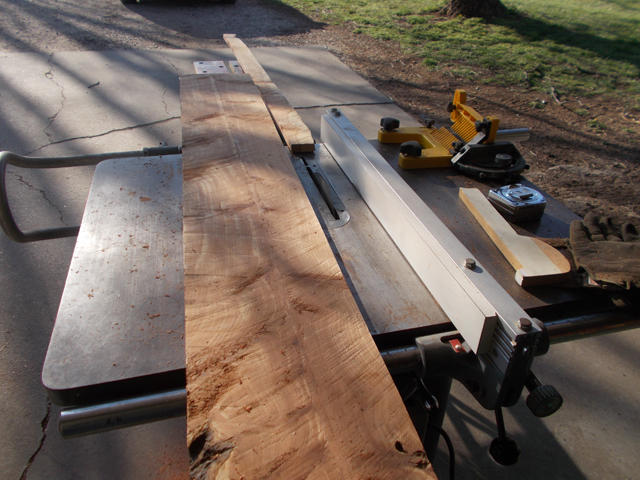
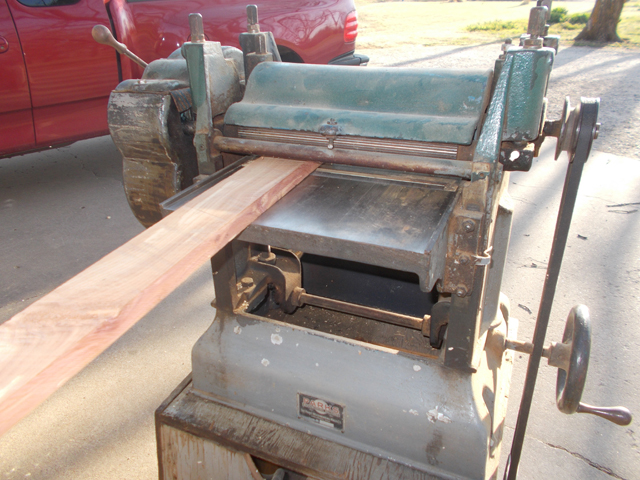
This thing appeared on my doorstep last week... Along with 6 "friends".. Task being that I rehab that #4 and send it back to Gene Howe...Took about an evening in the rehab shop.. Looks a little better? View from the back porch.. Tried out on a slab of Ash lumber....seems to work well enough..will ship this out this week.. Stay tuned..have 6 more to do..
19 points -

Drool Worthy
John Moody and 18 others reacted to Gene Howe for a topic
19 points -

Sic transit gloria mundi
FrederickH and 17 others reacted to kmealy for a topic
I'm (temporarily) famous. November WOOD Magazine that arrived today has my Top Shop Tip of the issue. A full page dedicated to a simple tool I cobbled together. Not bad for two popsicle sticks and some scrap wood.
18 points -
I finally finished the buffet table. It’s about 50 inches long and 13 inches deep. I made it from walnut and butter nut. Finished with 4 coats of Armor Seal. I started this project around mid September and just finished it. This was a very hard build for me. I didn’t have any plans other than what I had in my mind and just went with it. Now, it’s on to re-arranging the shop a little bit.
18 points
-

What's On Your Work Bench?
John Morris and 17 others reacted to PostalTom for a topic
Q: Why does a chicken coop only have two doors? A: Because if it had four doors, it would be a sedan.18 points -

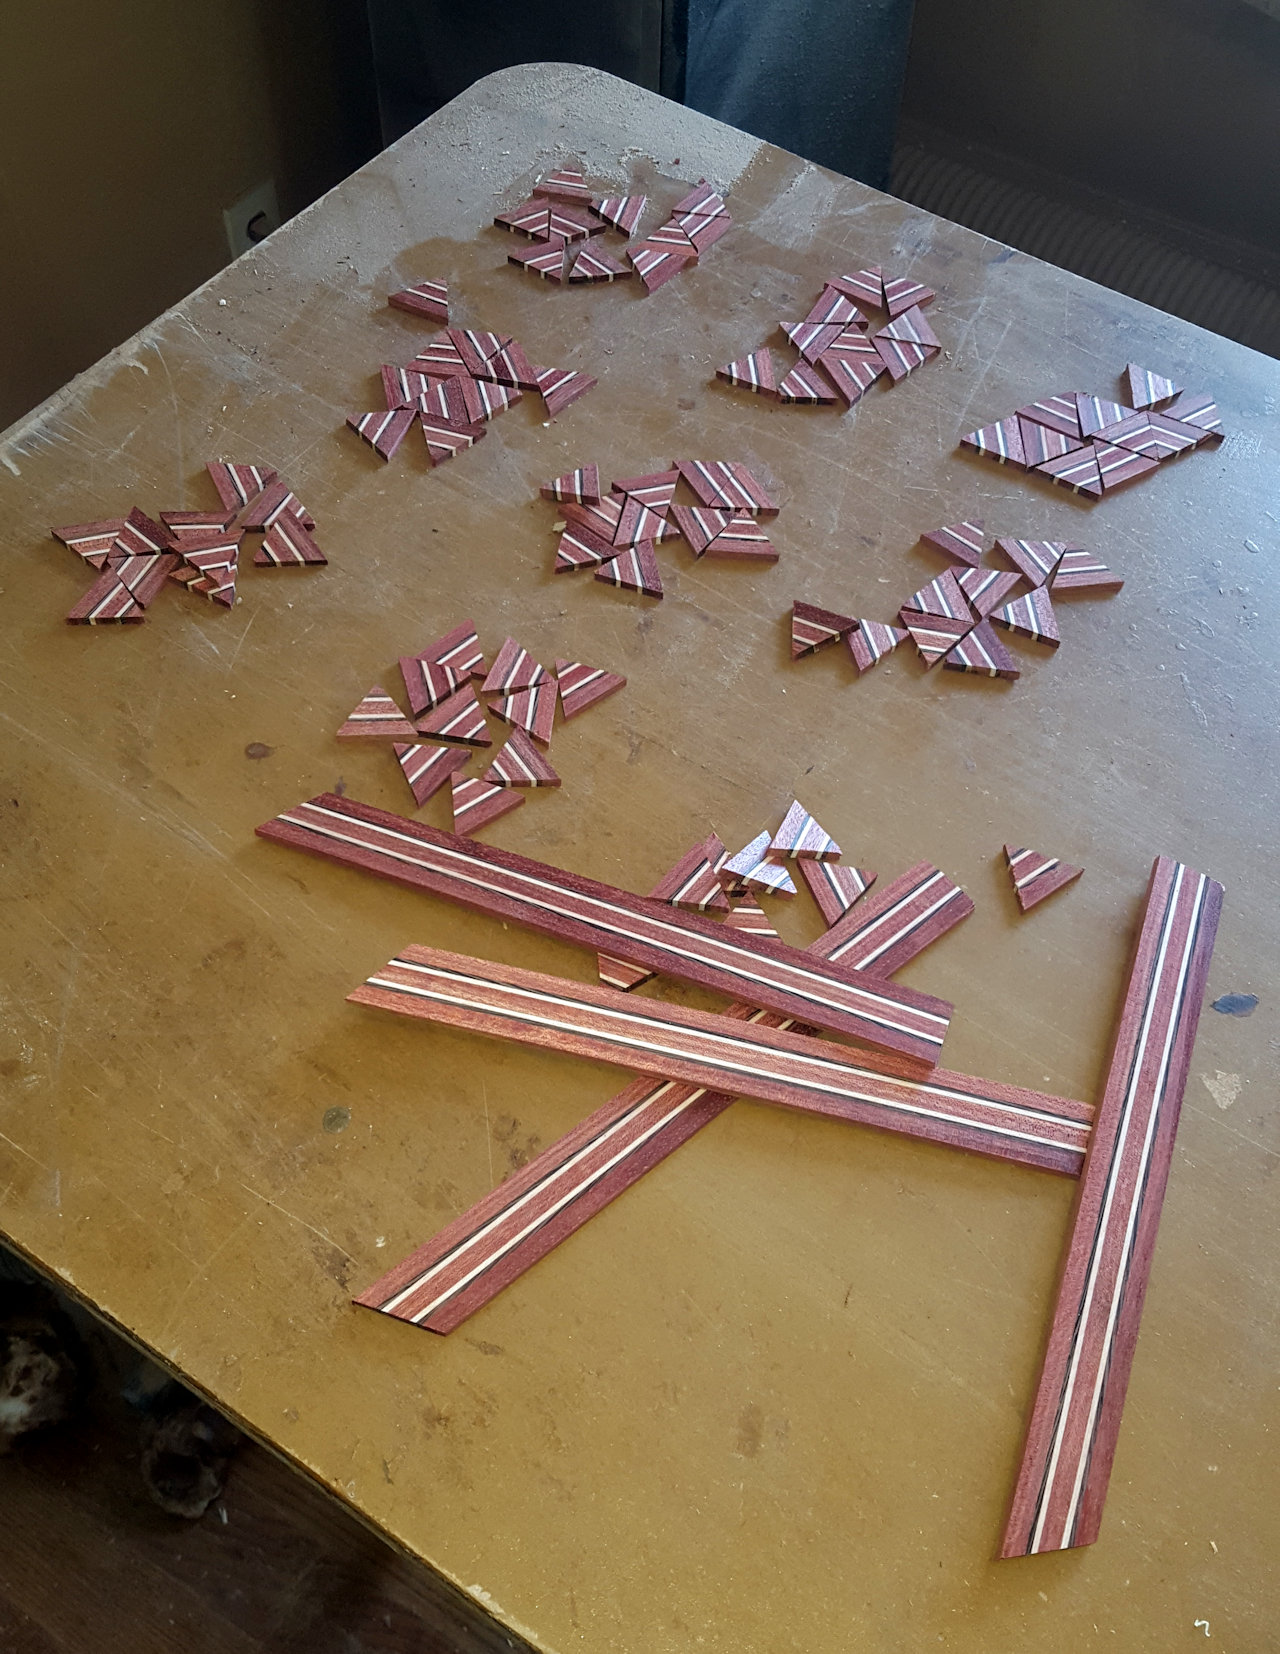
Triangulating a Box....
jttheclockman and 17 others reacted to Waxing Moon for a topic
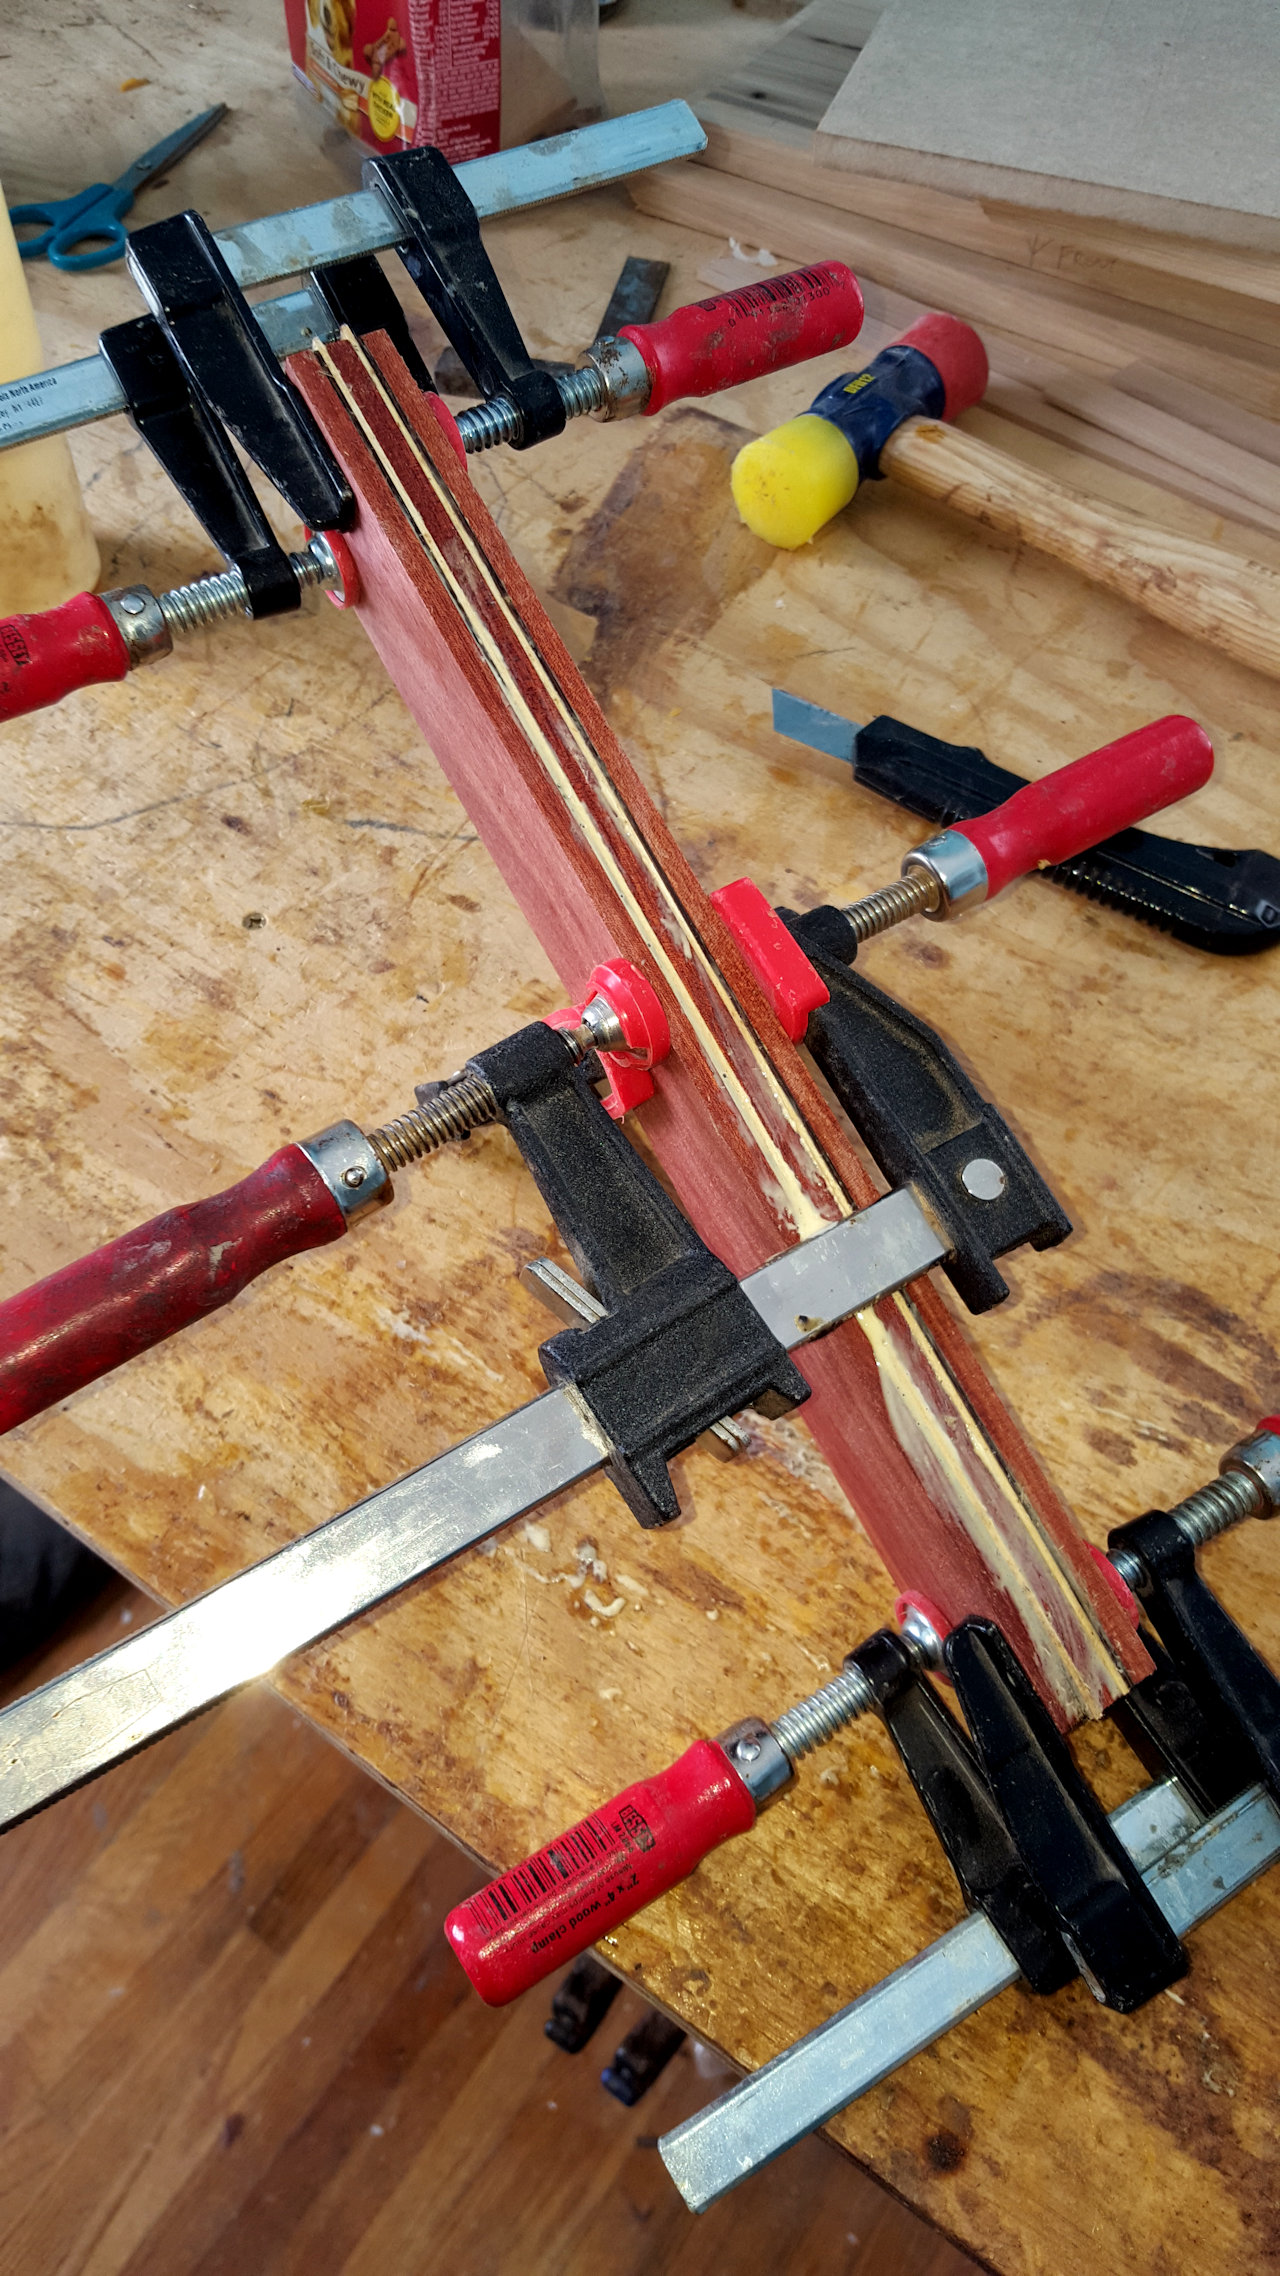
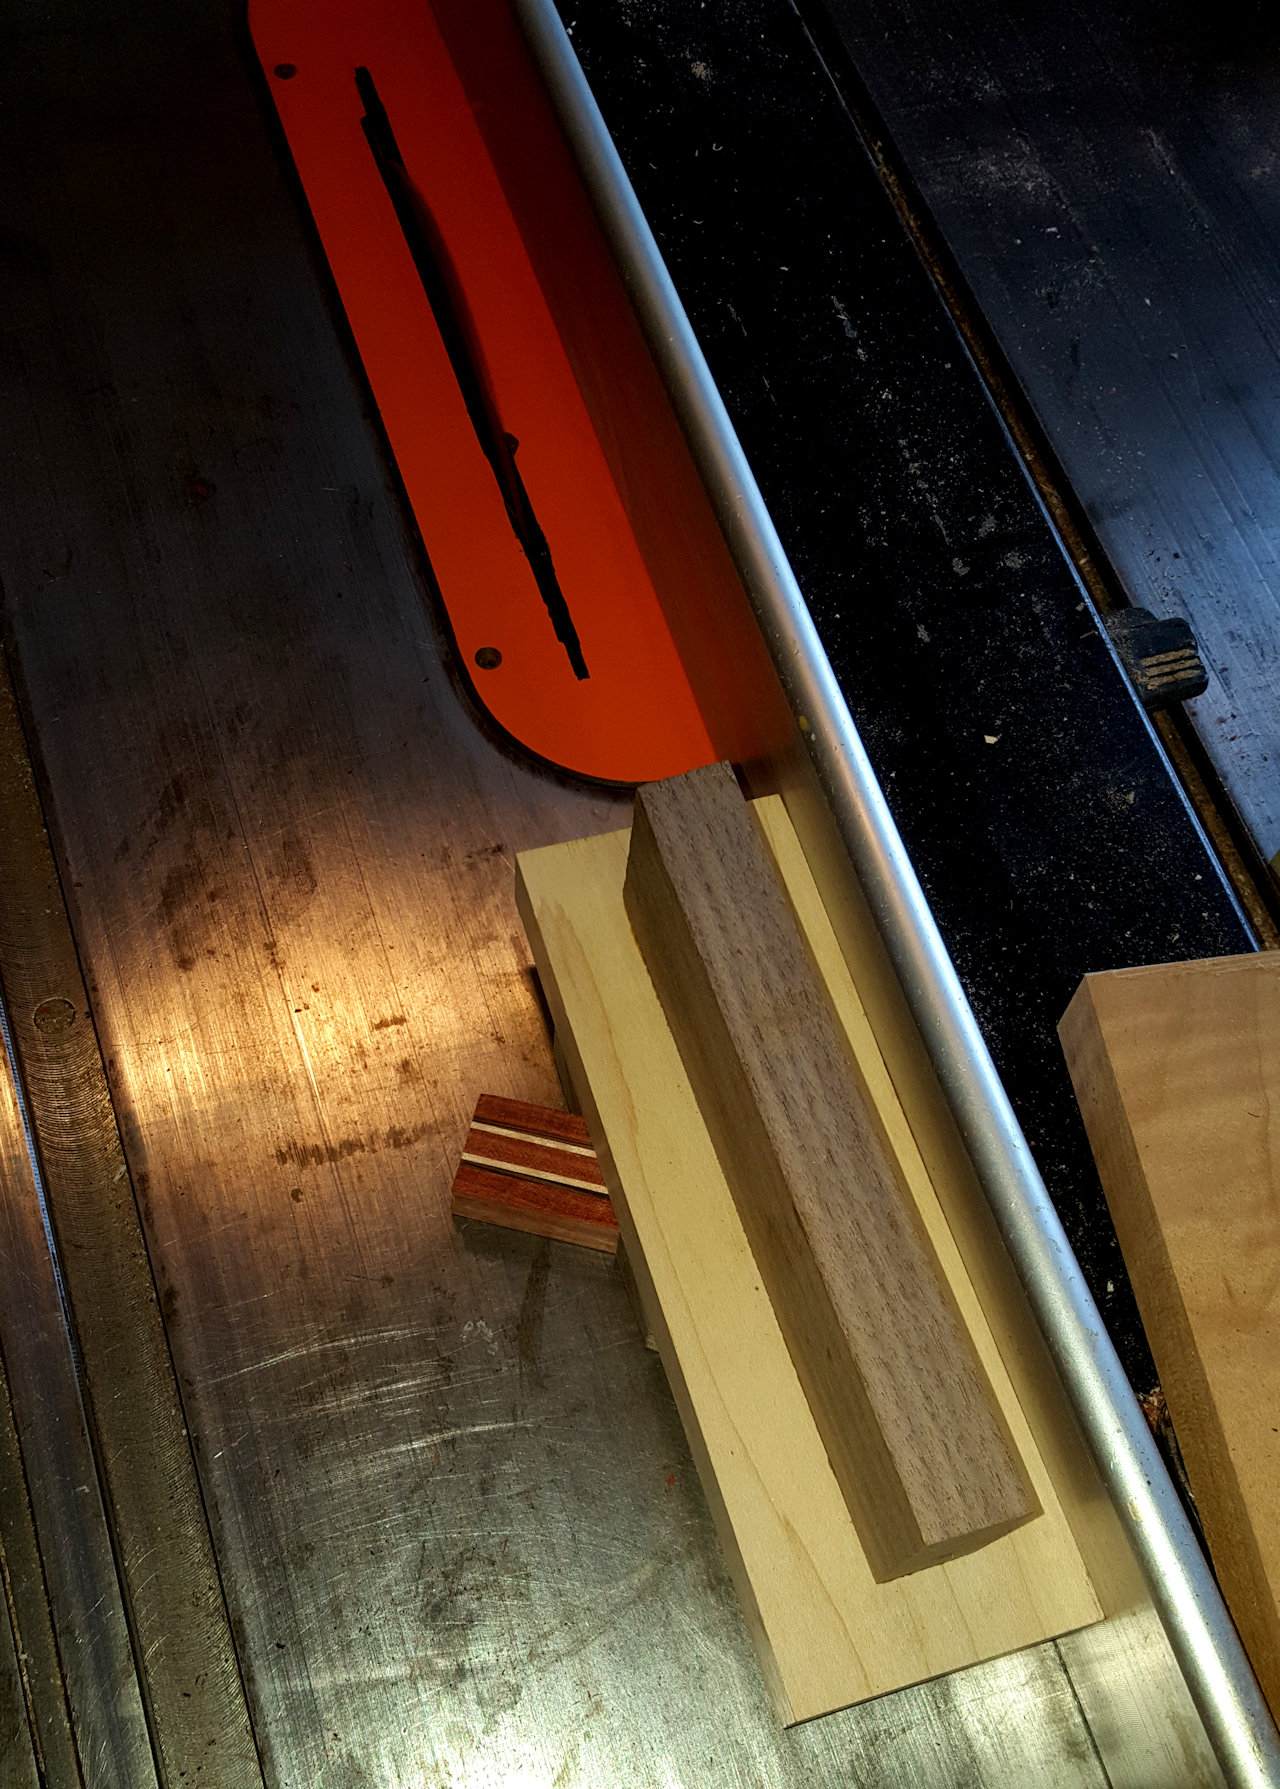
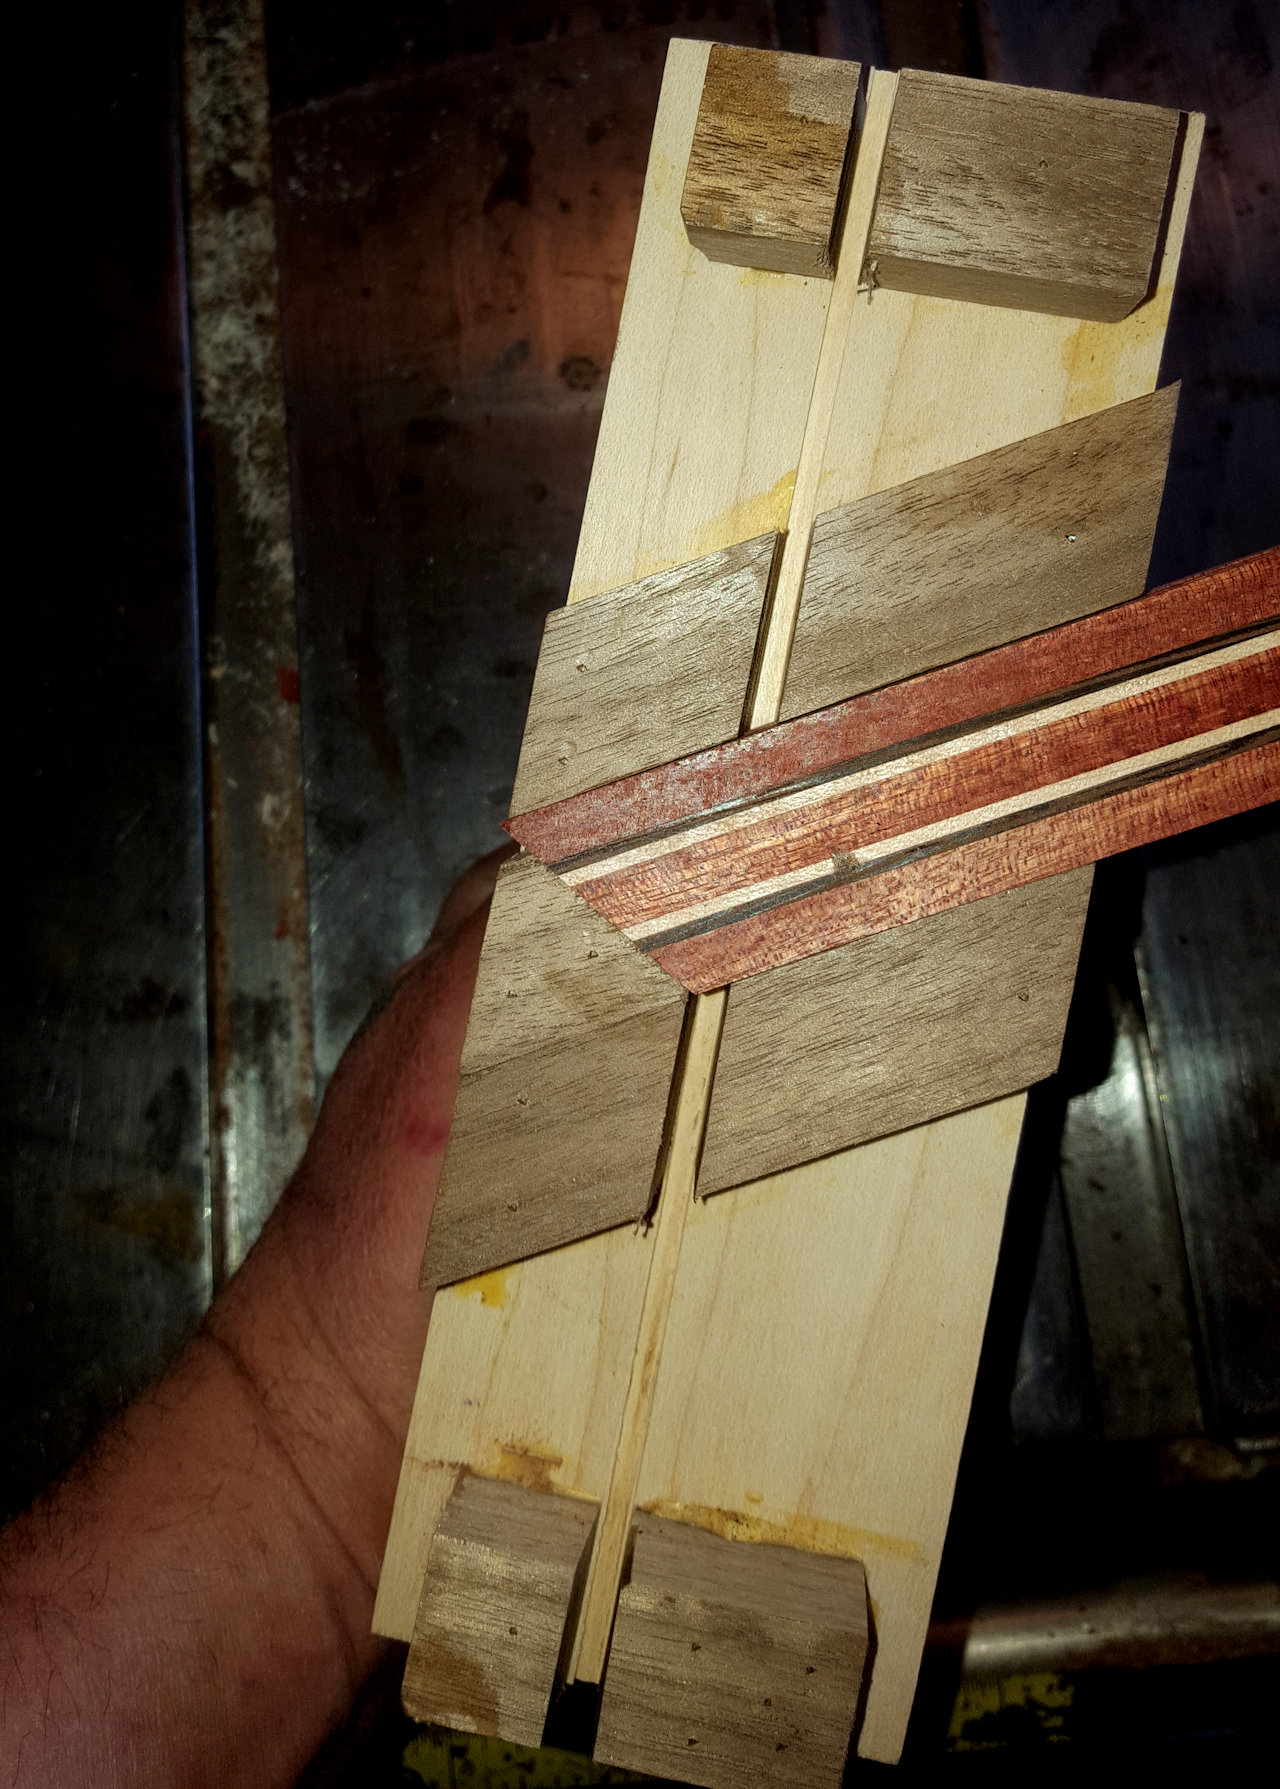
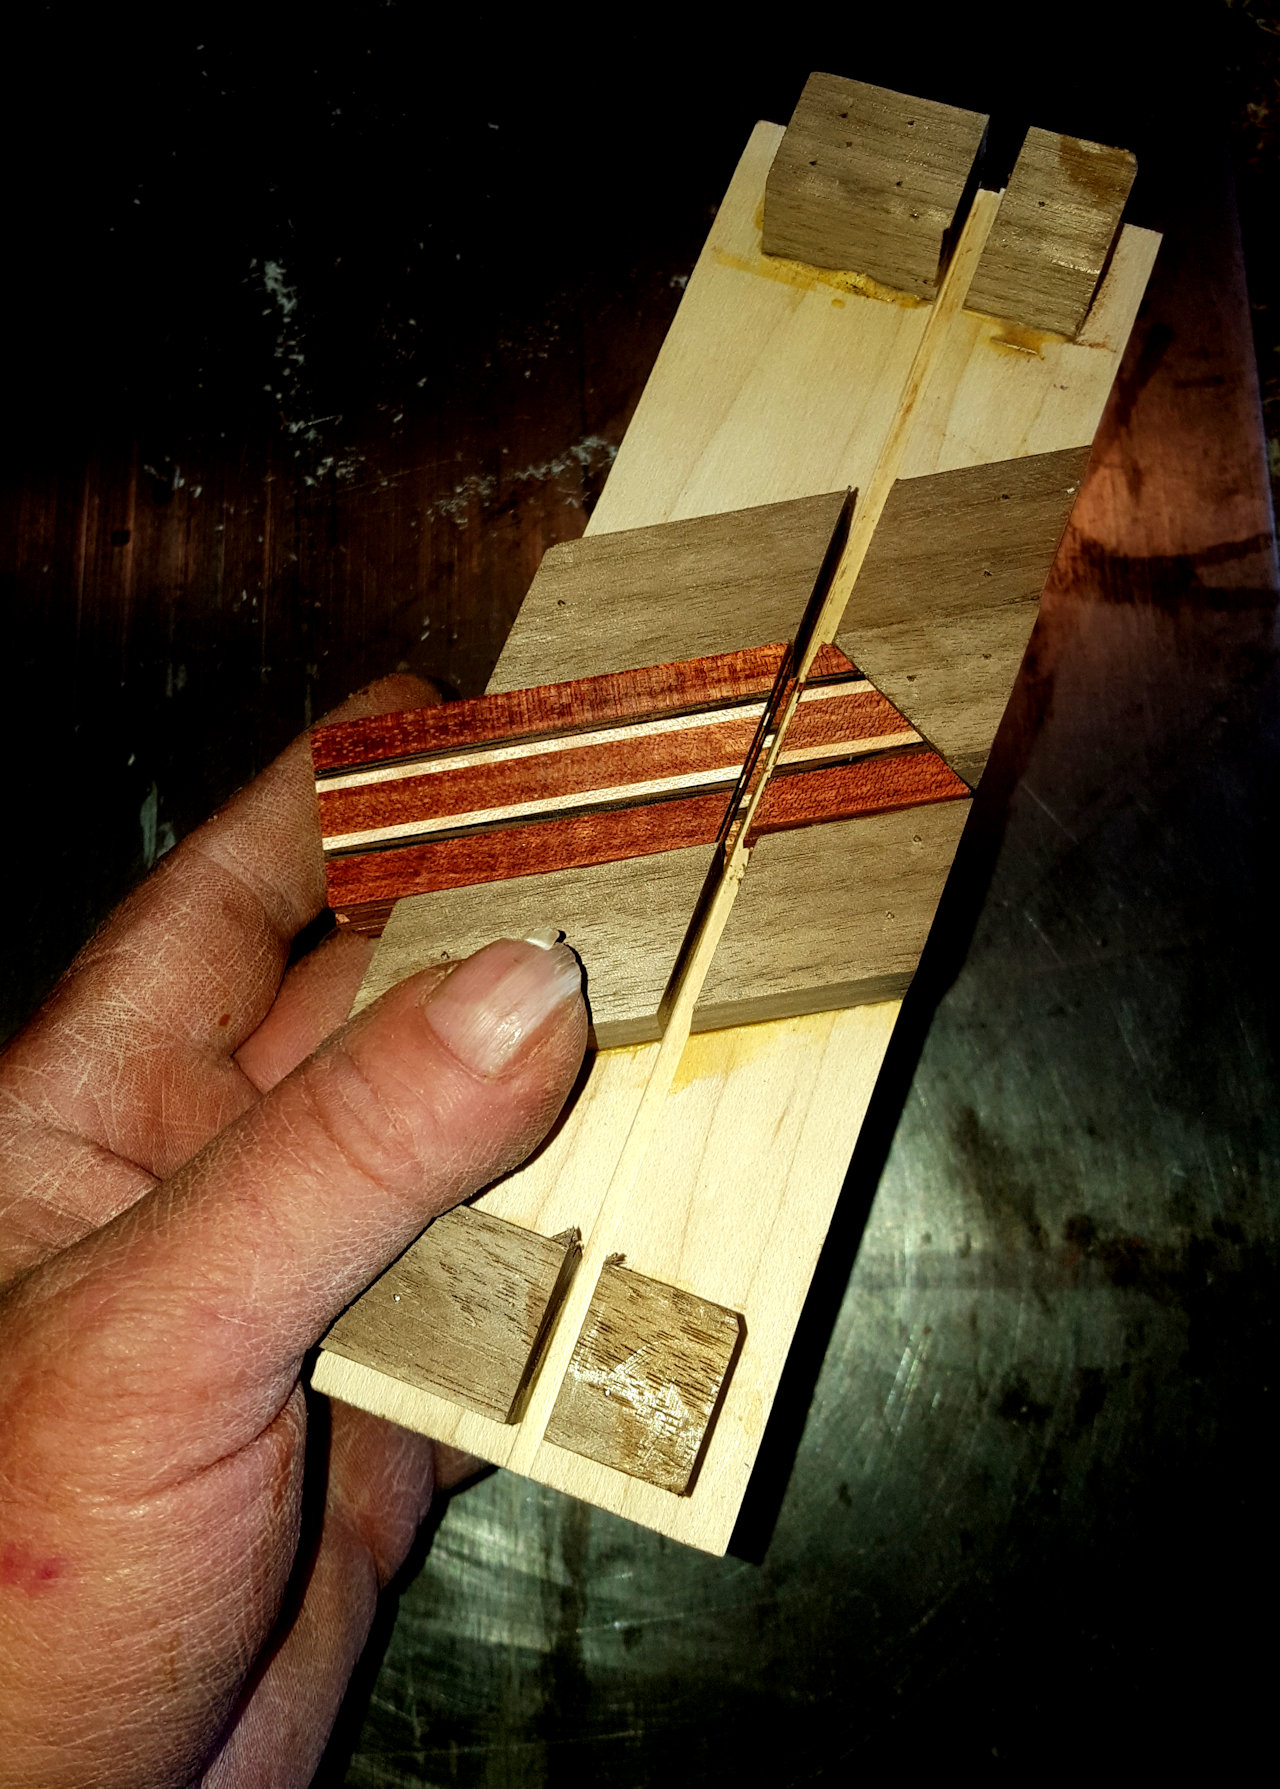
I'm in the process of making some decorative inlay for a box..... but, I would imagine this could be put on anything if one so desired.... I used three pieces of 1/4" thick bloodwood, and two pieces each of 1/16" thick maple and wenge to make the 1" thick laminate....once dried and cleaned up, I sliced off from the edge several strips about 5/32" thick.... you can cut as thick as you like, just make your jig and dado work with that dimension... then cut a 30 degree slice off the end of each strip using your miter gauge. I cobbled together a jig to cut 4 triangles at one time.... flipping the strips after each pass..... Once you have enough triangles.... have some fun!
18 points -
.thumb.jpg.573d1497d0675219908c85aabefd797a.jpg)
Thank You
Gerald and 16 others reacted to John Morris for a topic
I'm sitting here with cup o joe in hand, and thinking about how fortunate we are, to have a place to call home on the www, a place like TPW where folks are open, non judgemental, ego's are left at the door, and pride is in small quantity. Friendship abounds, and you all are just plain decent and good. This is a good place, and you all make it what it is today. This is your home, your content, we only provide the space, you all provide the heart and soul of The Patriot Woodworker. A hearty thanks to our moderators, you know who you are, and our admins, we all know who we are , and most importantly, a huge THANK YOU to the members who comeback each and every day, and keep our little corner of the world lively and alive. I don't say it enough, but thank you all, we are a small community, but in many ways we are mighty!
17 points -
Ok, I've mentioned this many times and it's finally to a point where I can post photos. Over the last 30 years or so I have replaced tops, backs, done fret jobs, inlay, glued braces and lining, refinished, made bridges, saddles, and nuts, replaced tuners, and all kinds of repairs, etc. but this is the first guitar I've built from scratch. I cut all the wood for this including resawing the back/sides/top, cutting the binding and bracing from lumber or billets, etc. Along the way I've designed and built my own modular cantilever side bending fixture that will accommodate sizes from Jumbo down to 0, possibly smaller like a Ukulele. I'll post photos of the side bending fixture later and also built all the forms, fixtures, templates, and jigs for the build. I started the build a couple of years ago just working an hour in the evening, sometimes two, and some on weekends, but I put it aside and didn't touch it for about 8 months. I'll tell you ahead of time that it sounds good, is bright, has great sustain, and plays very easily with good action. But it may be a while before I make a video of it being played. Back and sides - Honduras Mahogany Top and bracing - Sitka Spruce Neck - African Mahogany with Maple and Honduras Mahogany center pieces Headstock, rosette, arm bevel, heel cap, and tail wedge - Walnut burl Headstock inlay - Zebrawood Fingerboard, bridge - East Indian Rosewood Binding, purfling - Zebrawood and Maple Sound port lining - Macassar Ebony Solid lining - Honduras Mahogany Side braces - Honduras Mahogany Finish - Shellac (French polish), measured just over 1 mil at the bridge The neck is bolted on and I devised a way for it to be completely removable. It can go from tuned to pitch to neck off in about 5 minutes. In the week that the guitar has been tuned to pitch it is holding its tuning as good as my other guitars. The intonation still needs some minor tweaking but I'll play it a while before working on it again. Assuming I like it enough to play in church I'll install a K&K Pure Mini pickup. If I decide to just play it at home and with friends I'll save the pickup for a future guitar. In the meantime, here are a few photos of the build and some of the finished guitar. Back bracing with Padauk glue strip - Top bracing - Gluing the back in place - Finished guitar. I didn't want a super high gloss finish but rather decided to do an old world vintage patina. Nothing against the super high gloss finishes but I have 5 guitars with high gloss finish and wanted this one to be different. Now that I've done it this way I like it even better than I thought I would. So feel free to comment, ask questions, critique. I have about 1,500 photos of the build and good documentation but these few photos tell the story just fine, I think, so I'll spare you the copious extras. Enjoy! David
17 points
-

Mahogany Flag Case
p_toad and 16 others reacted to Ron Dudelston for a topic
I build veteran burial flag cases and I sell them in my Etsy store. Recently, I got a call from a guy in Denver asking me to build a very special case. His father recently passed and his father was a WW II vet. He had served in North Africa with Patton and was quite proud of that fact. So proud that he requested that he be buried in a casket built from African mahogany. The son called to ask if I would build a flag case from African mahogany for the flag that draped his casket. Thanks to Frank Miller Lumber I was able to find quarter-sawn African mahogany and provide the case. Here’s the case.
17 points -

Kissmas Trees
Lori Harper and 16 others reacted to Artie for a topic
So last year Woodcraft came out with their Kissmas tree plans, and being simple enough to do that I could make them, I made them. 21 so far, and requests for 3 more as of right now. Painting them can get tedious/monotonous (Alexa has greatly helped with that, got 127 hours of music stored on her through Spotify). Other than the painting I like making them. The point of todays missive is there was an unforeseen bonus to making them. A bunch of the recipients have posted them to me, on Facebook. None of them look remotely the same. I gave them Christmas presents last year and now they’re giving me Christmas presents this year. Now for many of the talented/accomplished artists/woodworkers here, making presents and giving them to people and having the people so happy to get them is probably old hat, but this is really cool for me ! Here are some of the pictures I have gotten.
17 points -
17 points
-

I just want to point out
4DThinker and 16 others reacted to Fred W. Hargis Jr for a topic
that if you still use a biscuit joiner (like I do, love it) it's really important that you put the blade on it in the correct direction. True enough, the sawdust isn't as bad with a backwards blade, but the smoke does interfere with your vision.17 points -

The current FWW magazine features ...
1fizgig and 16 others reacted to derekcohen for a topic
... this piece of mine in the Gallery ... Derek Cohen of Perth, Australia, built this chest of drawers for his wife; it features figured Jarrah drawers and a makore frame-and-panel case. “Essentially, the design is a modern bombé, with tapered and curved sides, and a bow front. The drawers required compound dovetails,” he said. The top conceals a dressing-table mirror, and the top drawer has a hidden Quaker lock to protect a jewelry drawer with sliding trays.⠀ JARRAH AND MAKORE, 16-1⁄2D X 24-1⁄2W X 49H⠀ FROM FWW 285⠀ ⠀ These were the photos they did not publish ... Regards from Perth Derek
17 points -
Friends son has expressed a interest in woodworking. As Ralph cannot nail two boards together he asked could I give his son some shop time and see where this leads. I suspect this was to keep him from investing a lot of money on something that was nothing more than a passing interest. Brent, his son, came over for a few nights and I mapped out what I needed for a storage bin. Sat him down and asked him to draw out details. He got the basics and then set about finding scraps I had of plywood and set to the task of making this storage bin. Learned all about each machine before I let him touch it. I won't cover in a short description near what he and I went over but he learned about a few types of joints, how to attached edge banding to boards both with pin nails and just glue. Lots of mistakes we had to fix or just cover up. Finishing was frustrating for him, but hey we got to start somewhere and this is a shop fixture not a frame for a painting at a museum. More than once he gave me this look of why not fix this. Had to point out to him that along the way I referenced several shop fixtures that had mistakes. Yeah, I use them for reference as well. Normally I am not much for company in the shop so this was a bit out of my comfort zone. But with today's educational system in the state that it is where else can he explore this skillset. He installed this evening while I worked on a fixing a drawer for the neighbor. Not bad, not Tal Mahal either but hey it works, is well built, as in plenty of glue and screws, and has plenty of coats of poly. Bit shiny but I let him have at it explaining as we went how to improve. Still have to do some touch up work on the insert for the brushes but I have time. Oddly his favorite part was removing a section of the pegboard wall and installing a stud and bracing where one was not. Only had one available stud to attach to because some moron built this garage with 24 inch centers..... So now he wants to build a back shed for his Dad's lawn equipment this summer.
17 points
-

Teddy's owl
Chips N Dust and 16 others reacted to Lissa Hall for a topic
Teddy's owl he made for his mother for Christmas, the grass was scrap piece my uncle did not use and the tree was free hand by myself. the creativity was all teddy as well as everything else with some guidance. He did a great job and loves woodworking. I am blessed to have him learning with me.
17 points -
Paid it forward
Robert McMillan and 16 others reacted to kmealy for a topic
As president of the local woodworking club, I am on the contact list. I got an e-mail from a guy last week who'd like to build a jewelry box for his girlfriend but didn't have the tools to do it (lives in an apartment). He came over this afternoon. Nice young man in his mid-20s, an industrial engineer that works for a big company in town. Anyway, he brought over two 2' pieces of 1/2" maple and some 1/8" plywood 12" squares. Cut out the box sides, splined them, groove for the bottom, an egg-grate interior and a plain flat lid. Off he goes. Hope his girlfriend is happy and maybe hooked him on woodworking? I had a couple of guys who helped me out when I was first getting started.17 points -
Positive Vibes
Jim L and 16 others reacted to John Morris for a topic
I just wanted to wish all the woodworkers who show up here every day, or some days, a wonderful fantastic beautiful time in all your shops, I truly do mean that. I love woodworking, and I love interacting with fellow woodworkers on any level. You all are the best, and I'd like to personally thank each of you for showing up, and sharing, collaborating, teaching, learning, mentoring, and being here for each other in this wonderful most awesome adventure called woodworking! I just felt like saying that folks, we love ya'll here, and I personally feel blessed to be able to wake up in the morning before I head off to my day job, and check in here, and I feel blessed to be able to check in here at night, and whenever I can get on here, which is quite often actually. And I feel incredibly blessed to have a wife and family who puts up with it all. Woodworking, fun, addictive, peaceful, exciting, new people, new knowledge, it's what it's all about. Thank you all. Ya I know, I been mushy a tad lately, don't know what's been coming over me, menopause? Thank you folks.17 points -

Flag Case
p_toad and 15 others reacted to Headhunter for a topic
Lost my dad at the end of August last year and needed a flag case for his burial flag. Based this on a design from Mr. Dudelston and worked it up in mesquite. Finally got around to installing the name plate this morning. He started at the bottom and worked his way up over 33 years of service.
16 points -

Copycat birds.
p_toad and 15 others reacted to Steve Krumanaker for a topic
There is a guy in a facebook group I belong to who has been posting pictures of birds he's turned, I'm sure Lew knows who I'm talking about. They are kind of stylized and I can't say they really like any real bird I've ever seen. Even so, they caught my eye and I wanted to try doing some. These are on a sycamore limb. Birds are spalted maple the beaks are ebony.
16 points -

Shaker berry box
John Morris and 15 others reacted to Danl for a topic
I made Shaker berry boxes for a few Christmas presents this year. Four of the boxes have cherry sides and maple handles & bottoms. The fifth box is made from all poplar. The sides and handle are 1/8” thick and the bottoms are ¼” thick. The construction is 1/8” x 1/8” box joint. The finish is two coats shellac. Danl
16 points -
I haven't posted any projects lately because I have been working on a snack tray cabinet. It's from the December 2008 issue of Woodsmith Magazine. First appearance of the project looks like a small cabinet that would go by the end of a sofa, for example. It looks like it has five drawers, but it actually only has 1 drawer 4 fold up smack trays that inhabit the other four "drawer" slots. In the magazine, it was made from cherry, but I made it from red oak. I used red oak because that is what my wife wanted. I never got started on it before she passed, but I decided to honor her wishes anyway. I used two different stains on it, Minwax Golden Pecan, and Minwax Honey Maple gel stain. I wanted to experiment with the gel stain to see if I liked it. The jury is still out. I also tried some gel polyurethane, with the same resulting opinion. The colors of the two stains were almost identical. I didn't want a heavy stain, just light tint to match the coffee table I made from red oak several years ago. This is the cabinet as it will normally look. This is showing the one drawer pulled out. And this shows one of the snack trays opened up, with the other three partially extended from the cabinet.
16 points
-
After some fussing yesterday to get it to fit together properly without glue, decided to glue it up today after church, will let it cure all night and do more tomorrow. need to cut the top off, and then add some horizontal corner splines out of wenge and cherry. the vertical splines are of cherry, same wood as the rest of the box. they will get cut off and sanded smooth. This will be for my wife's, and later mine too, cremation remains. have a plot purchased, and a marker stone ordered. My wife Linda loved everything i made for her, I think she'd love this too.
16 points
-
Well it has been a crazy project building a shop and actually starting to set it up so I can make things. There is an ever-increasing list of to-do’s but I am at a point where it is workable. I started with the hard problems… Actually building a shop, but this gave me the opportunity to make sure that power, heating/cooling etc… were all in place. Now I am on to the little things like shop layout, dust collection, tooling, organization, jigs, and storage solutions interspersed with actually making things for around the house. I am sure there will be many more updates as things get whipped into shape around here
16 points
-
Not really woodworking, but an assembly project for my daughter. She has been working from home since the covid stuff started and has been working on a small foldable computer desk, but definitely needed more space to work on. We located this desk and the seller wanted $450.00 to assemble it. I told my daughter I could assemble it, saving that cost. It was allegedly an 8 hour job but I did spend a good part of 2 days with the assembly. Not too bad for an old pfart.
16 points
-

Care package
Thad and 15 others reacted to FlGatorwood for a topic
This is the care package that I made up for my classmate friend. I hope this puts a smile on her face and some bounce in her step. This was fun for me. Rolling pin made of scraps of cherry and pear. Writing pens, one of pine, one of pear, and one of mahogany. The ornament is mahogany. Those of you with a Shopsmith, show us what you have. Looking forward to seeing your posts of "made on a Shopsmith" real soon.
16 points -
I have spent some time this year reworking my shop arrangement. Started with a 60 amp service & this allowed me to move the compressor into an attached shed then hard piped it into the shop. Install a small dust system in the shed and connected my miter saw, belt/spindle sander & a port for my ROS. I passed on things to other people that could use them & got rid of things I haven't or won't need. Consolidated everything to the 3 walls in the shop. I realized during the process that walking around my work bench to get to the other side of the shop just wasn't working anymore, time to downsize & go mobile. The plan is to build a set up to house my table saw and router table in one mobile unit. I have had a good conversation with @Gunny about the do's & don'ts with regards to this set up, "Often suffer from paralysis by analysis in getting a project started" Thanks Gunny. I have the base started with some 4x4 that my Dad had stored, straight and dry. Cut some lap joints, dry fit & ready to screw and glue. Notches in the middle are for the uprights & the cuts were made, after the pics, on the end lap joints for the same.
16 points
-

Went sledding
Harry Brink and 15 others reacted to John Hechel for a topic
Finally made a crosscut sled. Why did i wait so long? This thing is a game changer for squaring off big pieces like this chaotic end grain board.
16 points -
Cornhole Board Project (Shopsmith)
Warped & Twisted and 15 others reacted to John Morris for a topic
Boy these Cornhole games sure are popular. Our neighbor's daughter is getting married this May and they asked me if I could build a couple Cornhole boards for them, they are going to have games at the wedding reception. I only first heard of this game because of @John Moody, John is the resident Cornhole builder in our community. So I know what little I do know by John's work, and I just scanned the internet really quick to get the regulation sizes of everything and I set to building their boards from wood I had left over from other projects. I have not had a full day in the shop in two years, really, no kidding, life has been quite a challenge and I was so happy to just get this day to make some dust on such a basic project, I loved it. I had my folk music going in the shop, a little bit of Johnny Cash, some Del McCoury and Bill Monroe, and tapered the day off with Hank and Waylon, man what a joyous day. It was just one of those days that lined up perfectly to do some "me" time and the family was completely ok with it. Also, I got to really get into my Shopsmith! And what a blast I had with it. So, I know they are just Cornhole boards, but what's more important, is that I had a day of fun, so if you want to see some boards, read on! I set up my outfeed table configuration to handle some mid size panels for the Cornhole boards. Ripped a couple pre-prefinished 3/4" panels I had left over from a prior project, I am getting used to my Shopsmith today. I then set up my outfeed table to handle ripping some narrow boards, the table needs to be set at the center of the table saw or in line with the blade, it was a quick operation, part of using these Shopsmith's is knowing what they are capable of, and how to maximize their ability, I am not there yet, I am only discovering the surface of what these machines are capable of. I pushed the oak boards through with minimal effort. Then I joined each board just to clean up the edges and to have a nice mating edge to the underside of the surface board. I need to align my Shopsmith fence as you can see a tad burning on the oak edge. I have not adjusted my Shopsmith yet since I purchased it, the gent I bought it from had it sitting in his garage for 15 years with no use, so no doubt I need to tune up the alignment. I have however oiled the sheeves and other areas and I tensioned the drive belt to specs before I used it. I used good ol pocket holes to mount the sides of the boards up to the surface board. I drilled out all my pocket holes first. Then I set to screwing the boards to the underside of the Cornhole deck. I swear Shopsmith and Rigid have a secret relationship, because my Rigid Shopvac hose is the perfect size for the table saw dust port, and the jointer dust port. I cut a small radius on the end of the back cornhole board legs, so they'll fold up and down easily. This bandsaw is really nice, I can't believe how something small and seemingly very simple in design, is so accurate and easy to use. I aint kidding folks, I like it better than my 15" Grizz I had. A very strong feature of the Shopsmith is the Drill Press operation, it's sweet, I like it, I am happy. Quiet, accurate, with an adjustable table for in and out, and up and down and of course since the power head operates the Drill Press, it's variable speed. Drilling the holes out for the carriage bolts. The back folding legs are mounted, you flip them up and lock them down by tightening the wingnuts, I used a 5/16" carriage bolt, washer and wingnut. Legs up. I still have to cut out the 6" diameter Cornholes, but mission basically accomplished. Our neighbors should like them, she is going to paint a mural on the deck of the Cornhole board, I think the LA Dodgers symbol. Any my baby put to sleep, she did well today, I was please with the operations, and I became more efficient at the changeovers, I am getting good at operating my Shopsmith, and it's turned out to be a great machine for my purpose, and, mama gets to park her car in the garage now! I hope John Moody approves of the way I made these boards, and if anyone has any tips on the building Cornhole boards I am all ears, I may do some for my family as well, not sure yet, depends if the kids want them or not. If you want to build your own boards, here is the site that John Moody directed me too, they have all the information and specs for them there. https://www.playcornhole.org/ Thanks for sharing a part of my day with me folks.
16 points -
Here's the newest addition (and my first commission!!). My battle buddy asked me to make this as a thank you gift for her friend. I wasn't sure it would turn out right, but she loves it, so I guess that means it did...
16 points
-

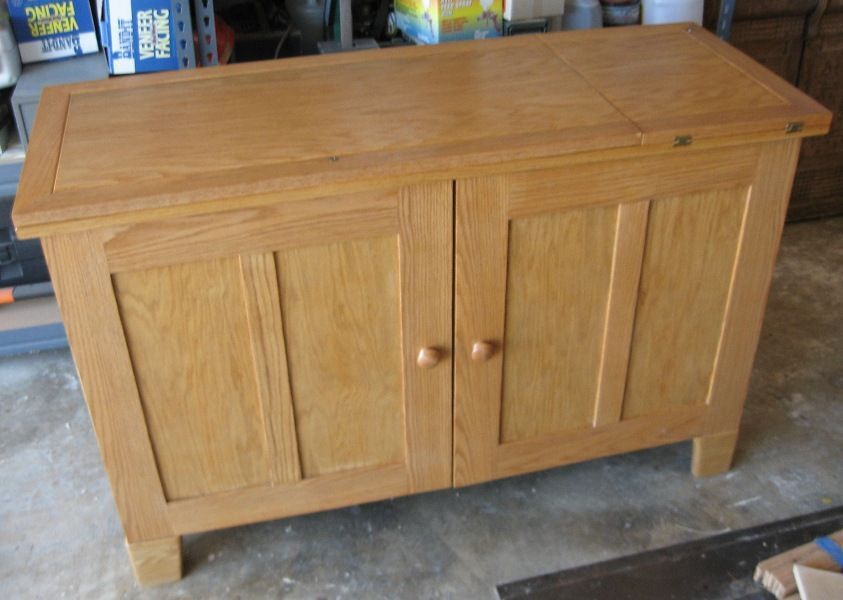
Wife's art cabinet
FlGatorwood and 15 others reacted to hatuffej for a topic
Here are a couple of pics of a storage cabinet I built for the wife. She found one of my WWing mags and made the "request" (Ha!) w/o the attendant "please". Who am I to resist SWMBO? I did garner a few points for it, though. hat
16 points -
So, on facebook, someone told me about a place called Makerspace. Its less than a mile from my house and has LOTS of toys!!! Planer, joiner, table saw, miter saw, CNC, and so much more! Will have to pay monthly membership dues...but considering my lack of space, its cheaper than paying the other place to do it for me. AND... its climate controlled! I can still do a lot of my work in my shed, but I can also do a lot there!!!16 points
-
Rifle Case Done
Nic Eseman and 15 others reacted to Gene Howe for a topic
Finally gotter done.
16 points -

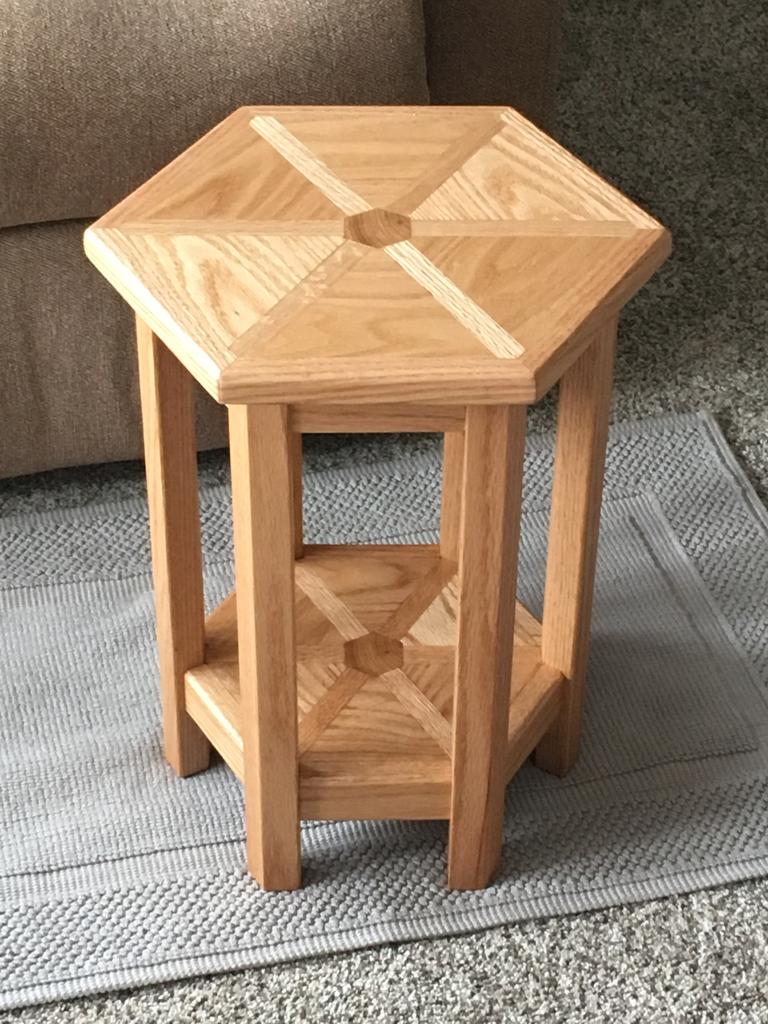
Hexagon End Table
steamshovel and 15 others reacted to RJR for a topic
I made this end table without a plan . It had 50 separate pieces and 30 MT's The legs are 5 sided. This is the bottom of the top and lower shelf, legs and stretchers. The finish is one coat of shellac sealer and 2 coats of poly. I hope these pictures turn out. It is my first attempt of inserting photos They might be too big. RJR
16 points -

Kitchen Island (PIP)
steven newman and 15 others reacted to Will Downing for a topic
My client came to me over Christmas with a page torn from the Southern Living magazine depicting a kitchen island built from reclaim porch posts and lumber. The caveat was it had to be down-sized to 24x24x36 and move-able. Sure, no problem says I...hmmph! First, has anyone priced used porch posts since Pinterest? Then I priced new posts. Both are cost prohibitive. Then I got an idea, build my own. So my wife found these balusters at a yard sale. But only three. So I cut them in half (giving me six tops) and bought a 4x4 pine post to recreate the bottoms, Drilled out the bottom sections to accept a 1 /14" dowel, 5 inches long Then centered up the tops and drilled matching holes. Cut my dowels using a stop for consistency A little sanding and then assembly Now I have six legs completed. Four users and two for testing. Some detail work to make everything flow and these are ready to sand. Now the key here was the use of reclaimed lumber, so I plundered around the rathole and found this fir. Cut to length for the rails and pocket holes added. I have some 5/4 red cedar ratholed in a buddies barn, so I went and pulled two planks out to create the bottom. Resawed and planed. Cut to length and placed on the assembled leg frame And the finished bottom assembly. Now I'm ready to paint. The request for the legs and rails is to be painted in bright white. I'm going to polyurethane the shelf rails and use that as an accent piece. After paint, I'll attach the hardware (casters.) Next up: Creating the top. (BTW, I've kept up on the site, but with work and life just haven't had a chance to chime in much over the last few months. W)
16 points -

Ole woodworker's despair
Wirebender and 15 others reacted to Ron Altier for a topic
If I stand still, maybe it will show. I had it in my hand, that much I know. I walked from over there to over here, Oh why, Oh why can't I find my gear. If I scan the room one more time, I know it will show and once again be mine. But once again, it doesn't show, I'm left alone and don't know where to go. Think I'll set down and take a rest, Cause that's the one thing I do best. As I slowly descend into that soft ole chair, I look around again and in slow despair. I guess I didn't need it anyway, It will certainly show up some day. As I slowly take a seat, I find it as-------------- my butt hits the seat. I did that this morning and thought it would make a good poem for a snicker16 points -
Last year I suffered a stroke during the season and spent time in a rehab hospital. Last night my wife was not feeling well and today was taken to the hospital, She suffered a stroke . She is not able to walk so I don't know where we go from here. I don't know what happens tomorrow.15 points
-
I always wanted to try to make a 3D cutting board. I made the time to make one for my niece for Christmas. It was a little time consuming but alot of fun. This one was made out of Black Walnut, Ash and Cherry,Your angles and measurements need to be precise and you need to take your time in the glue up. All lessons i learned the hard way. I will make some more of these because it is so cool watching it transform as you put it together, and i have enough lumber left over. I found some different patterns that i will try. She was happy and loved it so it was all worth it!
15 points
-
I'm famous (again)
John Hechel and 14 others reacted to kmealy for a topic
Local theater organization group visits our productions and provides awards at the end of the season. We got several for set design and construction for this year's show. my daughter got some as the producer and granddaughter got some acting awards for her roles.
15 points -
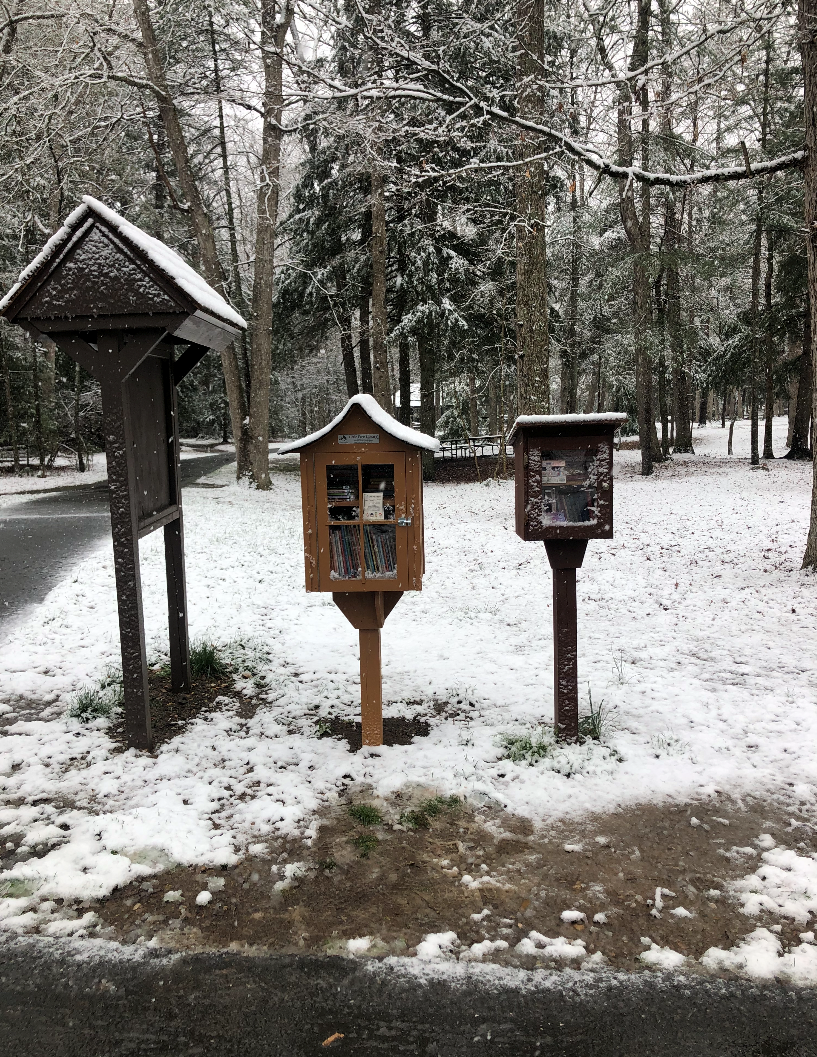
A while back, I made a little "Kids Free Library" for the local public library. It was to be placed in the Michaux State Forest, Caledonia State Park (about 12 miles west of Gettysburg). The director of the local library sent me some pictures of it in its new home- Next to the original "Grownups" library- Closeup-
15 points
-
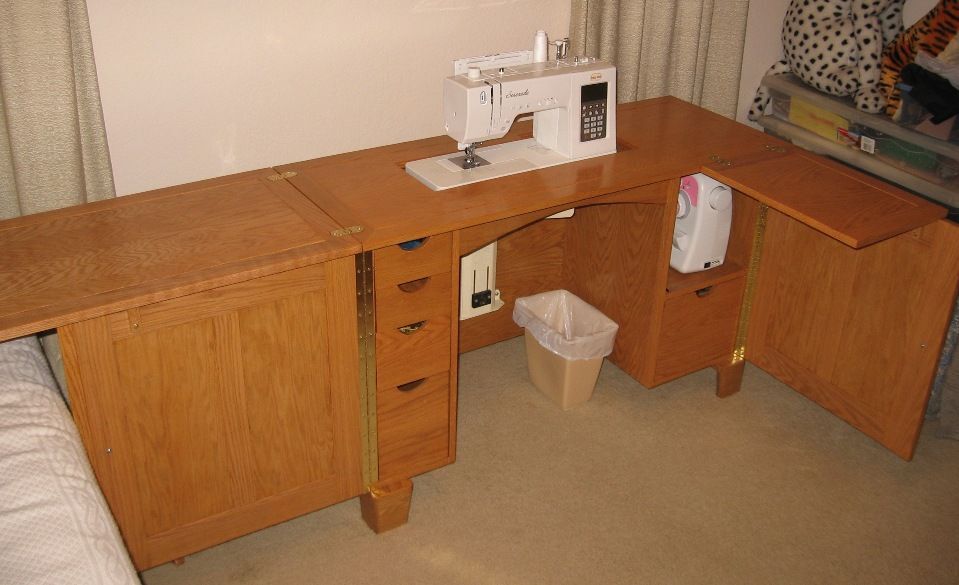
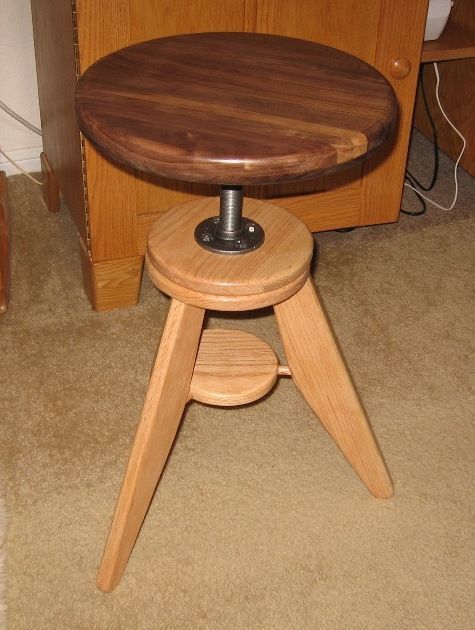
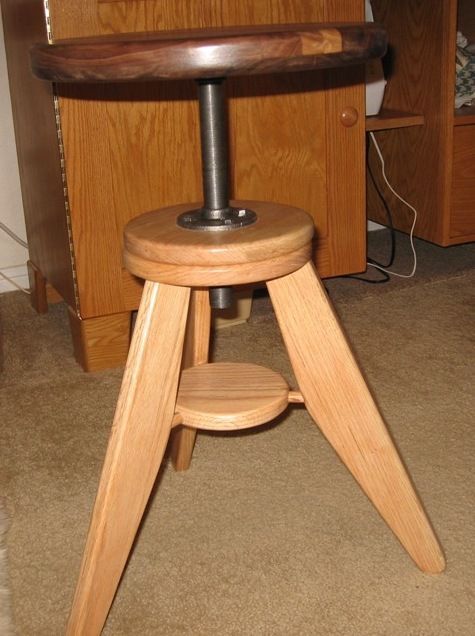
Keeping wife-person happy
KevTN and 14 others reacted to Headhunter for a topic
Had to build these to make the wife-person happy and occupied. Don't remember where I got the plans for the cabinet but I apparently did it right since it all works as described. The guy at the sewing shop was getting rid of the machine lifts so I got three of them for nothing. Can't beat that with a stick. (So to speak!) The stool I built based on the old style piano stools that adjust for different heights of players. Didn't have the adjustment mechanism so had Lowes completely thread a piece of 1" black iron pipe and used some floor flanges. Kinda slow in moving up and down but it does work eventually.
15 points -

What's On Your Work Bench?
Larry Buskirk and 14 others reacted to Thad for a topic
Getting the Disston all cleaned up...... And, getting it all put back together.....just needs a good sharpening, now.
15 points -

What's On Your Work Bench?
John Morris and 14 others reacted to Gunny for a topic
Still working on Urn, just finished glue up on top. Will put a profile on it and sand it down then off to finish room. Dry fit:
15 points -

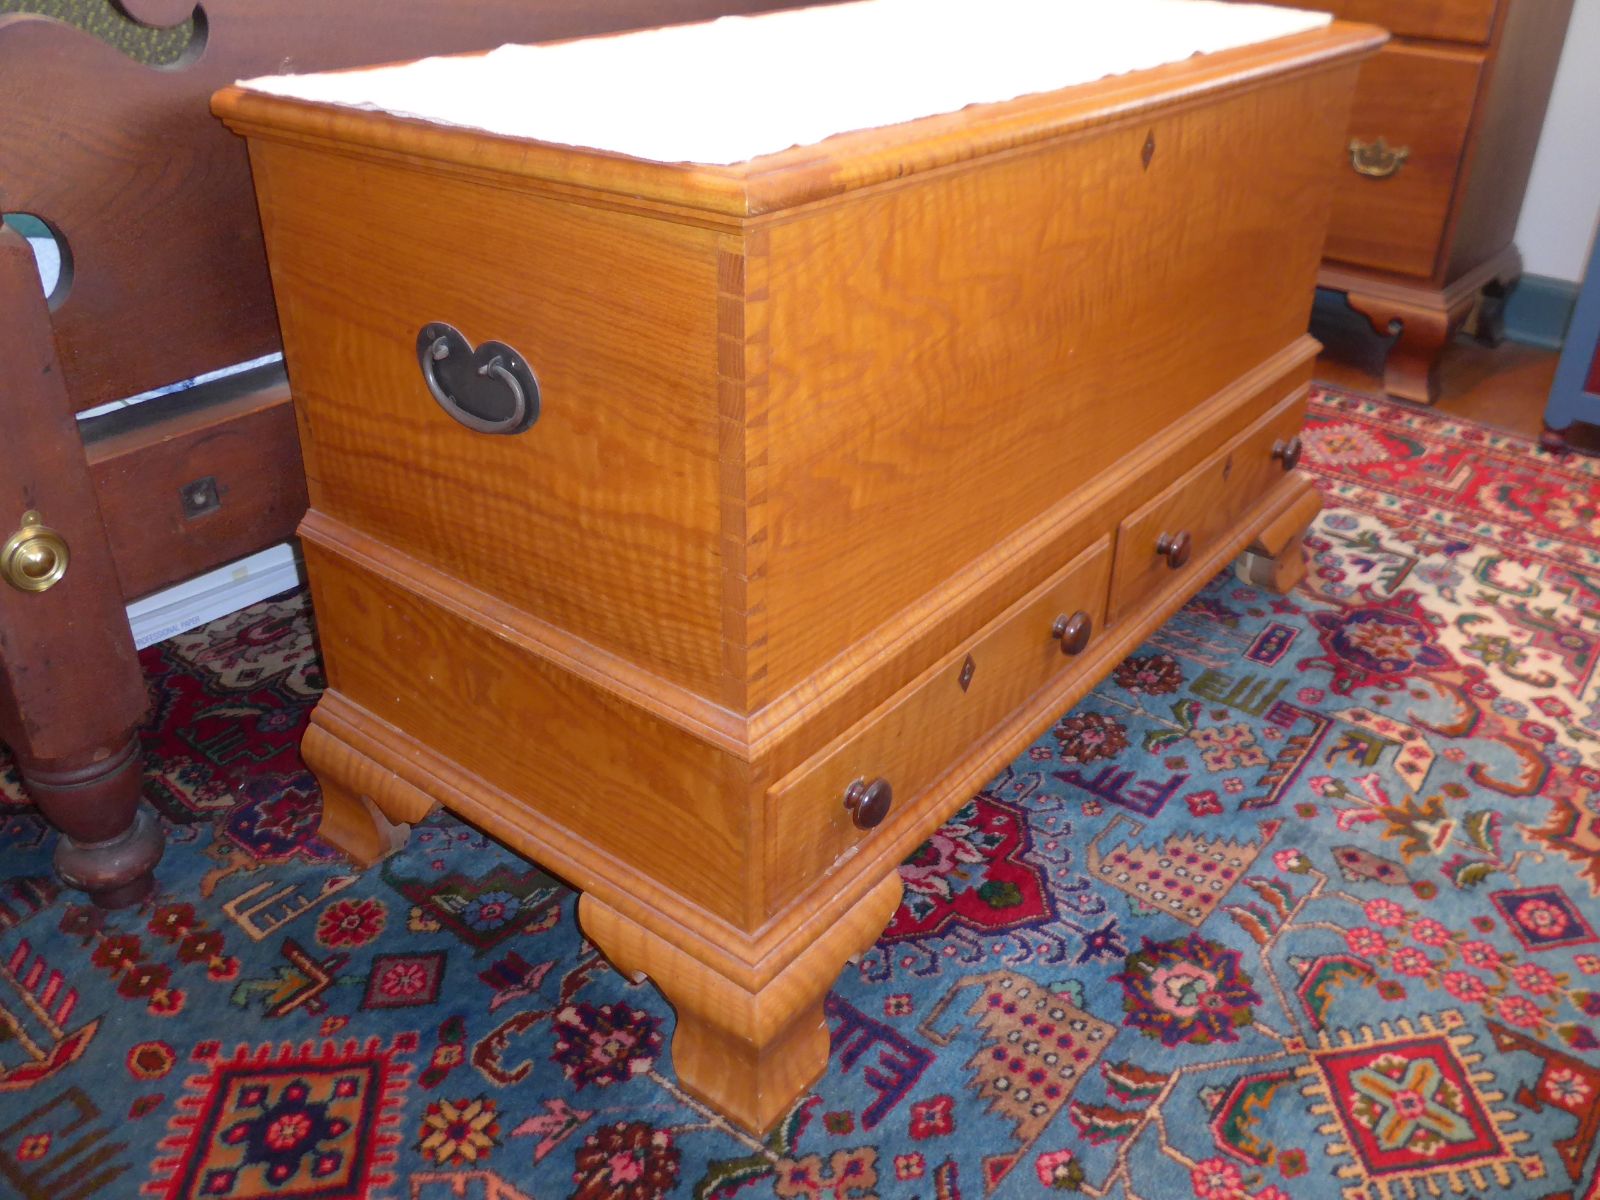
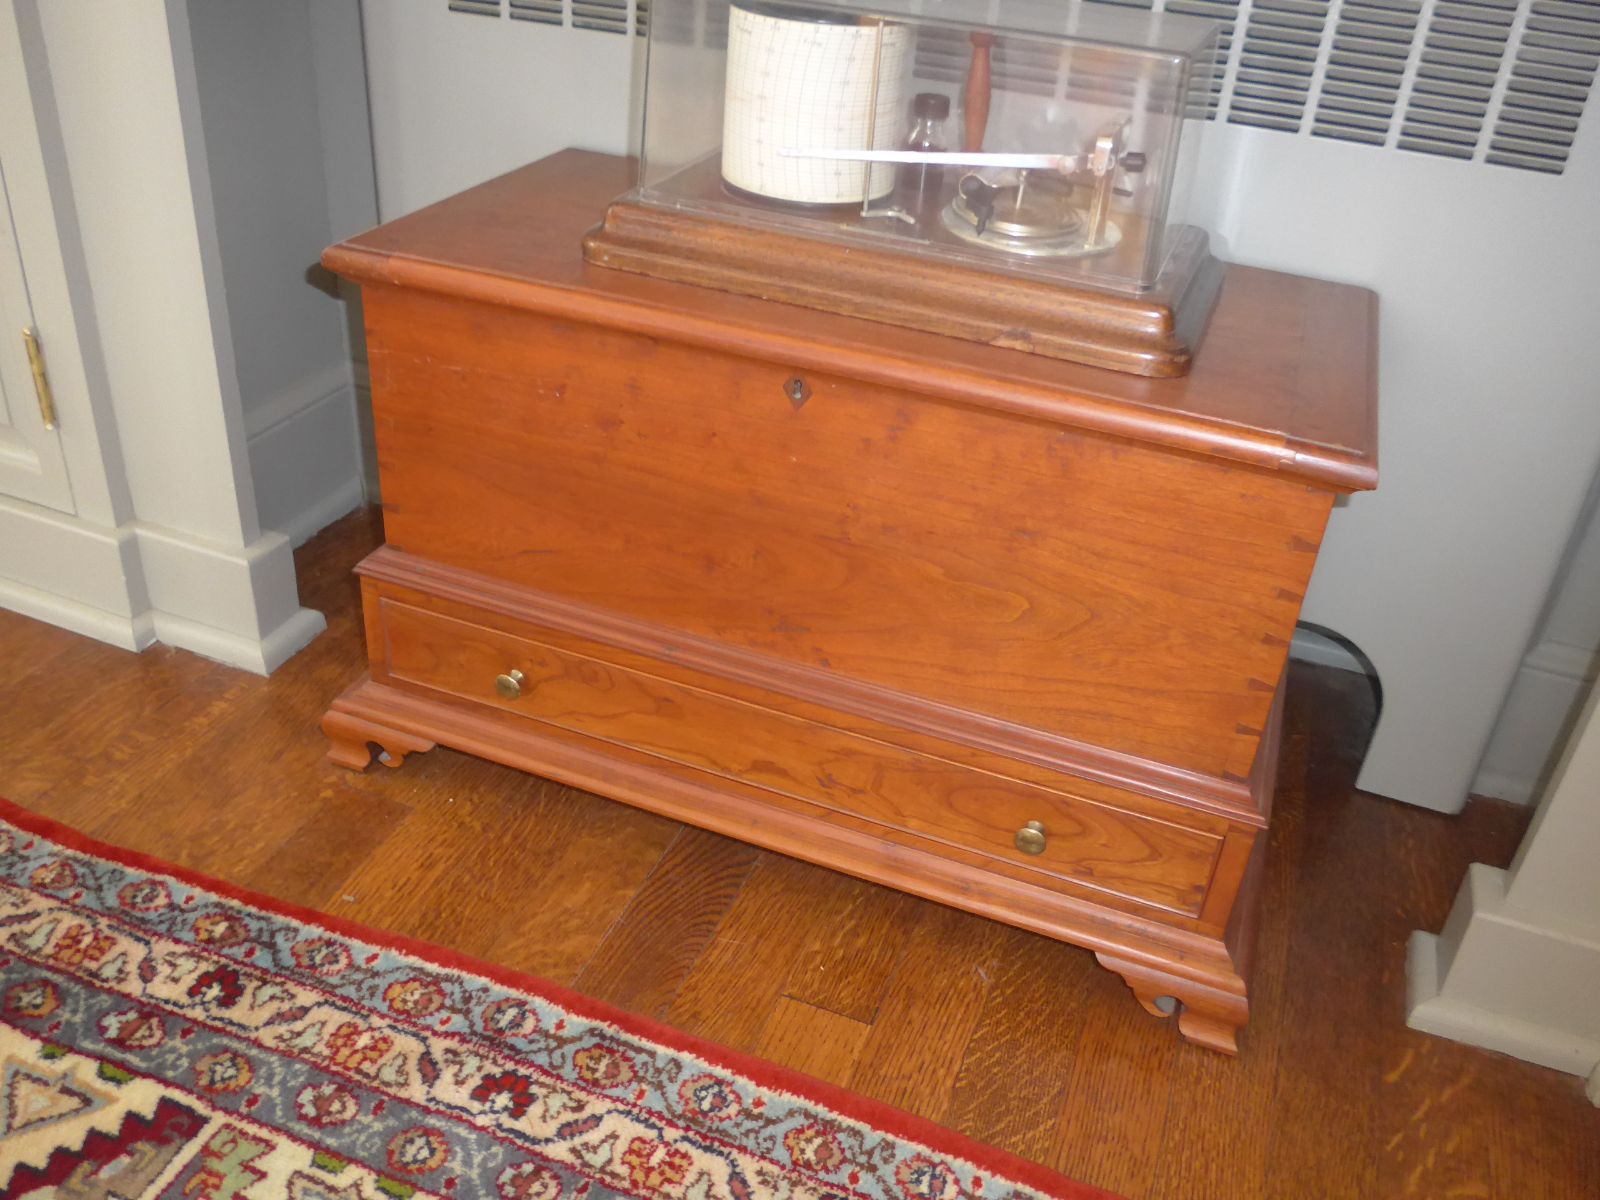
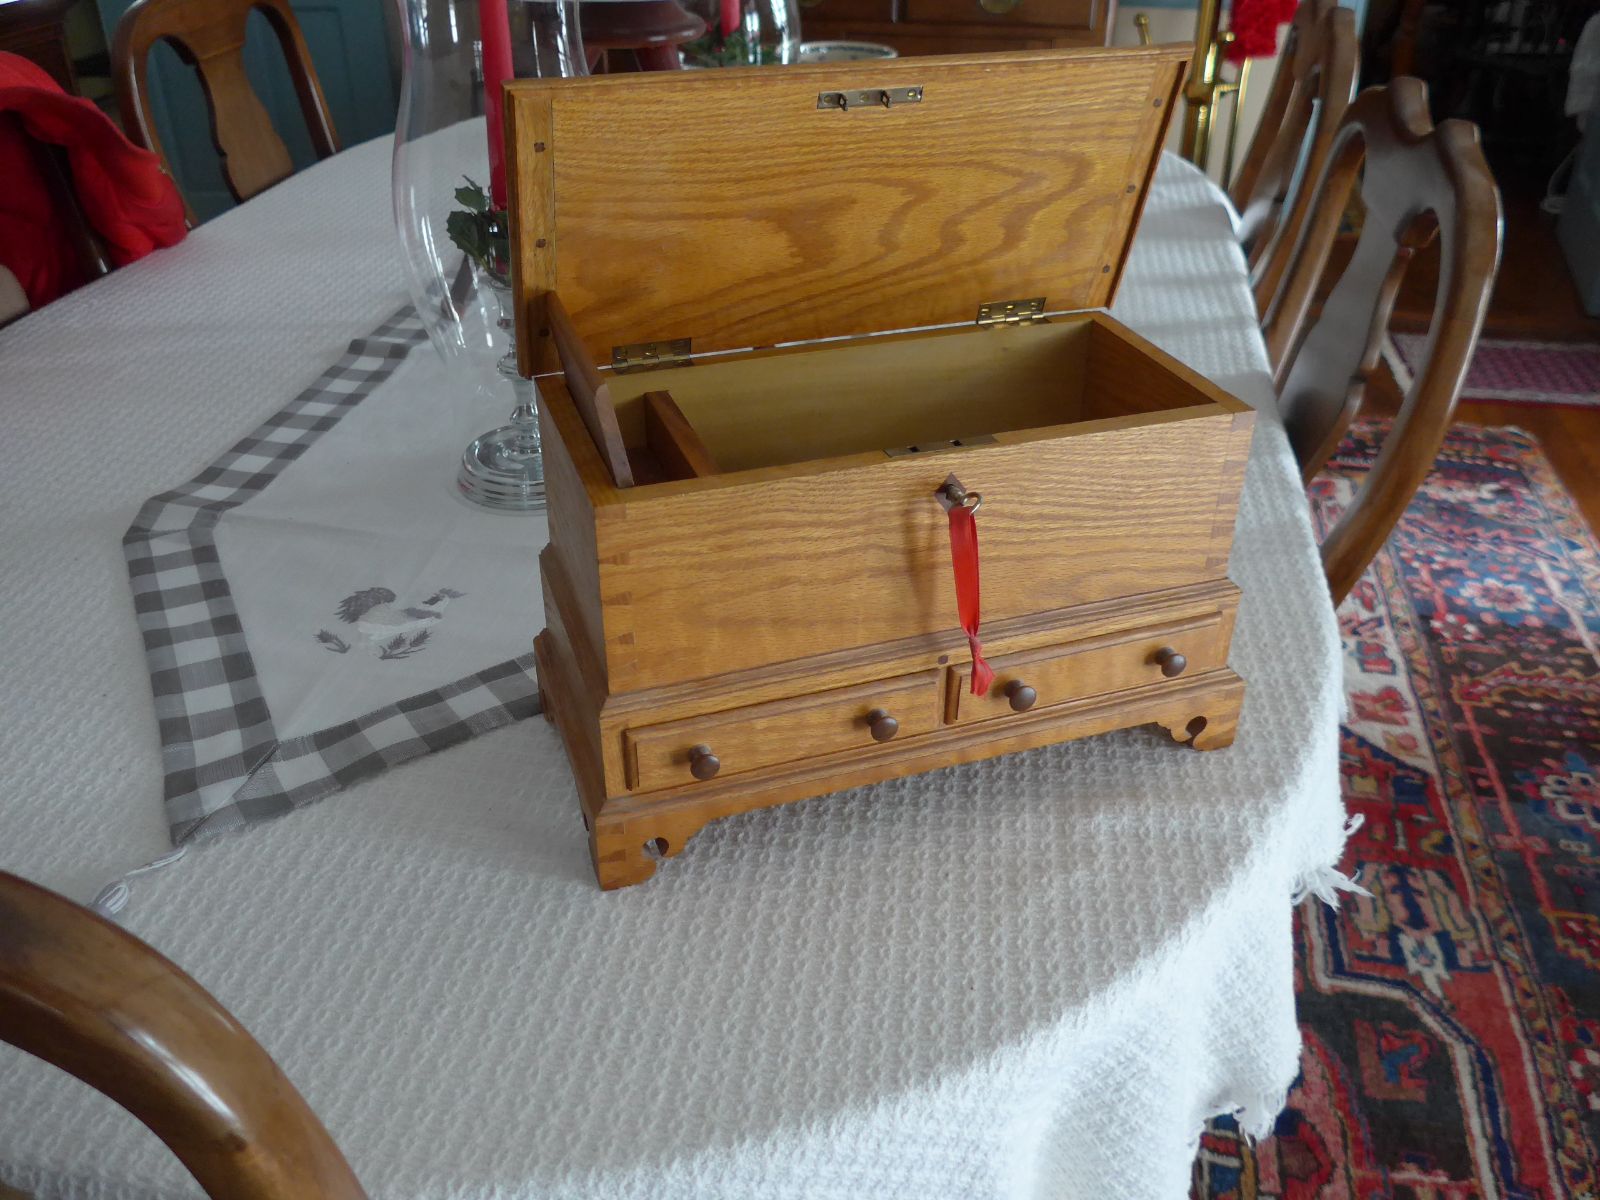
One(s) of my favorite things to build.
DuckSoup and 14 others reacted to FrederickH for a topic
I have always enjoyed constructing chests/boxes. The more dovetails, the happier that I am. Here's four chests that I've made, starting with a full sized Pennsylvania walnut blanket chest. Construction is walnut/poplar with hand forged hinges and hardwear from Ball & Ball. The second is a 2/3 size made from curly oak/poplar. This wood was a birthday present from a friend. The lock escutcheons are an inlaid ebony wood. Number 3 is a 1/4 size chest made from PA cherry/poplar. The last one is made from the leftover oak/poplar from #2 and is a fully functional "little" chest and was made for our daughter. All four of these chests were modeled on the first one.
15 points -

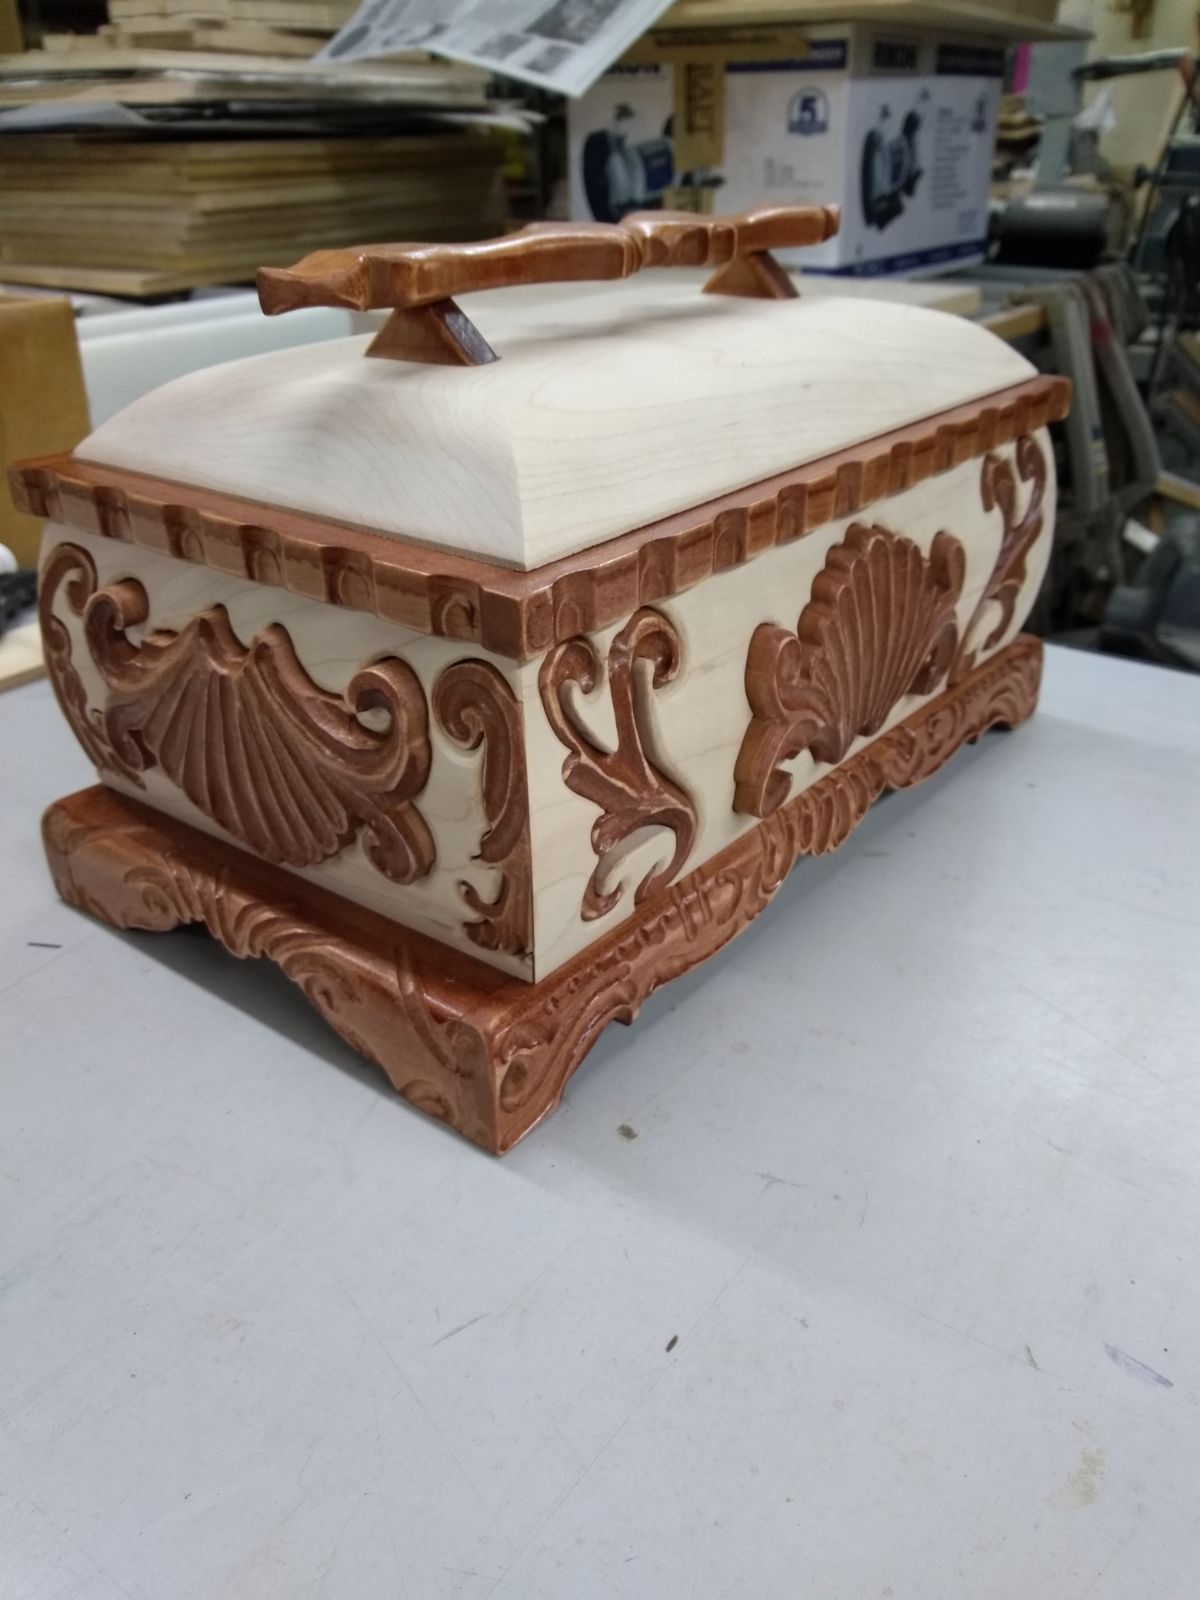
Back on the boxes
Ron Altier and 14 others reacted to Smallpatch for a topic
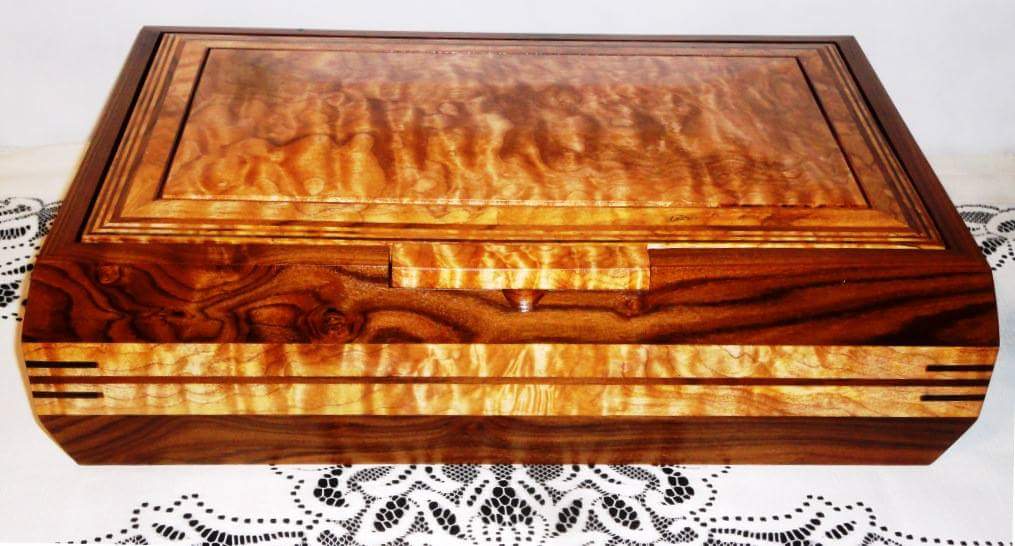
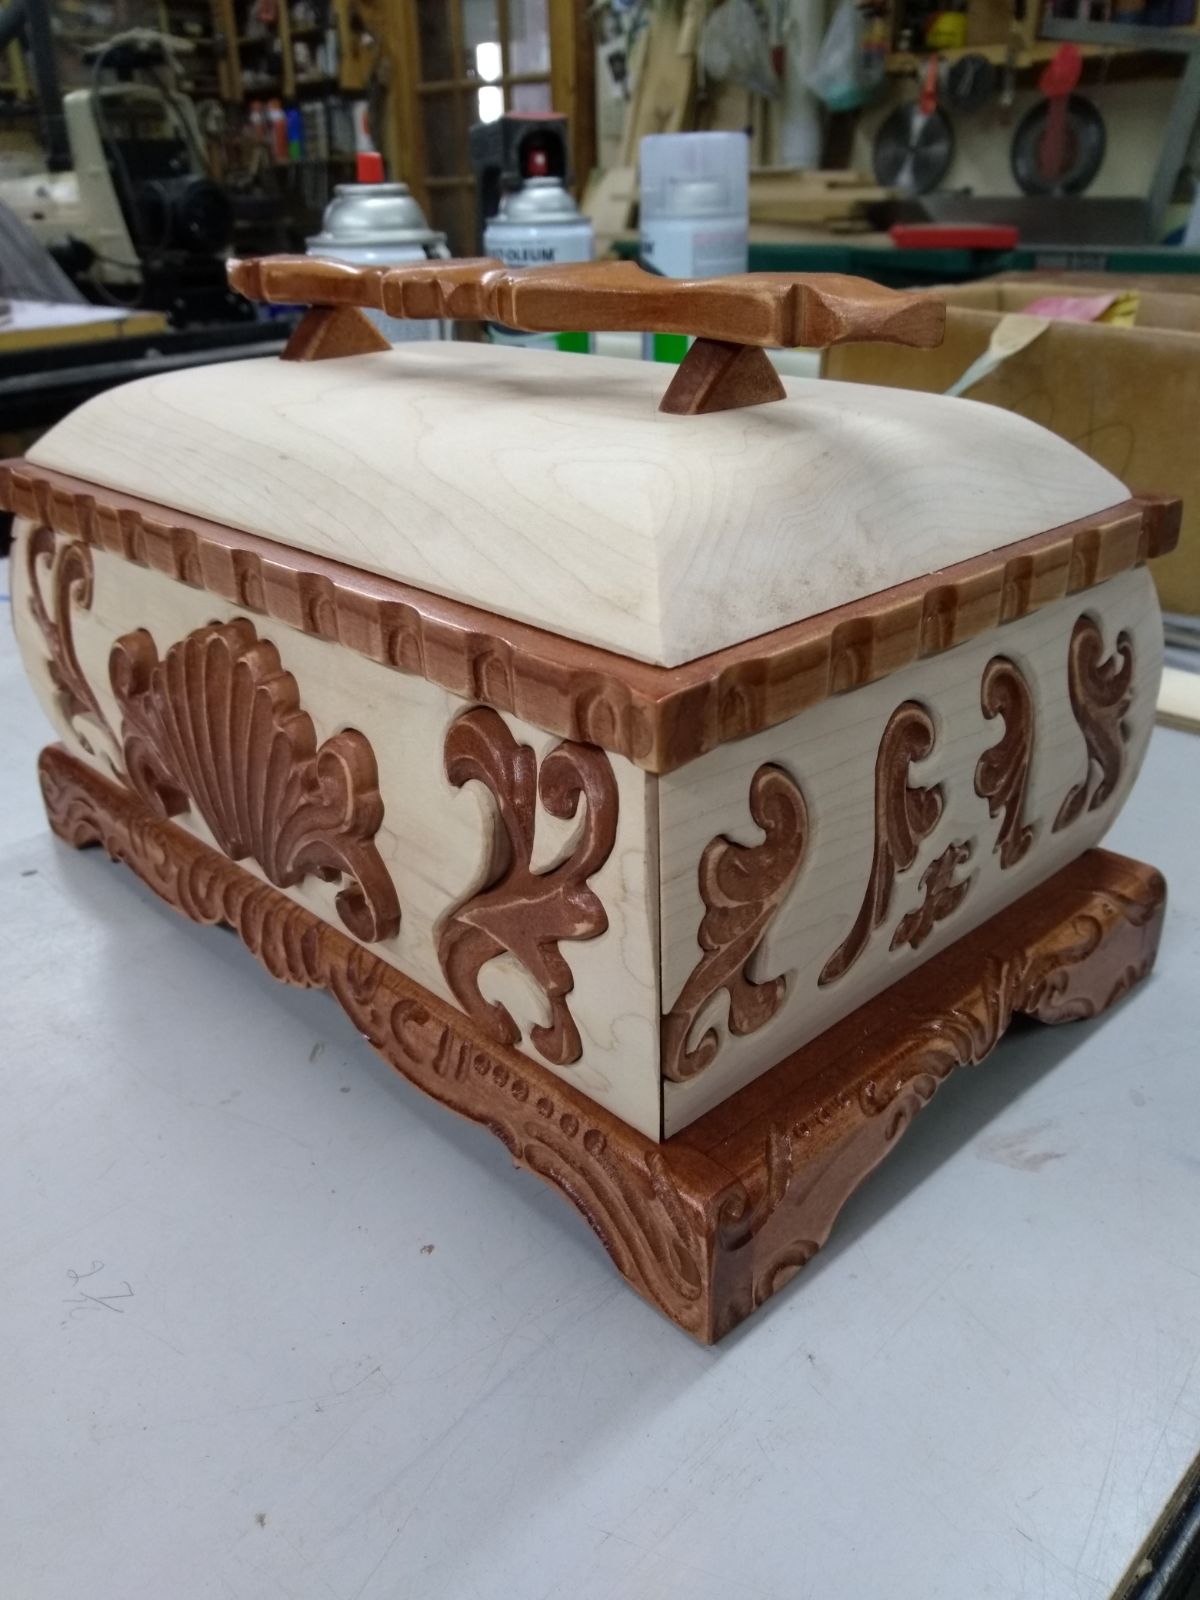
I'm still working on these jewelry boxes. There are lots of first time things going on with these boxes for sure..This box was the goat so I have a few things I wanted to see for my self. I had nothing on paper just in my head. It is sitting there with 4 screws holding all the pieces together so I could exchange things and then put it all back together. In a round about way this is almost like the rest of the carving I do. Like I have different carvings , some up and others down and one end is different that the other. Some of the pieces was in the wood pile from things I built from long ago....Like the handle on the top was the cut off sides from two pieces and I just glued them together back to back and I ended up with about the right length handle for the top. The brown base is four small pieces glued together and the brown top piece is four small pieces glued together and those are holding it all together or else the box would fall apart... I learned not the have the carvings too close to the ends for the wood is tapered 45 degrees and would cause problem later...These mistakes will stay with this box for a reminder for later..al the carving pieces was my own design and they will be pushed out more for the finished product.... and I still can't decide which way the carving should be , right side up or up side down? And since I tapered the lid, hinges and the screws that close to the edge might be a problem? Also I don't have to worry about ever seeing another box exactly like this for no one has a weird brain like mine!
15 points -
Cat
LarryS and 14 others reacted to Ron Altier for a topic
I am into making Christmas presents for my family. My daughter loves cats and I came up with this idea. I have made a parrot and stylish bird so far. For my Christmas present, she sent me 2 boxes of wood. One was mostly firewood, but the other contained some nice pieces. The background wood is White Limba (never heard of that one) The cat head is Canary wood, The eyes are Ebony surrounded by Osage Orange. It is about 9x11
15 points -
I found out what my work shop is
DAB and 14 others reacted to Ron Altier for a topic
My grandson was visiting and was making some Christmas gifts with Grandma out of wood, paper, styrofoam, etc. They was doing this in her sewing room. Soon he came to my shop looking for rubberbands. I had 3 small boxes of different sizes, from a garage sale. He left, but soon returned for a tiny hook for his tree ornament. Of course I have different sizes in silver and gold color. Later he returned for something else, while I went to another storage box, he said," Grandpa, you don't have a workshop, you got a hardware store" I just had to smile15 points -
...and surprised. Stumpy Nubs http://www.stumpynubs.com sponsored a chair building contest. I was just notified that my Morris chair took second prize. The prize is a Smart Vise. Here's the chair.
15 points
-
What to do with drop off's
DuckSoup and 14 others reacted to Waxing Moon for a topic
Made this from some "leftovers".... Quilted maple, Morado and a bit of Ebony.
15 points


.jpg.41d9df91c81e2d29cde6e234b7b803bd.jpg)
.jpg.fa46ea6b1e17dda6fd1e53992f79f15b.jpg)
.jpg.feb8f898c799c0e33b3a3a9125fdfdb3.jpg)
.jpg.6b744cc00d6fecc4093f1a72b2c9a011.jpg)
.jpg.649b2287627710c0faaa6d45d3c28875.jpg)
.jpg.3314eac43545eafbacc8dd3062b5fbd4.jpg)
.jpg.334a355dfb2f45688045959420cd3729.jpg)
.jpg.d569dedb3cd96b8eda6e7eab7fc2d8f4.jpg)
.jpg.62ea8c39ff4be11b8ce87cb32f7a521e.jpg)
.jpg.e73a3dc877a6dd78111542afc80dceb1.jpg)
.jpg.e698e31af748011a317cec5e3bcf75b5.jpg)
.jpg.86237b3b4a7b2a3fa6367924c68ea7e4.jpg)
.jpg.a225dd8670b69b8e314005a0531d0b7e.jpg)


.jpg.8b7bfd7483237f092a73385c80162d76.jpg)