Fred Wilson
-
Posts
2,507 -
Joined
-
Last visited
-
Days Won
35
Content Type
Profiles
Forums
Gallery
Military
Glossary
Events
Downloads
Blogs
Store
Links Directory
Community Map
Everything posted by Fred Wilson
-
Yep, grandpa..... Health is "good" and staying busy t the saw. Show coming up in a couple of weeks that I'm getting ready for. Hopefully filling up the coffers a little bit.
-
Great job. Love the originality
-
Lew, thanks for realigning the picture. Did not notice the state outline until you turned it. Not ready for production work, Gene?????? I hear that is what CNC and Laser machines are now the "go to" machines. That being said, The just an NOT do what we do on our eye-hand coordination creations. Great job.
-

How long does scroll saw blades last
Fred Wilson replied to Smallpatch's topic in Scroll Sawing Tips
Thanks, Patch- 3 replies
-
- 1
-

-
- loose blades
- slowing down cutting
- (and 1 more)
-
How long does scroll saw blades last
Fred Wilson replied to Smallpatch's topic in Scroll Sawing Tips
Jesse You are right on with your explanation. I want to add just a couple of things. Let me know if you disagree (I won't be offended). As ya'll might notice, when the cut is pretty straight there is no burning. Go into a corner and it starts to burn. When we cut "straight" we are pushing directly into the teeth of the blade and not going sideways. Going into a corner, we have a tendancy to push sideways, hence putting more pressure on either the right or left ide of the blade This will cause more friction and cause burning. Right? That was one of the hardest things I had to overcome. Speed can also create more burning. I notice that the piece shown is pretty thick. Harder to cut. More pushing. More heat. Slowing down the speed will create less heat. Also, I have found out that it is the sawdust left in the cut will cause burning faster. When cutting anything over 1/2" I will switch to a "skip tooth" type of blade. This lets the dust be cleared out of the cut and therefore less heat buildup. Oh yes, I forgot to mention using a blade that has fewer teeth. ie. moving from a #5 to a #7 blade. Fewer teeth, less heat buildup. Just my 2 cents worth. Works for me. More thoughts from other members? Would be appreciated. Jesse has started a great thread. fred- 3 replies
-
- 3
-
-
- loose blades
- slowing down cutting
- (and 1 more)
-
Time for a different type of scroll sawing
Fred Wilson replied to Smallpatch's topic in Scroll Sawing
Hey, Patch You have been a busy scroller. I guess it's that time of year. I'm making special stuff for all my extended family. busy time. -
 Gene. Thanks for asking. The background is your standard 3/4" Sepele and stained a little darker. Normally I would use Black Walnut but the prices are beyond my reach. The other pieces ar 1/4". As you can tell, each of the feather pieces are cut an glued in place. Then the emblem is cut and glued on the top of it all. Unfortunately, I can not stack cut these pieces since some of them are really small and, knowing me, I would lose them..... When all it done, they are finished with several coats of gloss lacquer.
 -
Yes, dire I was. Worked radio/radar repair on (mainly) B47s, B52H, KC97 and KC135 aircraft. (And any other crazy airplanes that had trouble and lande at Homestead.
-
My pleasure, sire
-
Since Judy ad IU are going to be "on the road" for the next couple of weeks znd i will be away from my beloved scroll saw, I thought I would post a few of my latest "projects". Still having fun making sawdust.

-
Yepper. Pilot holes are cut woutside of the letters to they will always will ne nicely cut.
-
Thanks, Gene
- 7 replies
-
- 2
-
-
- honor
- amnericana
- (and 2 more)
-
This project is wonderful. EVEN the letters. Great idea for lining them up. Another trick I have learned is to use a STRAIGHT edge (ruler, 1/2" board, painters tape, etc.) taped to the board so I don't have to try to get rid of the pencil marks.. Trick #2 - When cutting the letters out, do not get rid of the scrap. Lining up the scrap and putting C glue on the letters then drop them into the holes in the scrap. This keeps the letters lined up perfectly. Just my 2 cents
- 3 replies
-
- 2
-

-
-
- like printed.
- is exactly
- (and 1 more)
-
Fred - great idea. Do you have a preference in brands of dyes?
-
To stain or not to stain - that is the question. I normally do not like to stain my projets - BUT - there are times that I think staining will enhance a project. Preconditioning the wood seems to be the ticket for an even color look wiwthout blotching. I am wondering what y'all think about it and what you use before applying and rubbing out the stain. This inquiring mind would like to know ! ! !
-
Gene, glad you got it up and running. I hate it when one of my nuts get loose - especially the one in front of the saw and it's running. Time to make some sawdust and get the ultra clean bench full of sawdust.
-
Thanks, Grandpad. Yes, spending a lot of time at the saw getting ready for upcoming Arts and Crafts shows. Love making this fine sawdust.
- 7 replies
-
- 3
-
-
- honor
- amnericana
- (and 2 more)
-
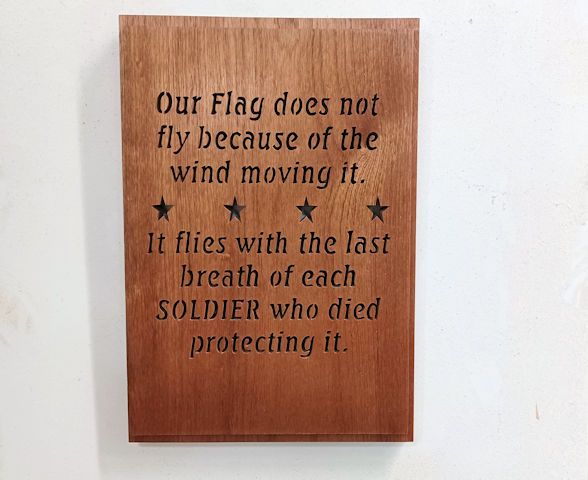
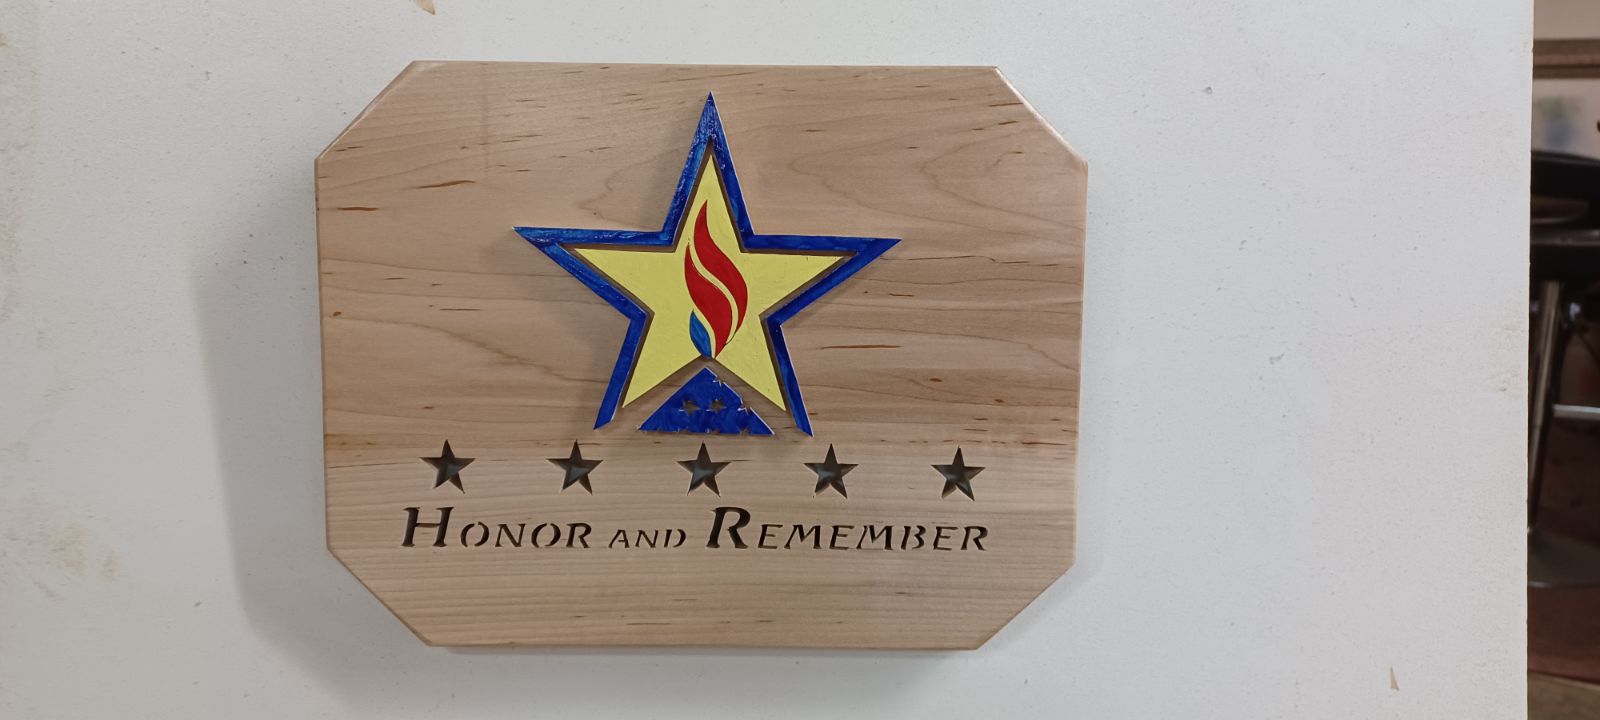
Hi, folks Whilst I was "surfing" the web, I stumbled upon a site that I would like to share with you. I was so impressed with the symbolism that I designed a cutting to honor this organization and our heroes. The symbolissm in this cutting is as follows: The Red Field represents the blood spilled by brave men and women in America's military throughout our history, who willingly gave their lives so that we all would remain free. The Blue Star represents active service in military conflict. This symbol originated with World War I, but on this flag it signifies service through all generations from the American Revolution to present day. The White Border beneath and surrounding the gold star recognizes the purity of sacrifice. There is no greater price an American can pay than to give his or her life in service to our country. The Gold Star signifies the ultimate sacrifice of a warrior in active service who will not return home. Gold reflects the value of the life that was given. The Folded Flag signifies the final tribute to an individual life that a family sacrificed and gave to the nation. The Flame is an eternal reminder of the spirit that has departed this life yet burns on in the memory of all who knew and loved the fallen hero. If you want to take a look at their web site - click here
- 7 replies
-
- 10
-
-
-
- honor
- amnericana
- (and 2 more)
-
Maybe even THREE?
-
RJ, did you buy TWO?
-
Great project. Turned out really well. Great fit with the egg cartons. Hope this keapts the cat out.
-
Hey, Fred - where is Wapakoneta, Ohio...... We will be in Belpre the 3rd seekend in July.
-
Hey, Wich - love your style, son
- 3 replies
-
- 2
-
-
- baltic birch
- balticbirch
- (and 6 more)
-
I guess I'm "old school". I just sand the piece of blank wood with 220 paper, leaving the dust on the wood, use light coat of 3M 77 on the pattern, let the glue dry about 10 seconds and stick on the wood. The sawdust places a small "barrier" between the paper and the wood. Easy peezy to pull pattern off. (My 2 cents worth)
-
Great idea to set the drill press higher. I find myself leaning over to get the holes in the right places. obtw - I use a #58 bit for my #3 holes